|
New
Translations here
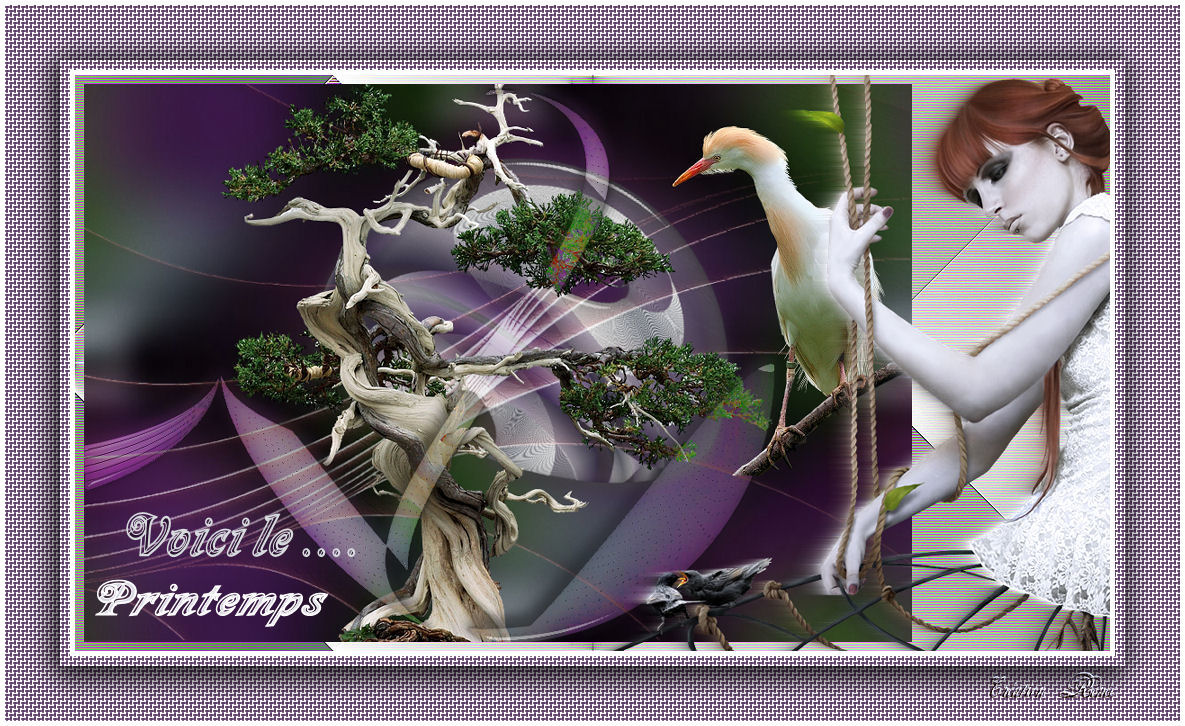
Voici le Printemps
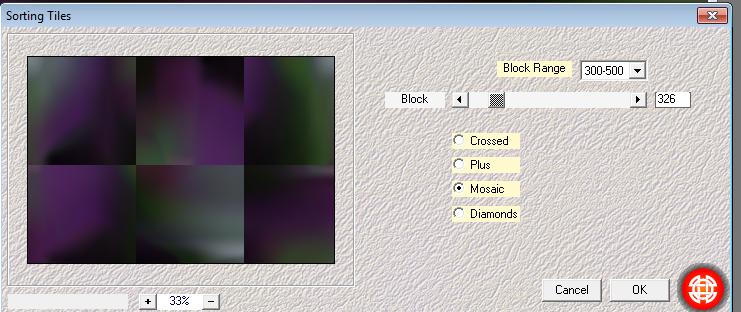
Let's start the lesson 1. Open the image ''fond1 '' (Size 920 x 620 pixels)Window - Duplicate (or shift+D) - Close the original and proceed on the copy 2. Layers-Duplicate 3. Effects-Plugins -Medhi /Sorting tiles with settings below
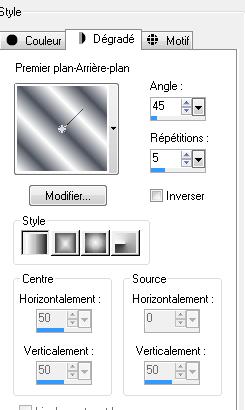
4. Effects-Plugins - Simple /Pizza slice Mirror 5. Effects-Edge Effects-Enhance 6. Layers- New raster layer 7. Material Properties: Set your foreground color to #ffffff-Set your background color to #4d525d- Set your foreground to gradient 'foreground-background' - Linear - with these settings
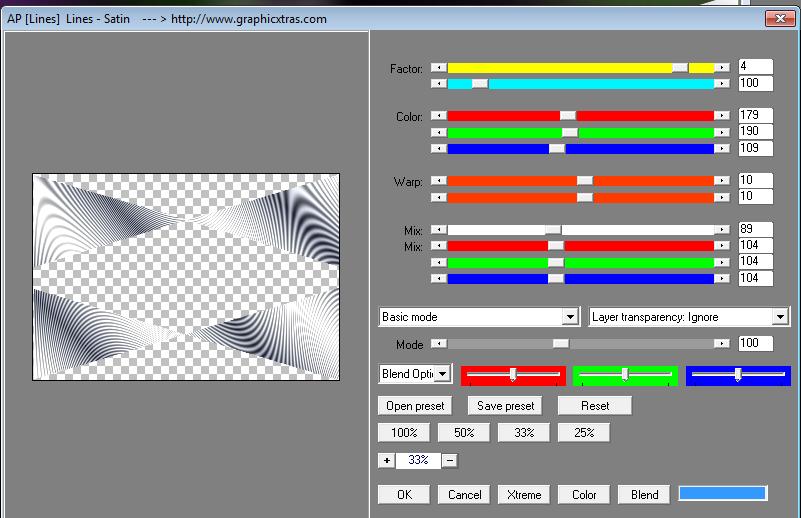
8. Activate Flood Fill Tool and fill the layer with the gradient 9. Effects-Plugins - Simple /Pizza Slice mirror /Double click on this layer and set the Blendmode to Hard Light 10. Layers- Merge-Merge Down 11. Effects-Geometric Effects-Perspective-Horizontal-Distortion 90° Transparent 12. Effects-Plugins - Simple /4Away Average 13. Layers-New raster layer 14. Selections –load/save selection –load selection from disc and choose: ''renee-voici le printemps'' - Activate Flood Fill Tool and fill the selections with the gradient 15. Effects-Plugins - AP[Lines 01] lines/satin with the new versions of AP[Lines /Overlay satin]>>>I show the two screenshots as below in the example
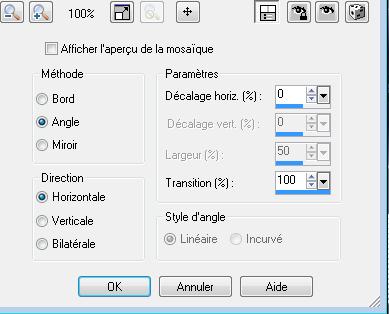
16. Selections-Select All - Layer palette: Make raster 1 active 17. Effects-Image Effects-Seamless Tiling with these settings
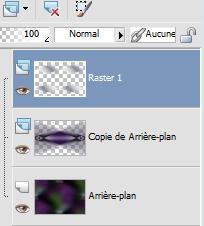
- Your layer palette look like this now
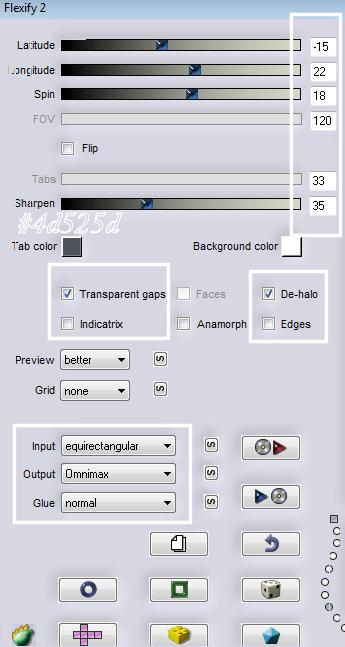
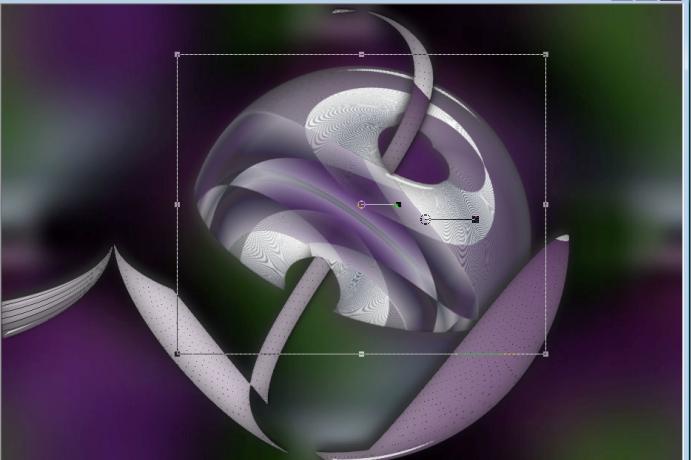
18. Layers-Merge-Merge-Down 19. Effects-Plugins - Flaming pear /flexify2 with these settings
20. Image Resize 55% resize all layers not checked 21. Effects-Plugins -EyeCandy5 Impact / Glass -tab Settings/User settings choose my preset: ''renee-voici-le printemps'' 22. Image Free Rotate 20 ° right 23. Open the tube ''renee-printemps image 1'' -Edit/ Copy-Edit - Paste as new layer on your working area (do not move it is in the right place) -Double click on this layer and set the Blendmode to Luminance -Set the layer opacity of this layer to 63% - Activate your Pick Tool (K) Mode Scale- place it in the right place as shown in the example below
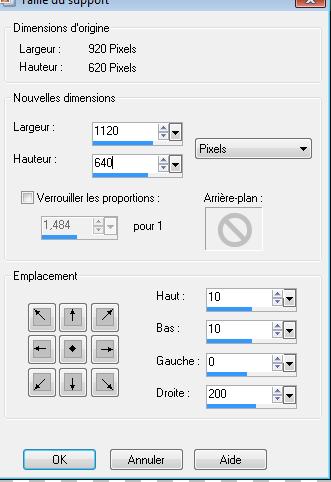
- Activate the top layer in the Layer palette 24. Open the tube ''cid_B96778b''-Edit/ Copy-Edit - Paste as new layer on your working area (do not move it is in the right place) 25. Layers-Arrange Move Down - Activate the second layer from the bottom of the Layer palette (copy layer) 26. Open the tube''renee-printemps -image2''/-Edit/ Copy-Edit - Paste as new layer on your working area (do not move it is in the right place)- Set the layer opacity of this layer to 67% 27. Open the tube ''anna.br_garça_boiera_by_Igoo-Alder-07/0210'' - Image Mirror / Image Resize 70% - Edit/ Copy-Edit - Paste as new layer on your working area and move to the right/placer 28. Layers-Merge-Merge Visible 29. Image Canvas Size with these settings
30. -Color-palette:Set your foreground color to #ffffff -Set your background color to #4a2153 - Set your foreground to gradient 'Foreground-background' Radial with these settings
31. Layers- New raster layer 32. Layers-Arrange-Sent to Bottom/Activate Flood Fill Tool and fill the layer with the gradient 33.Effects-Image Effects-Seamless Tiling with these settings
34. Effects-Plugins - Simple /Horizontal grain 35. Layers Duplicate -Image Flip 36. Layers- Merge-Merge Down 37. Effects-Edge Effects-Enhance More 38. Layers-New raster layer Layers-Arrange-Sent to bottom - Color-palette:Set your foreground color to #817986 -Activate Flood Fill Tool and fill the layer with the foreground color #817986 39. Open the tube ''nicole-femme 20'' - Image Rezise 90% / Edit/ Copy-Edit - Paste as new layer on your working area and move to the right 40.Layers Duplicate 41. Layers-Arrange-Move Down 42. Effects-Distortion Effects-Wind/Winddirection From left 65 43. Layers-Merge-Merge Visible 44. Image Resize 90% (Resize all layers checked) 45. Image - Add borders-Symmetric checked: 5 pixels white 46. Activate Text tool-Font ''Milano LET '' (font included with tutorial materials.) Write your text 47. Image - Add borders-Symmetric checked: 65 pixels en #5b3966 48. Image - Add borders-Symmetric checked: 5 pixels white 49. With your magic wand - select the border of 65 pixels 50. Effects-Texture Effects-Weave with these settings
51. Selections-Deselect All 52. Selections-Select All-Selections Modify-Contract with 60 pixels 53. Effects-Plugins - EyeCandy5 Impact -Perspective shadow -tab Settings/User settings choose my preset: ''renee-perpsective-cadre -printemps'' Repeat this filter with the same settings Save as JPG
I am part of Tutorial Writers Inc. My tutorials are regularly recordedt ReneeGraphisme_All rights reserved
*
|
 Translations