|
Let's start the lesson.Open the Color-Palette
-
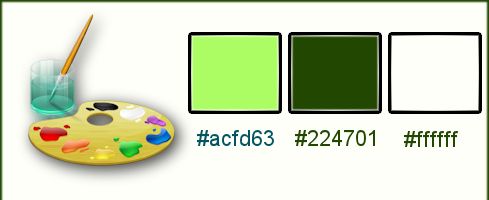
Set your foreground color to #acfd63
-Set your background color to#224701
-
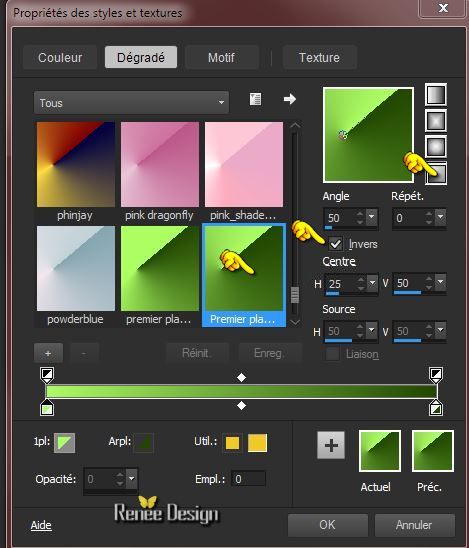
Set your foreground to gradient 'Foreground-background' -Radial with these settings
1.
Open a transparent image of 1015 x 645 pixels
-
Activate Flood Fill Tool and fill the layer with the gradient
2.
Layers- Duplicate
3.
Image - Mirror
-
Double click on this layer and set the Blendmode to Luminance / Set the layer opacity of this layer to 50%
4.
Layers- Merge- Merge- Down
5.
Layers- Duplicate
6.
Effects-Plugins – Unlimited 2.0 – Two Moon – Verticale Ripplie with these settings 54/47
7.
Effects-Edge Effects- Enhance More
8.
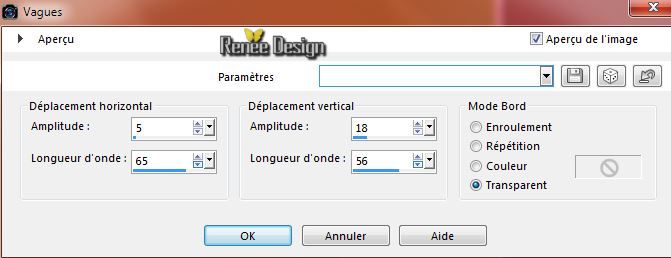
Effects- Distortion Effects- Wave with these settings
9.
Image - Flip
10.
Double click on this layer and set the Blendmode to Overlay/ Set the layer opacity of this layer to
69
11.
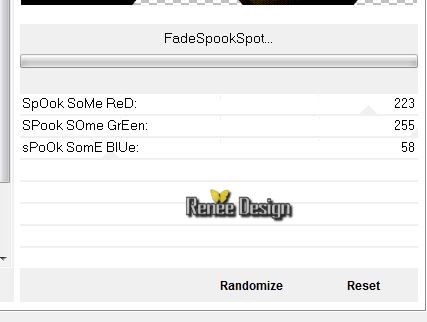
Effects- Plugins – Unlimited 2.0 – Twomoon /FadeSpookSpot...
-
Set your foreground to gradient 'Foreground-background' - Sunburst with these settings
as shown in the example below

12.
Layers- New raster layer
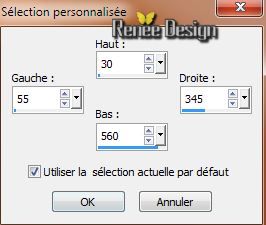
13.
Selections-Custom Selection(S) with these settings
14.
Activate Flood Fill Tool and fill the selection with the gradient
Selections- Deselect All
15.
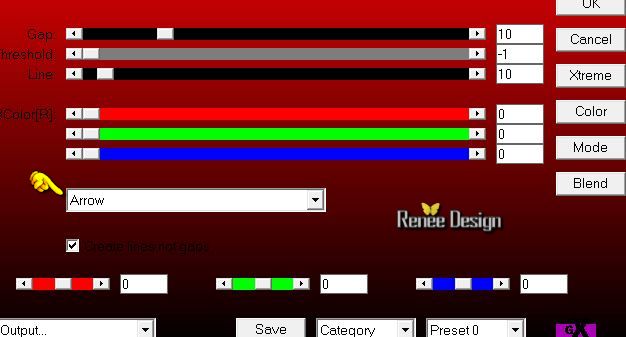
Effects- Plugins–AP01 [Innovation]- Line
Silverling with these settings
16.
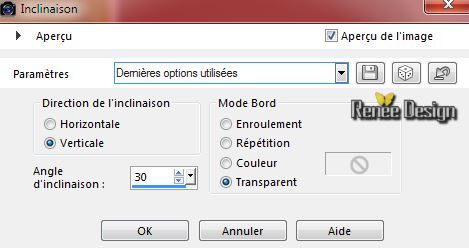
Effects- Geometric Effects-Skew with these settings
17.
Layers- Duplicate
18.
Image - Mirror
19.
Layers- Merge-Merge-Down
20.
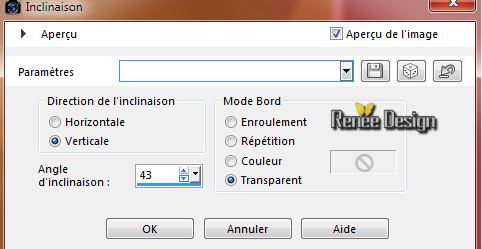
Effects- Geometric Effects-Skew with these settings
21. Effects-Plugins – Unlimited 2.0 – Toadies- Blur 'em!...
settings
111/12
22. Effects- Edge Effects- Enhance
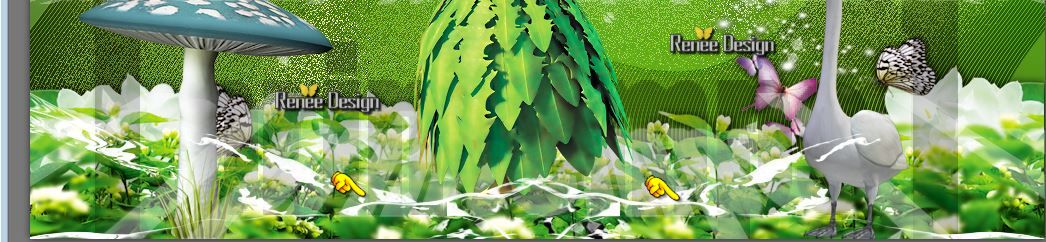
23. Activate the tube ’’voici_le_printemps_paysage_papillons’’
- Edit/copy- Edit/ paste as new layer on your working area
- Move Tool (M) place against the bottom edge
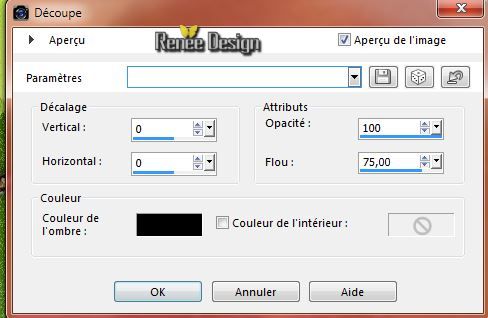
24. Effects - 3D Effects - Drop shadow with these settings 1/1/100/14 black
25. Layers- New raster layer
26.
Selections - load/save selection - load selection from disk and select my file: ‘’
voici_printemps_1’’
27. Activate Flood Fill Tool and fill the selection with the gradient
28. Effects–
Effects-Texture Effects-Weave with these settings
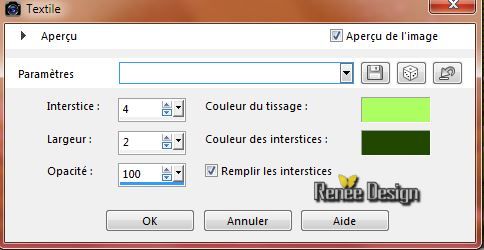
-
Selections- Deselect All
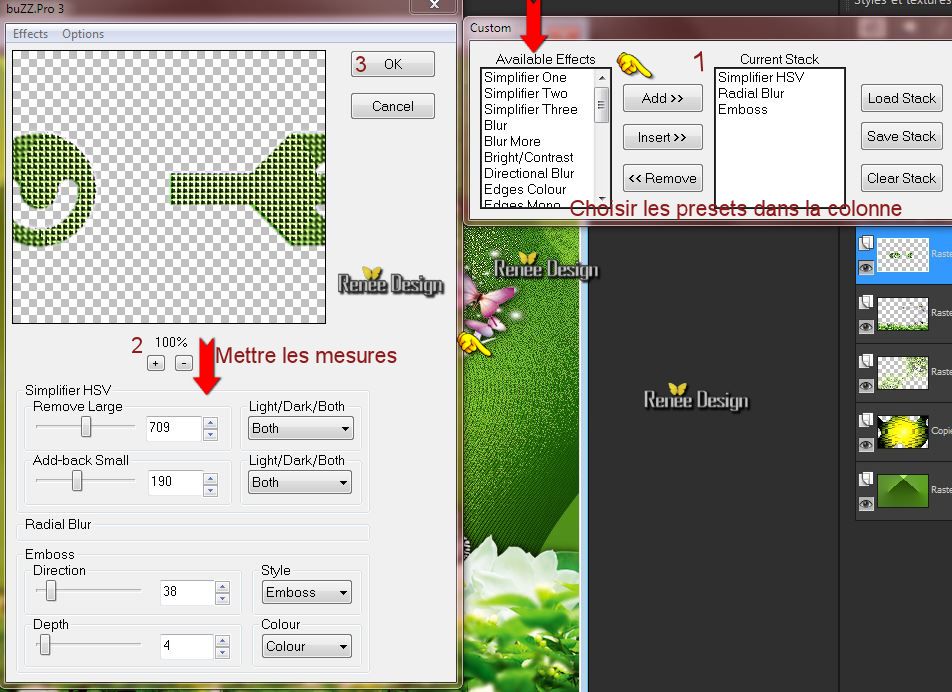
29. Effects- Plugins – BuZZ Pro
1. Choose Effects in the roll over menu "Avaiable Effects"
First- click on Simplifier HSV then back to "ADD"
-click on "Radial Blur" then back to "ADD"
-click on - "Emboss" then back to "ADD
clic
>>Insert>> Links will open a window again
(If you made a mistake, highlight the wrong item and click the Remove button to correct
Add the measures in the left part of the plugin )
2. Click insert to add these items on the right site of the menu
3.Take the settings in the left as shown in the example /Tik
Ok
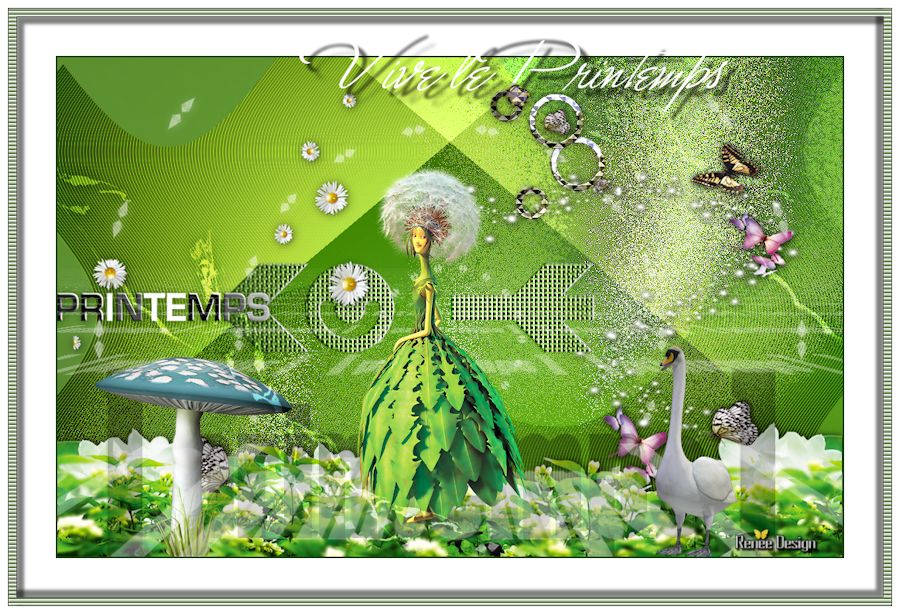
You must achieve a similar result as shown in the screen below
30. Activate the tube ‘’ renee_voici_le_printemps_texte’’
Edit/ Copy-Edit - Paste as new layer on your working area- With your Move Tool (M) move to the left side
31. Open the tube Brush‘’ pinceau_printemps’’ in your PSP
- File-Export-Custom Brush, give the brush a name: ‘’Printemps
‘’
32. Activate Brush Tool and select the brush: –‘’Printemps’’ with these settings as shown in the example below

- Set the foregroundcolor to White
33. Layers- New raster layer=Raster 6
34.
Place the brush with the foregroundcolor white on the bottom edge of your work
35. Layers- Duplicate
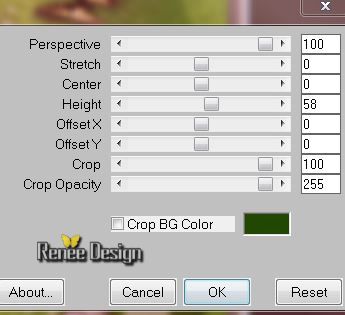
36. Effects- Plugins– Mura’s Meister –Perspective
Tilling
37. Effects - 3D Effects - Drop shadow with these settings 1/1/52/18 color white
- Activate the layer underneath= (Raster 6)
38. Effects- 3D Effects- Cutout with these settings
39. Layers- New raster layer
40.
Selections - load/save selection - load selection from disk and select my file: ‘’vive_printemps_3
41. Activate Flood Fill Tool and fill the selection with the the foregroundcolor white (click 2 a 3
times into selection)
-
Selections- Deselect All
42. Effects - 3D Effects - Drop shadow with the same settings
43. Double click on this layer and set the Blendmode to Screen
- Activate the top of the layer palette
44. Activate the tube ‘’ sdjpc-champignons-61’’
- Edit/ Copy-Edit - Paste as new layer on your working area
- Activate the Move Tool-move to the bottom left side
45. Activate the tube ‘’MRD_SeaFairies1_Part1_E53’’
Edit/ Copy-Edit - Paste as new layer on your working area
- Activate the Move Tool-move to the right side
46. Activate the tube ‘’ @ster_tube_piumino’’
- Edit/ Copy-Edit - Paste as new layer on your working area
- Activate the Move Tool(M) move into the center
47. Layers- New raster layer
48.
Selections - load/save selection - load selection from disk and select my file: ‘’
voici_printemps_2 »(the selection is a little outside of your work
-It is not a problem)
49. Activate Flood Fill Tool and fill the selection with color white (click links and right)
The result
-
Selections- Deselect All
50. Effects- Plugins– Simple – Diamonds
51. Double click on this layer and set the Blendmode to Overlay/ Set the layer opacity of this layer to 75%
52. Effects - 3D Effects - Drop shadow with these settings 3/3/35/24 black
-
Repeat: Effects - 3D Effects - Drop shadow with these settings -3/-3/35/24 black
53. Activate the tube ‘’paquerette »
- Edit/ Copy-Edit - Paste as new layer on your working area
- With your move tool place it in to the left ( put a flower on the I of the Title
)
54. Image - Add borders-Symmetric checked: 2 pixels backgroundcolor
55. Image - Add borders-Symmetric checked:50 pixels color white
56. Image - Add borders-Symmetric checked:1 pixels backgroundcolor
57. Image - Add borders-Symmetric checked: 10 pixels color white
58. Image - Add borders-Symmetric checked:1 pixels backgroundcolor
59. Activate Magic Wand and click in the white border of 10
pixels
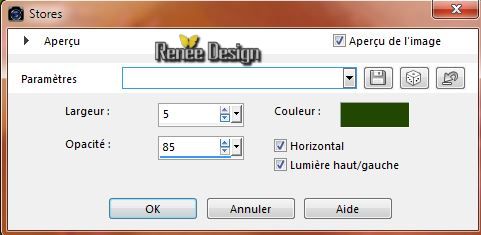
60. Effects- Texture Effects- Blinds with these settings
61. Effects - 3D Effects - Drop shadow use the default settings:10/10/100/15 black
-
Repeat: Effects - 3D Effects - Drop shadow with these settings -10/-10/ 100 /15
-
Selections- Deselect All
62. Image - Add borders-Symmetric checked: 10 pixels color white
63. Activate the tube ''Text''- Edit - Copy -Edit - Paste as new layer on your working area and move
64. Image
Resize with 900 pixels Width
Save as JPG
I hope you enjoyed this lesson
Renée
This lesson was written by Renée 20/02/2015
Placing
2015
*
Any resemblance with an existing lesson is merely a coincidence *
* Don't forget to thank the people who work for us and with us.
I named the tubeurs - Testers and the translators.
Thanks Renée.
*
| 
 Translations


 When you see this logo the filter is imported in Unlimited

 _All rights reserved