|
New
Translations here
TEMPETE EN MER
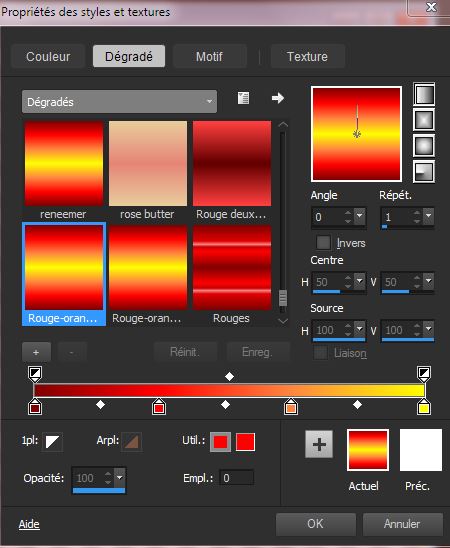
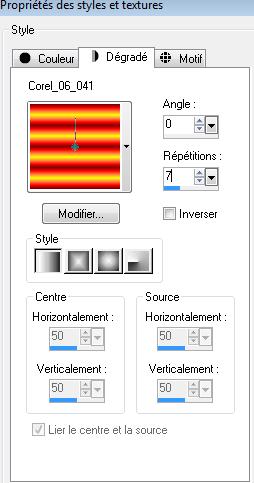
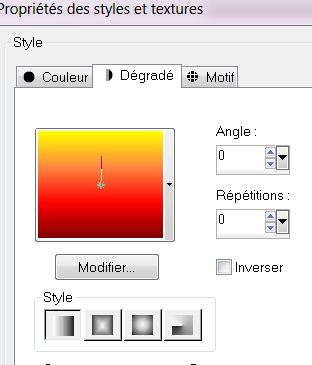
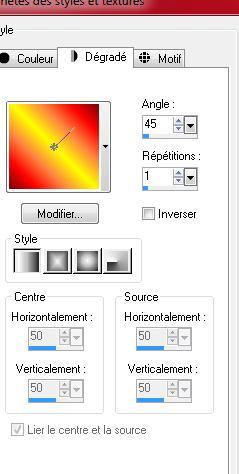
Let's start the lesson. Properties Foreground - Set your foreground material into gradient and select Corel-06-041'' 1. File: Open a new transparent image of 1000 x 600 pixels 2. Properties Foreground :Prepare a linear gradient configured like this. Activate Flood Fill Tool and fill the layer with the gradient
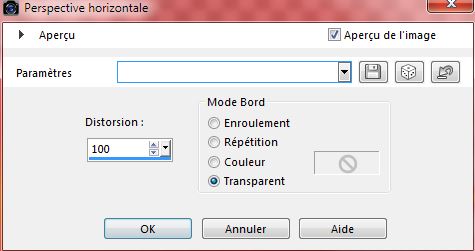
3. Effects- Geometric Effects- Perspective Horizontal -Distortion 100-Transparent
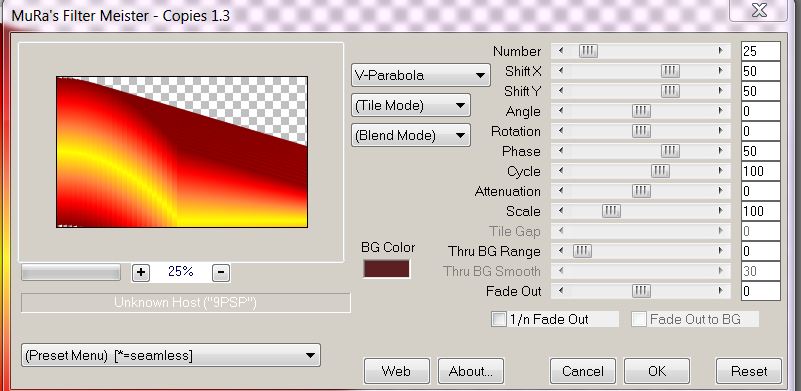
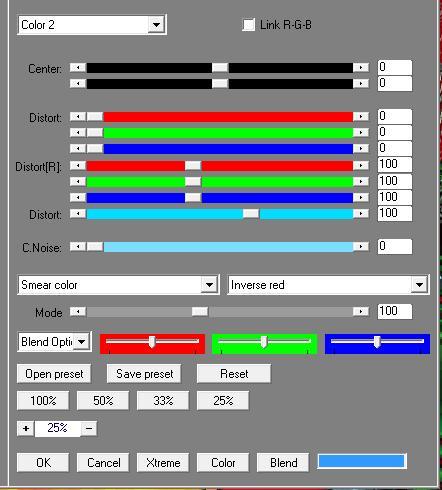
4. Effects- Plugins - Mura's meister /copies use settings below
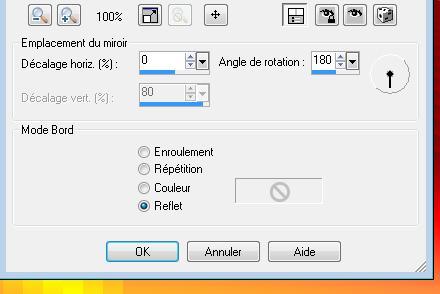
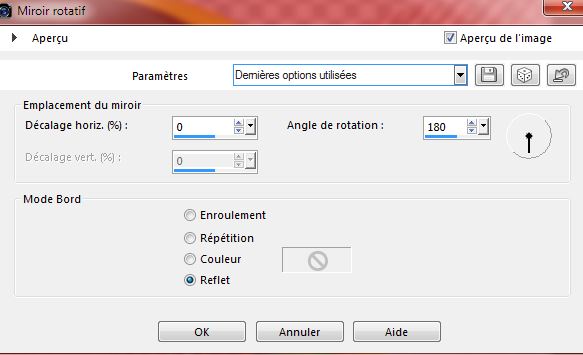
5. Effects- Reflection Effects- Rotating Mirror
6. Effects- Plugins - Flaming pear - Flexify 2
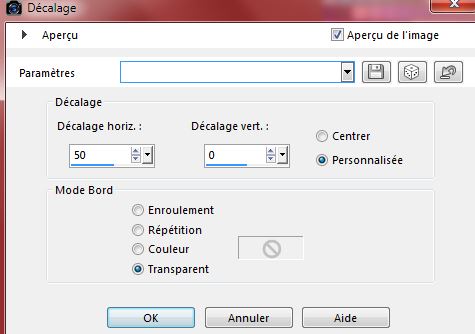
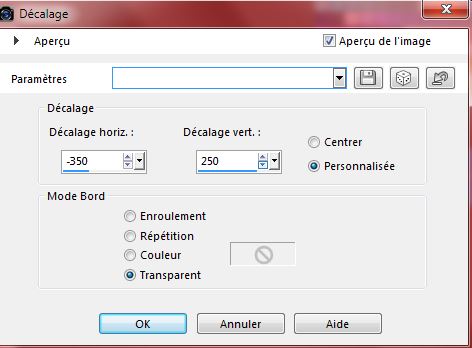
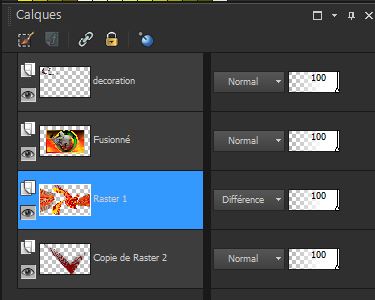
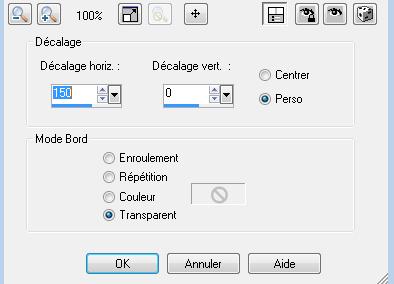
7. Layers- Duplicate- Image Mirror- Layer Palette - Double click on this Layer and set the Blend Mode to "Difference" 8. Effects- Image Effects- Offset use settings below
9. Layers- Merge- Merge Layers Down 10. Layers- New Raster Layer -Activate Flood Fill Tool and fill the layer with the gradient 11. Effects- Geometric Effects- Perspective Horizontal -Distortion 100 /transparent 12. Effects- Geometric Effects- Perspective Vertical -Distortion 100 / transparent 13. Effects- Plugins - Mura's Meister /copies use settings below
14. Effects- Reflection Effects- Rotating Mirror
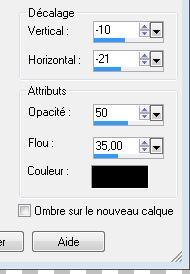
15. Effects- 3 D Effects- Drop Shadow with these settings
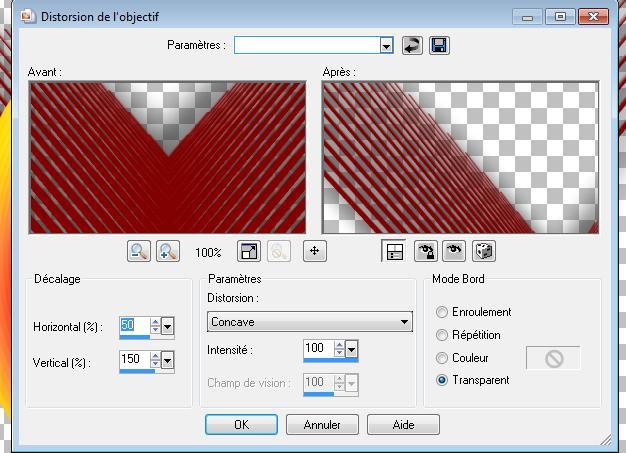
-Repeat: Effects- 3 D Effects- Drop Shadow with these settings 10/ 21 16. Effects- Distortion Effects- Lens Distortion use settings below
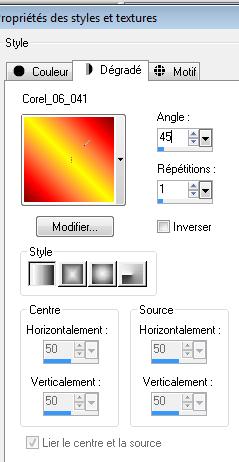
17. Layers- Arrange- Sent to Bottom 18. Layers- New Raster Layer 19. Layers- Arrange- Sent to Bottom - Properties Forground; Change the settings of the linear gradient ''Corel_06_041 into these settings -Activate Flood Fill Tool and fill the layer with the gradient
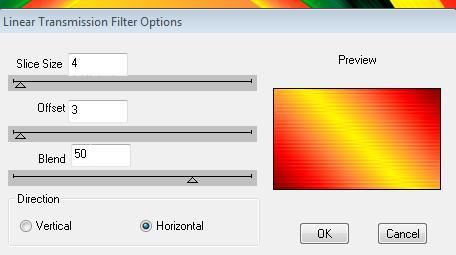
20. Effects- Plugins - Dbs flux /Linear transmission
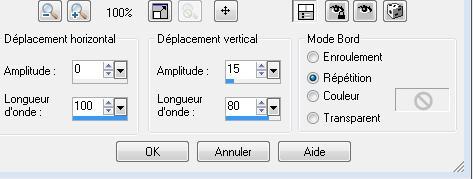
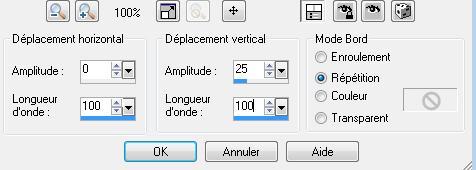
21. Effects- Distortion Effects- wave use settings below
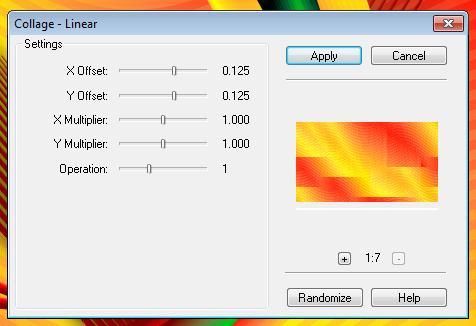
22. Effects- Plugins - Fm Tile tools - Collage linear
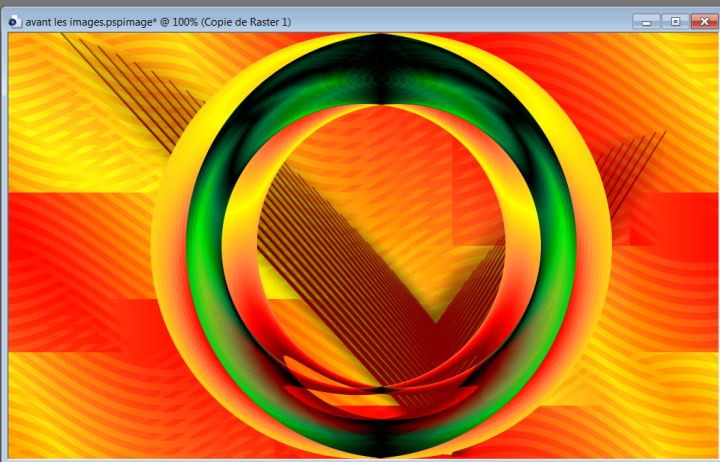
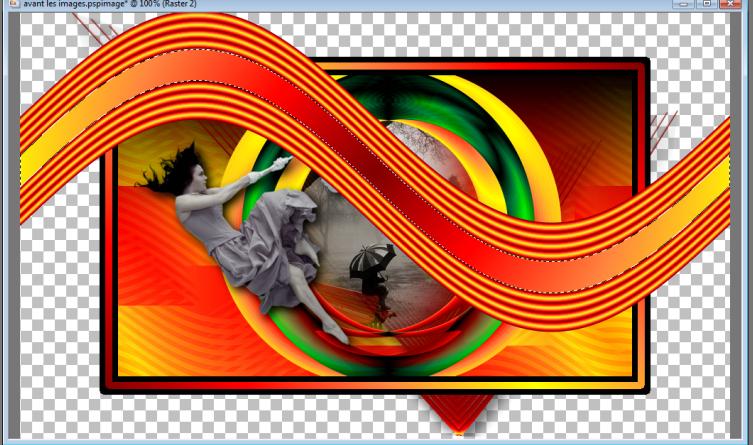
23. Effects-Plugins - Adjust variation - Click Original / Clicking Darker - You should have this result as shown in the print screen below
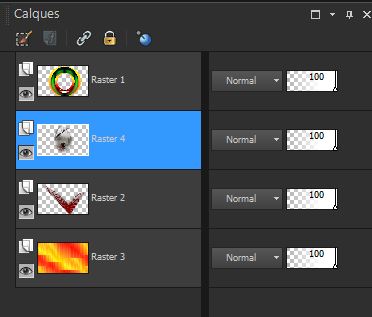
- Activate the top of the layer palette 24. Open the tube «Narah_0160_Paisaje_Abril2009« - Edit/ Copy-Edit - Paste as new layer on your working image 25. Effects-Image Effects-Offset with these settings H = 0 and V = 30 Transparent 26. Layers- Arrange - Move Down Layer Palette look like this now-You should have this result
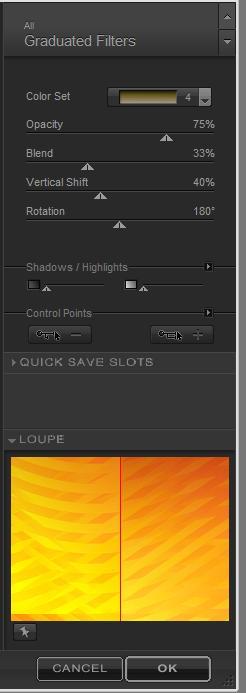
- Activate the bottom of the layer palette (Raster 3) 27. Effects-Plugins - Nick Color effect Pro.3/ Graduated Filters /Color set /Olive 4 /
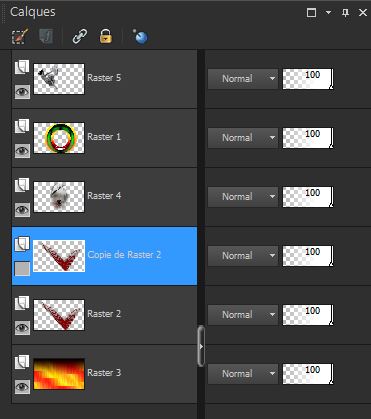
- Repeat this filter - Activate the top of the layer palette 28. Open the tube « Xtreme-Women-91-Blown-Away-25-03-09 « - Edit/ Copy-Edit - Paste as new layer on your working image 29. Effects-Image Effects-Offset with these settings H= -245 and V =40 transparent 30. Effects- 3 D Effects- Drop Shadow with these settings: 8/8/100/25 black -In the Layer Palette- Make Raster 2 active 31.Layers- Duplicate = Close the bottom layer in the layer palette = (Copy of Raster 2) - Layer Palette look like this now-You should have this result
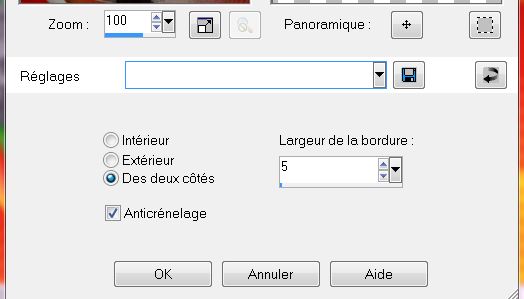
32. Layers-Merge-Merge Visible 33. Activate the Merged Layer -Image Resize to 75% Resize all layers not checked 34. Layers- Arrange- Bring to Top 35. Selections- Select All- Selections Float-Defloat 36. Selections-Modify-Select-Selection Borders with these settings-Both sides
37. Selections- Promote selection to Layer 38. Activate Flood Fill Tool and fill the selection with the gradient 39. Effects- 3 D Effects -Chisel use settings below
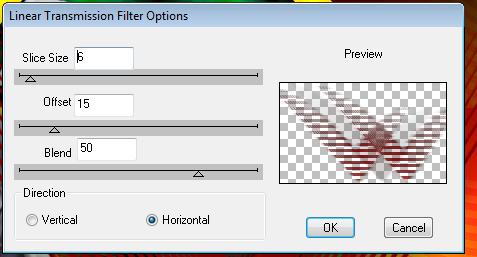
- Selections- Deselect All 40. Layers- Merge- Merge Layers Down 41. Open the layer (Copy of Raster 2) 42. Layers- Duplicate 43.Layers- Arrange- Bring to Top 44. Effects- Plugins - DBS FLUX /Linear Transmission
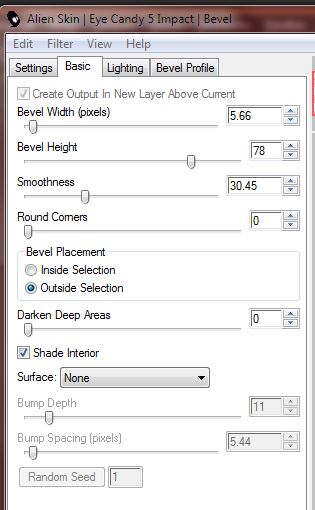
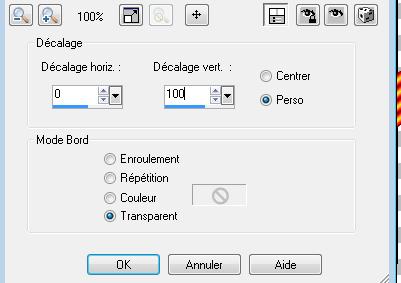
45. Effects- Geometric Effects- Perspective Horizontal -Distortion 50 transparent 46. Effects-Distortion Effects- Twirl - Degrees 390° 47. Effects- Plugins - Eye Candy 5 Impact - Bevel-tab Settings/User settings choose my Preset groove outside
48. Image Resize to 50% Resize all Layers not checked 49. Effet - Effects-Image Effects-Offset with these settings
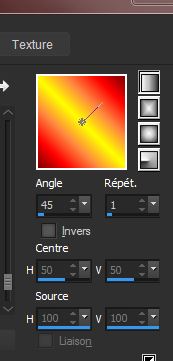
Layer palette - rename this layer ''decoration'' 50. Layers- New Raster Layer - Properties Forground; Change the settings of the linear gradient into these settings
51.Selections –load/save selection –load selection from disc and select my selection:'' @renee_tempete_en_mer'' 52. Activate Flood Fill Tool and fill the selection with the gradient 53. Selections- Deselect All 54. Effects- Distortion Effects- Wave with these settings
55. Layers- Duplicate 56. Effects-Image Effects-Offset with these settings
57. Layers- Merge- Merge Layers Down 58. Activate your Magic Wand and click in the middle between two curved lines 59. Layers- New Raster Layer - Properties Forground; Change the settings of the linear gradient into these settings
60. Activate Flood Fill Tool and fill the selection with the gradient /You should have this result as shown in the print screen below
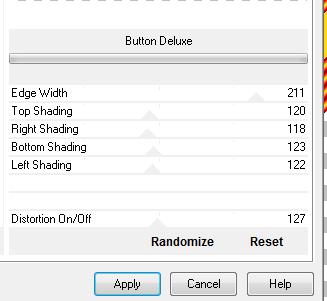
61. Selections- Deselect All 62. Layers- Merge- Merge Layers Down 63. Effects- Plugins - Unlimited 2.0 - Factory Gallery B / Button De luxe
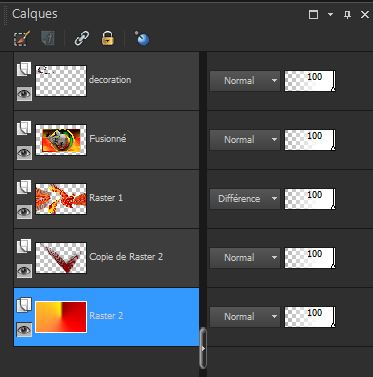
64. Layers- Duplicate 65. Image Mirror /Image Flip 66. Effects- Plugins - Unlimited2.0 - FactoryGallery B /the black Hole 126/126/153 66. Layers- Merge- Merge Layers Down 68. Effects- Distortion-Twirl- Degrees 60 69. Layers- Arrange- Move 2x Down (underneath the merged layer ) 70. Layer Palette - Double click on this Layer and set the Blend Mode to "Difference" -Layer Palette look like this now-You should have this result
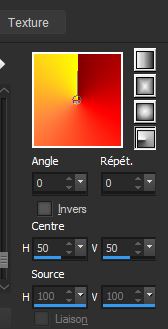
71. Layers- New Raster Layer 72. Properties Foreground : Change your linear gradient into a radial gradient configured like this
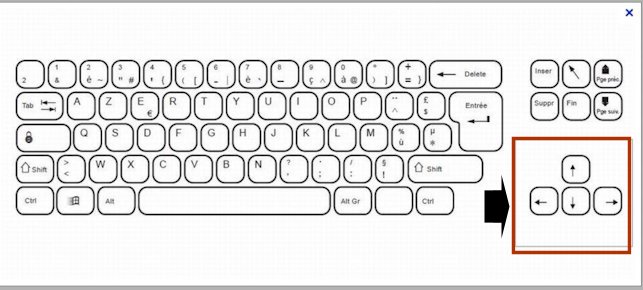
73. Activate Flood Fill Tool and fill the layer with the gradient 74. Adjust- Blur- Gaussian Blur : Radius 20 73. Layers- Arrange- Sent to Bottom - Layer Palette look like this now-You should have this result 74. Make Copy of Raster 2 active- Double click on this Layer and set the Blend Mode to "Hard Light" - Activate th bottom layer in the layer palette -Activate Pick Tool (K)- With your arrow keys on the keyboard left and bottom until it abuts against the edge The Result
75. Activate the top of the layer palette 76. Layers- New Raster Layer 77. Properties Foreground : Change your radial gradient into a linear gradient configured like this / Activate Flood Fill Tool and fill the layer with the gradient
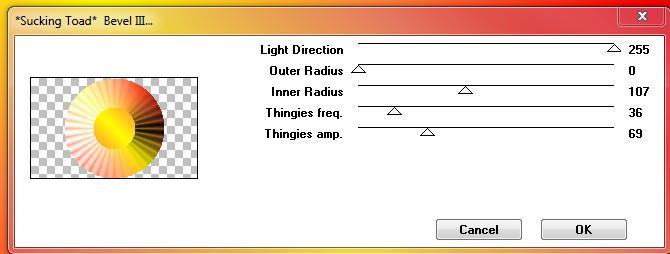
77. Adjust-Blur- Gaussian Blur : Radius 20 78. Effects- Plugins -Unlimited 2.0 - Toadies /Toadies - _Sucking Toad_ Bevel III Do you have problems with this-image is into the zipfile and paste as a new layer on your working area
- - Layer Palette - Double click on this Layer and set the Blend Mode to "Multiply " 79. Effects-Image Effects-Offset with these settings
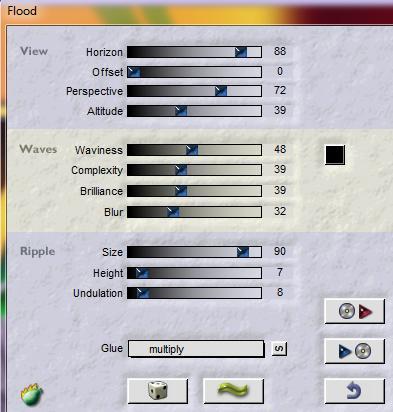
- Activate the bottom layer in the layer palette = (Raster 2) 80. Effects- Plugins - Flaming pear - Flood >use settings below - Glue Multiply
81. Open the tube « calguisSwans22012015« Edit/ Copy-Edit - Paste as new layer on your working image and move to the bottom left 82. Open the tube« grand canard « Edit/ Copy-Edit - Paste as new layer on your working image and move 83. Open the tube'' de la femme lettre '' Edit/ Copy-Edit - Paste as new layer on your working image and move 85. Open the tube « branches « Edit/ Copy-Edit - Paste as new layer on your working image and move to the upper right corner 86. Layers- Merge- Merge Layers All 87. Image - Add borders-Symmetric checked: 5 pixels black 88. Image - Add borders-Symmetric checked:40 pixels #ffdf0f 89. Activate the Magic Wand and select the border of 40 pixels * Do you have problems with this- an image is into the zipfile and paste into selection >>Continue with step 95 90. Effects- Plugins - Unlimited 2.0 - AP distort /Gradient shift
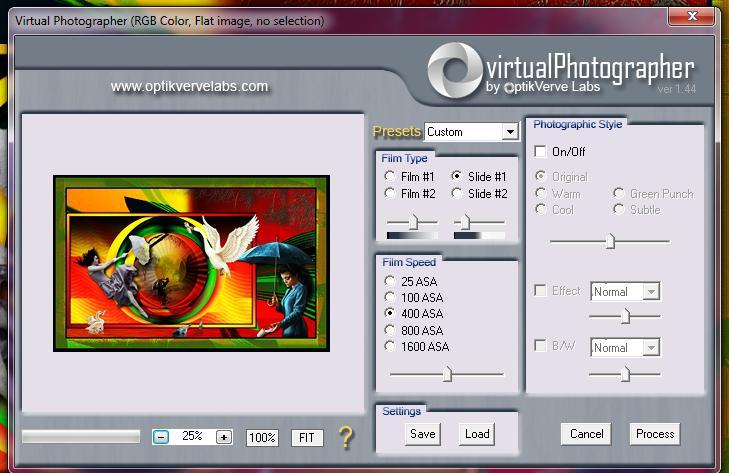
.91.Selections- Promote selection to Layer -Image Flip Selections- Deselect All 92. Layers-Duplicate 93. Image Flip / Image Mirror 94. Layer Palette - Double click on this Layer and set the Blend Mode to " Exclusion" -Set the layer opacity of this layer to 66% 95. Image - Add borders-Symmetric checked: 5 pixels black 96. Effects- Plugins - Optikvervelabs /Virtual photogapher use settings below
97. Open the tube "texte " Edit/ Copy-Edit - Paste as new layer on your working imageand move- Layers- Merge Merge Layers All Save as JPEG
I hope you enjoyed this lesson
Renée
This lesson was written by Renée
Edited and Update
April - 2012 *
Any resemblance with an existing lesson is a coincidence * Do not forget to thank the people who work with us and for us I have appointed the tubeurs and translators Thanks Renée * i
I am part of the Tutorial Writers Inc. My tutorials are registered regularly ReneeGraphisme_All rights reserved
*
|
 Translations