|
Let's start the lesson.
1. Open the image
''fond_renee_steampunk_23.jpg''- Promote Background layer
=Raster 1
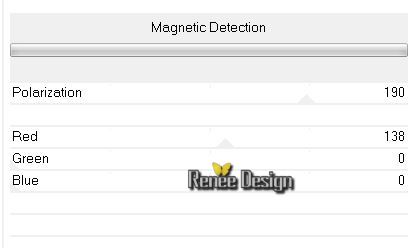
2. Effects- Plugins - VM Experimental - Magnetic Detection
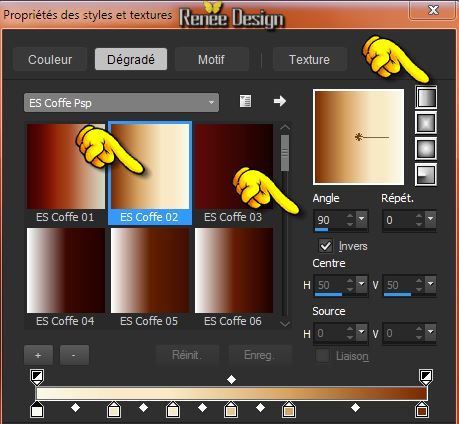
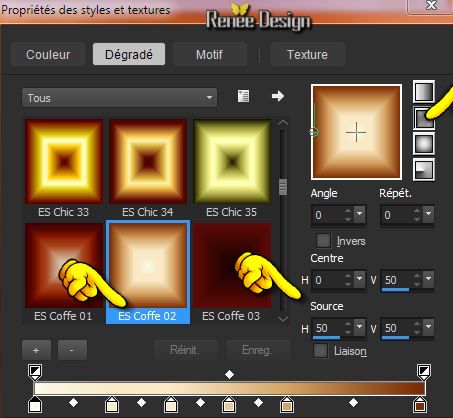
- Material of the foreground: foreground to Gradient and choose: ''ES Coffe 02.pspGradient''
Put your foreground into a linear gradient with settings below./Material of the background:backgroundcolor to color white
3. Layers - New raster layer
4. Selections -Select
All -Selection Modify - Contract 30 pixels
- Activate Flood Fill Tool and fill the selection with the gradient
5. Effects- Plugins -VM Distorsion -Vision Impossible using the default settings
-Selection- Deselect All
6. Image Resize 80% (Resize all the layers not checked)
7. Effects-Plugins -Transparency - Eliminate white
8. Effects- 3D Effects- Drop Shadow using the default settings
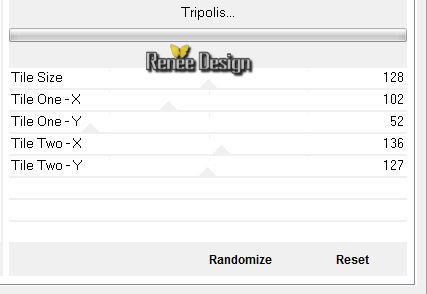
9. Effects- Plugins -VM Instant Art -Tripolis
10. Effects-Plugins - VM Distorsion - Radiator
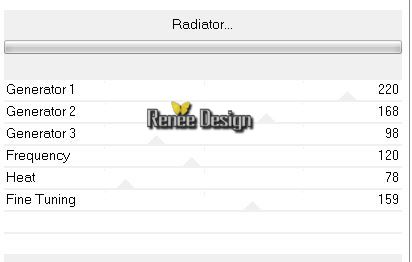
- In the Layerpalette, set Blend Mode to Soft Light
11. Effects-User Defined Filter-- Emboss 3 using the default settings
- Material of the foreground :Change the settings of this gradient/ Prepare a Rectangular Gradient as configured like this.
12. Layers - New raster layer
- Activate Flood Fill Tool and fill the layer with the gradient
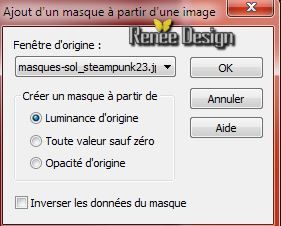
13.
Layers-New Mask Layer From Image and choose Mask:
"masque-sol_steampunk23.jpg''
14. Layers- Merge-Merge Group
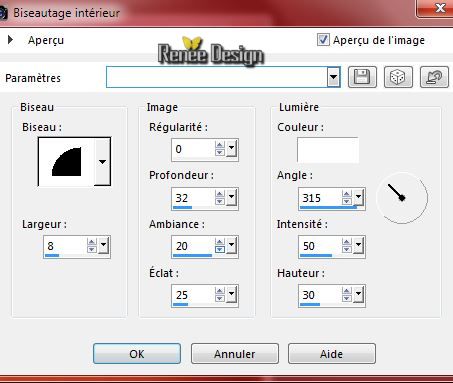
15. Effects- 3D Effects- Inner Bevel with these settings
16. Activate your Pick Tool ( K) Pull the Left and Right Nodes outwards so you do not see the lines anymore (see example )
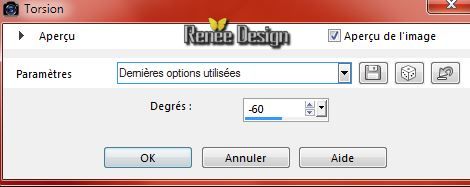
17. Effects- Distortion Effects -Twirl with these setting
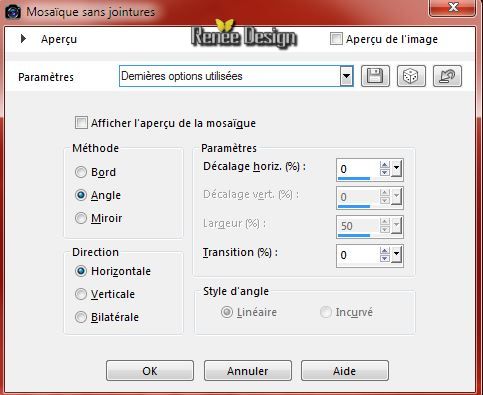
18. Effects-Image Effects-Seamless Tiling use the settings below
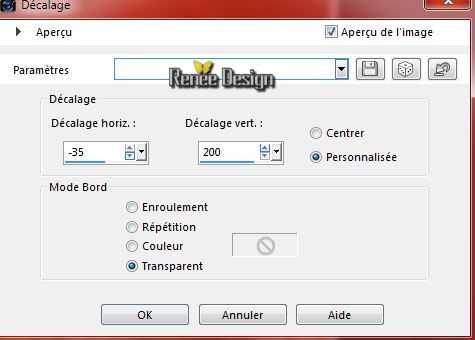
19. Effects- Image Effects-Offset with these settings H = 0 and V = -18 Transparent
- Activate the bottom of the Layer-Palette =Raster 1
20. Layers- New Raster layer
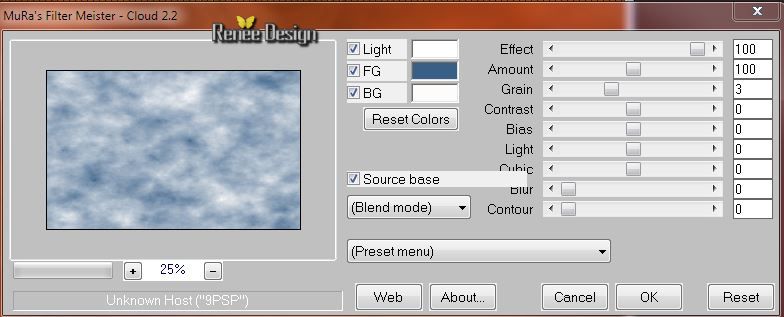
21. Effects- Plugins - Muras' Meister - Clouds - Color white and color
#385f88
22. In the Layerpalette, set Blend Mode to Multiply and Opacity to 71%
-Activate the top of the layer-Palette
23. Material Properties:Set your Foregroundcolor to #cd9637 Set your Backgroundcolor to:#7e3704
24. Layers - New raster layer
25. Selections - load/save selection - load selection from disk and choose my selection: ''steampunk_23_1''
-Activate Flood fill tool and fill the selection with the foregroundcolor
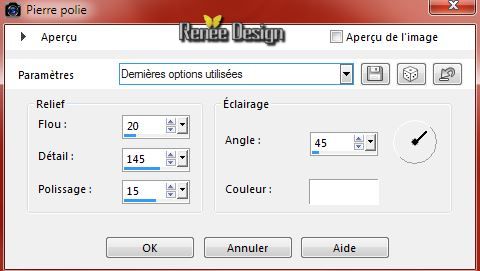
26. Effects- Texture Effects-Polished Stone with these settings
Keep Selected
27. Layers - New raster layer
28. Effects- 3D Effects- Buttonize with these settings
29. Layers- Merge-Merge Down
30. Effects-Plugins --EyeCandy 5 Impact - Glass-tab Settings/User Settings and choose my preset
"steampunk_23_glass''
- Selections-Deselect All
31. Effects-Plugins - EyeCandy 5- Chrome -tab Settings-Preset / Ripple Edge
32.
In the Layerpalette, set Blend Mode to Hard Light
33.
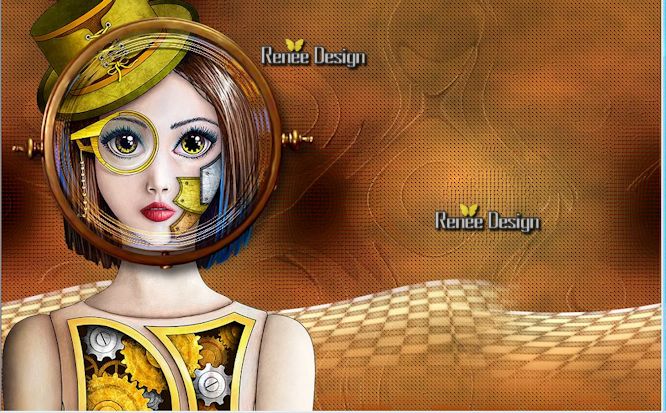
Open your tube ''cadran_steampunk_23''- Edit/copy-Edit paste as a new layer on your working area
Activate your move tool move in the circle see example
34.
Open your tube ''Jenn_SteamPunkCartoonGirl.psp" - Image
Mirror
35.
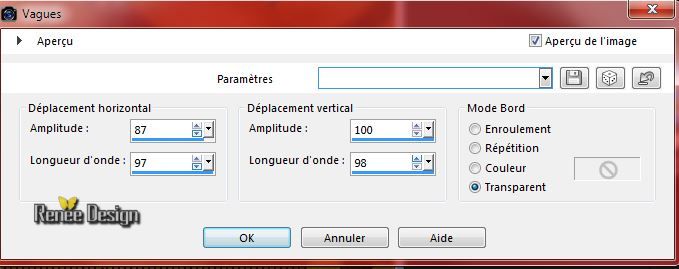
Edit/copy-Edit paste as a new layer on your working area
With your move tool:move to the left like this
36.
Layers- Arrange- Move 2 x down
-
Your work look like this now
- In the Layer Palette: activate Raster 3 (effects clouds)
37.
Selections - load/save selection - load selection from disk and choose my selection: ''steampunk_23_2''
38.
Selections- Promote selection to layer
-
Selections-Deselect All
39.
Layers- Arrange-Bring to Top
40.
Effects- Plugins - Graphic Plus Colorize with these settings
(In earlier versions, can result in a slightly different effect )

41.
In the Layerpalette, set Blend Mode to Burn
42.
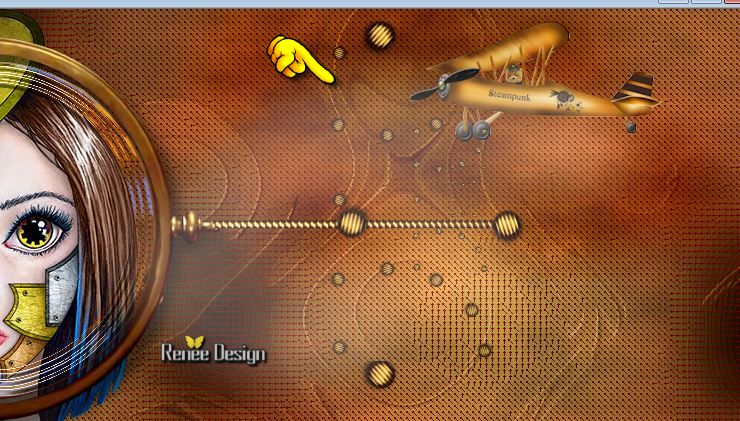
Open your tube ''steampunk_23_avion'' -Edit / Copy -Edit - Paste as new layer on your working area
-place it in the right place like this:
43.
Layers - New raster layer
44.
Selections - load/save selection - load selection from disk and choose my selection: ''steampunk_23_3''-
-
Activate Flood fill tool and fill the selection with color white (click 3 a 4 times in the selection )
-
Selections-Deselect All
45.
Open your tube ''Jeanne_Backgr_Birds_16_05_2014._ .psp''
- Edit / Copy -Edit - Paste as a new layer on your working area
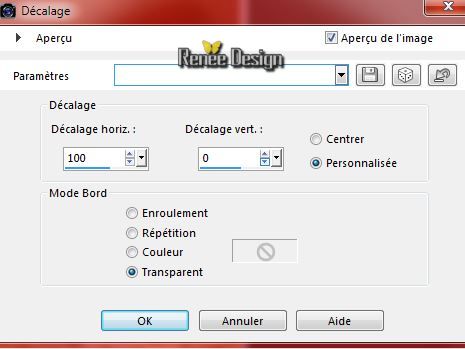
46.
Effects- Image Effects-Offset with these settings
47.
In the Layerpalette, set Opacity to 55%
48.
In the Layerpalette, activate Raster 5
49.
Layers- Duplicate
-Image Mirror
50.
Effects - Images Effects - Offset with these settings
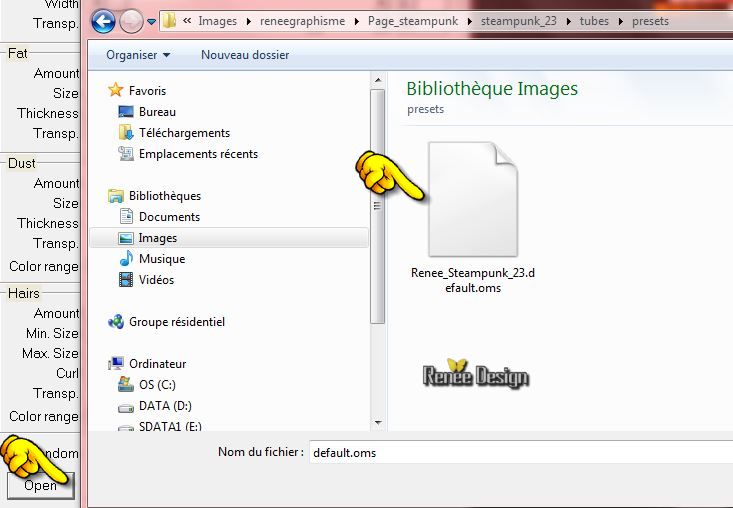
51.
Effects- Plugins - Vanderlee - Old Movie-select my Preset
'' Renee_Steampunk_23.default''- or set it manuall
-You can change the colors
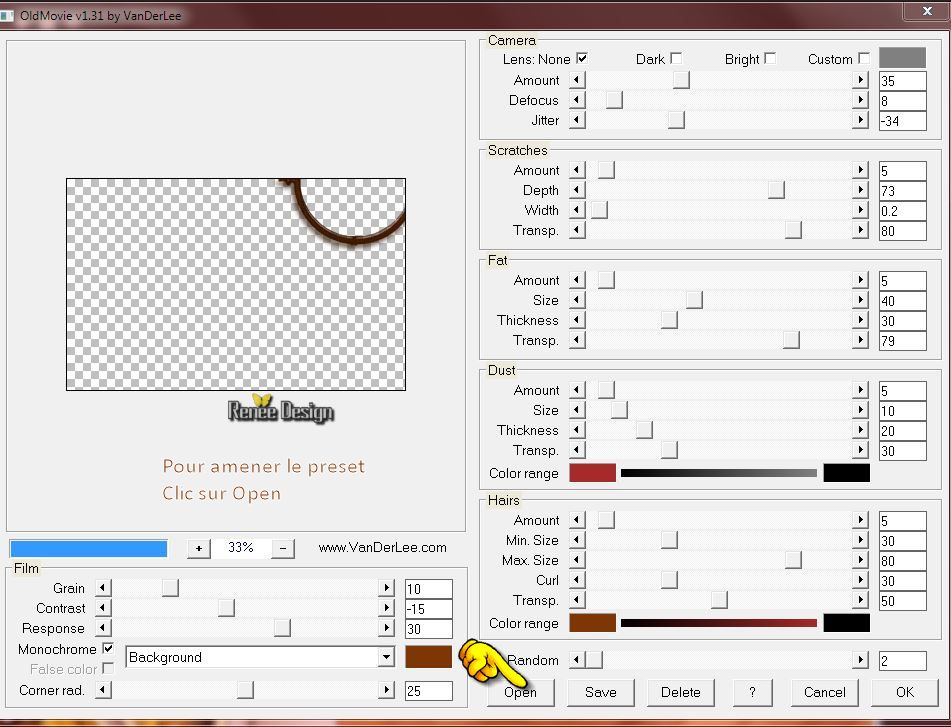
Preset >>>Click Open>>and select my file and OK
- Activate the top of the layer-Palette
52.
Open your tube ''Renee_Steampunk_23_nuage''
-
Edit/copy-Edit paste as a new layer on your working area
-
With your move tool move to the top right corner-In the Layerpalette, set Blend Mode to Overlay
53.
Layers- Merge -Merge Visible
54.
Color Palette:foregroundcolor to#e0c92e
56.
Layers - New raster layer
57.
Pot of Paint Opacity 50% -Activate Flood fill tool and fill the layer with the foregroundcolor
58. Effects- Plugins Unlimited 2.0 -
Alf's Power Toy's - Color Grid using the default settings
59. Selections - load/save selection - load selection from disk and choose my selection:'' steampunk_23_4''
Press the delete button on your key board
60.
Effects- Plugins - Graphic Plus - Emboss all
0 (using the default settings)
-Selections-Deselect All
61.
Effects- Distortion Effects- Wave with these settings
62.
Selections - load/save selection - load selection from disk and choose my selection: "steampunk_23_5''
Press the delete button on your key board
-
Selections-Deselect All
63.
Effects-3D effects-Drop Shadow with these settings : 3/3/100/9 black
64.
Open your tube ''Belscrap_Steampunk_El 63.pspimage''
-
Edit/copy-Edit paste as a new layer on your working area and move
65.
Open your tube ''Image30.pspimage_de Marielg''
Image
Resize 60 %
-Edit/Copy -Edit - Paste as new layer on your working area and move
-
See great example
66.
Layers- Arrange- Move Down
67.
Effects-3D effects-Drop Shadow with these settings :1/1/100/22 color black
- Activate the top of the layer-Palette
68.
Open your tube ''steampunk_23_clous "
-Edit/Copy -Edit - Paste as new layer on your working area
-
Place on the circle
69.
In the Layerpalette, set Blend Mode to Soft Light
70.
Image - Add borders-Symmetric checked: 1 pixel color black
71.
Image - Add borders-Symmetric checked: 10 pixels color white
72.
Image - Add borders-Symmetric checked: 1 pixel color black
73.
Image - Add borders-Symmetric checked: 50 pixels color white
74. Open your tube ''texte_steampunk_23"
-
Edit/copy-Edit paste as a new layer on your working area and move
75.
Image - Add borders-Symmetric checked: 1 pixel color black
Save as JPG
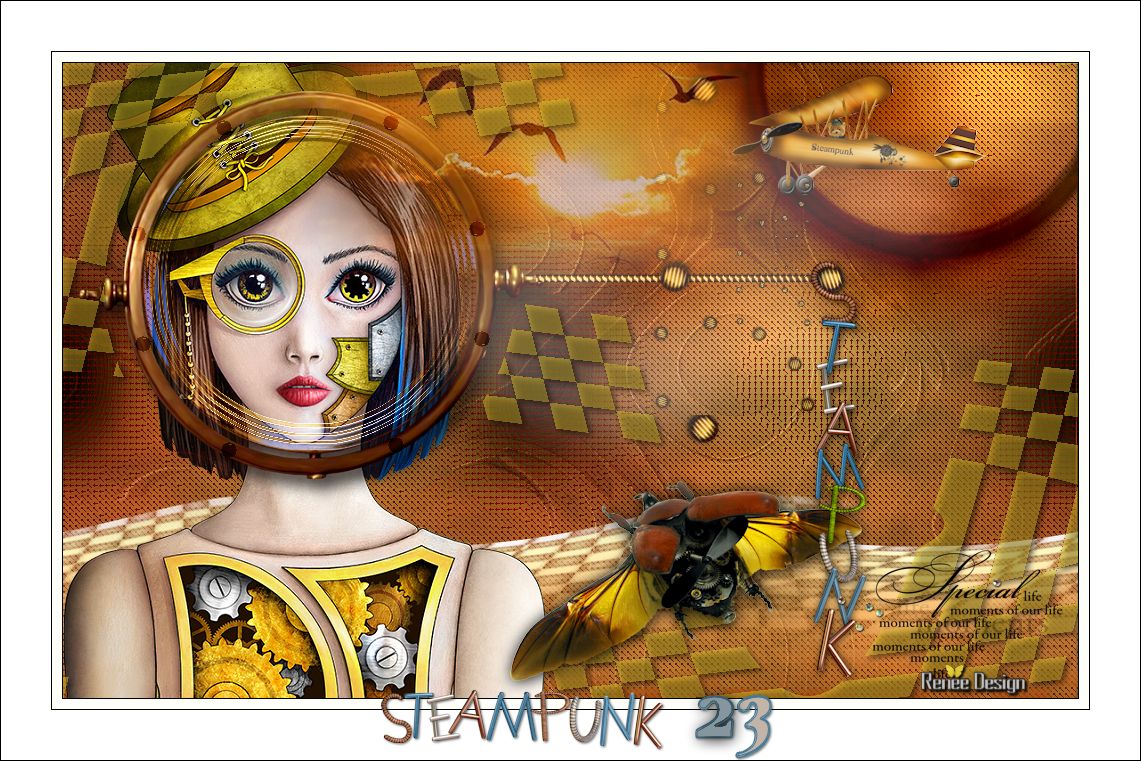
I hope you enjoyed this lesson
Renée
This lesson was written by Renée 28/09/2014
Created the
14/10/2014
*
Any resemblance with an existing lesson is merely a coincidence *
* Don't forget to thank the people who work for us and with us. I named the tubeurs - Testers and the translators.
Thanks Renée.
|
 Translations


 All rights reserved