|
Let's begin
1. Open your tube "fond_apothicaire"
2. Layers - New raster layer / Fill with #000000 (black)
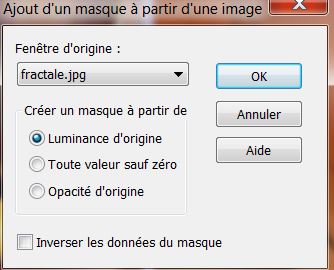
3. Layers - new mask layer from an image
''fractale.jpg''
4. Layers - merge group /
Change layer blend mode to Overlay
5. Layers - add a new layer
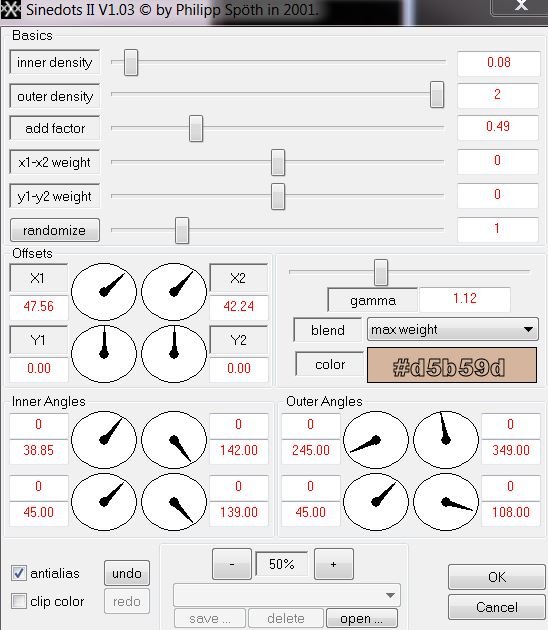
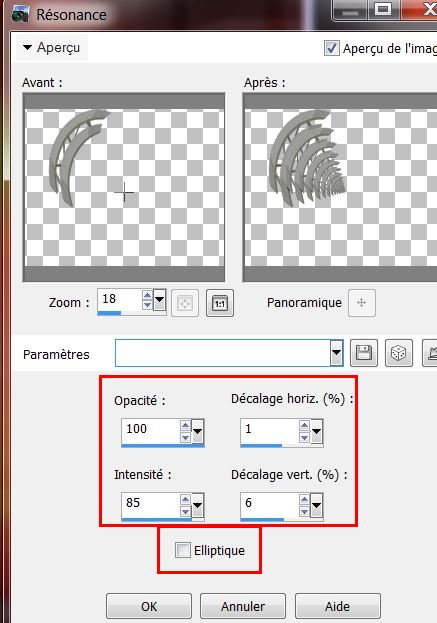
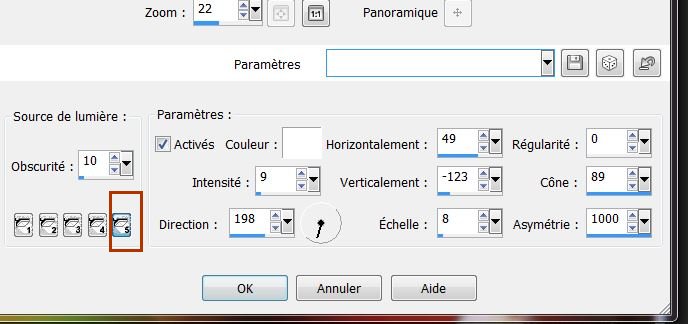
6. Effects - Plugins - Dragon Fly - Sinedots II
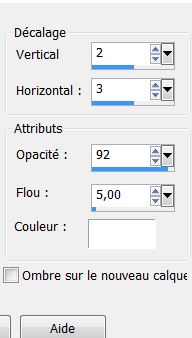
7. Effects - 3-D effect - Drop Shadow
8. Layers - Merge Visible
9. Effects - Flaming Pear - Aetherize

10. Layers - New raster layer / Fill with black
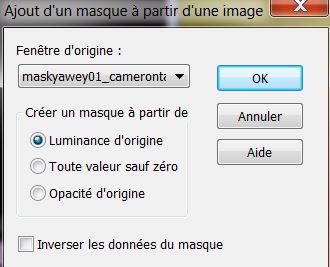
11. Layers - New mask layer from image
/''maskyawey01-Cameron''
12. Layers - merge group
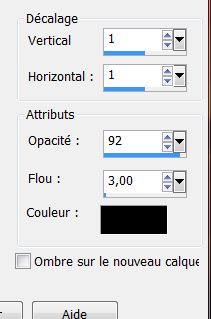
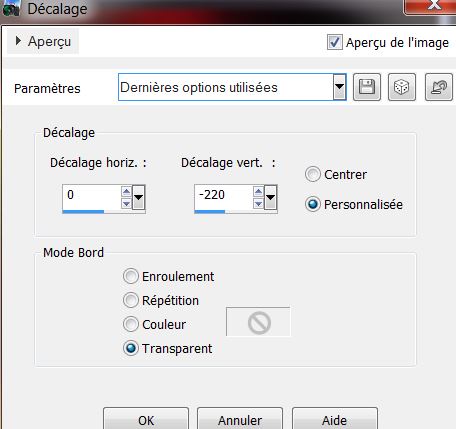
13. Effects - image effect / Offset
14. Effects - 3-D effect - Drop Shadow
15. Layers - add a
new layer
16. Selections - load selection "apothicaire_1"
With white color and the
paint tool settings like this
* Click at least 6 times in the selection

17. Effects - Texture Effect - Blinds

18. Selections - Select none
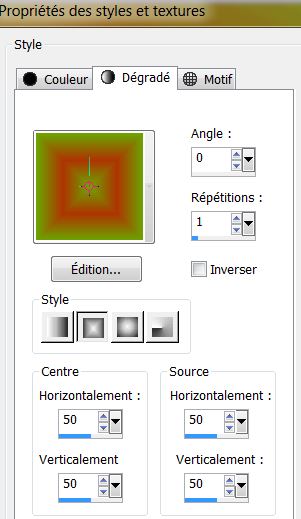
19. Effects - Filters Unlimited 2.0 - It@lian Editor -
Effeto Fantasma/ settings 41/41
20. Effects - Edge effects - Enhance more
21. Open the tube ''image-1'' and paste as new layer
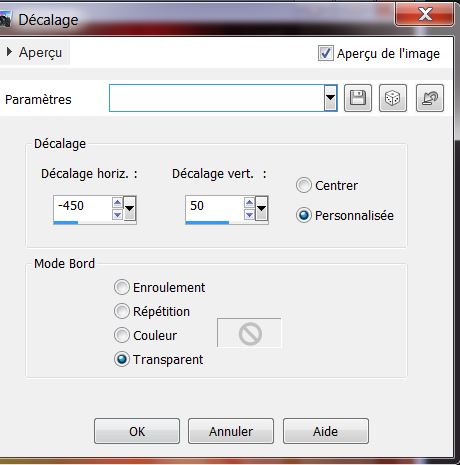
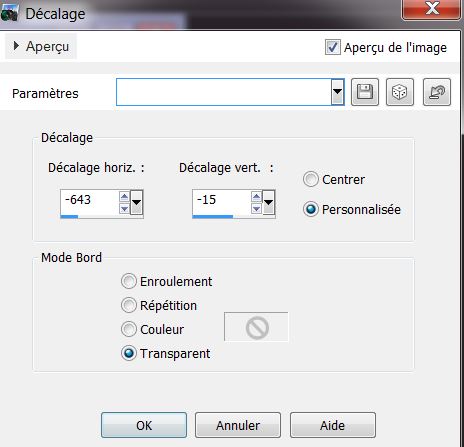
22. Effects - Image effect - Offset
23. Effects - Eye Candy 5/Impact - Extrude - Preset "apothicaire_extrude"
Change the layer blend mode to Hard Light and opacity to
62
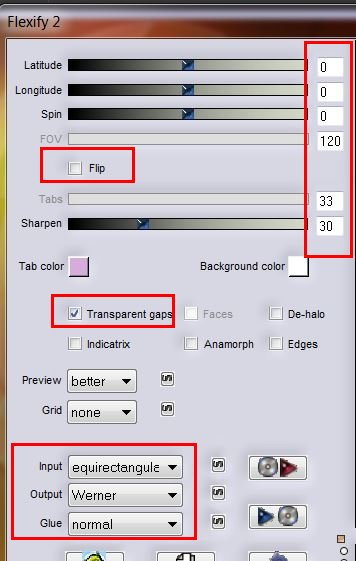
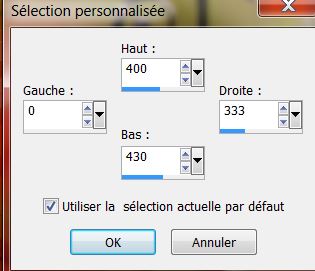
24. Effects - Flaming Pear - Flexify2
25. Effects - Reflection effects - Feedback
26. Layers - add a new layer
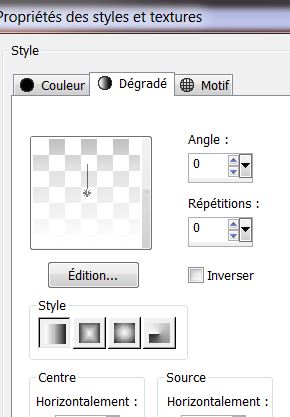
27. Prepare a rectangular gradient / with these colors
in the foreground #6ba502 and background #ae3400 -
configured like this
28. Fill the layer with the gradient
29. Effects Filter unlimited 2 - Pixelate / Sector
Mosaic - 255/14 (Included in the tubes folder)
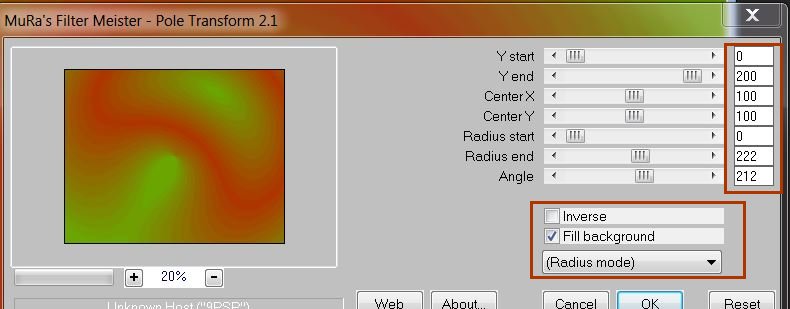
30. Effects - Mura's Meister / Pole Transform 2.1
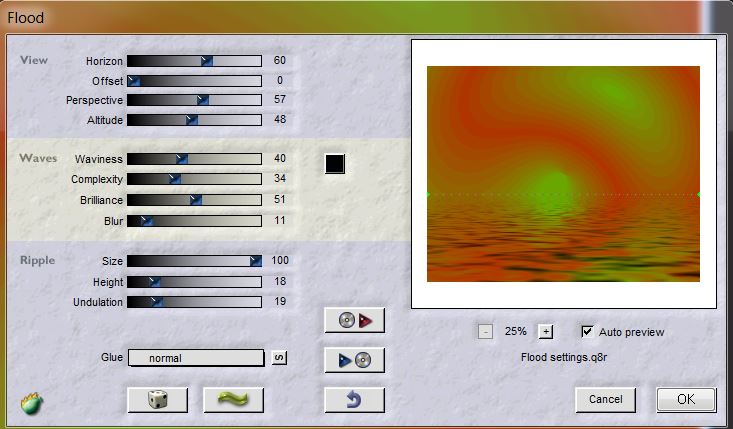
31. Effects - Flaming pear - Flood
32. Effect - Geometric effect - Circle - Transparent
selected
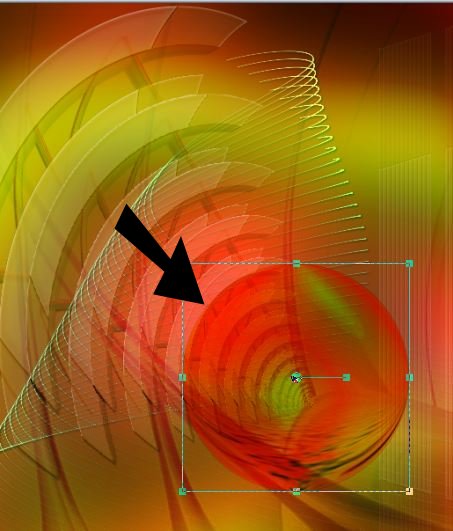
33. Image - resize to 30% / all layers unchecked
Change the layer mode to hard light and using the SELECT
tool (K) place like this / against this edge
34. Layers - New raster layer
35. Selection tool (rectangle) - Custom selection

36. Fill the selection with color #ae3400
37. Selections - Select none
38. Effects - 3-D effects - Drop Shadow 5/6/8/5 Black
39. Layers - duplicate
40. Effects - Image effects / Offset - transparent/ H =
40 and V = 0
41. Layers - duplicate/ Effects - Image effects / Offset
- transparent/ H = 40 and V = 0
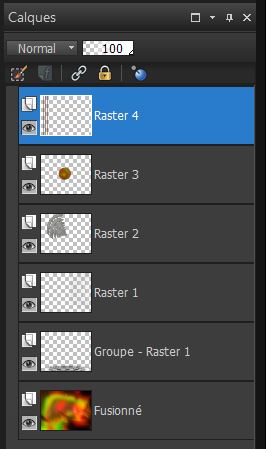
42. Layers - merge down/ two times
Layers palette should look like this:
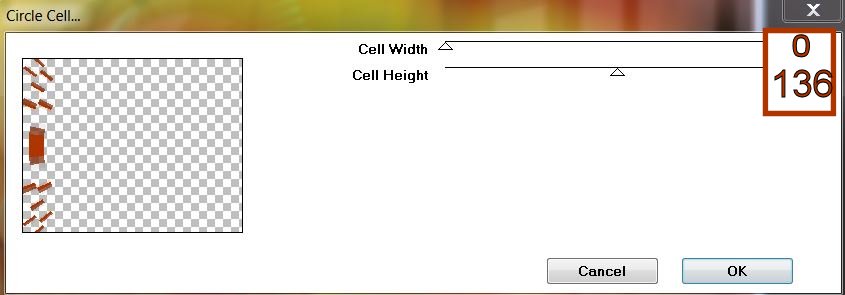
43. Effects - Plugins - Deformation - Circle cell
44. Effects - Eyecandy 5 Impact - Extrude - Preset
"apothicaire_extrude_2"
45. Open the tube "apothicaire_chaine" and paste it in
place
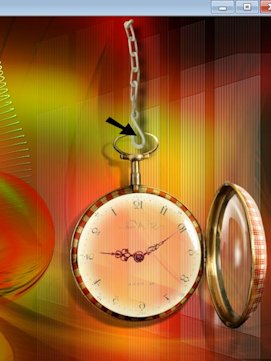
46. Open the tube "apothicaire_montre_gousset" paste it
in place. I erased some rings / (see screenshot here to
give the impression it was hanging inside)
47. Copy and Paste in
place the tube "apothicaire_fiole" Place on the clock as
shown
48. Layers - new raster layer
49. Selections - load selection "apothicaire_2" and fill
with black
50. Effects - Alien Skin/ Snap Art - Pen and Ink /
Preset - "apothicaire_snap_art"
51. Selections - deselect
52. Effects - Illumination effects - Lights
53. Color palette - set the foreground to white and the
background to black
54. Layers - add a new layer
55. Selection tool - Custom selection
55. Prepare a linear gradient - Fading Background
(Corel_06_025)

56. Using the Right
mouse click/ Fill the selection with this gradient
57. Selections - modify / contract by 3 Pixels
58. Prepare a linear gradient - Fading foreground
59. Left mouse click - Paint and fill the selection / on
the same layer / with the new linear gradient
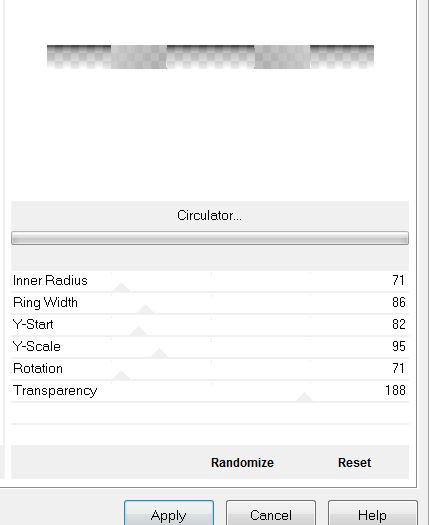
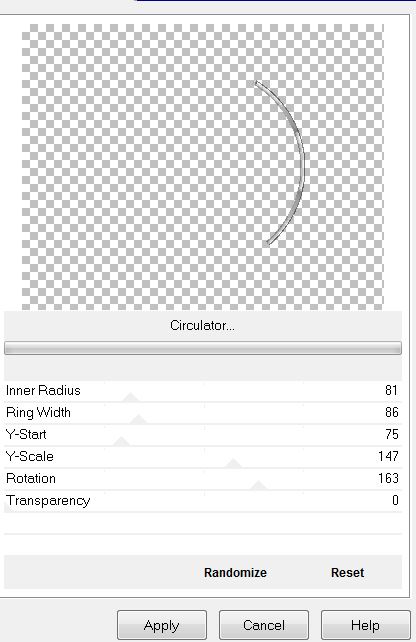
60. Effects - Filters Unlimited 2.0 / Factory N /
Circulator
61. Selections - Select none
62. Layers - Duplicate 2 times
* For convenience rename 1/2/3 and so your palette looks
like this
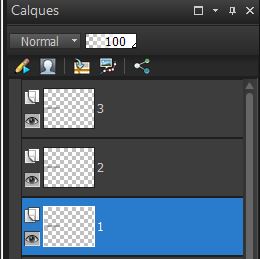
63. Activate layer number 1
64. Effects - Filter Unlimited 2.0 / Factory N /
Circulator
65. Effects - EyeCandy5 Impact - Extrude / Preset
"apothicaire_extrude_1"
66. Image / resize to 50% - all layers unchecked
67. Effects - Image effects - Offset
68. Activate layer 2
69. Effects - Eyecandy 5 Impact / Extrude - Preset
''Small Offset 45 degrees"
70. Activate layer 3
71. Effects - EyeCandy 5 Impact / Extrude - Preset
"apothicaire_extrude_2"
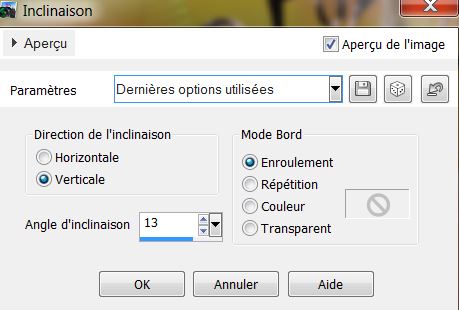
72. Geometric effects - Skew
73. With your Pick tool (K) place like this
74. Lower
the Opacity down to 75
75. Layers - Merge Visible
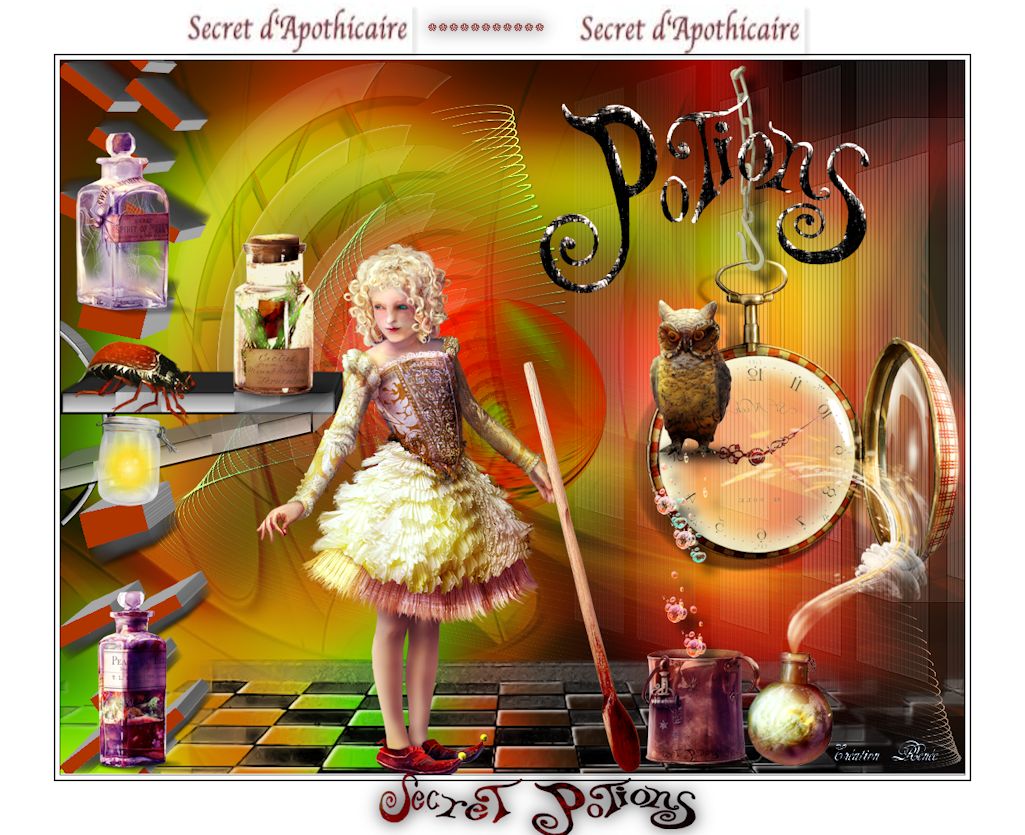
We will now use various tubes to dress our work
- Open the file lorieD tubes sticking number
7/130/133/134/136/169 tubes up to your taste
- Open the tube "apothicaire_insect" Paste as new layer
- Open the tube "LoriD_apothicaire_fille" Paste as new
layer
- Open the tube _"apothicaire_cuillere" Paste as new
layer
- Open the tube "_apothicaire_chaudron" Paste as new
layer
- Open the tube "_apothicaire_bulles" Paste as new layer
Make sure everything is well placed
76. Image - add borders 1 pixel black
77. Image - add borders 5 pixels in white
78. Image - add borders 2 pixels black
79. Image - add borders 65 pixels white
80. Paste or write your text to taste
81. Image - add borders 2 pixels black
82.Image - Resize to 1025 pixels wide
It's Done, Thank you Sally

|


 Translated
by Sally
Translated
by Sally