|
New
Translations here
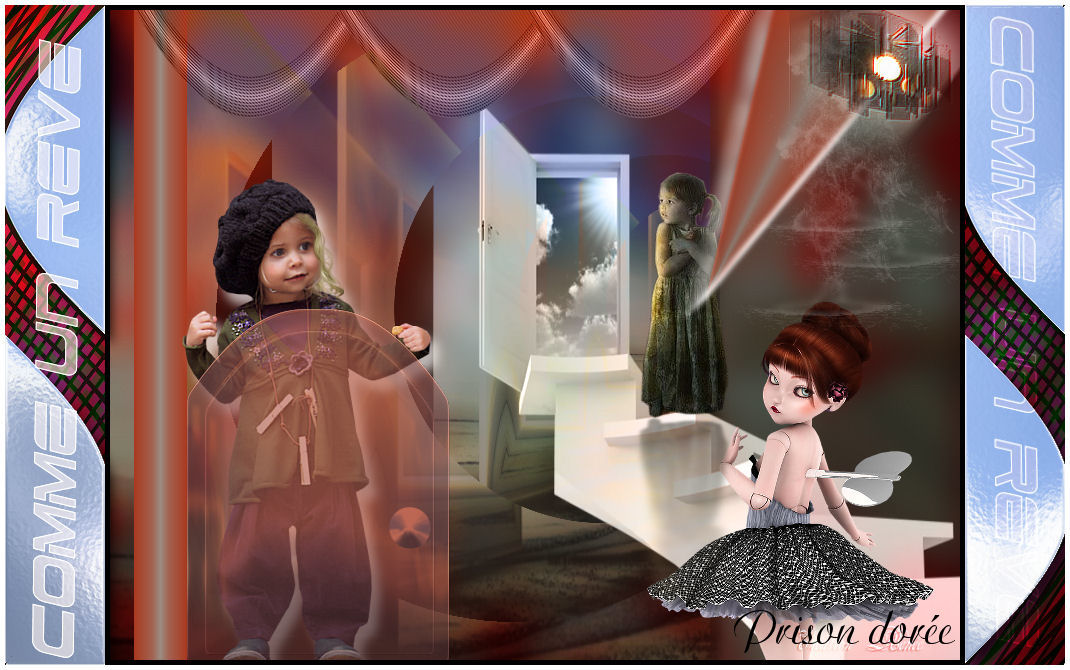
Prison dorée
Let's start the lesson.
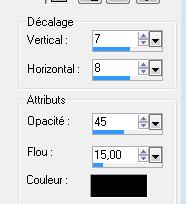
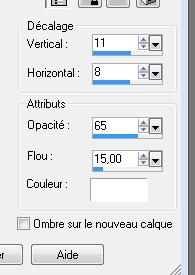
2. Layers- Duplicate /Image Free Rotate 90° to right 3. Effects- 3D Effects-Drop Shadow with these settings
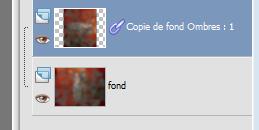
-Repeat: Effects- 3D Effects-Drop Shadow negative -7/-8 shadow on new layer checked 4. Layers- Merge- Merge- Down
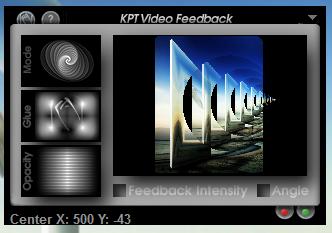
5. Material palette:Set your foreground color to:#b2431c -Set your background color to: #9b8c82 6. Layers- New Raster layer 7. Selections- Select All / Selections Float 8. Layers- New Raster layer 9. Open the tube " image oiseaux fenêtre" Edit-Copy-Edit Paste into selection 10. Selections- Deselect All 11. Effects- Plugins - KPT 3/video feedback( Attention:Do you have problems with this filter ? There is an image in the folder and paste it as a new layer on your working image )
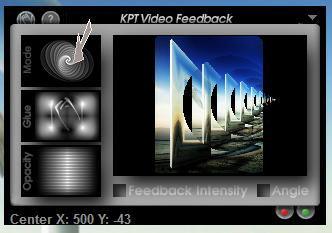
**I will now show you how to proceed 1. Repeat several times , see arrow, until you are satisfied with the result>>>
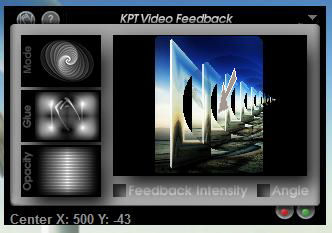
2. In the display, see arrow, while clicking until the result is oké>> *We proceed with the lesson 12. Layers- Merge- Merge- Down Double click on this layer and set the Blendmode to "Soft Light" -Set the layer opacity of this layer to 87% 13. Effects-Image Effects-Offset with these settings H=-150 and V =0 transparent 14.
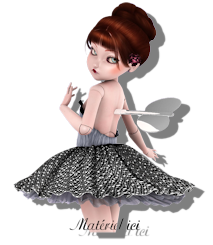
Open the tube « JVDE_trap » - (see finished image) 15.
Open the tube
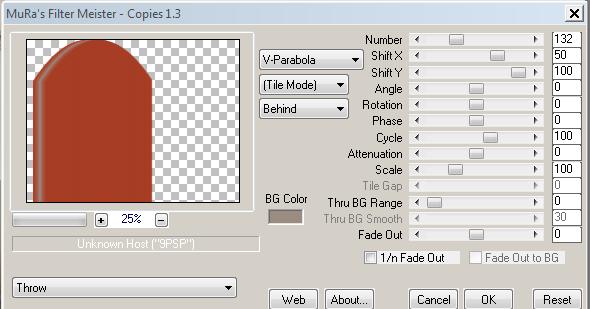
« JVDRdisney 14 »/Image Resize 50% / 16. Open the tube ''colonne'' /Edit/copy- Edit/ paste as new layer on your working image 17. Effects-Image Effects-Offset with these settings H= -271 and V = 0 18. Layer-Duplicate 19. Effects- Plugins - Mura's meister/ copies with these settings
20. Image Resize 55 % /Image Mirror /Edit/copy- Edit/ paste as new layer on your working image and move 21. Effects- Plugins -Eyecandy5 Impact /chrome -Tab Settings/User settings choose my preset: "renee espoir" 22. Layers- Duplicate / Image Resize 80 % / Move Tool- place it in the right place (see the finished image) Layers- Merge- Merge Down /Set the layer opacity of this layer to 62% 23. Open the tube « bouton de porte /Edit/copy- Edit/ paste as new layer on your working image and move 24. Open the tube " fleche espoir"/ Edit/copy- Edit/ paste as new layer on your working image and move 25. Effects- Plugins - Eyecandy 5 Impact /blacklight -Tab Settings/User settings choose my preset: ''espoir2 renee'' 26. Open the tube « voile espoir »/ Edit/copy- Edit/ paste as new layer on your working image and move /Double click on this layer and set the Blendmode to "Luminance" 27. Open the tube « JHanna-193-tube-160809 » / Image Resize 80% -Edit/copy- Edit/ paste as new layer on your working image and move -Layers- Arrange- Move Down underneath raster 5 (the Door ) 28. Effects- 3D Effects-Drop Shadow with these settings
29. Open the tube "filette "/Edit/copy- Edit/ paste as new layer on your working image 30. Open the tube " spot "Edit/copy- Edit/ paste as new layer on your working image and move to the upper right corner 31. Layers- New Raster layer 32. Activate the brush image " pinceaux éclats " in your PSP - File- Export Custom Brush-Give it a name "pinceaux éclats "Activate your Brush Tool and choose the brush " pinceaux éclats " with these settings -Set your foreground color to #ffffff- Apply 2 ore 3 x in the upper right corner by using your foreground color
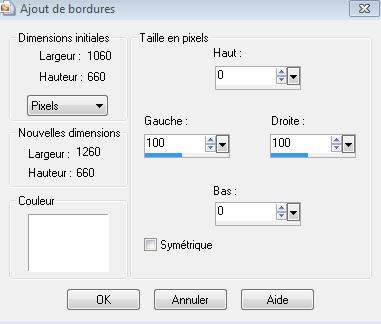
33. Layers- Merge- Merge All 34. Image - Add borders-Symmetric checked: 5 pixels black 35. Image - Add borders-ASymmetric with these settings - white
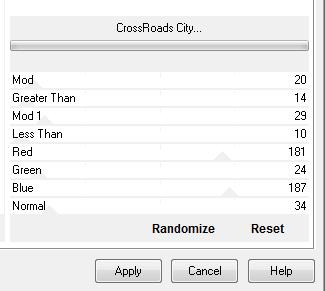
36. With the magic wand select Asymmetric border 37. Open the tube " fond pspimage " / Edit-Copy-Edit paste into selection -Keep selected 38. Effects- Plugins - Unlimited - Andrews 57/CrossRoads city with these settings ..
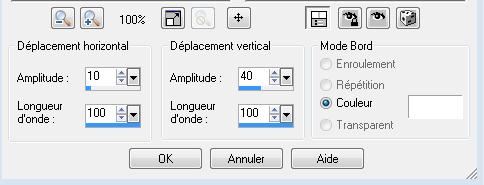
39. Effects- Distortion Effects- Wave with these settings
40. Selections-Deselect All 41. With the magic wand select the white parts 42. Effects- Plugins -Eyecandy 5 Impact / chrome -tab Settings/User settings choose my preset: ''renee espoir 2'' 43. Selections-Deselect All 44. Edit/ Copy-Edit - Paste as new layer on your working image and move 5 white 45. Open the tube "texte " Edit/ Copy-Edit - Paste as new layer on your working image and move to the left side /Double click on this layer and set the Blendmode to "Screen " 46. Layers- Duplicate /Image Mirror /Image Flip /Double click on this layer and set the Blendmode to "Overlay" Save as JPG
Renée
I am part of Tutorial Writers Inc. My tutorials are regularly recordedt . ReneeGraphisme_All rights reserved
*
|
 Translations