|
FILTERS Graphic Plus
Redfield
Emboss 3
Nick Color Effex - Pro 3
Andromeda - Perspective
Xero- Improver
Andromeda - Perspective
Flaming Pear
*
Click here
my
website
*
http://www.reneegraphisme.fr/ |
|
Tubes are of
*
Tchounette
SivinaOrsi
Kitty
Angel Design
*
These tubes were received from tubeurs
sharing groups
Or found by me searching on the net
I am grateful to have been given
permission these beautiful tubes so
please use any copyright information as
needed
If one of these tubes is yours,
Contact me
so I can make a link to your site
or remove it
Thank you Renee
|
|
Materials
link for
download
Click here
 |
|
Before you start
*
Open PSP
Open / tubes duplicate and close originals
Open then Minimize the mask in PSP
Put filters in their proper folders
Brushes and other tools in their respective folders
To import presets / Double-click the file it will
automatically install
|
Let's begin
1. Open a new image 985 x 615 pixels
2. Fill with the color #dbbda5
3. Effects - Graphics Plus - Cross Shadow
4. Layers - duplicate
5. Effects - Redfield - Crackle 3D / (Water Ripples)

6. Layers - Change
the layer mode to Multiply
7. Effects - User Defined Filter - Emboss 3/ default
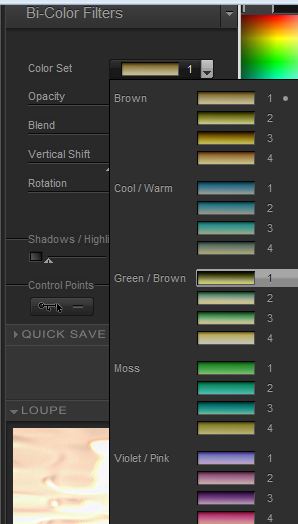
8. Effects - Nik Software - Color Efex Pro - Bi-Color Filters
Green/Brown/ set 1
9. Layers - add a new raster layer
10. Fill with black
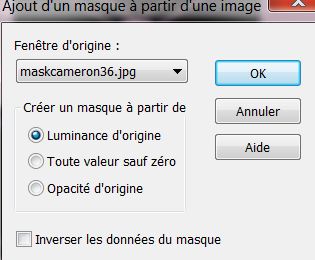
11. Layers - new mask layer from image / open ''maskcameron36''
12. Layers - merge group
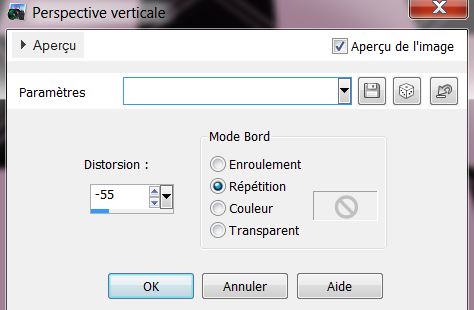
13. Effects - geometric effects - perspective - vertical
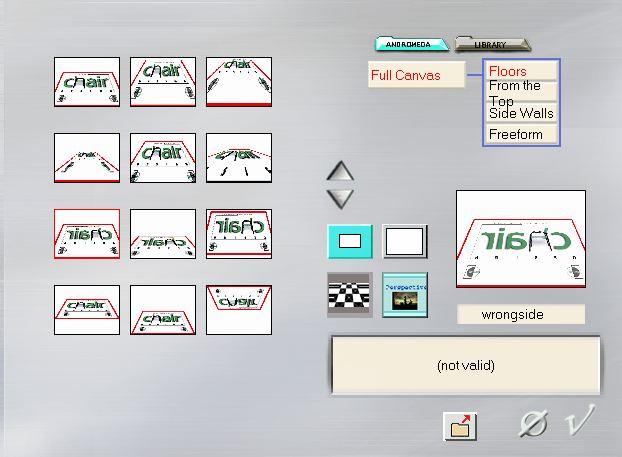
14. Effects - Andromeda/ perspective / Floors / Wrongside
15. With the select/pick tool (K) - scale mode - move lower to
450 pixels, like this

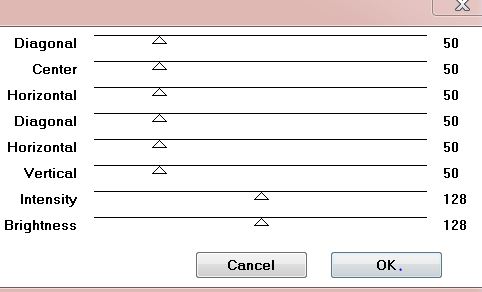
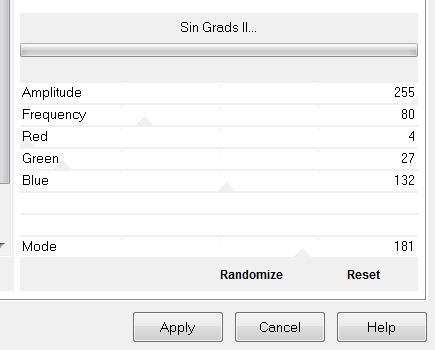
16. Effects - Alf's Power Sines / Sin Grads II
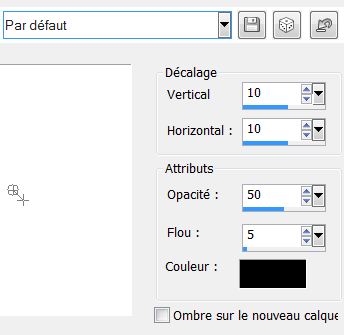
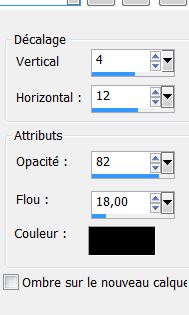
17. Effects - 3-D effect - Drop Shadow. Select the default like
this
18. Open the tube ''TCH-PAY-fantasy004'' and paste as a new
layer
19. Effects - again Nik software/ Color Pro 3 as above but
choose / preset = Brown 1
20. Effect - Xero - Improver / put all the parameters to 10
21. Layers - merge visible
22. Copy "tube_sol" and paste tube as a new layer / move to the
bottom of your image and change the mode to luminance Legacy
23. Layers - add a new layer
24. Selections - load the selection ''renee_pour_eau''
25. Effects - 3 D effects/ Drop Shadow
26. Layers - add a new layer
27. Copy and paste the tube ''chg.4.2604.2011'' into the
selection
28. Selections - Select none
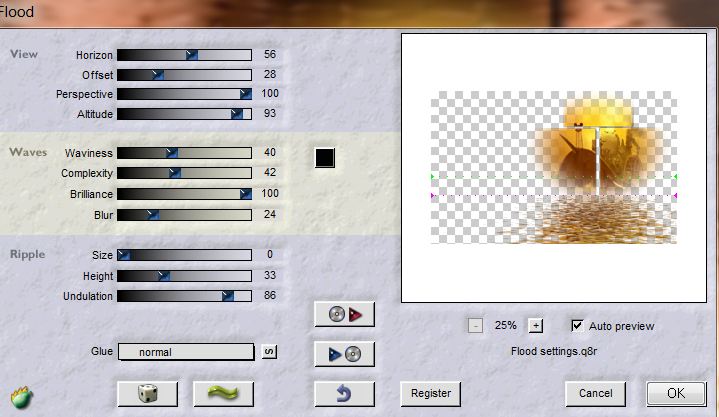
29. Effects - Flaming Pear - Flood
30. Copy and paste the tube ''renee_pour_eau_bulles''
31. Stay on the top layer of the Layers palette
32. Layers - add a new layer
33. Selections - load selection ''renee_pour_eau_1'' fill with
the color #5a4e1b
34. Selections - Select none
35. Effects - distortion effects - wind from the left /
intensity at 100
36.Layers - duplicate / Image - Mirror
37. Open the tube ''KS-3-egs_13 200944de kitty'' Mirror image
and paste as a new layer
- It is in place - now stretch it using the tool (K) as follows
38. Open the tube
''31_silvina_vanesa_orsi'' Image - Mirror Image
39. Copy and Paste as new layer
40. Open the tube ''angeldesign_gouttes2_image_danae'' copy
raster 2 and paste as a new layer
41. Open the tube ''renee_pour_eau fleur'' resize to 65% and
paste as a new layer in place
42. Copy and paste the tube ''renee_pour_eau_goutte_bleu''
43. Copy and paste the tube ''renee_pour_eau_effet rouge'' move
to a good place on the right / lower its opacity to 79
44. Layers - Merge Visible
45. Image - add borders 3 pixels black
46. Image - add borders 50 pixels white
47. Copy and paste tube ''renee_pour_eau_cadre_4 boules''
48. Using the enclosed font with a white foreground and the
background the color #8a1112
- write your title
*-*-*
Lesson over
Thanks
Sally
*
I am part of tutorial writers inc.
My tutorials are regularly recorded


|
Your Gallerie
ckick here
 |