|
New
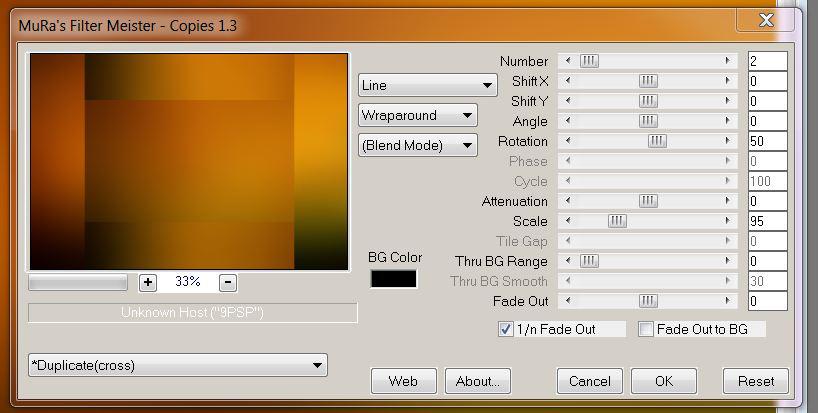
1. Material Properties: Foreground color to #5f3d03 Background color to #e9b249 2. Open the Background image : '' la foret de tina -fond1"- Window Duplicate-Promote Background Layer =Raster 1'' 3. Effects- Plugins - Mura's Meister - Copies 1.3 with these settings
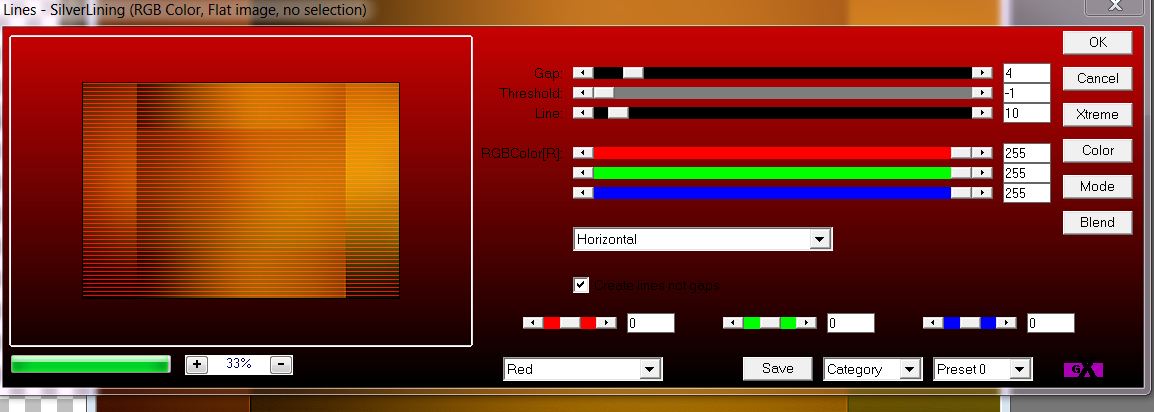
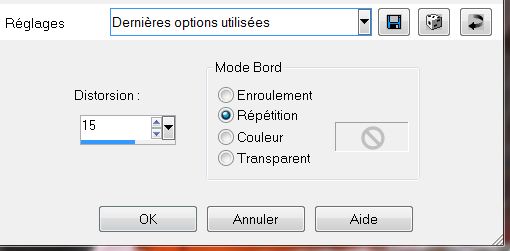
4. Effects- Plugins -AP 01 - Line Silverling with these settings
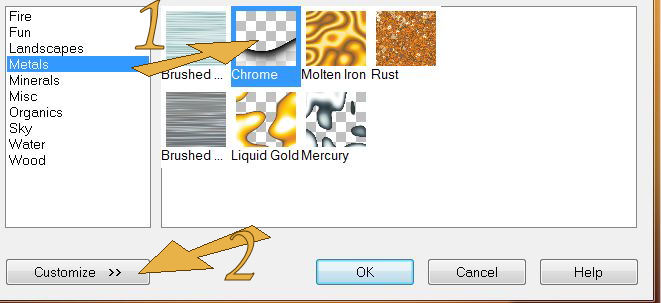
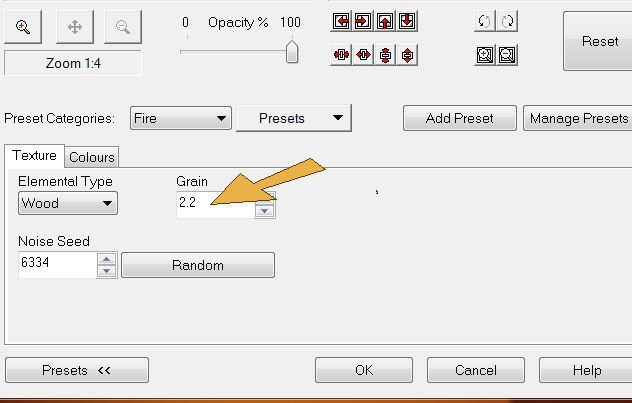
5. Layers- Duplicate 6. Effects- Plugins -Xe Xtras- Effet X elemental>>>Metal Chrome >>Customize> Grain a 2.2 >>OK with these settings
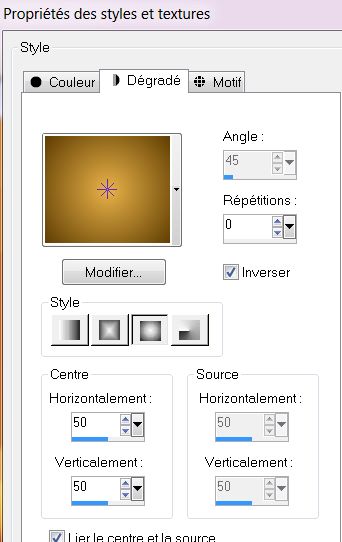
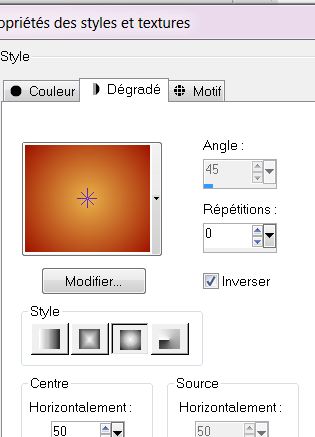
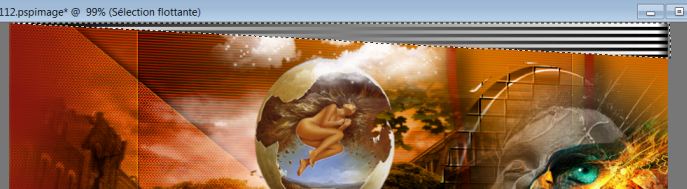
7. Layer Palette -Double click on this layer and set the Blendmode to Hard Light 8. Image Flip -Activate your Pick Tool (K) Mode Scale -Push downwards to 350 9. Layers- Duplicate 10. Effects- Image Effects- Offset with these settings: H= 0 and V = 35 Transparent 11. Layers- Merge-Merge Down 12. Activate the top of the Layer Palette 13. Layers- New raster layer 14. Selections - load/save selection - load selection from disk and choose my selection: ''renee_la foret de Tina 1 '' -Prepare a sunburst gradient configured like this.
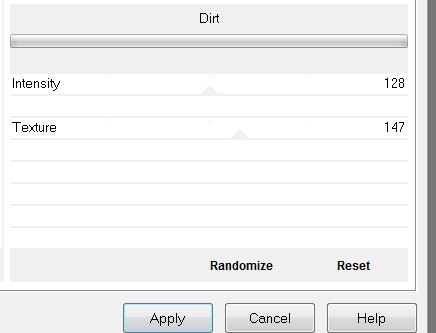
15. Activate Flood Fill Tool and fill the selection with the gradient 16. Effects- Plugins- ICNET Filters - Special Effects 1- Shiver to 46/0 17. Effects- Edge Effects- Enhance 18. Effects- Plugins -Unlimited - Photo Agin kit - Dirt
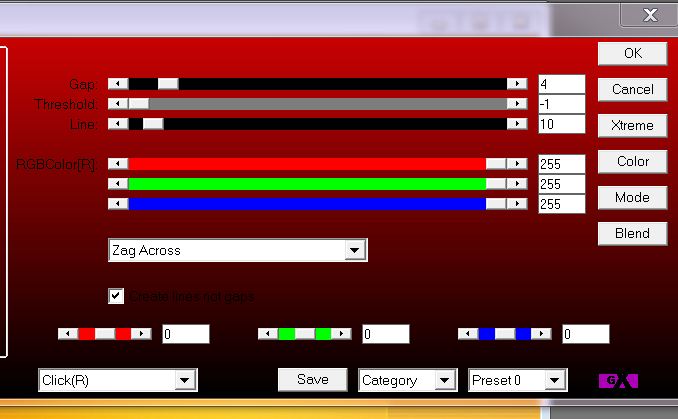
19. Effects- Plugins - AP 01 - lines Siverling with these settings >> Output,click « Dark2 » «click(R) »
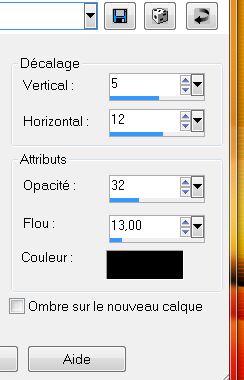
20. Layer Palette -Double click on this layer and set the Blendmode to Hard Light 21. Selections- Deselect All 22. Effects- 3D Effects- Drop Shadow with these settings
23. Material of the foreground -Chance the foreground color into this color #9e1200 24. Layers- New raster layer 25. Selections - load/save selection - load selection from disk and choose my selection: ''renee_la foret de Tina 2'' Prepare a Sunburst Gradient as configured- Activate Flood Fill Tool and fill the selection with the gradient
26. Selections- Deselect All 27. Effects- Plugins -Eye Candy 5
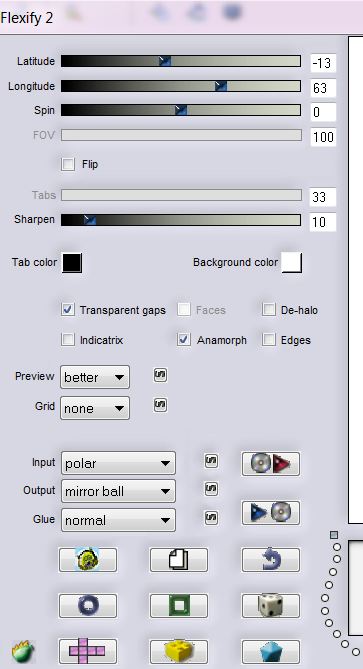
Nature - Drip 28. Effects- Plugins - Eye Candy 5 -Impact - perspective shadow – Preset - Drop shadow lowest 29. Layers- Duplicate 30. Layer Palette -Double click on this layer and set the Blendmode to Multiply and set the layer opacity of this layer to 89% 31. Activate copy of raster 2 set the Blendmode to Normal 32. Effects- Plugins - FLAMING PEAR - flexify2 with these settings
33. Effects- Plugins -Eye candy 5 - Texture -tab Settings/User settings choose my preset''renee_la foret de tina texture / Wood'' - Layer Palette -Double click on this layer and set the Blendmode to Luminance Legacy -With your move tool move to the right side as shown in the example below
34. Effects- User Defined Filter- – Emboss 3 using the default settings 35. Activate the top of the layer palette 36. Layers-New raster layer 37. Selections - load/save selection - load selection from disk and choose my selection: ''renee_la foret de tina 3'' 38. Open the tube ''T.Reagen1937_16-10-12 ''/ Edit/copy-Edit paste into selection 39. Layer Palette -Double click on this layer and set the Blendmode to Hard Light and set the layer opacity of this layer to 95% 40. Open the tube ''Treagen2234_29-09-12'' Edit/copy-Edit paste as a new layer on your working area-With your move tool move to the right side 41. Layers- Arrange- Move down -underneath copy of raster 2 as shown in the example below
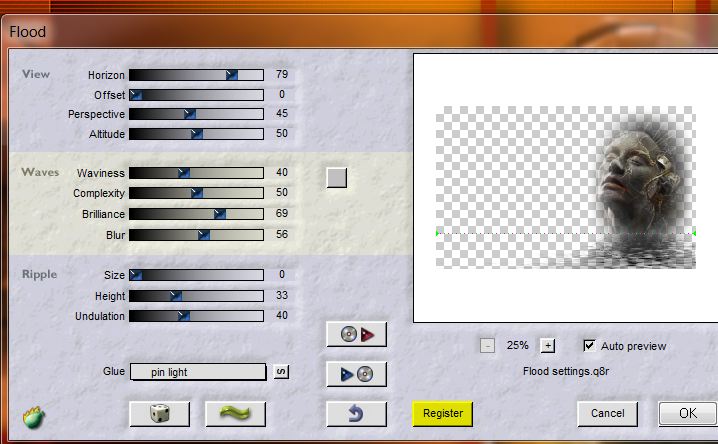
42. Activate raster 4 - Effects- Plugins -Flaming pear flood with these settings If you do not have« glue pin light », use « lighten »
43. Open the tube ''Bird from Treagen_3363'' / Image Mirror Edit/copy-Edit paste as a new layer on your working area - With your move tool move to the right side as shown in the example below
44. Layer Palette -Double click on this layer and set the Blendmode to Hard Light 45. Layers- New raster layer 46. Open the Brush :''la foret de tina 2'' FG-Color #841716 - If the brush does not work the tube is into the zipfile ( set the blend mode to Luminance Legacy) - You will configure your brush like this **attention blend mode to Luminance Legacy
-Place it in the top left corner with your foreground color as shown in the example below /Stamp twice for a better effect
47. Open the tube ''Treagen2219_26_08_012'' Image Resize 2 x to 65 % Edit/copy-Edit paste as a new layer on your working area - With your move tool move as shown in the example below
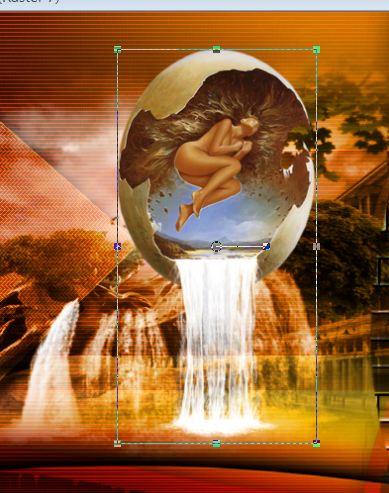
48. Open the tube ''Treagen2038_20-10-12'' - Image Resize with 65%,-Edit/copy-Edit paste as a new layer on your working area and move 49. Open the tube ''partie mur .pspimage '' Edit/copy-Edit paste as a new layer on your working area and move 50. Open the tube ''Treagen2005_29_09_012 '' Image Resize with 45% / Image Mirror /Edit/copy-Edit paste as a new layer on your working area and move 51. Layers- Merge-Merge Visible 52. Effects- Geometric Effects -Perspective horizontale with these settings
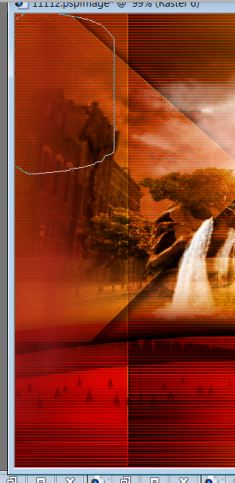
53. Activate Freehand Selection -Lasso- draw a selection like this 54. Selections- Promote selection to layer 55. Effects- Plugins- L& K's - Trouble - click Reset and OK
56. Selections- Deselect All 57. Effects- 3 D Effects- Drop Shadow with the same settings 58. Open the tube ''nuage la foret de tina '' Edit/copy-Edit paste as a new layer on your working area and move 59. Image - Add borders-Symmetric checked:2 pixels white 60. Image - Add borders-Symmetric checked:25 pixels #841716 61. Image - Add borders-Symmetric checked:2 pixels white 62. Image - Add borders-Symmetric checked:2 pixels #841716 63. Image - Add borders-Symmetric checked:2 pixels white 64. Image - Add borders-Symmetric checked:50 pixels #841716 65. Activate the tube "text "/Edit/copy-Edit paste as a new layer on your working area / Ore write your own text ( Font is included into the zipfile) 66. Image - Add borders-Symmetric checked:2 pixels white Save as JPG I hope you enjoyed this lesson Renée This lesson was written by Renée 3/12/2014 Placing 10/2012 *
Any resemblance with an existing lesson is merely a coincidence * * Don't forget to thank the people who work for us and with us. I named the tubeurs - Testers and the translators. Thanks Renée. *
* I am part of Tutorial Writers Inc. My tutorials are regularly recorded. ReneeGraphisme_All rights reserved
*
|
 Translations


 Let's start the lesson.