|
Let's begin
1. Open the image ''flute_de_pan_fond.jpg''/Promote to background layer raster 1
2. Layers - new raster layer / Color Palette: Flood Fill Tool: Fill the layer with black
3. Layers-New Mask Layer from Image ''flute_de_pan_image529'' 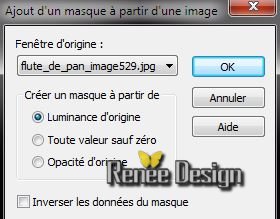
4. Effects - Edge effects-Enhance More/Layers- Merge-Merge group
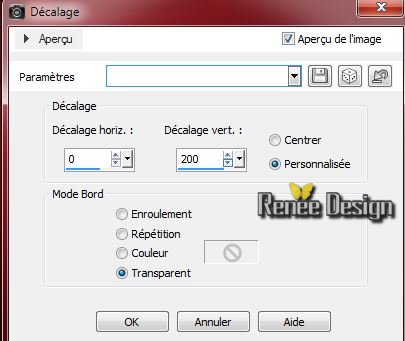
5.
Effects- Image Effects-Offset
6. Layers-Duplicate
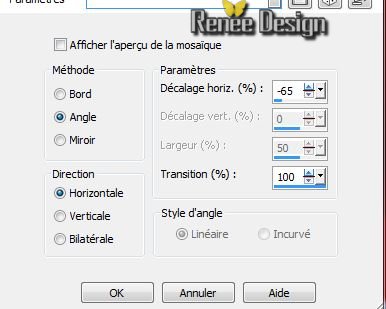
7. Effects -Image Effects-Seamless Tiling

Repeat- Effet -Image Effects-Seamless Tiling
8.Effects - Geometrie Effects- Circle. Edgemode - Transparent
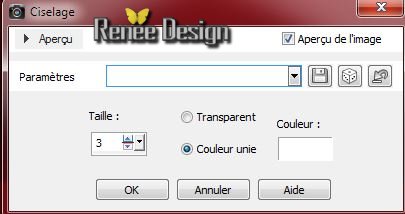
9. Effects - 3D Effects- Chisel
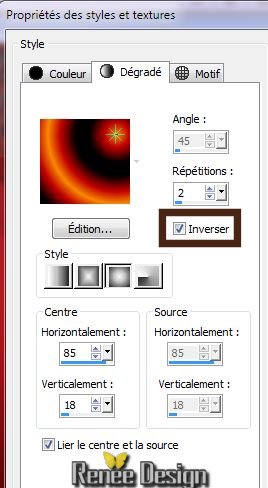
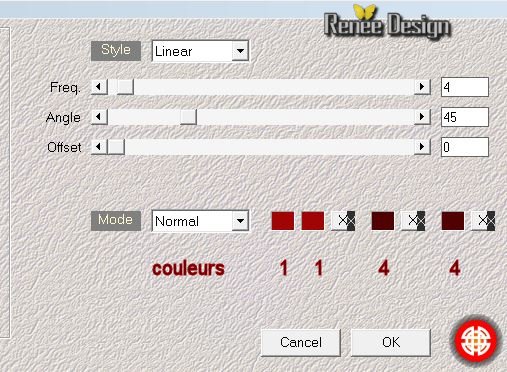
10.Properties foreground:Foregroundcolor gradient
""@ann_1240911_GR_Svetlana-TDStudio''
Prepare a sunburst gradient configured like this
11. Layers-New Rasterlayer
12. Selections - load/save selection - load selection from disk and choose'
''flute_pan_1''/Flood Fill Tool :Fill the selection with the gradient (1 click)
13.Selections - select none
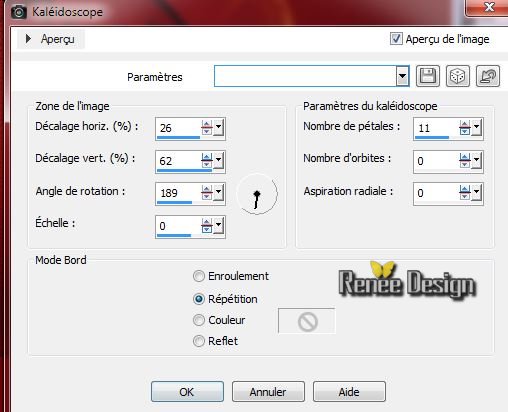
14 .Effects - Reflections Effects-Kaleidoscope
15.Open the tube ''nicole-mist-paysage-26-2012'' edit/ copy- edit/ paste as new layer (well placed)- Arrange layer above raster1
Stay on top of the layer in your layer palette
16. Open the tube
''flute_de_pan_image2 '' edit/ copy- edit/ paste as new layer.Pick Tool : Place to have this result
17. Blend Mode of this layer : Luminance ( Legacy)
and the opacity to 67%
18. Open the tube "nicole-etrange23-2013'' /edit/ copy- edit/ paste as new layer / Pick Tool: place on the left, and the opacity to 77%
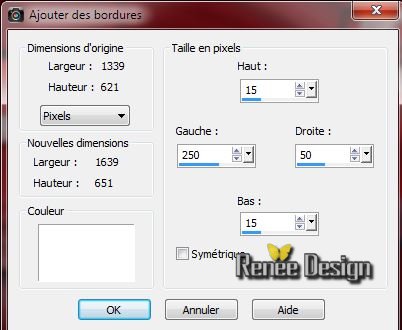
19. Image add borders on 4 pixels black/Promote to background layer = Raster 1
20. Layers-Duplicate
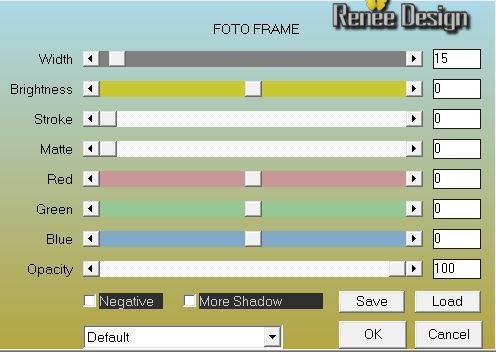
21. Effects - Plugins AAA Frame - Foto Frame
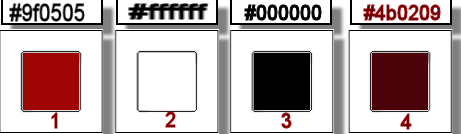
22. Image -Layers resize 65% (Resize all the layers NOT checked).
23. Layers-Duplicate
24. Image -Layers resize 32% (Resize all the layers NOT checked).
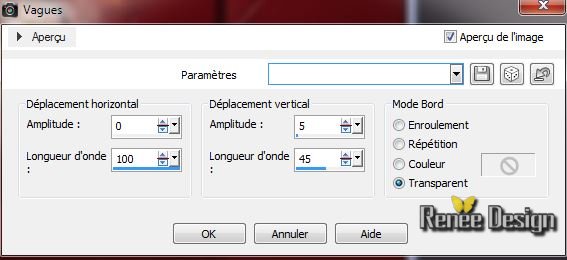
25. Effects - Distortion Effects- Wave
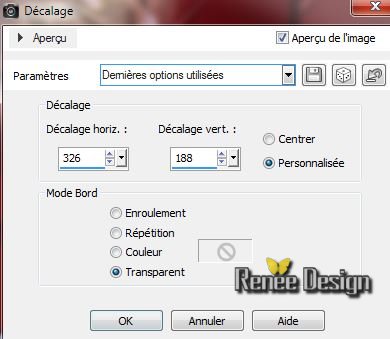
26. Effects - Image Effects -Offset
27.Layers-Duplicate
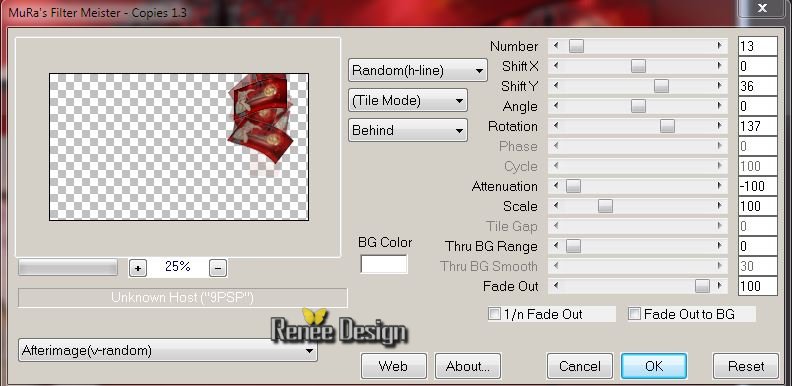
28. Effects - Plugins Mura's Meister - Copies
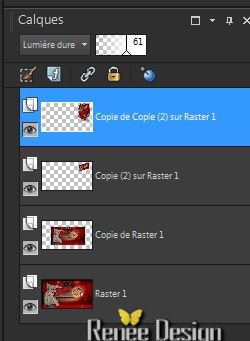
29. Blend-Mode of this layer : "Hard Light" and the opacity 61%
This is the result
30. Activate your bottom layer in your layer palette (raster 1)
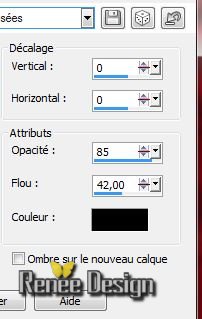
31. Properties foreground: Foregroundcolor to (no 1) #9f0505 Backgroundcolor to no 4) #4b0209
32. Effects-Plugins Medhi- Wavy Lab 1.2
Numbers correspond to order of the colors in the palette of colors in the tube 1
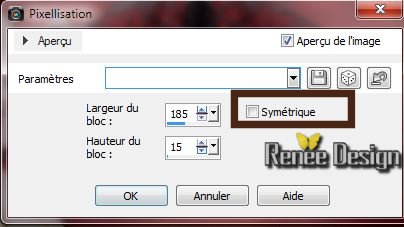
33. Effects - Distortion Effects - Pixelate
34. Effects - Edge Effects -Enhance More
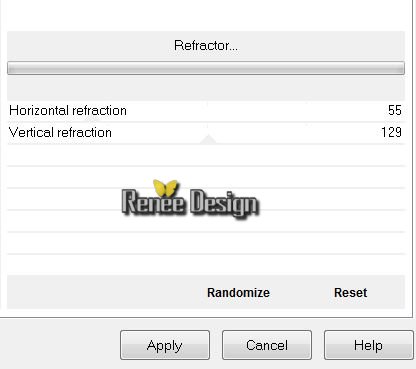
35. Effects-Plugins Unlimited -Filter Factory Gallery M /
Refractor
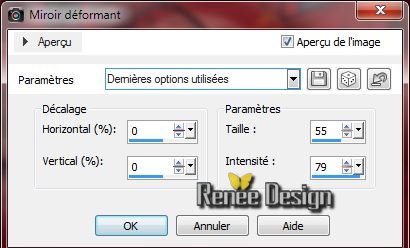
36. Effects-Plugins Simple Pizza slice Mirror / Repeat
37. Layers-Duplicate/ Stay on this layer (copy of raster 1)
38. Selections - load/save selection - load selection from disk and choose''
flute_pan_2''
39.
Delete
40.
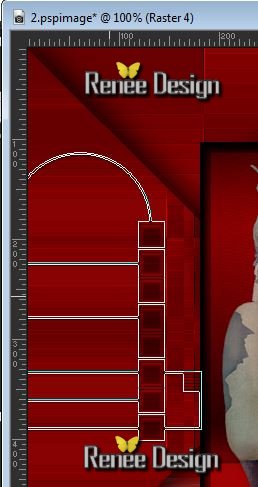
Selections-Invert
41. Effects - 3D Effects / dropshadow , with these settings / Repeat: with these settings
42.Selections - select none
43. Layers-Duplicate
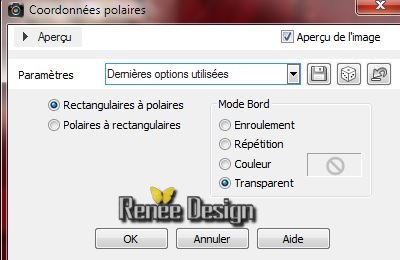
44. Effects -Distortions Effects-Polar Coordinates with these settingss
45. Layers-Merge-Merge Down
This is the result

46. Effects - Distortion Effects -Warp
47.Back on the bottom layer (Raster1)
48. Layers-New Raster layer . Flood Fill Toll: Fill the layer with white #ffffff
49. Layers-New Mask Layer from Image ''flute_pan_image 80991.jpg''
50. Layers- Merge-Merge group/ Effects - Edge Effects-Enhance
51. Layer-Duplicate -Image Mirror /Layers-Merge-Merge Down
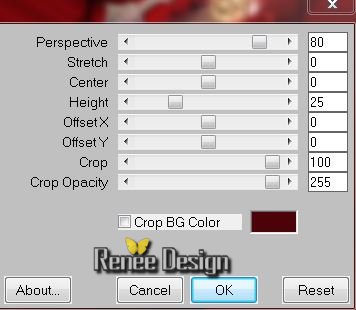
52. Effects - Plugins Mura's Meister - Perspective Tilling
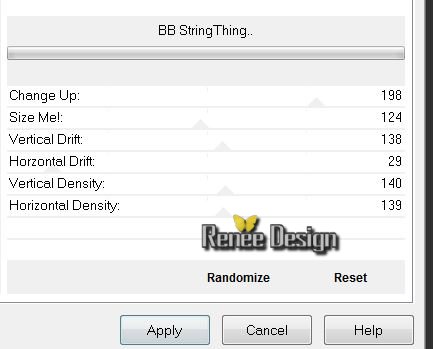
53.Effects -Plugins Unlimited -&<BKG Designer sf10I>/ BB
String Thing
54. Activate your bottom layer in your layer palette (Raster 1)
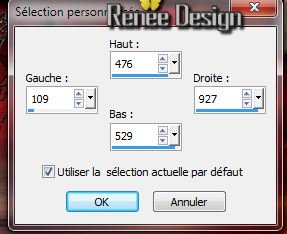
55. Selections / Custom selection (K) and go here

clic ici 
Selections-Custom selection with these settings
56. Selections-Promote Selection To Layer
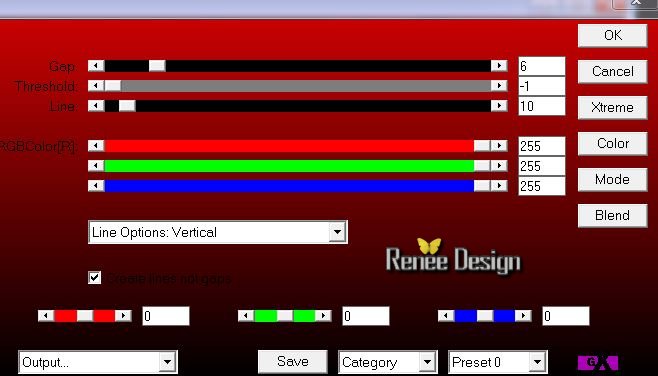
57. Effects - Plugins AP01 (Innovation) - Line
Silverling
58. Selections-select none
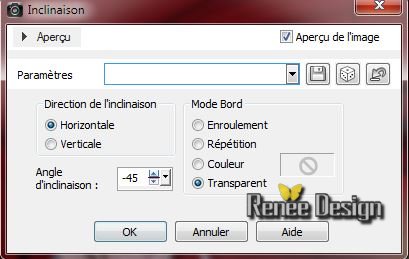
59. Effects - Geometric Effects -Skew
60. Layers-Duplicate -Image Mirror / Layers-Merge-Merge Down
61.Effects - Distorsion Effects -Wave (with the same settings as point 25
)
Activate your top layer
62. Open the tube "nicole_etrange_velo'-se placed on the bottom layer of the tube/edit/ copy- edit/ paste as new layer and place
63. Open the tube ''12926131117_animaux_nikita
''Resize 30 %/edit/ copy- edit/ paste as new layer /Image mirror -and place
64. Paint Brush Tool ''flute_pan_brush1''
-File-Export-Custom Brush-give it a name
65. Layers - new raster layer -Open the Brush ''flute_pan_brush1 /and place the Brush on your image as in the example

66. Layers-Duplicate/Layers-Merge-Merge Down
67. Layers - new raster layer / Paint Brush Tool: Look for the brush:
''flute_pan_brush_2'' File-Export-Custom Brush-give it a name
Open the Paint Brush Tool /Size 185
color black/ and place the brush on your image as in the example

68.Layers / merge / merge all flatten
69.
Image - add borders symmetric 3 pixels color black
70. Image - add borders asymmetrical color white
71. Magic wand
Click with your magic wand in the in the white border
72. Layers - new raster layer /Flood Fill Tool: Fill the selection with your color (no4') #4b0209
73. Effects-Plugins Simple -Zoom out and flip
74. Selections-Invert
75.
Effects - 3D Effects / Dropshadow , with these settings 0/0/50/15 black
76. Selections-Select-none
77. Layers - New raster layer
 78.
Selections - load/save selection - load selection from disk and choose ''flute_pan_3' - Flood Fill Tool: Fill the selection with your black color 78.
Selections - load/save selection - load selection from disk and choose ''flute_pan_3' - Flood Fill Tool: Fill the selection with your black color
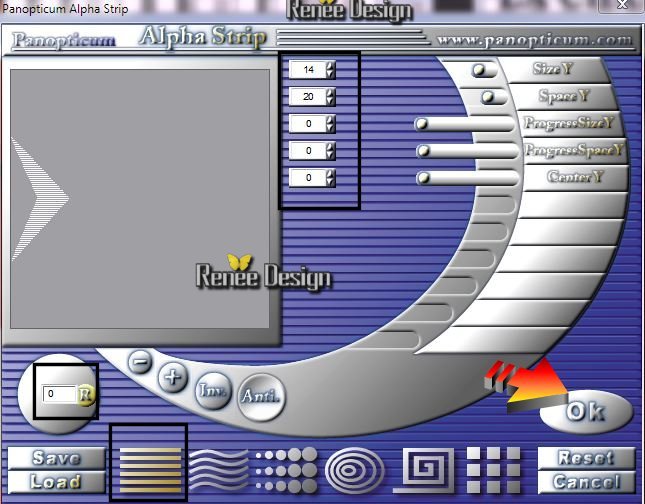
79. Effects - Plugins Panopticum /Pan Alpha Strip
80.
Effects - 3D Effects / Dropshadow /3D Effects / Dropshadow
81. Open the tube ''nicole-personnage54-2013''-Image
resize 60% .edit/ copy- edit/ paste as new layer
82. Layers - merge - merge all
83.
Image - add borders symmetric 10 pixels black
84. Open your text. edit/ copy- edit/ paste as new layer
85. Effects - 3D Effects / Dropshadow /3D Effects / Dropshadow
86. Layers - Merge - Merge all
87. Image Resize to 1015 Pixels width
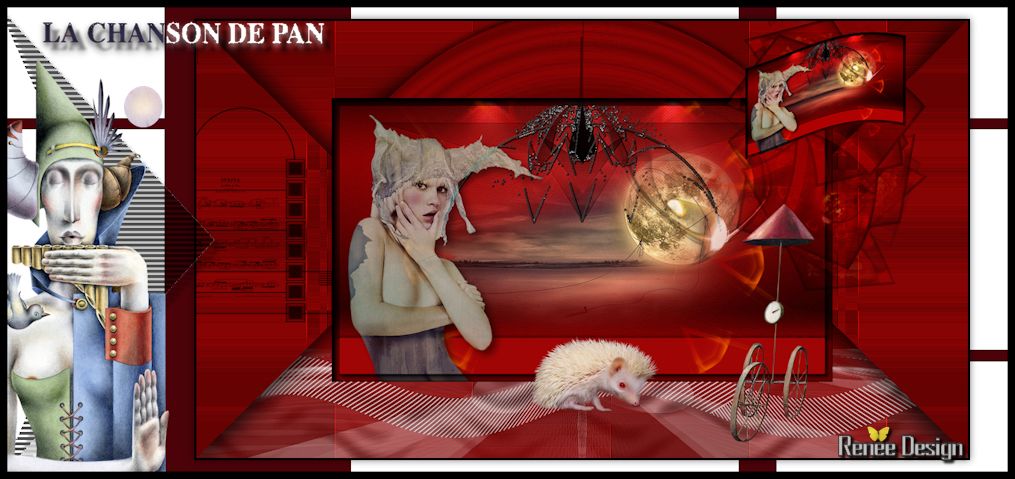
Lesson over Thanks
This lesson was written by Renées
Renée
8/12/2013
Created the
le 18/12/2013
*
Any resemblance with an existing lesson is merely a coincidence
Don't forget to thank the people who work for us and with us.
I named the tubeurs - Testers and the translators
Thank you

| 

 Translation