|
New
Translations here
Kendra
Let's start the lesson. 1. File - New - Open a new transparent image of 920 x 520 pixels 2. Color Palette: Set your Foregroundcolor to #daccae /Set your Backgroundcolor to #a47c3f - Properties Forground; Set your Foregroundcolor to forground-background linear gradient, with these settings 135/2 reverse checked 3. Effects- Plugins -VM Distorsion - Flipper
4. Effects- Plugins - Unlimited -Scribe -4 Way mirror 5. Effects- Edge Effects- Enhance More 6. Effects- Plugins - Scribe -Swich You can colorize it now
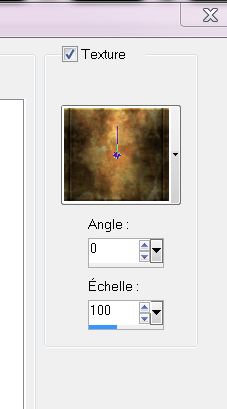
7. Effects- Plugins – Simple – Quick Tile 8. Selections/selections load/save-load selection from disk, look for selection "reneekendra'' 9. Selections- Promote selection to layer 10. Properties Forground; Set your Foregroundcolor to white- with texture and select my file : texture ''69 gold_pracken'' use settings below .
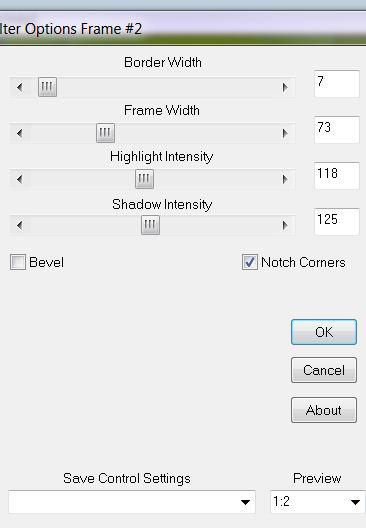
-Floodfill tool: fill the selection with the foreground texture 12. Effects- Plugins- Bordermania - Filter Options Frame #2
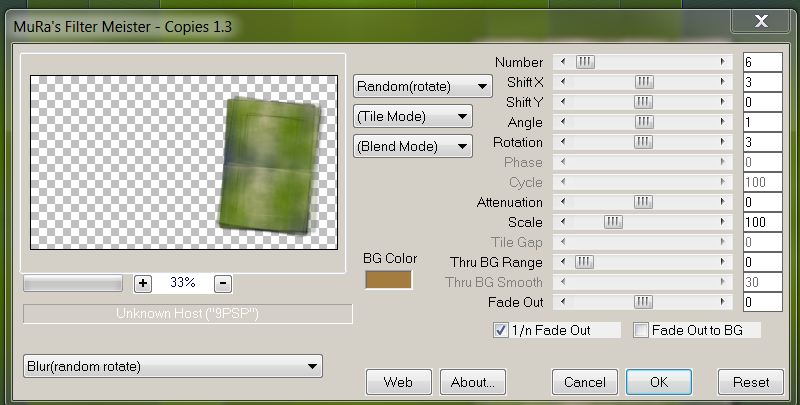
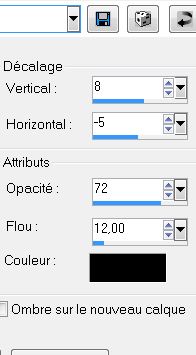
13. Selections- Deselect All 14. Effects - 3D Effects - Drop shadow with these settings 3/3/72/8 black 15. Effects-Plugins - Mura's Meister - copies use settings below
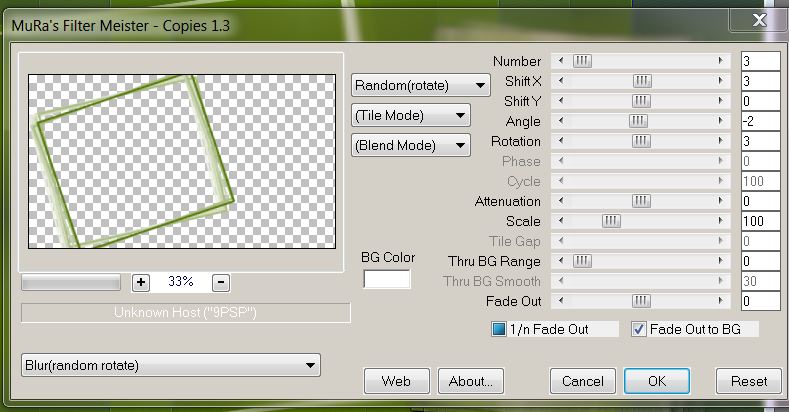
16. Layers - New Raster layer 17. Selections/selections load/save-load selection from disk, look for selection ''renee- kendra1'' - Activate Flood Fill Tool and fill the selection with this color #547706 18. Selections- Deselect All 19. Effects- Plugins -Mura's Meister copies use settings below
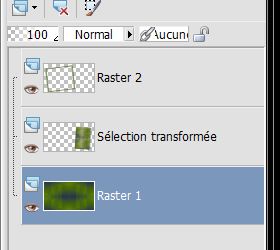
20. Effects - 3D Effects - Drop shadow with the same settings - Your layers palette should look like this now
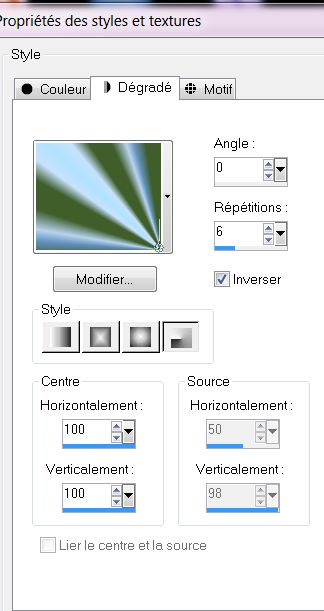
21. In the Layer Palette: activate raster 2/Layers- Duplicate 22. Effects- Plugins -Simple - Center Tile 23. Layers- Arrange- Move 2x down /Layer Palette -Double click on this layer and set the Blendmode to Hard Light and set the layer opacity of this layer to 89% 24. Effects- Plugins -Eyecandy 6 - Glass - - Activate the top of the Layer Palette 25. Layers - New Raster layer 26. Change foreground material into a radial gradient and select ''renee_Kendra_1'' with these settings
27.Selections/selections load/save-load selection from disk, look for selection ''renee-kendra2 » -Activate Flood Fill Tool and fill the selection with the gradient 28. Selections- Deselect All 29. Effects - 3D Effects - Drop shadow with these settings
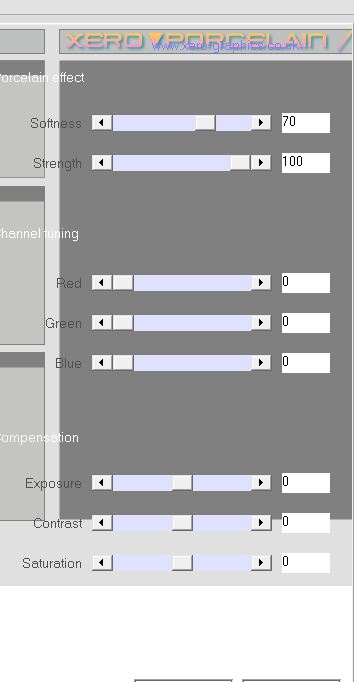
30. Effects-Plugins XERO XP -Porcelaine with these settings
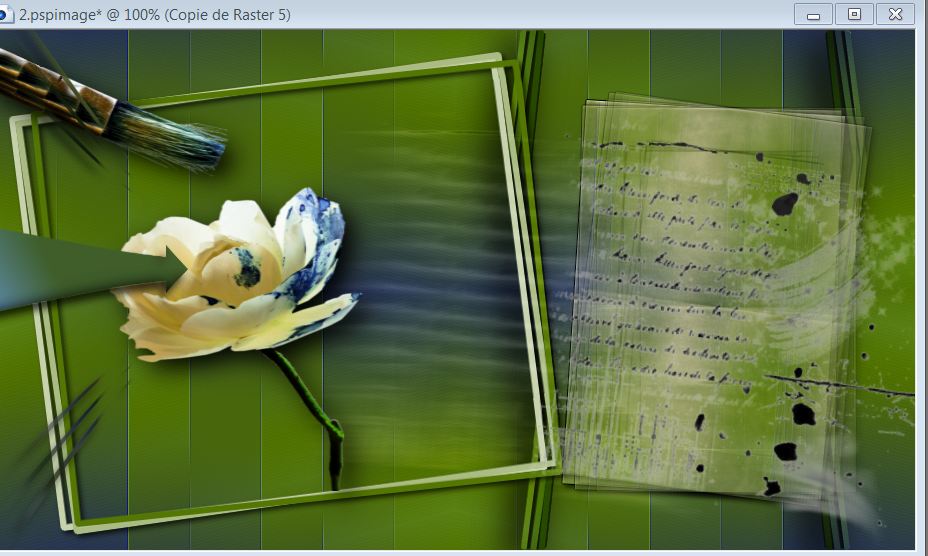
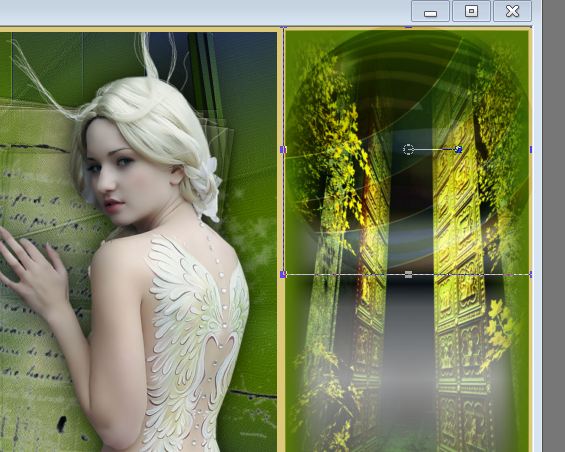
** if you do not have this filter Xero take a newer from my website ** 31. Open the ube ''calguiflowerrose07102012'' activate raster 1 of the tube- Edit/copy -Edit - Paste as new layer on your working area. With your move tool move to the left 32. Layers- Arrange- Move Down (under raster 3) - In the layer palette: activate raster 2 and gently erase part covering the brush 33.Open the tube ''renee-kendra-lettre'' -Edit /copy -Edit - Paste as new layer on your working area. With your move tool move to the right side 34. Layers- Duplicate - Layers- Arrange- Move Down 35. Effects-Distortion Effects- Wind from left to 100 - Move this to the left -and set the Blendmode to Soft Light - Your work look like this now
36. Open the tube ''renee-kendra-rayons'' Edit/copy-Edit paste as a new layer on your working area. Do not move -Set the Blendmode to Soft Light 37. Effects- User Defined Filter-Emboss 3/ using the default settings 38. Open the tube ''cal-gui-angel-winter-14112008'' / Image Resize with 60% Edit/copy-Edit paste as a new layer on your working area and move 39. Effects- Plugins -EyeCandy5-Impact
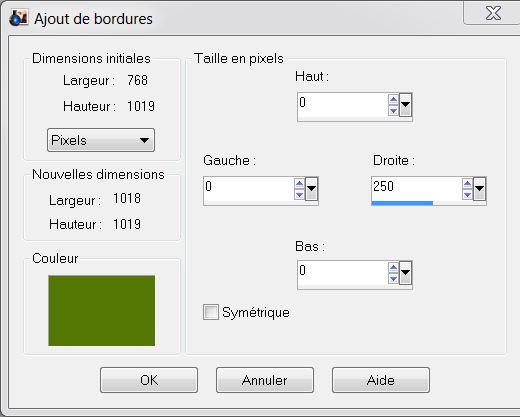
-perspective shadow - 40. Open the tube ''renee-kendra- barre ondulée'' - Edit/copy-Edit paste as a new layer on your working area and move 41. Layers- Merge- Merge Visible 42. Image - Add borders-Symmetric checked: 5 pixels #dbc878 43. Image - Add borders- Asymmetric with these settings /color #547706
44. Activate Magic Wand and select the border of 250 pixels 45. Layers - New Raster layer 46. Open the tube ''TReagen2224_14_09_012'' - Image Mirror - Edit/copy-Edit paste into selection 47. Selections-Modify-Select-Selection Borders with these settings - Both side
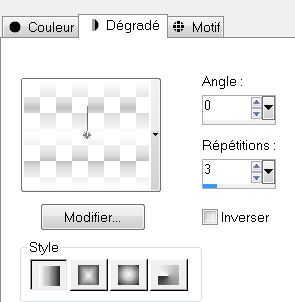
48. Activate Flood Fill Tool and fill the selection with this color #dbc878 49. Selections- Deselect All 50. Layers - New Raster layer 51. Selections/selections load/save-load selection from disk, look for selection ''renee-kendra -3'' 52. Change foreground material into a white fading foreground radial gradient with these settings
53. Activate Flood Fill Tool and fill the selection with the fading foreground gradient 54. Selections- Deselect All - Set the layer opacity of this layer to 60% 55. Open the tube ''AD-By-Happy ''Edit - Copy -Edit - Paste as new layer on your working area. With your move tool move to the upper right side as shown in the example below - Layer Palette -Double click on this layer and set the Blendmode to Soft Light
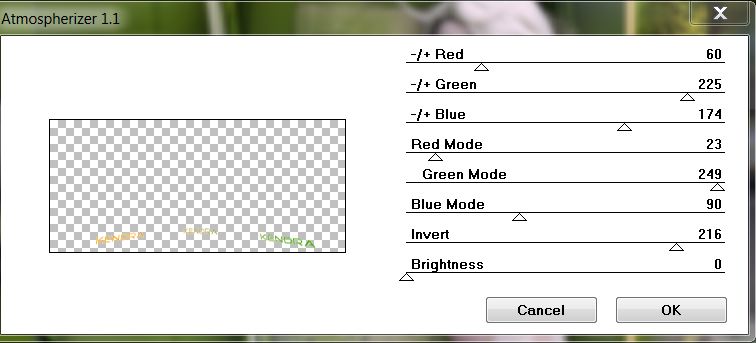
56. Open the tube ''rene-kendra-echelle''/Edit/copy -Edit - Paste as new layer on your working area . - Place it in the right place 57. Open the tube ''Treagen_2670 '' merge raster 3 and 1 '' Image Resize with 60 % Edit -Copy -Edit - Paste as new layer on your working area . Double click on this layer and set the Blendmode to Luminance Legacy and set the layer opacity of this layer to 78% 58. Open the tube ''renee-kendra-titre ''Edit/copy-Edit paste as a new layer on your working area / Ore write your own text 59. Effects- Plugins – Unlimited - Color rave – Atmospherizer1.1
60. Effects-3D effects-Drop Shadow with these settings 2/ -3 / 45 /5 black 61. Image - Add borders-Symmetric checked: 25 pixels #547706 Save as JPG
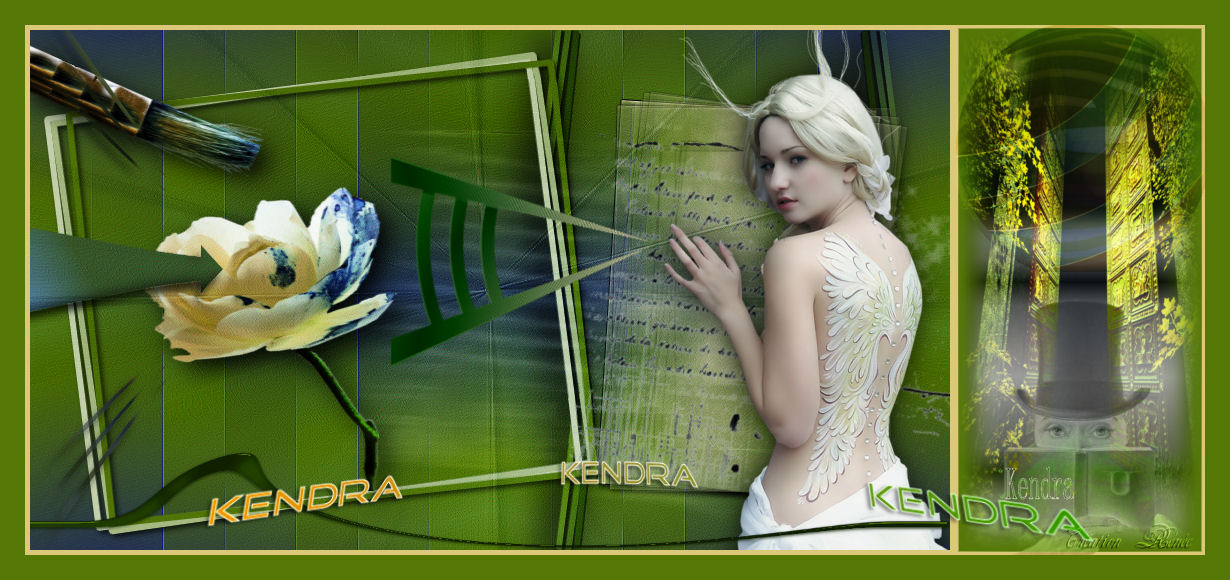
I hope you enjoyed this lesson Renée This lesson was written by Renée Placing 11 october 2012 *
Any resemblance with an existing lesson is merely a coincidence * * Don't forget to thank the people who work for us and with us. I named the tubeurs - Testers and the translators. Thanks Renée. *
I am part of Tutorial Writers Inc. My tutorials are regularly recorded. ReneeGraphisme_All rights reserved
*
|
 Translations