|
I would like to know what you
think...

Translated by Sally
*
Materials
for download here
Filters used
Dragon Fly / SinedotsII
Filter Factory GalleryB / Fluttering Flag
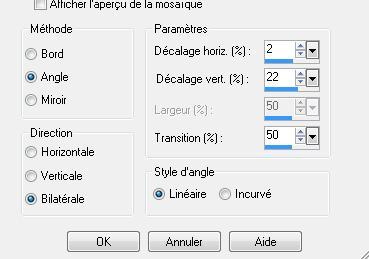
Frischluft Flair / Mosaic Plane V.1.1
DBS Flux / Radical Warp Filter
Greg's Factory Output Volume II / Pool Shadow
You can find them here:
http://www.reneegraphisme.fr/filtres/Mes filtres.html
*
TUBES
*
Reverie - Cat - Mariel and
masks from Narah
*
These tubes were
received from tubeurs sharing groups
Or found by me
searching on the net
I am grateful to have
been given permission these beautiful tubes so
please use any
copyright information as needed
If one of these tubes
is yours,
Contact me
so I can make a link
to your site
or remove it
Thank you Renee
*
|
Before you start
*
Open PSP
Open / tubes duplicate and close originals
Open then Minimize the mask in PSP
Put filters in their proper folders
Brushes and other tools in their respective folders
To import presets / Double-click the file it will
automatically install
|
Let's begin
1. Open the tube "fond astre" - Duplicate and close the original
2. Layers - new raster layer
3. Change your foreground color to #ffffff - flood fill tool with
the following settings

4. Layers - New mask layer from image - "1217491258 masques"
Check Source Luminance - Effects - edge effects/enhance - Layers -
merge group
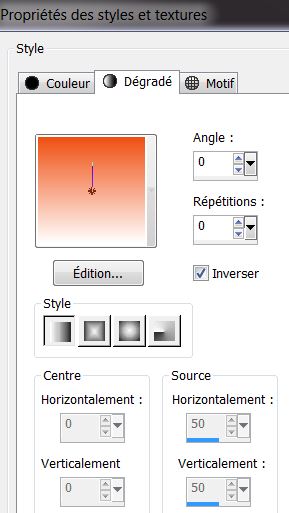
5. Change the foreground color to #ef5012 and background color to #ffffff
6. Create a linear gradient as follows
7. Layers - new raster layer - load selection from disk
"renee_space1" - fill with the gradient using the following settings
8. Effects - Texture effects - blinds/ color black
9. Selections - select none
10. Effects - Distortion effects - Twirl to 405 degrees
11. Effects - Image effects - seamless tiling
12. Adjust - Sharpness - sharpen
13. Layers - Duplicate - Image - mirror
14. Layers - merge down - change to hard light mode
15. Open tube "kat_0324" - Paste as a new layer - change blend mode
to screen and opacity to 93
16. Open tube "128506086_feerie" - Paste as new layer. Image -
mirror/ move into place in the left corner
Move this layer down twice under raster1
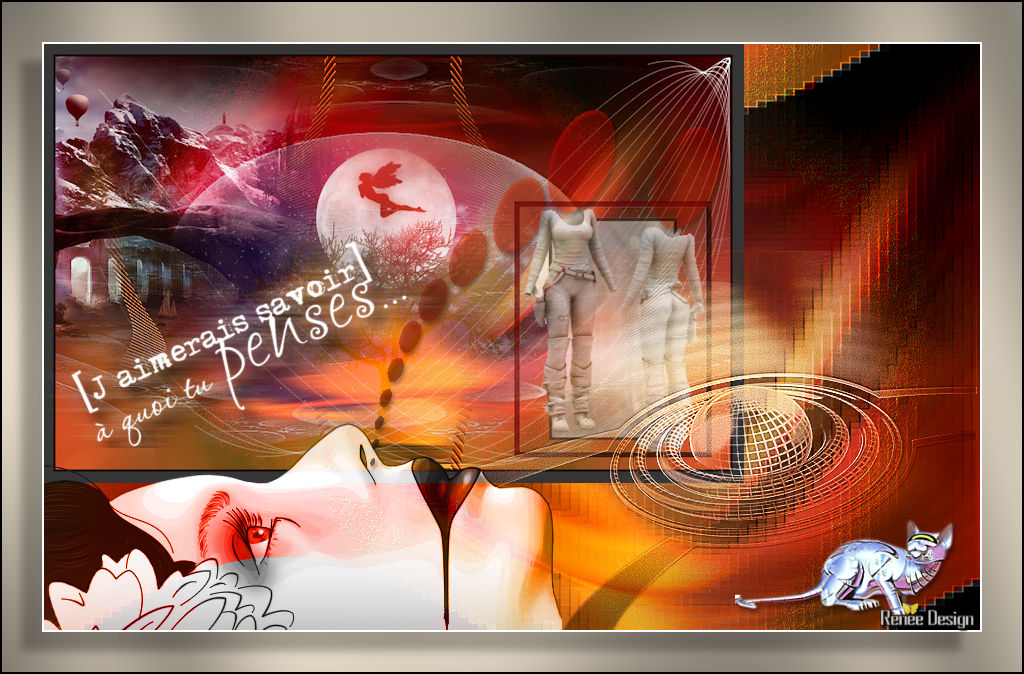
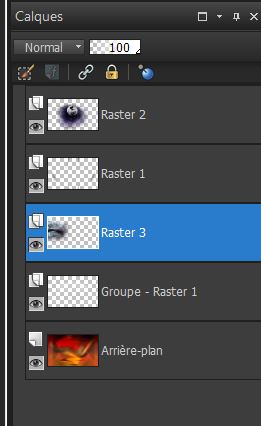
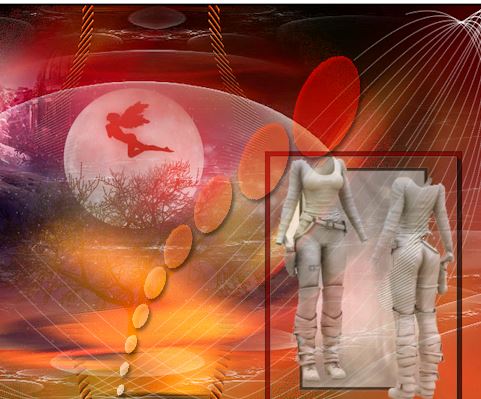
Your image and pallet should look like this:
17. Change this layer to hard light mode - Click on the top layer
18. Open the tube "robot" - Paste as new layer/ move to the right -
lower the opacity to 69
19. Click on the bottom layer - Layers - new raster layer
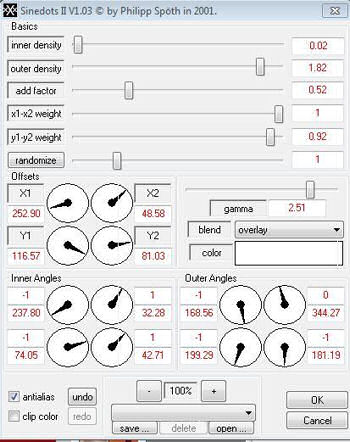
20. Effects - Dragonfly - SinedotsII
21. Layers - merge visible
22. Image - add border 3 pixels black
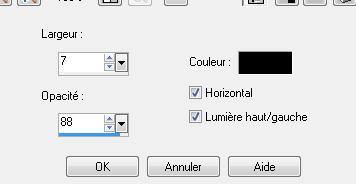
Image - add borders 15 pixels White - Select this border with your
magic wand - flood fill with black - opacity set to 80
23. Layer palette click on the background - promote to raster layer
24. Image - resize 75% / all layers unchecked
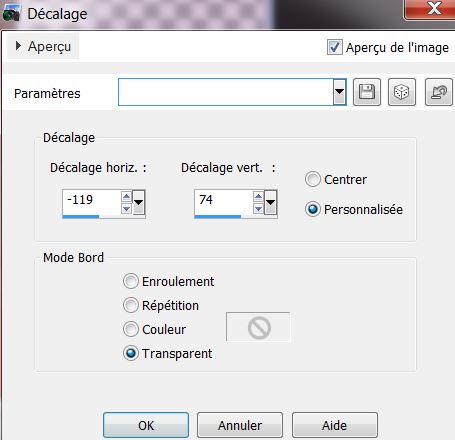
Effects - image effects/ offset
25. Layers - new raster layer
26. Selections - select all
27. Open tube "fond astre" - paste into the selection
28. Selections - select none
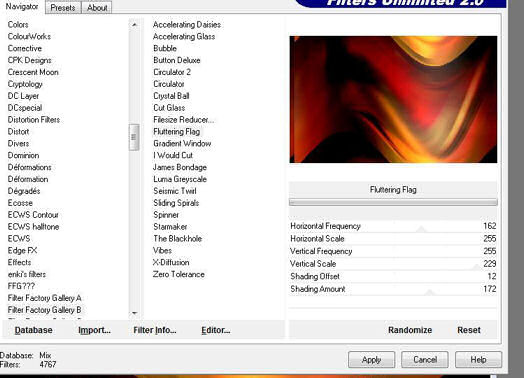
29. Effects - Filters unlimited2.0 - Filter Factory Gallery B -
fluttering flag
30. Layers - Arrange/ move down - Layers - duplicate
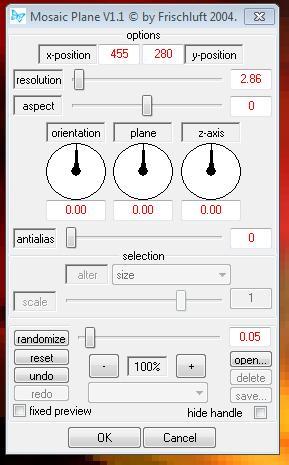
31. Effects - Frischluft Flair - mosaic plane V1.1
32. Change this layer to Luminance mode
33. Effects - User Defined filter - emboss3/ default
34. Layers - new raster layer
With your foreground color as #ef5012 and background color as black
create a linear gradient/ 0/0 uncheck Invert
Floodfill tool - tolerance = 0 and = 100 coverage

35. Fill this layer with the gradient
36. Selections - select all - open tube "mariel 2007_03 mars_vector
02T" - paste into the selection
37. Selections - select none
38. Adjust - Blur - Gaussian Blur/ 25
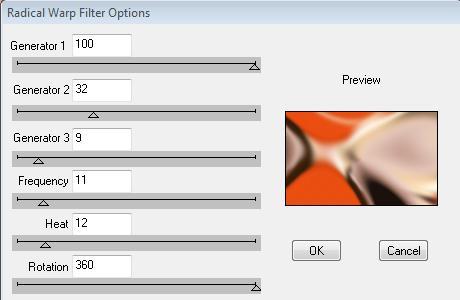
39. Effects - Dsb flux - radical warp filter options
40. Adjust - Noise/add noise - uniform 5% - uncheck monochrome
41. Layers - New mask layer from image "3 dart_016"/ Change the mode
to Luminance legacy - Layers - merge group
Image - resize 65%/ all layers unchecked and place in the bottom
right
42. Effects - Edge effects - enhance - Change mode to hard light
43. Re-open the tube "mariel 2007_o3 mars_vector02t". Paste as new
layer and move into place - change mode to Luminance
Layers - Arrange - move up
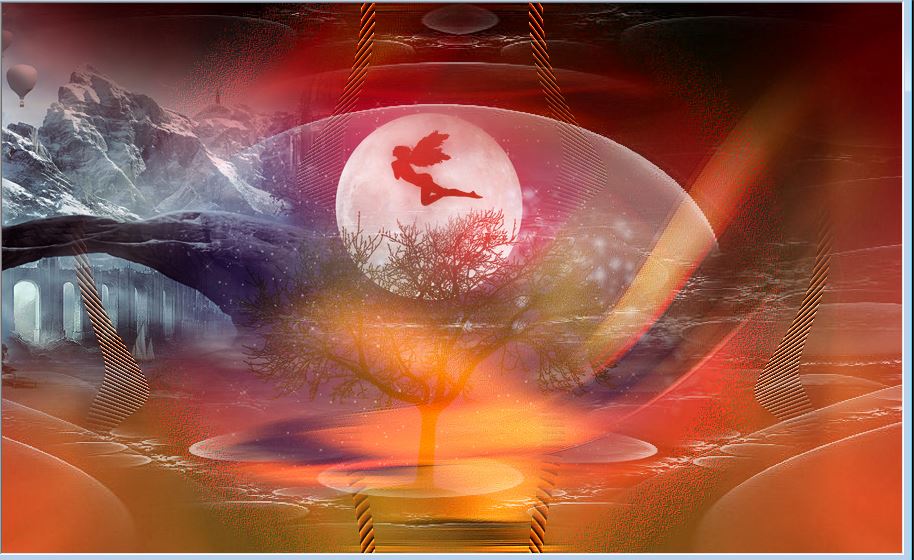
It should look like this:
Make sure you are on the top layer
44. Layers - add a new layer. Selections - load selection from disk
"renee_space2"
Configure your paint tool like this - Tolerance = 100 and opacity 80
Fill the selection with the same linear gradient 0/0/ Invert
unchecked

45:
Fill this selection with the gradient
46. Selections - select none
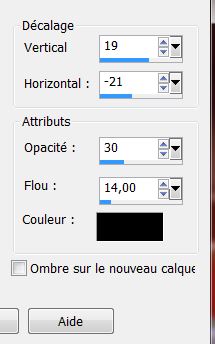
47. Effects - 3D effects - drop shadow - 3/2/50/5 black
Change the blend mode to hard light move above the character like
this
48. Layers - Duplicate layer/ Using the rectangle selection tool/
select the largest oval top
49. Edit copy / edit paste as new layer
- Position above the second character shape like this >>

48. Change the layer mode to Overlay
49. Open the tube "chat robot" - Paste as a new layer - Use the same
drop shadow which is still in memory
50. Open the tube "texte" - Paste as new layer
51. Check everything is in place - Layers - Merge all layers
52. Image - add borders 2 pixels white
53. Image - add borders 40 pixels #b6ad9e
54. With your magic wand select the border of 40 pixels
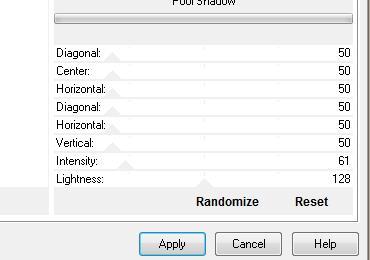
55. Effects - Filters unlimited2.0 - Greg's Factory Output Vol II -
poolshadow
56. Selections - Invert
57. Effects - 3D effects - drop shadow
58. Selections - select none
59. Image - add borders/ 2 pixels black
All Done
Thanks Sally *
I am part of Tutorial
Writers Inc.
My tutorials are
regularly recorded


|
Your creations here
 |
|