|
Loving-Dresse
Just a step to take!
Let's start the lesson. c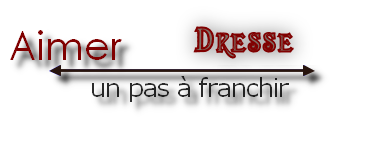
1. Open the Image : ''fond_hommage_dresse''/Promote Background layer =Raster 1
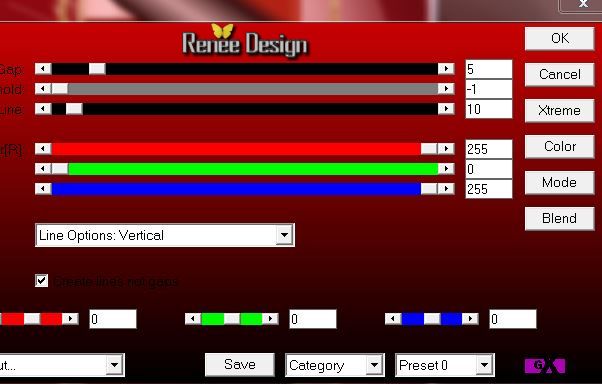
2. Effects- Plugins -Jeux de lignes -Entrelacement
3. Effects-Edge Effects- Enhance
4. Layers- New raster layer
5. Selections - load/save selection - load selection from disk and choose my selection: '' dresse _1''/ Activate Flood fill tool and fill the selection with color white
Selections- Deselect All
6. Effects- Plugins -Mura's Meister - Copies

7. Effects - 3D Effects - Drop shadow with these settings:3/60/60/40 color black
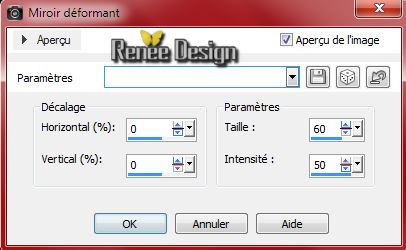
8. Effects- Distortion Effects- Warp use settings below
9.Layers- New raster layer
10. Selections - load/save selection - load selection from disk and choose my selection: '' dresse _2'' /Activate Flood fill tool and fill the selection with color white
Selections- Deselect All
11.Layers- New raster layer
12.
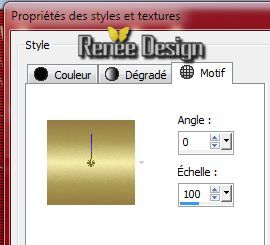
Properties foreground:foreground to pattern and choose my pattern ''motif_or'' with these setting. Selections - load/save selection - load selection from disk and choose my selection: '' dresse _3''
13. Activate Flood fill tool and fill the selection with the foreground pattern
Selections- Deselect All
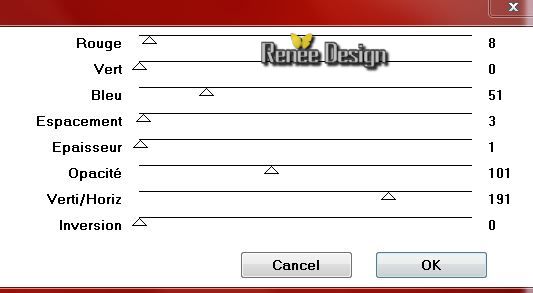
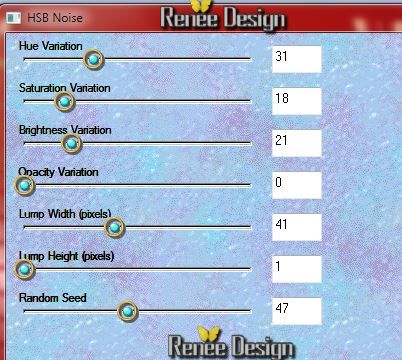
14. Effects- Plugins - EyeCandy 3.1 / HSB Noise use settings below
15.Effects- Edge Effects-Enhance
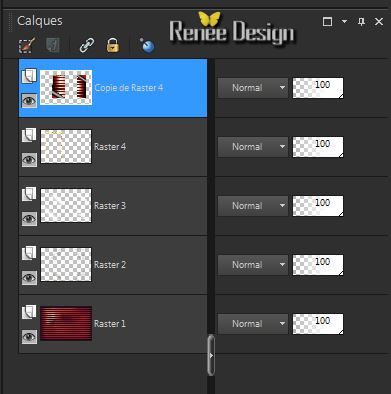
16. Layers-Duplicate
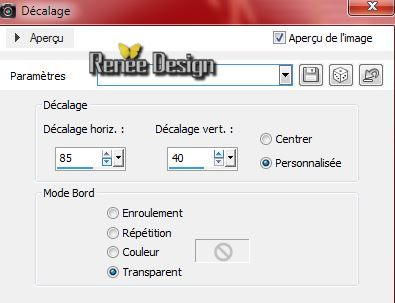
17. Effects- Image Effects-Offset use settings below
18. Image Resize
80% (Resize all the layers not checked)
19. With the magic wand select the inside of the two frames- Activate Flood fill tool and fill the selection with the background color #a91700
20. Selections-Promote selection to layer
21. Effects-Plugins Unlimited 2.0
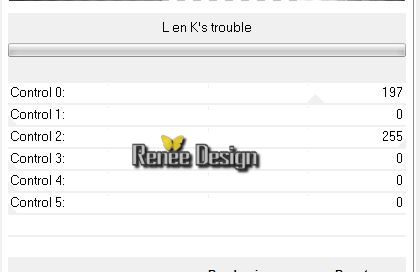
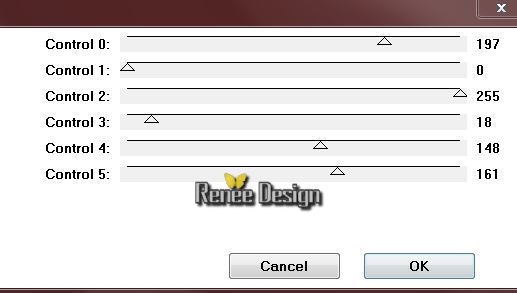
- L and K's /trouble use settings below
-By ordinary filters ( Effects Plugins ), L and K Trouble, you will get a better result
- Effects- Plugins - L and K's /trouble use settings below
- Effects- Plugins -
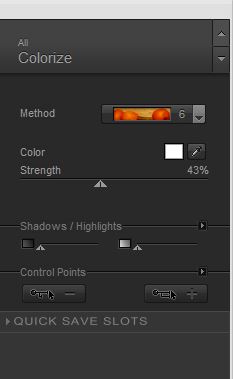
Nick Color Effex Pro .3 / Colorize- Color= White
Selections- Deselect All
22. Layers-Merge-Merge Down
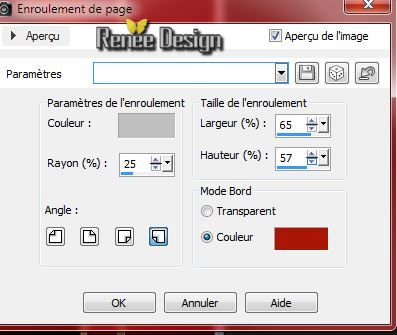
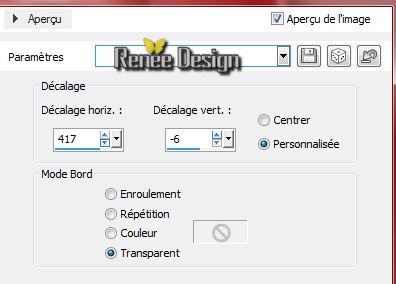
23. Effects- Image Effects- Page curl use settings below
Colors#c0c0c0 and
#a91700
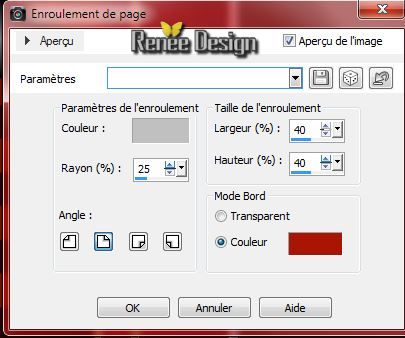
24. Repeat - Effects- Image Effects- Page curl use settings below ( with the same colors)
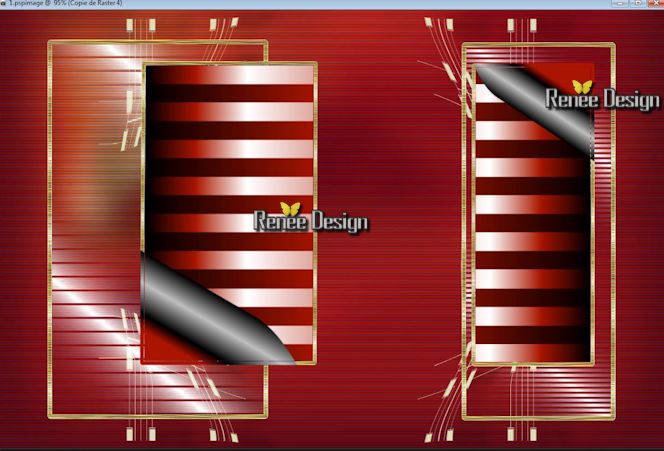
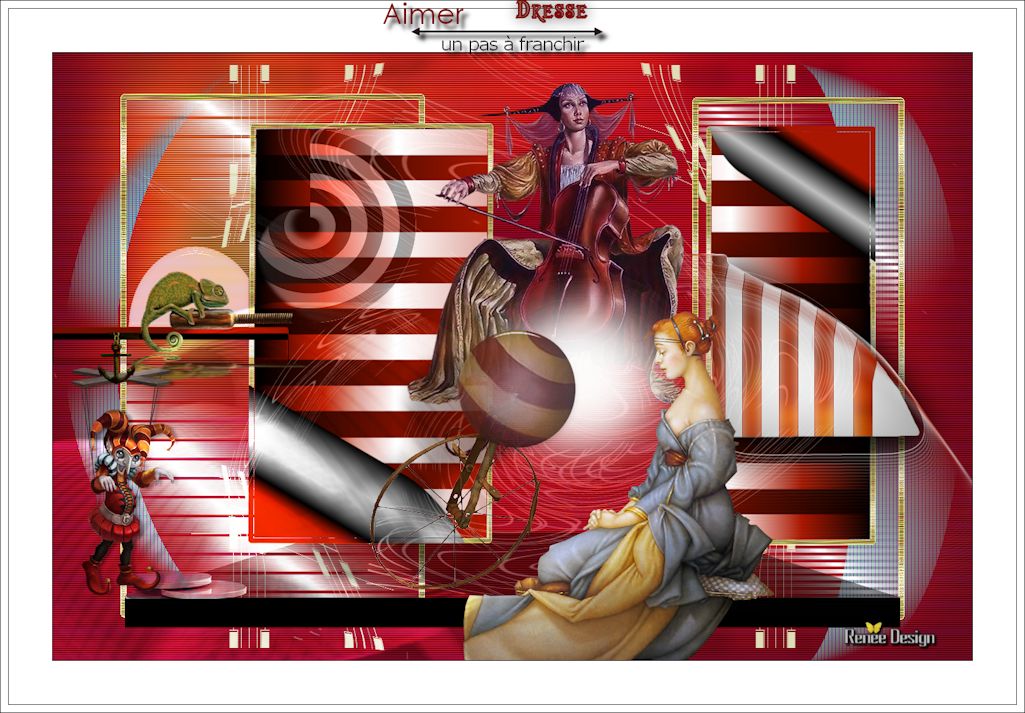
This is what you should have now
25. Layers- New raster layer
26. Selection Tool ( S ) Custom selection use settings below

-Activate Flood fill tool and fill the selection with color black
Selections- Deselect All
27. Effects- Plugins -EyeCandy5 - extrude tab-User-User Settings click on the preset '' dresse _extrude''
28. Layers- Arrange- Move Down- Layer Palette -Double click on this Layer and set the Blend Mode to "Multiply"
- Activate the bottom of the layer-Palette =Raster 1
29. Layers- New raster layer
30. Selections - load/save selection - load selection from disk and choose my selection: "dresse_4"
- Activate Flood fill tool and fill the selection with color white (click 2 times in the selection )
Selections- Deselect All
31. Effects- Plugins -AP01 - Lines silverling use settings below
- Layer Palette -Double click on this Layer and set the Blend Mode to "Exclusion " and lower the opacity down to: 73%
-Activate the top of the layer-Palette
32. Open the tube ''
dresse _tablette'' /Edit/copy-Edit paste as a new layer. With your move tool place it on the left side like this

33. Layers- New raster layer
34. Selections - load/save selection - load selection from disk and choose my selection: '' dresse _5''/ Activate Flood fill tool and fill the selection with this color #d4c9c2
35. Effects- Plugins - Eyecandy 5Impact - Glass- tab-User-User Settings click on the preset''
dresse
_glass''
-Layer Palette -Double click on this Layer and set the Blend Mode to "Screen "
Selections- Select All
36. Open the tube ''
dresse _image1 ''- Edit/copy-Edit paste as a new layer.
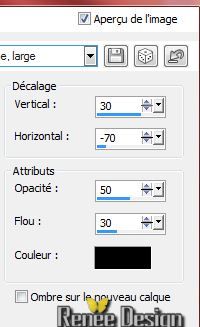
37. Effects- Image Effects-Offset use settings below
38. Effects- Plugins - EyeCandy 5 Impact - Blacklight- tab-User-User Settings click on the preset''
dresse _blacklight"
39.
Open the tube ''dreze_image2''/ Edit - Copy -Edit - Paste as new layer on your working area
With your move tool place it to the left corner as shown in the example below
-
-Layer Palette :Double click on this Layer and set the Blend Mode to "Luminance Legacy "
40.
Layers- New raster layer
41.
Selections - load/save selection - load selection from disk and choose my selection: ''
dresse _6" /Activate Flood fill tool and fill the selection with color white
-
-Layer Palette :Double click on this Layer and set the Blend Mode to "Luminance " Opacity of the layer down to 30%
Problems with the selection ?The picture is in the folder and then open the tube "selection 6 "and paste as a new layer on your working area. Do not move !!
42. Open the tube ''amXIQIO1wsycR04KdZt_9e2_GLA@500x638.pspimage''-
Image Resize 85% - Edit/copy-Edit paste as a new layer on your working area and move .
43. Effects- Plugins -Nick color Effex Pro 3.0 / Bi -Color -Filter -
Color set - violet -pink
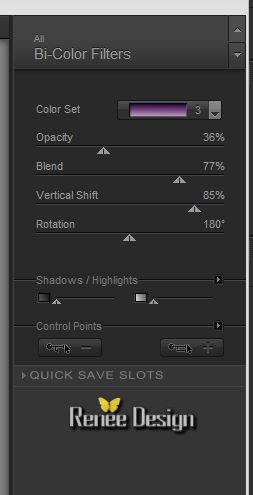
(Erase the signature)
44.
Open the tube '' dresse
_image3''/Editer copier - Edit/copy-Edit paste as a new layer on your working area and move .
45.
Effects - 3D Effects - Drop shadow with these settings:
46.
Open the tube ''aster-parkes_tube.pspimage ''/Image
Resize 78%/ Image Mirror
-
Edit/copy-Edit paste as a new layer on your working area . With your move tool place it on the right side
47.
Layer-Palette: activate Raster 12/ layer-of the tube: /amXIQIO1wsycR04KdZt_9e2_GLA@500x638)
-
Layers- New raster layer
48.
Selections - load/save selection - load selection from disk and choose my selection: ''
dresse _7''/ Activate Flood fill tool and fill the selection with color white (click 3-4 times in the selection )
Selections- Select All
-Activate the top of the layer-Palette
49.
Open the tube''Betsie 121-2013''/Image Resize 30% - Edit - Copy -Edit - Paste as new layer on your working area. With your move tool move to the left side
50. Effects- Plugins - EyeCandy 5 Impact / Perpsective shadow-Tab-Factory Settings and click on Preset
''Reflect in Front -Sharp"
51.
Open the tube ''calguisdeco12022014.pspimage''/Edit /copy the selected part!! and paste as a new layer on your working area. With your move tool place it on the left side
-
Layer Palette :Double click on this Layer and set the Blend Mode to "Luminance Legacy "
52.
Open the tube ''jester_marionette.pspimage''/ Edit/copy-Edit paste as a new layer on your working area. With your move tool place it on the left side
53.
Open the tube'' dresse
_ancre'' /Edit/copy-Edit paste as a new layer on your working area. With your move tool place it on the left side
54.
Layers- Merge- Merge Down
55.
Open the tube'' dresse
_effe_1"/Edit/ Copy -Edit - Paste as new layer on your working area. With your move tool move to the left side
-Layer Palette :Double click on this Layer and set the Blend Mode to "Overlay"
56.Layers- Merge-Merge Visible
57.
Image - Add borders-Symmetric checked 1 pixel color black
58.
Image - Add borders-Symmetric checked 60 pixels color white
59.
Image - Add borders-Symmetric checked 1 pixele color black
60.
Image - Add borders-Symmetric checked 10 pixels color white
61.
Activate the tube" titre"/Edit - Copy -Edit - Paste as new layer on your working area and move. Or write your own text
62.
Layers - Merge -Merge All (flatten)
62.
Image Resize 1025 pixels Width
Save as JPG
I hope you enjoyed this lesson
Renée
This lesson was written by Renée 3/08/2014
Created the
08/2014
*
Any resemblance with an existing lesson is merely a coincidence *
* Don't forget to thank the people who work for us and with us. I named the tubeurs - Testers and the translators.
Thanks Renée. |
 Translations


 All rights reserved