|
New
Translations here
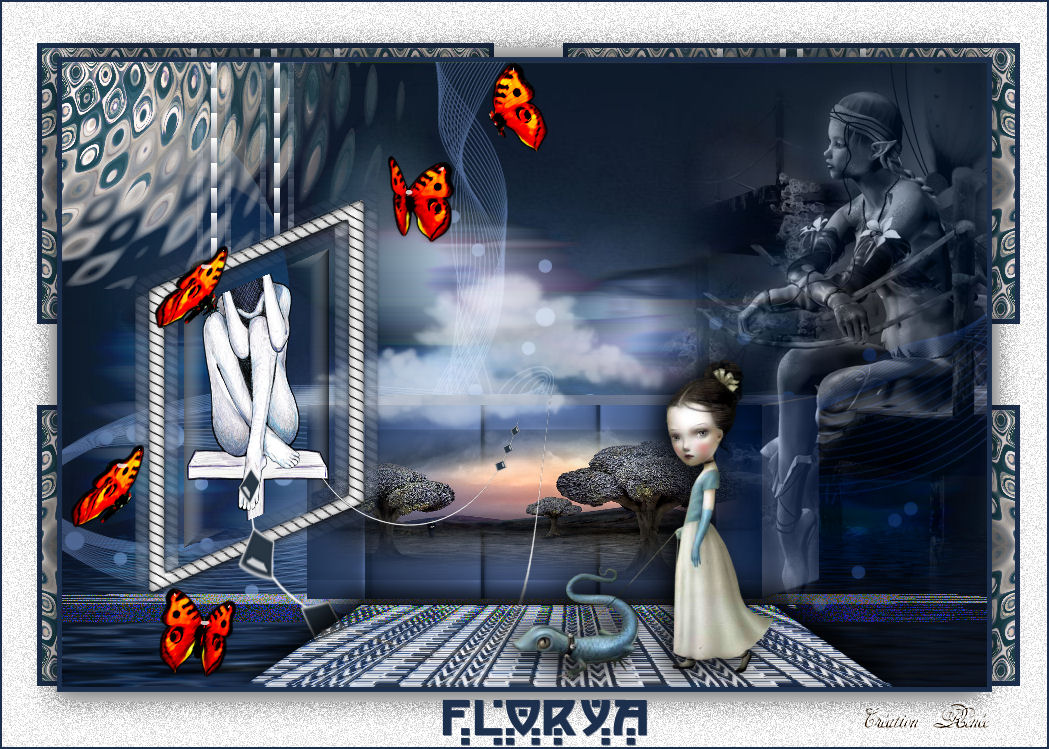
Freya....Florya
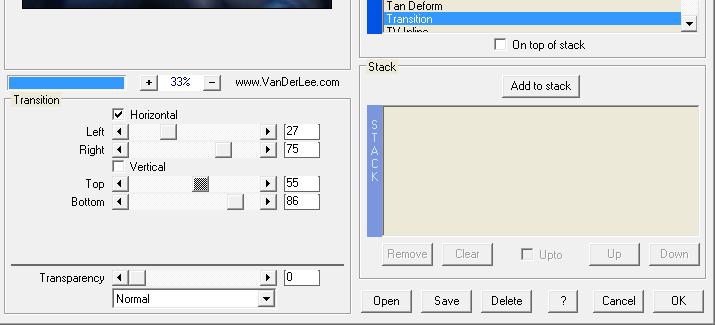
Let's start the lesson. 1. Open the backgroundimage ''fond freya'' Window - Duplicate (or shift+D) - Close the original and proceed on the copy -Promote Background Layer =Raster 1 2. Effects-Distortion Effects-Wind/Winddirection From left = 100 /Effects-Distortion Effects-Wind/Winddirection From right =100 3. Effects- Plugins - Vanderlee / transition with these settings
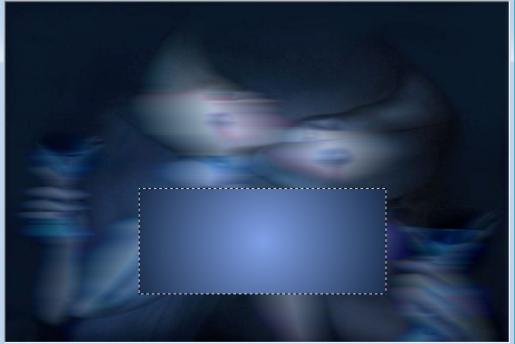
4. Layers- New raster layer 5. Selection Tool (S)-Rectangle-Draw a selection as shown below
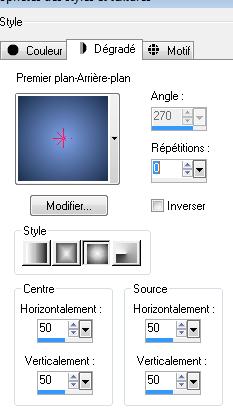
6. Material Properties:Put the foregroundcolor to #7fa1e8 and the backgroundcolor to #1c2f4d 7. Make a foreground/background sunburst gradient with these settings
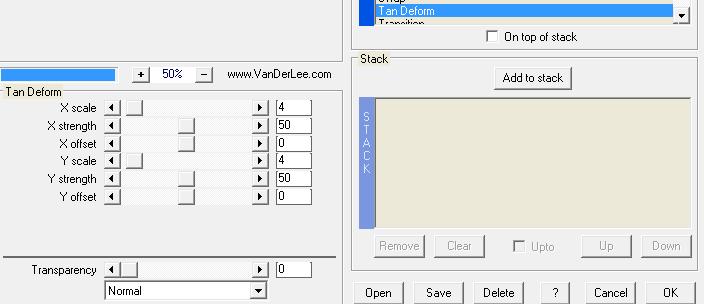
8. Activate Flood Fill Tool and fill the layer with the gradient 9. Effects- Plugins - Vanderlee Tan Deform with these settings
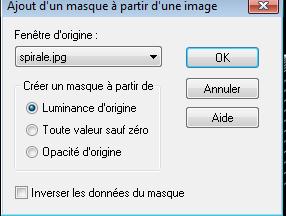
10. Effects- Plugins -EyeCandy 5/Impact - extrude/ tab Settings/User settings choose my preset: "renee -freya'' 11. Layers- New raster layer - Open the tube ''nicole-mist-paysage21-2012'' -Edit/copy-Edit paste into selection 12. Selections- Deselect All 13. Effects- 3 D Effects- Drop Shadow with these settings: 8/0/100/40 black 14. Layers- Merge- Merge Down 15. Activate the bottom of the layer-Palette 16. Layers- New raster layer 17. -Activate Flood Fill Tool and fill the layer with the foregroundcolor #7fa1e8 18. Layers- New Mask layer from Image and select Mask 'spirale.jpg''
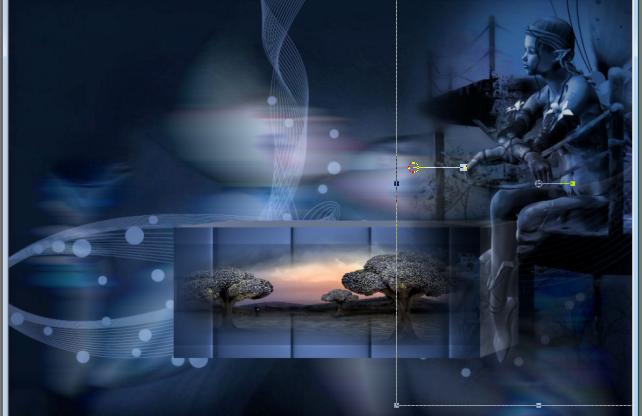
19. Layers- Merge- Merge Group 20. Double click on this layer and set the Blendmode to Screen and set the layer opacity of this layer to 55% -Activate the top of the layer-Palette 21. Open the tube -''Treagen351_29_7_012''- Image -Resize with 65% Image Mirror-Edit - Copy -Edit - Paste as new layer on your working area. With your move tool move to the right - Double click on this layer and set the Blendmode to Luminance and set the layer opacity of this layer to 85% With your move tool move as shown in the example below
22. Open the tube ''nuage-freya'' Edit - Copy -Edit - Paste as new layer on your working area. 23. Effects- Image Effects- Offset with these settings: H= -63 and V = 11 24. Double click on this layer and set the Blendmode to Hard Light and set the layer opacity of this layer to 61% 25. Layers- New raster layer 26. Material of the foreground - select my file in the list "Es Ocean Breeze 091" Make a foreground sunburst gradient with these settings
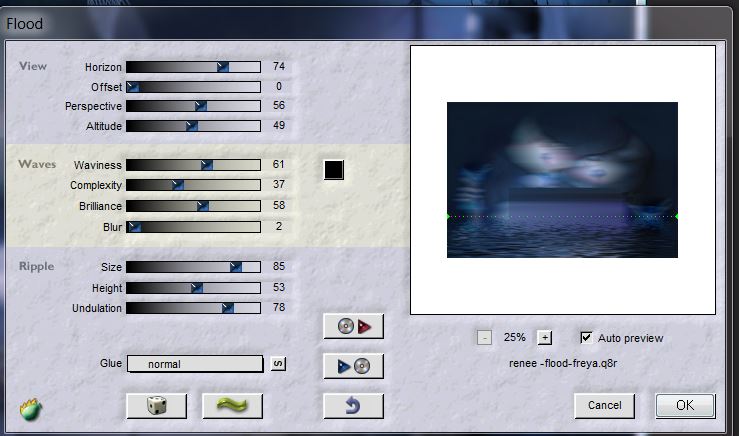
27. Selections - load/save selection - load selection from disk and select my file :''renee-freya1'' 28. -Activate Flood Fill Tool and fill the selection with the gradient 29. Selections- Deselect All 30. Double click on this layer and set the Blendmode to Screen and set the layer opacity of this layer to 36% 31. Activate the bottom of the Layer-Palette (=Raster 1) 32. Effects- Plugins - Flaming Pear /flood
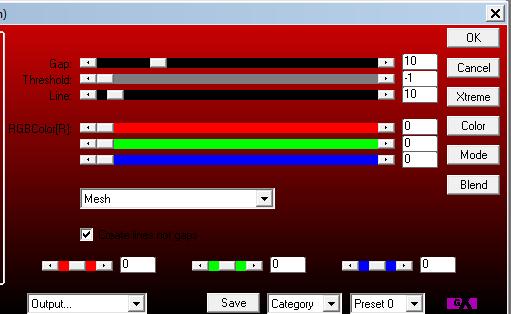
Click on the Red Arrow and load preset ''renee-flood-:freya'' Or if this is not working for you with these settings - Activate the top of the Layer Palette 33. Layers- New raster layer 34. Selections - load/save selection - load selection from disk and select my file : ''renee -freya 2" - Activate Flood Fill Tool and fill the selection with color white 35. Effects- Plugins - AP 01 (Innovation )- Lines -silverling with these settings
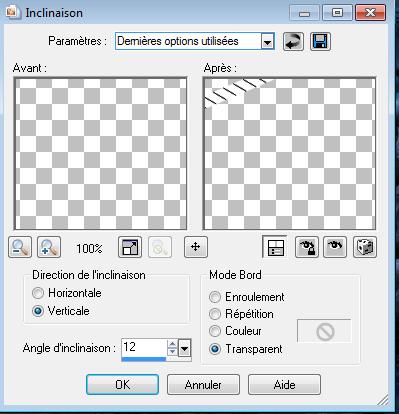
36. Selections- Deselect All 37. Effects- Geometric Effects- Skew with these settings-Transparent
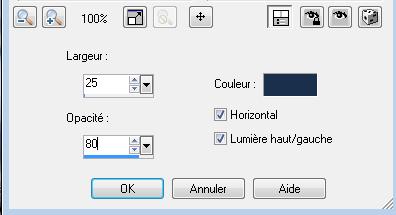
- Effects- Geometric Effects- Skew with the same settings- >> Wrap 38. Effects-Plugins - EyeCandy 5-Impact - Glass / tab Settings/User settings choose my preset: ''renee-glass-freya -petit cadre'' 39. Layers- New raster layer 40. Selections - load/save selection - load selection from disk and select my file :''renee-freya 3'' et Activate Flood Fill Tool and fill the selection with color white 41.Selections- Deselect All 42. Effects- Texture Effects- Blinds with these settings-Color #1A2F4C
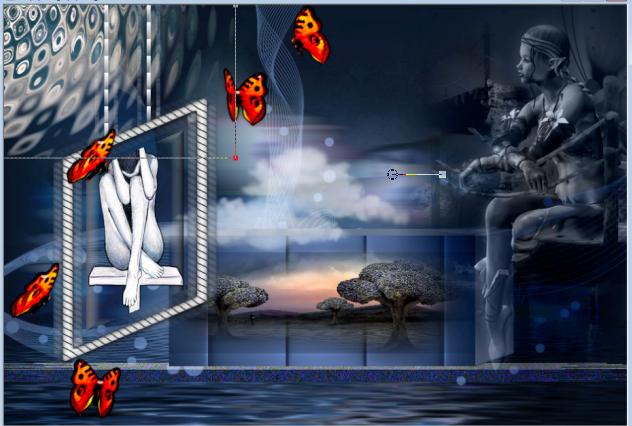
43. Layers- Arrange- Move Down 44. Activate the top of the Layer Palette/Layers- Merge- Merge Down The result
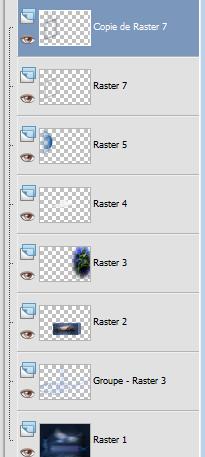
45. Layers- Duplicate 46. Effects- Plugins - Toadies / What are you
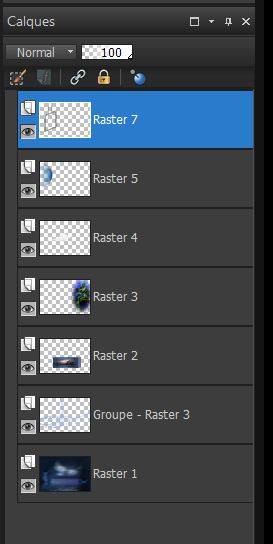
- Your layer palette looks like this:
47. Layers- Merge- Merge Down = (copy of raster7 and raster 7) is one layer 48. Activate your Magic Wand with these settings as shown in the example below(ore take the lasso )
49.With the Magic Wand select the inside
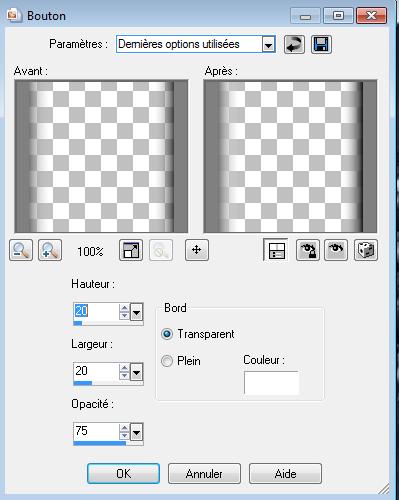
50. Effects- 3D Effects- Buttonize with these settings
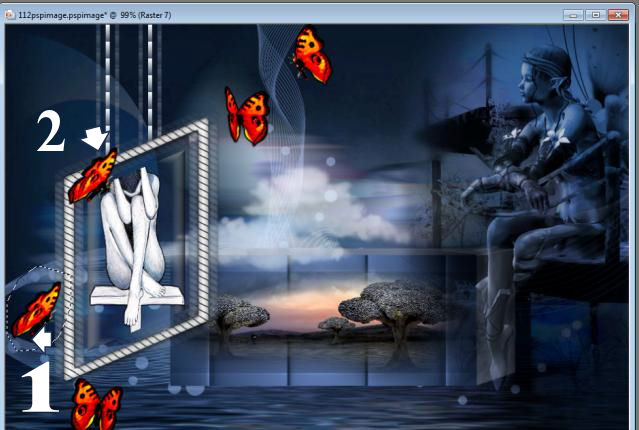
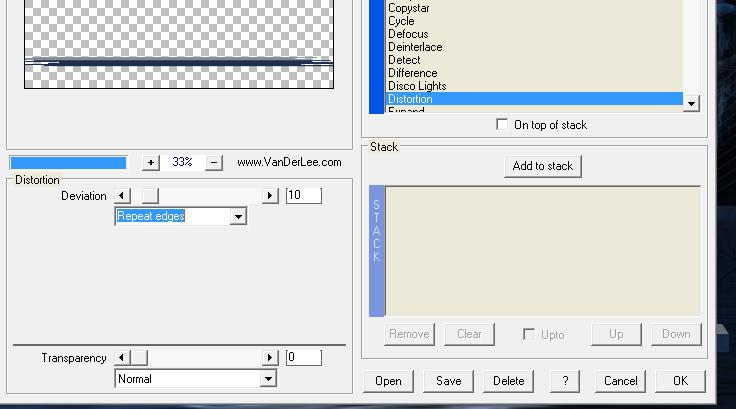
51. Open the tube '' Nicole -femme-69-2012'' activate raster 1 of the tube -Edit/copy-Edit paste as a new layer on your working area and move 52. Selections- Deselect All - Activate your tube again ''Nicole -femme-69-2012''/activate ''papillons'' Edit/copy-Edit paste as a new layer on your working area and move 53. Activate the Freehand Tool-Lasso-Select the butterfly = no 1 - Edit/copy-Edit paste as a new layer on your working area and move = no2 With your move tool place it to the right place as shown in the example below 1 =selection and 2 = placing -Layers- Merge- Merge Down (butterflys is one layer ) 54. Stay on this layer 55. Effects- Plugins - Eyecandy 5-Impact - Glass / tab Settings/User settings choose my preset:" renee-freya-glass papillons '' 56. Activate the bottom of the layer palette 57. Layers- New raster layer 58. Selections - load/save selection - load selection from disk and select my file :''renee -freya 4'' Flood Fill Tool; fill the selection with the backgroundcolor 59. Effects- Plugins - Eyecandy 5 -Impact /Extrude tab Settings/User settings choose my preset: ''renee -freya-extrude barre'' 60. Selections- Deselect All 61. Effects- Plugins - Vanderlee - Unplugged X .V2 /Distorsion with these settings
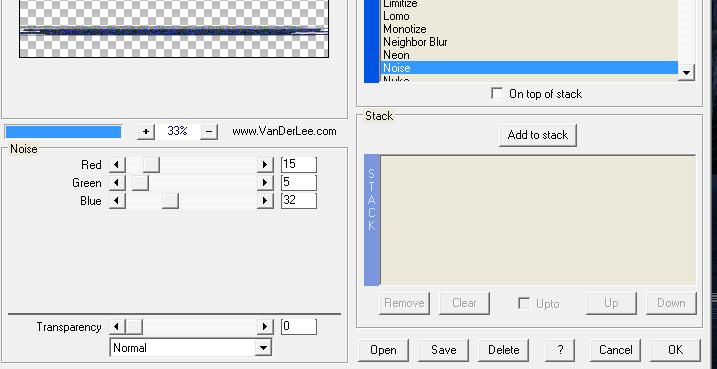
62. Effects- Plugins -Vanderlee Unplugged X.V2/ Noise with these settings
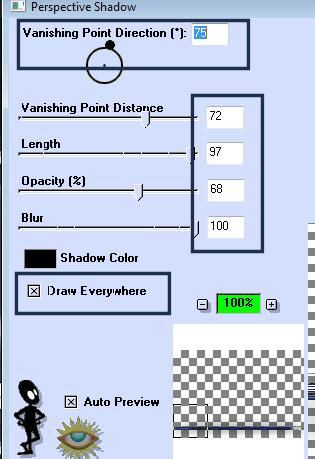
63. Effects- Plugins - EyeCandy 3.0 /perspective Shadow with these settings
64. Activate the top of the layer palette 65. Open the tube ''renee-freya-image 1 '' Edit/copy- Edit Paste as a new layer on your working area - With your Move Tool-move as shown in the example below
66. Open the image ''renee-freya-image 3'' Edit/copy-edit Paste as a new layer-Do not move it is in the right place 67. Effects- Plugins - Flaming Pear - Flexify 2 with these settings
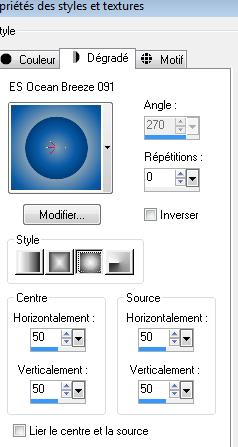
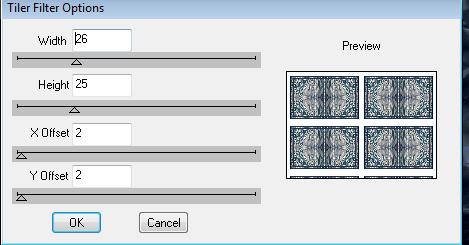
- Do not move it is in the right place 68. Open the tube ''renee-freya-image 2 -Edit - Copy -Edit - Paste as new layer on your working area. 69. Double click on this layer and set the Blendmode to Luminance and set the layer opacity of this layer to 65% 69. Open the tube ''Jhanna_191 -Cnicoletta'' Image -Resize with 60% /Image Mirror -Edit - Copy -Edit - Paste as new layer on your working area and move 70. Layers- Merge- Merge Visible 71. Image - Add borders-Symmetric checked: 5 pixels Backgroundcolor 72. Image - Add borders-Symmetric checked: 55 pixels white 73. With the Magic Wand select the white border of 55 pixels 74. Effects- Plugins - DSB FLUX / Tiler Filter Options
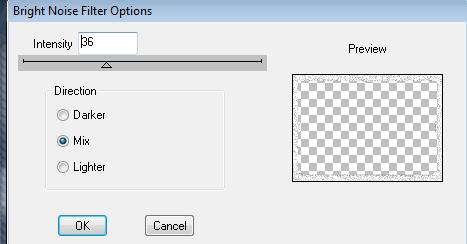
75. Selections- Invert 76. Effects- 3D Effects- Drop Shadow with these settings 12/ - 8 / 45 / 40 black 77. Selections- Deselect All 78. With the magic wand select the white border 79. Selections- Promote Selection to layer - Selections- Deselect All 80. Effects- Plugins - Dsb FLUX- Bright Noise with these settings
81. Image - Add borders-Symmetric checked: 2 pixels Backgroundcolor - Text Tool-Font ''BalaCynwyd '' Write your text "Florya" Save as JPG * I hope you enjoyed this lesson Renée This lesson was written by Renée Placing 2011 * Any resemblance with an existing lesson is merely a coincidence * * Don't forget to thank the people who work for us and with us. I named the tubeurs - Testers and the translators. Thanks Renée.
I am part of Tutorial Writers Inc My tutorials are regularly recorded ReneeGraphisme_All rights reserved
|
 Translations