|
New
Translations here
*
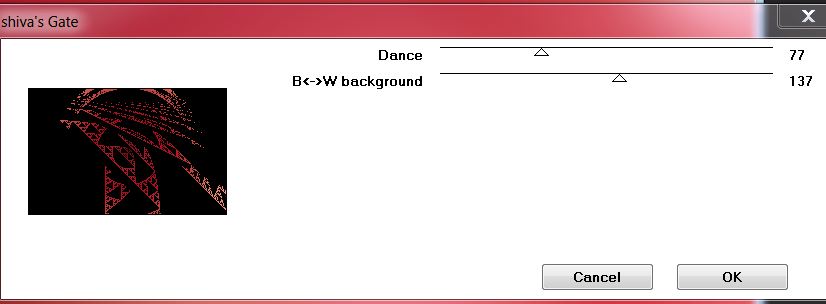
Let's start the lesson. 1. Open the Background image : fond -''Finely-1 " Window Duplicate -Promote Background Layer =Raster 1'' 2. Effects- Plugins - Kang1- Shiva's Gate
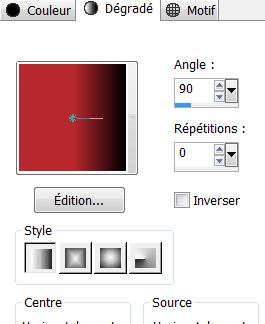
3. Layer- New raster layer 4. Selections - load/save selection - load selection from disk and choose my selection: ''renee_finely'' 5. Material Properties: FG-Color to this color #b9282e and BG-Color to color black 6. Prepare a linear gradient configured like this.
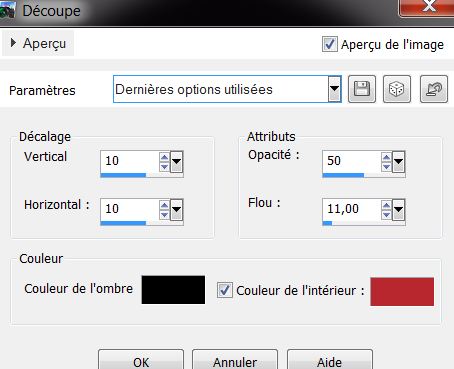
7. Activate Flood Fill Tool and fill the selection with the gradient 8. Effects-3D Effects- Cutout with these settings -Color: #000000 and #b9282e
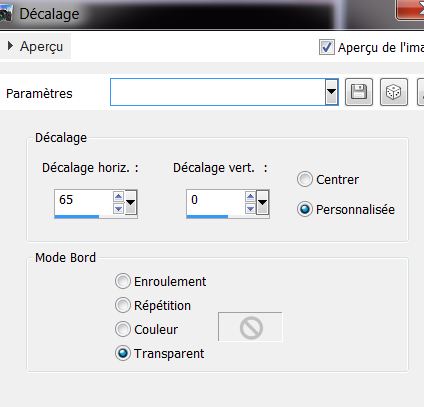
9. Selections- Deselect All 10. Layers- Duplicate 11. Effects - Image Effects - Offset with these settings
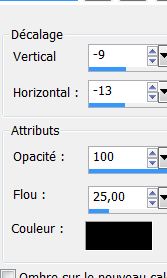
12. Effects - 3D Effects - Drop shadow with these settings
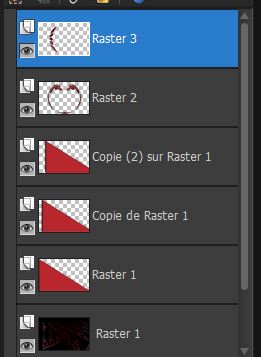
13. Layers- Duplicate 14. Effects - Image Effects - Offset with these settings
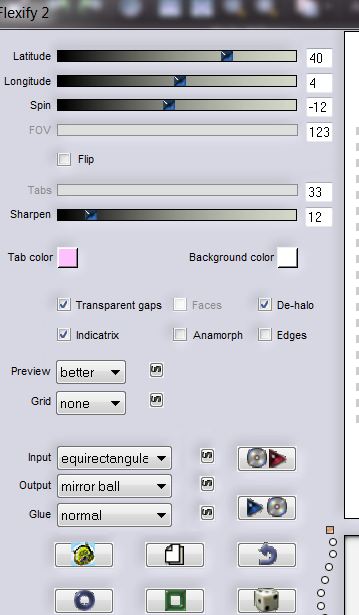
15. Layer- New raster layer 16. Selections - load/save selection - load selection from disk and choose my selection: ''renee_finely_1'' 17. Activate Flood Fill Tool and fill the selection with gradient 18. Selections Deselect All 19. Effects- Plugins -Flaming pear -Flexify2
20. Effects - 3D Effects - Drop shadow with the same settings 21. Layers- Duplicate 22. Image Mirror 23. Layers- Merge- Merge Down 24. Open the tube ''renee_boutons_finely'' Edit/copy-Edit paste as a new layer on your working area 25. Effects - Image Effects - Offset with these settings
26. Effects- Geometric Effects - Circle - Transparent / -Do not move it is in the right place You should have this result:
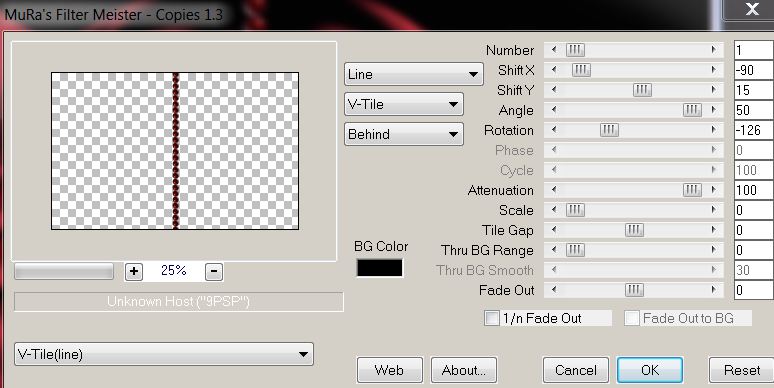
27. Open the tube ''bille-rouge '' Edit/copy-Edit paste as a new layer on your working area - -Do not move it is in the right place 28. Effects- Plugins - Mura's Meister - Copies with these settings
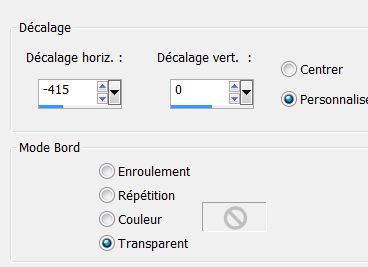
29. Effects - Image Effects - Offset with these settings H= - 430 and V = 0 30. Layer- New raster layer 31. Selections - load/save selection - load selection from disk and choose my selection: ''renee_finely2'' 32. Activate Flood Fill Tool and fill the selection with gradient - Effects- Edge Effects-Enhance 33. Selections Deselect All
34. Effects- Plugins
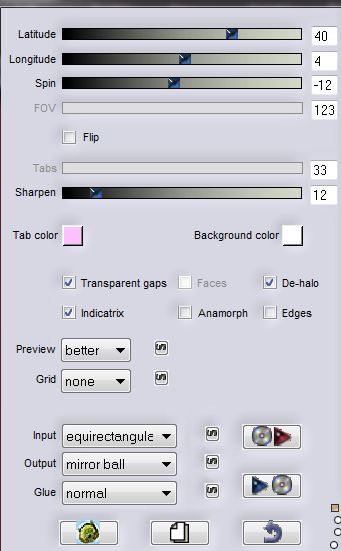
- EyeCandy 5 Impact - Extrude - 35. Layer- New raster layer 36. Selections - load/save selection - load selection from disk and choose my selection: ''renee-finely3'' 37.Activate Flood Fill Tool and fill the selection with the gradient 38. Selections Deselect All 39. Effects- Plugins - Flaming Pear - Flexify 2 with these settings
40. Layer Palette -Double click on this layer and set the Blendmode to Luminance Legacy 41. Layers- Duplicate 42. Image - Flip 43. Layer Palette -Double click on this layer and set the Blendmode to Hard Light 44. Open the tube ''Alies536-vrouw-15062011'' Edit/copy-Edit paste as a new layer on your working area and move 45. Effects - 3D Effects - Drop shadow with these settings :3/-5/65/8 black 46. Open the tube ''boule-finely'' Edit/copy-Edit paste as a new layer on your working area and move 47.- Layers- Merge- Merge Down and repeat /Now all the balls on one layer Effects- Plugins -Eyecandy5/perpsective shadow- tab Settings/User settings choose my preset:''renee-finely'' 48. Activate the tube "text "/Edit/copy-Edit paste as a new layer on your working area / Ore write your own text 49. Layers- Merge- Merge Visible 50. Image - Add borders-Symmetric checked: 5 pixels #ffffff 51. Image - Add borders-Symmetric checked: 5 pixels #b9282e 52. Image - Add borders-Symmetric checked: 25 pixels #ffffff 53. Image - Add borders-Symmetric checked: 5 pixels #b9282e Save as JPG I hope you enjoyed this lesson Renée This lesson was written by Renée 2012 *
Any resemblance with an existing lesson is merely a coincidence * * Don't forget to thank the people who work for us and with us. I named the tubeurs - Testers and the translators. Thanks Renée.
I am part of Tutorial Writers Inc. My tutorials are regularly recorded. ReneeGraphisme_All rights reserved
*
|

 Translations