|
New
Translations here
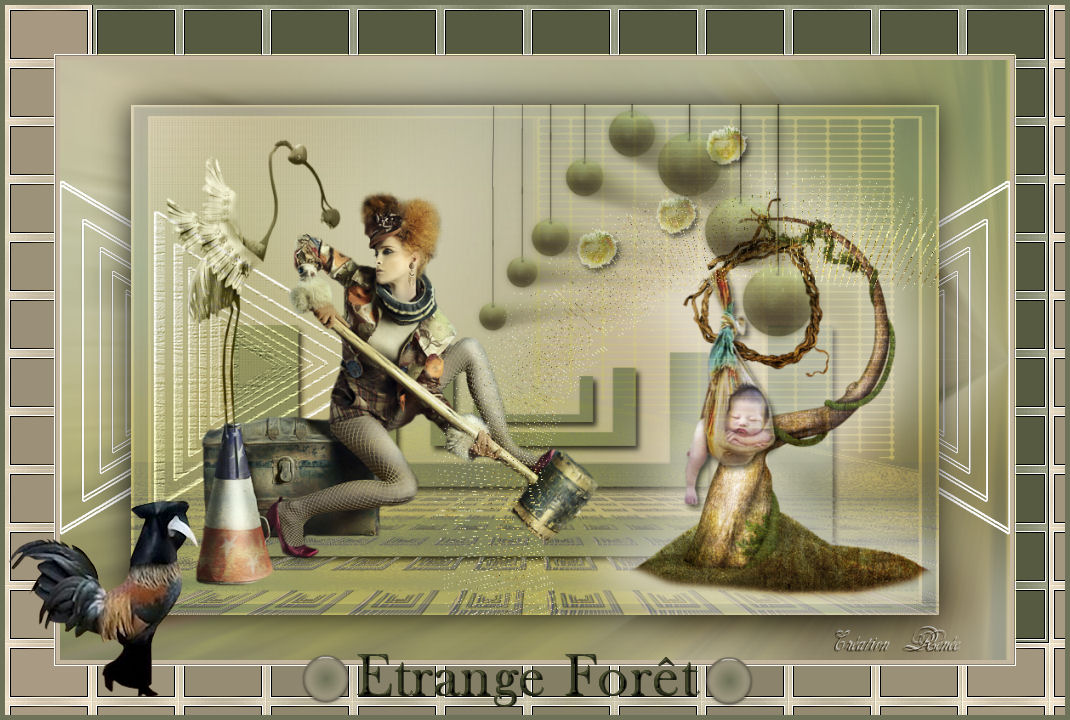
ETRANGE FORET
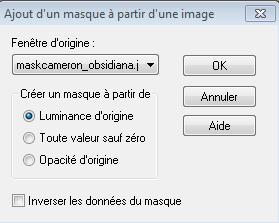
Let's start the lesson. 1.Open a new transparent image of 950 x600 pixels 2. Selections- Select All 3. Open the image « renee-fond-etrange foret »Edit/ Copy-Edit - Paste into selection 4. Selections- Deselect All 5. Layers- New Raster Layer-- Activate Flood Fill Tool and fill the layer with color #7e825d 6. Layers- New Mask layer from Image and choose Mask: « maskcameron-obsidiana »
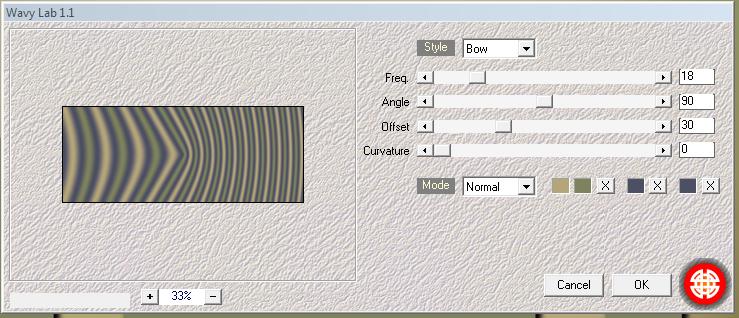
7. Layer-Merge-Merge Group 8. Effects- 3 D Effects-Drop Shadow with these settings: 5/4/75/9 black 9. Layers- Duplicate - Selections Select All-Selections-Flottante-Selections-Statique 10. Effects- Plugins- Medhi - Wavy Lab1.1 - colors #BAA27E and #80845F /Layer Palette - Double click on this Layer and set the Blend Mode to "Hard Light "
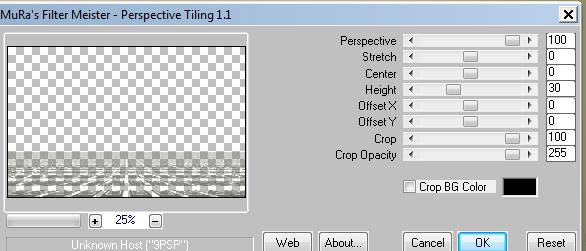
11. Effects-Plugins- Unlimted - Filter Factory Gallery S/ Fractal Tiler 0/0 12. Effects- Plugins- Mura's Meister - Perspective Tiling with these settings
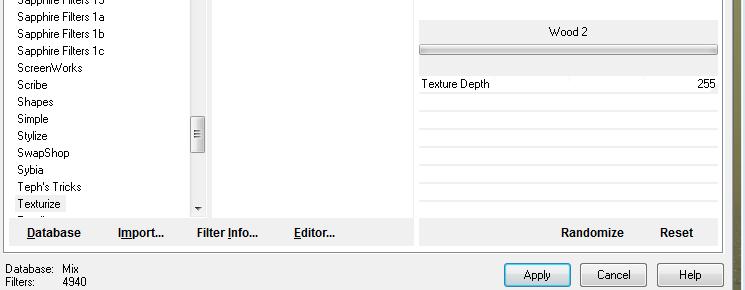
13. Open the tube ''renee-etrange foret-arbre'' Edit/ Copy-Edit - Paste as new layer on your working image and move to the right 14. Open the tube « triangle « Edit/ Copy-Edit - Paste as new layer on your working image 15. Effects- Mage Effects- Offset with these settings H= -350 and V =0 16. Effects- Plugins - Eyecandy5 Impact - extrude -tab Settings/User settings choose my preset ''renee -etrange foret -extrude'' 17.Effects- Plugins-Unlimited - Texturize /wood2 with these settings - Layer Palette - Double click on this Layer and set the Blend Mode to "Overlay " 18. Open the tube « 1123- luzcristina '' Image Mirror -Edit/ Copy-Edit - Paste as new layer on your working image and move - In the Layer-Palette- Make Raster 2 active (=Tube renee etrange foret arbre) 19. Open the tube « 1293385531-enfants-nikita «select the baby/ Image-Resize to 75%- Edit/ Copy-Edit - Paste as new layer on your working image and move -Set the layer opacity of this layer to 83 % 20. Effects- 3 D Effects-Drop Shadow with these settings: 5/4/75/9 black 21. Layers- Merge- Merge- Down 22. Effects- Plugins- Eyecandy5I Impact - gradient Glow -tab Settings/User settings choose my preset « reneeetrange » 23. Activate the top of the layer palette 24. Open the tube « petite fleur « Edit/ Copy-Edit - Paste as new layer on your working image and move 25. Open the tube ''calguisblandPluckersbirds07062012'' "Select the bird on the right"/Image Resize to 50% -Edit/ Copy-Edit - Paste as new layer on your working image and move - Layer Palette - Double click on this Layer and set the Blend Mode to Luminance-Legacy " 26. Open the tube ''fruit étrange ''Edit/ Copy-Edit - Paste as new layer on your working image-do not move !! 27. Effects- Distortion Effects- Spiky Halo with these settings
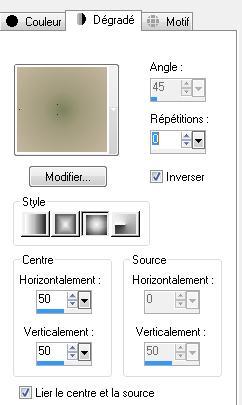
28. Activate the top of the layer palette 29. Color-palette:Set your foreground color to color #c5b69f -Set your background color to color: #7e825d - Color Palette:Set your foreground to gradient 'Foreground-background' -Sunburst -configured like this.
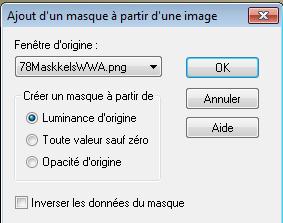
30. Layers- New Raster Layer - Activate Flood Fill Tool and fill the layer with the gradient 31. Layers- New Mask layer from Image and choose Mask: »78MaskkelsWWA »
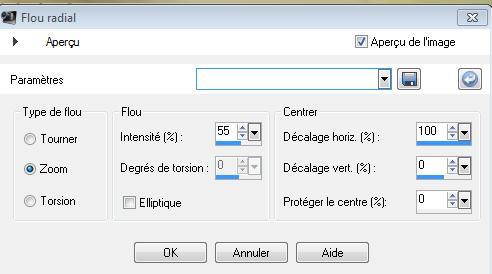
32. Layers-Merge- Merge Group - Layer Palette - Double click on this Layer and set the Blend Mode to "Overlay " 33.Layers- Merge- Merge Visible 34. Layers- Duplicate /Image Resize to 85% all layers not checked 35. Effects- Plugins- EyeCandy5 Impact / perspective shadow-tab Settings/User settings choose my preset ''renee-etrange-foret-perspective shadow'' - Activate the bottom of the layer palette 36. Adjust-Blur- Radial Blur with these settings
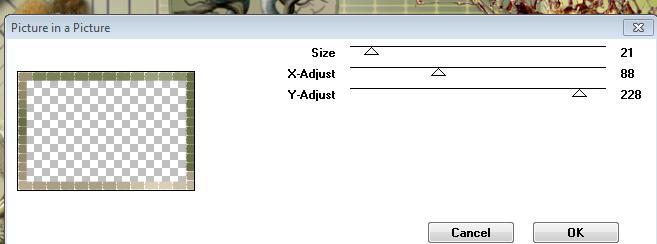
37. Open the tube ''renee-etrange -foret-image 1 '' -Edit/ Copy-Edit - Paste as new layer on your working image and move 38. Activate the top of the layer palette 39. Open the tube « logane_forme1-08mai-2012'' »/Image Resize to 45% /Image Mirror Edit/ Copy-Edit - Paste as new layer on your working image and move 40. Effects- Plugins - Eyecandy5 /Motion trail -tab Settings/User settings choose my Preset « renee -etrange foret-motion trail « - Layer Palette - Double click on this Layer and set the Blend Mode to "Multiply "-Set the layer opacity of this layer to 69% 50. Layers- Merge- Merge Visible 51.Image - Add borders-Symmetric checked: 5 pixels #c5b69f 52.Image - Add borders-Symmetric checked: 50 pixels #ffffff 53.Activate the Magic Wand and select the border of 50 pixels - Activate Flood Fill Tool and fill the selection with the gradient 54. Selections- Promote selection to Layer 55. Selections- Deselect All 56. Effects- Plugins -VM Extravanga /Picture in picture with these settings
57. Effects- Edge Effects- Enhance More 58. Image - Add borders-Symmetric checked: 5 #7e825d 59. Open the tube ''Claudia viza-fantasia 147 ''select the cock" -Edit/ Copy-Edit - Paste as new layer on your working image /Image Mirroir and move 60. Open the tube "titre " Edit/ Copy-Edit - Paste as new layer on your working image and move -Ore write your own text Save as JPEG
I hope you enjoyed this lesson Renée
This lesson was written by Renée 2010
Edited and Update Renée
I am part of the Tutorial Writers Inc. My tutorials are registered regularly ReneeGraphisme_All rights reserved
* Any resemblance with an existing lesson is a coincidence
* Do not forget to thank the people who work with us and for us I have appointed the tubeurs and translators Thanks Renée
|
 Translations