|
New
Translations here
Divine Nature
Let's start the lesson. - Open a transparent image of 1000 x 600 pixels - Color-palette:Set your foreground color to #060c12 - Set your background color to #a01c36 - Set your foreground to gradient 'Foreground-background' - Linear - Angle 0 - Repeats 1 - Invert checked. -Activate Flood Fill Tool and fill the layer with the gradient - Layers- New Raster Layer - Selections- Select All--/Open the tube « lallique « Edit/ Copy-Edit - Paste into selection - Effects- Distortions Effects-Polar Coordinates-Rectangular to Polar - Selections- Deselect All - Layers- Duplicate - Image Flip /Double click on this Layer and set the Blend Mode to "Luminance" -Set the layer opacity of this layer to 44% - Layers- Merge- Merge Down - Effects-User Defined Filter- Emboss 3 using the default settings - Open the tube « betti-62-august-2009 » -- Edit/ Copy-Edit - Paste as new layer on your working area and move - With your Pick Tool (K) place it in the right place as shown in the example below --Double click on this Layer and set the Blend Mode to "Luminance- Legacy "
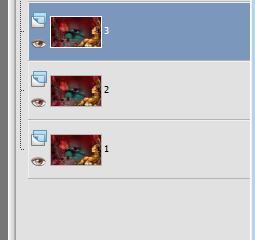
- Open the tube « aut16Sept07Bnll « Edit/ Copy-Edit - Paste as new layer on your working area and move - Open the tube « astertube-mothernature »/Image Mirror/Image Resize 85% - Edit/ Copy-Edit - Paste as new layer on your working area -With the Move Tool -(M) move it on the bottom right side - Effects- Plugins -Color effex Pro 3.0/Bi colorFilters/color set violet -pink 4 -Effects- 3 D Effects- Drop Shadow with these settings 7/5/85/8 black - Open the tube « verre-decore-tubed-by-thafs »/Image Resize 85% - Edit/ Copy-Edit - Paste as new layer on your working area and move - Double click on this Layer and set the Blend Mode to "Overlay " -Layers- Merge-Merge Visible - Layers- Duplicate- and repeat 2x and rename 1 / 2 /3
- Close the 3 layers in the Layer Palette - Open layer 1 - Adjust- Blur- Gaussian Blur: Radius: 63% - Open layer 2 - Effects- Plugins -Andromeda Perspective
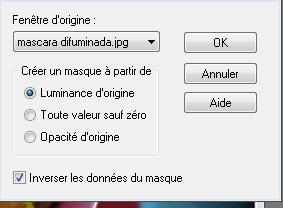
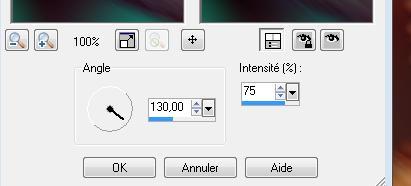
- Effects- Plugins -eyecandy5 /blacklight-tab Settings/User settings choose my preset "renee nature" - Activate the bottom of the Layer-Palette=raster 1 - Layers- New Raster Layer /Selections –load/save selection –load selection from disc and choose my selection: @renee nature - Open the tube « sol carrelage « Edit/ Copy-Edit - Paste into selection - Selections- Deselect All - Stay on this layer / Layers- New Mask layer from Image and choose Mask:
- Layers- Merge- Merge Group - Effects- Edge Effects- Enhance - Layer palette – Make raster 3 active - Effects- Image Effects- Seamless Tiling with these settings
- Adjust- Blur- Motion Blur with these settings (repeat 3 x)
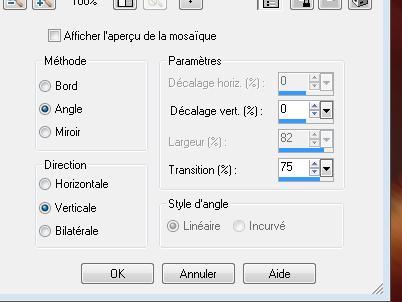
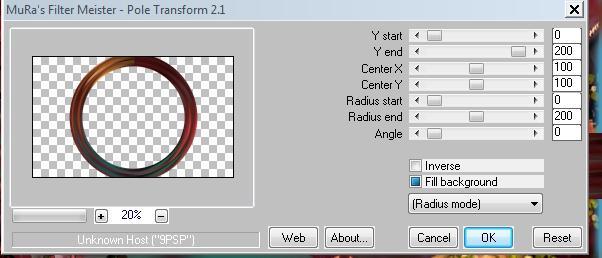
- Effects- Geometric Effects- /Perspective Horizontale a 90/ transparent - Image Mirror -Effects- Geometric Effects- /Perspective Horizontale a 90/ transparent - Effects- Filter -Mura's Meister /pôle transformation with these settings
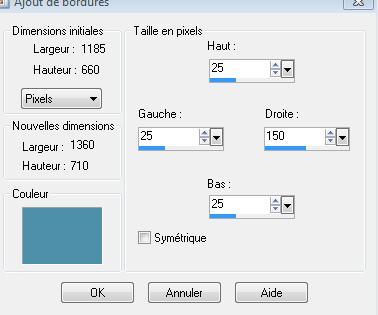
- Effects-Image Effects- Offset with these settings H=-500 and V =0 - Layers- Arrange- Move Down - To replace the top of the layers palette=layer 3 - Layers- New Raster Layer - Selections –load/save selection –load selection from disc and choose my selection:''@renee nature2'' - Open the tube visage -sublime-26 by thaf « Edit/ Copy-Edit - Paste into selection - Selections- Deselect All - Open the tube « lucioles « Edit/ Copy-Edit - Paste as new layer on your working area and move - Layers- Merge- Merge- Visible -Image - Add borders-Symmetric checked: 5 pixels black - Image - Add Borders NO SYMMETRIC -Color #4f8fa9
- Open the tube « JHanna-87b »/Image Mirror /--Edit/ Copy-Edit - Paste as new layer on your working area and move - Effects- 3 D Effects- Drop Shadow with these settings 7/4/85/14 black - Open the tube " texte"-- Edit/ Copy-Edit - Paste as new layer on your working area and move - Open the tube" nuage" --Edit/ Copy-Edit - Paste as new layer on your working image - With the Move Tool -(M) move it on the upper right corner -Image - Add borders-Symmetric checked: 10 pixels black Save as JPG
I am part of the Tutorial Writers Inc. My tutorials are registered regularly ReneeGraphisme_All rights reserved
*
|
 Translations