|
New
Translations here
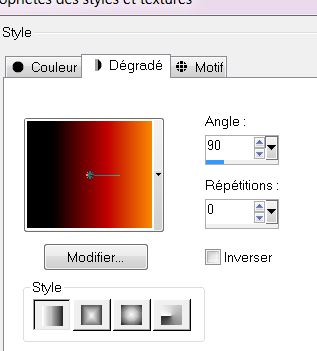
Let's start the lesson. 1. Open the Background Image ''renee_cree des souvenirs _fond1"Promote Background layer 2. Layers- New raster layer 3. Material of the foreground - select my file in the list ''creer des souvenirs'' /Put your foreground on the linear gradient with settings below
4. Flood Fill Tool: fill the layer with the gradient 5. Adjust-Blur-Motion Blur -Angle 72 Strength 100 6. Effects- Distortion Effects -Warp use settings below
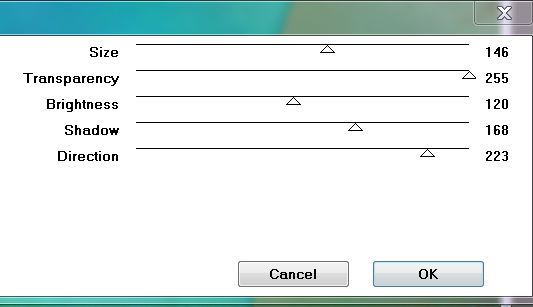
7. Layer Palette -Double click on this Layer and set the Blend Mode to Difference 8. Layers- New raster layer 9. Selections - load/save selection- load selection from disk and select my file ''renee_creer_des _souvenirs 1'' 10. Flood Fill Tool : fill the selection with this color #c96e1d 11. Set the layer opacity of this layer to 40% 12. Selections- Deselect All 13. Effects - 3D Effects - Drop shadow with these settings :1/0/100/24 black 14. Effects- Plugins – Graphic Plus -Page curl
15. Effects- Plugins - Toadies - What are you- settings 25 /25 16. Layers-Duplicate. Layer Palette -Double click on this layer and set the Blendmode to Multiplikation and set the layer opacity of this layer to 79% 17. Effects- Plugins -VM Distorsion – Slicer
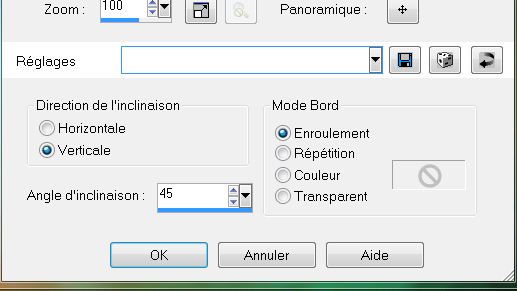
18. Effects- Geometric Effects-Skew with these settings
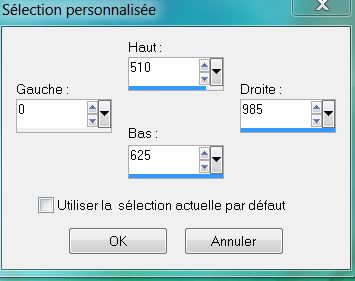
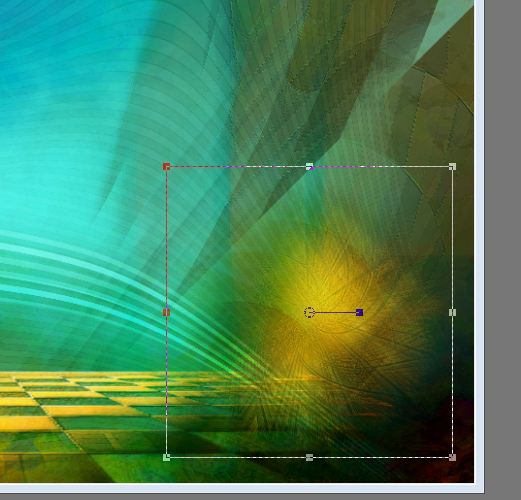
19. Activate the top of the layer-Palette 20. Layers- New raster layer 21. Selection Tool ( S ) Custom selection use settings below
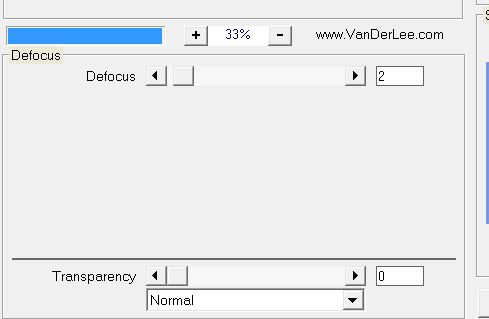
22. Open the tube ''renee_creer_des_souvenirs_sol'' Edit/copy- Edit Paste into selection 23. Selections- Deselect All 24. Layer Palette -Double click on this layer and set the Blendmode to Hard Light 25. Layers- New raster layer 26. Selections - load/save selection - load selection from disk and choose my selection:''renee_creer_des_souvenirs 2'' 27. Flood Fill Tool : fill the selection with this color #ffffc0 28. Selections- Deselect All 29. Effects- Plugins- Unlimited 2.0 - Vanderlee Unplugged /Defocus
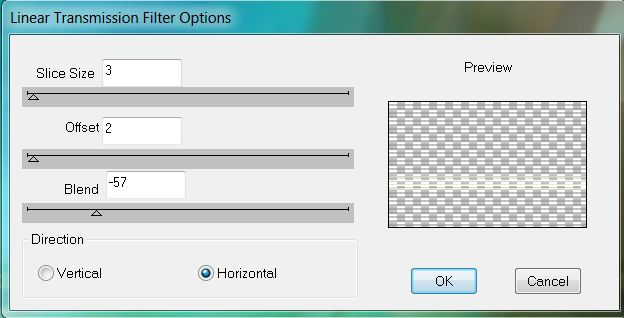
30. Effects- Plugins – DBS Flux -linear transmision
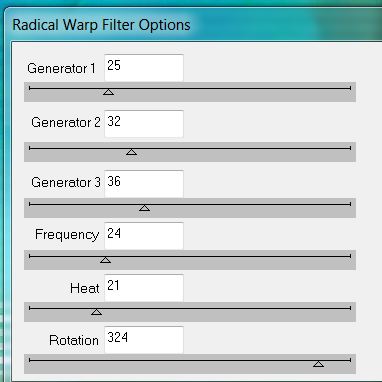
31. Effects -Plugins - DBS Flux- Radical Warp (Not to be confused with Radial warp) 32. Layer Palette -Double click on this layer and set the Blendmode to Overlay and set the layer opacity of this layer to 66%% 33. Open the tube ''creer des souvenirs _image 1 '' Edit/copy -Edit/paste as a new Layer on your working area and place like this
34. Layer Palette -Double click on this layer and set the Blendmode to Hard Light
35. Effects-Plugins – VM Extravanga -Heightline... 36. Open the tube ''renee_creer des souvenirs_image _2'' 37. Edit/copy -Edit/paste as a new layer on your working area and place 38. Effects- Plugins – Greg's Factory POOL II- CMY Isolate
- Activate Pick Tool- slightly rotate (K) so that it fits well 39. Layers- New raster layer
41. Color palette - change the foreground color to #947c60 // Close the background color 42. Trace the shape like this -
43. Convert to Raster Layer 44. Effects- Plugins - Mura's Meister – Pespective Tilling
45. Effects- Plugins – VM Extravanga - heightline using the default settings 46. Selections - load/save selection - load selection from disk and choose my selection: ''renee_creer des souvenirs _3''/ Hit the Delete Key of your Keyboard 47. Layer Palette -Double click on this layer and set the Blendmode to Hard Light 48. Open the tube ''creer_des souvenirs _image 3'' Edit/copy-Edit paste as a new layer. With your move tool move to the top left corner 49. Effects -Plugins – FM Tile Tools – blend emboss using the default settings 50. Open the tube ''creer des souvenirs-porte ''Edit/copy -Edit/paste as a new layer on your working area and place 51. Layer Palette -Double click on this layer and set the Blendmode to Luminance Legacy 52. Layers- New Raster layer 53. Color palette -change the foreground color to color #cc932f 54. Activate the Airbrush Tool with these settings
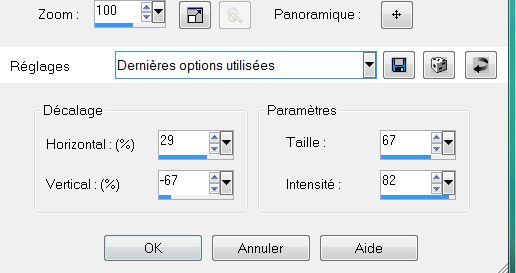
55. Effects-Plugins – Frischluf - Volumetric use settings below
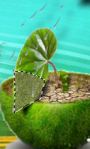
56. Open the tube ''lutin 12_L'' Edit - Copy -Edit - Paste as new layer on your working area and move 57. Open the tube ''HighFour_beanstalk_Element34'' Image-Resize 35 % Edit - Copy -Edit - Paste as new layer on your working area and move - Effects- 3D Effects- Drop Shadow-choice a light schadow 58. Open the tube ''creer des souvenirs-terre '' Edit - Copy -Edit - Paste as new layer on your working area and move -put it under the layer >>Lutin L12 59. Open the tube ''lutin assis '' Edit - Copy -Edit - Paste as new layer on your working area and move -put it under the layer Lutin L 12 60. Activate the top of the layer-Palette 61. Selections - load/save selection - load selection from disk and choose my selection:''renee_ creer des souvenirs 4'' Open the tube ''VC_GreenNoel_EI90 ''Edit/copy- Edit Paste into selection 62. Selections- Deselect All 63. Open the tube '' titre'' Edit - Copy -Edit - Paste as new layer on your working area and move 64. Open the tube ''creer des souvenirs_image 4 ''Edit - Copy -Edit - Paste as new layer on your working area and move 65. Open the tube ''creer des souvenirs_image 5 ''Edit - Copy -Edit - Paste as new layer on your working area and move - like this
66. Open the tube ''1beda_L'' Edit - Copy -Edit - Paste as new layer on your working area and move 67. Effects- Plugins - EyeCandy 5- Perspective -Tab-Settings -reflect in front 68. Open the tube ''libellule_L'' Edit - Copy -Edit - Paste as new layer on your working area and move 69. Activate the top of the layer-Palette 70. Layers- New raster layer 71. Selections - load/save selection - load selection from disk and choose my selection: ''renee_creer des souvenirs_5'' 72. Color palette -change the foreground color to #86795e Flood Fill :fill the selection with the foreground color 73. Selections- Deselect All 74. Layers- Duplicate 75. Image Free Rotate 9° to the left - attention 9 not 90 °
76. Layer Palette -Double click on this layer and set the Blendmode to Luminance and set the layer opacity of this layer to 50% 77. Back on the tube layer ''creer des souvenirs_terre'' 78. Activate -Freehand Selection Tool -Lasso: draw a selection like this
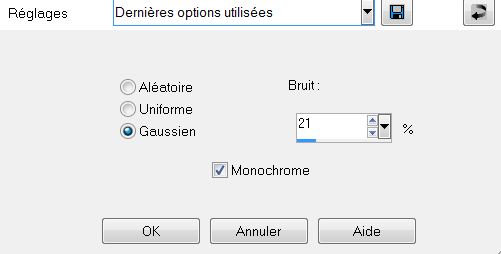
79.Foreground color : #86795e //Pot of Paint: Change the opacity of the color to 68% Flood Fill : fill the selection with the foreground color 80. Adjust-Add/Remove Noise-Add Noise with these settings
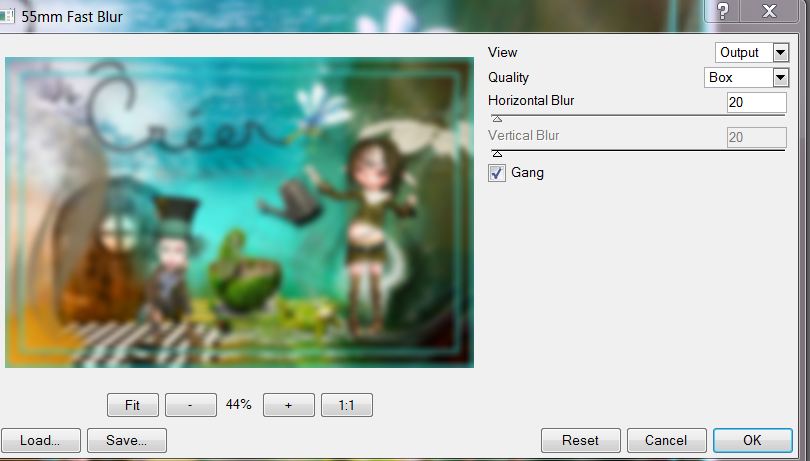
81. Effects- Plugins - Eye Candy5 - perspective -Tab Settings -Drop shadow blury 82. Selections- Deselect All 83. Layers- Merge- Merge Visible 84. Open the tube ''12L_gouttes'' Edit/copy -Edit/paste as a new layer on your working area and place 85. Open the tube ''creer des souvenirs-pluie'' Edit/copy -Edit/paste as a new layer on your working area and place – Image Resize 75 % (Resize all the layers not checked) 86. Layers-Merge-Merge All 87. Image - Add borders-Symmetric checked: 5 pixels #3bd8d3 88. Edit-Copy !! 89. Image - Add borders-Symmetric checked: 35 pixels white 90. With the magic wand -select the border of 35 pixels 91. Edit Paste into selection (Image is still in your PSP memory) 92. Effects- Plugins -Digital Film Tools – 55 mm Fast Blur
93. Selections- Deselect All 94. Image - Add borders-Symmetric checked: 5 pixels black
*
I am part of Tutorial Writers Inc. My tutorials are regularly recorded. ReneeGraphisme_All rights reserved
*
|
 Translations