|
Let's start the lesson.
1. Color-palette:Set your foreground color to color #0a1f69 - Set your background color to color #e0de2e
2.
File-Open a new transparent image of
800 x 600. pixels
3. Selections- Select All
4. Activate the tube ''
arrière-plan-look ''
5. Edit-Copy-Edit Paste into selections
6. Selections- Deselect All
7. Layers- Duplicate
8. Adjust-Blur-Gaussian Blur ; Radius 30.
- Stay on this Layer
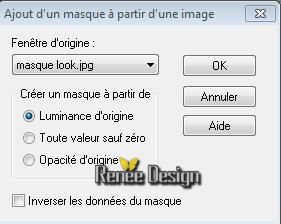
9. Layers- New Mask layer from Image and choose Mask: ''masque.look''
10. Layers- Merge- Merge Group
-Stay on this Layer
11. Effects –3D Effects- Drop Shadow with these settings: 4/4/ 100/9 #
000000
12. Effects- Edge Effects- Enhance
13. Layers- New Raster Layer
14.
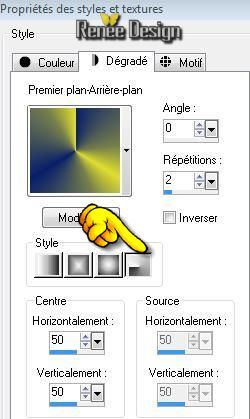
Color Palette:Set your foreground to gradient 'Foreground-background' -Radial -configured like this.
- Activate Flood Fill Tool and fill the layer with the radial gradient
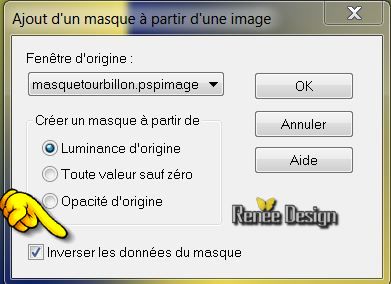
15. Layers- New Mask layer from Image and choose Mask: "masque
tourbillon"
- Layers- Merge- Merge Group
16. Layer Palette - Double click on this Layer and set the Blend Mode to "Hard Light "-Set the layer opacity of this layer to 82%
17. Effects- Edge Effects- Enhance More
18. Layers- Duplicate
- Layer Palette - Double click on this Layer and set the Blend Mode to "Overlay "-Set the layer opacity of this layer to 27%
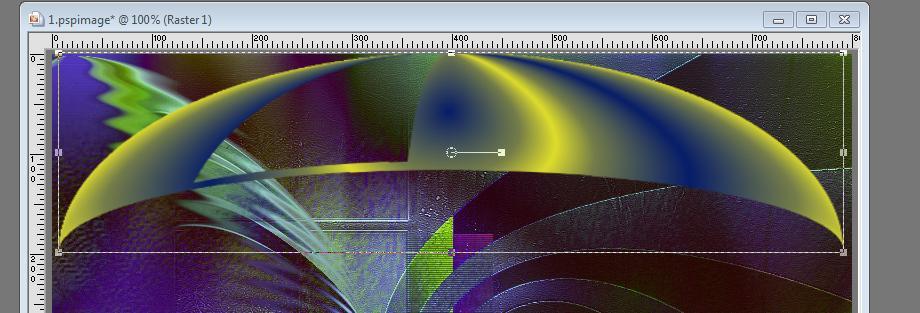
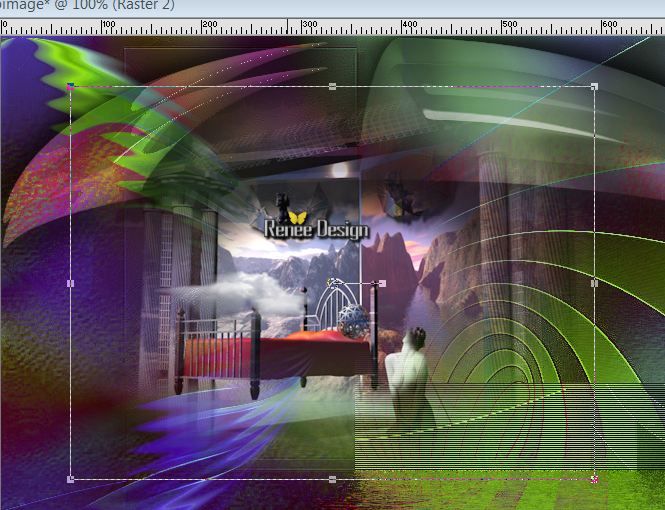
- You should have this result as shown in the print screen below
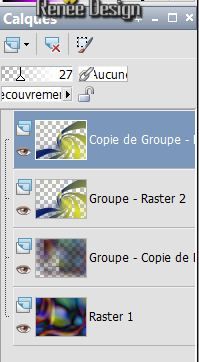
19. Layer Palette -Make Group-Raster 2 active (the second Layer from the top )
20. Selections –load/save selection –load selection from disc and choose my selection:" @renee-look1"
-Hit Delete on your Keyboard
21. Selections- Deselect All
- To replace the top of the layers palette
22. Layers- New Raster Layer
23. Selections –load/save selection –load selection from disc and choose my selection: @renee-look2''
- Activate Flood Fill Tool and fill the selection with the gradient
-Selections- Deselect All
24.
Effects-Distortion Effects-Wind/Winddirection From right 100
25.
Effects-Distortion Effects-Wind/Winddirection From left 100
26. Effects-Distortion Effects -Wave with these settings
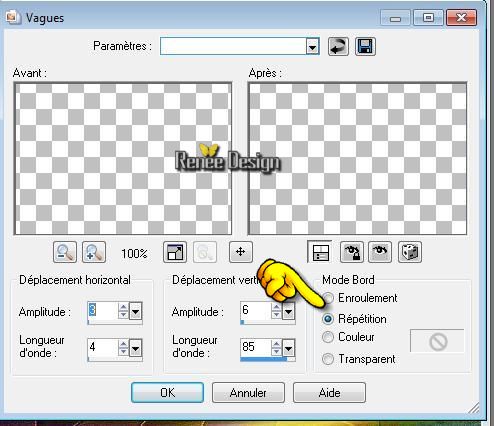
27. Effects- Geometric Effects -Circle / transparent
28. Effects- Image Effects- Offset with these settings
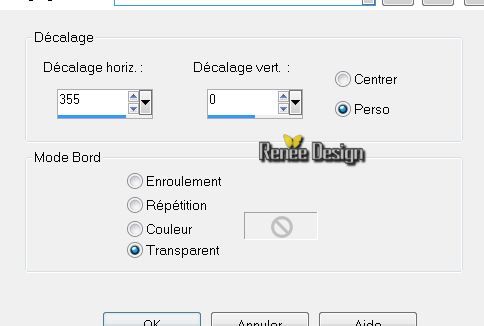
29. Image- Mirror
30.Effects-Image Effects- Offset with these settings H = -25 and V = 0 transparent
- Layer Palette - Double click on this Layer and set the Blend Mode to "Difference"
31. Layers- Duplicate /Layer Palette - Double click on this Layer and set the Blend Mode to" Hard Light "-Set the layer opacity of this layer to 78%
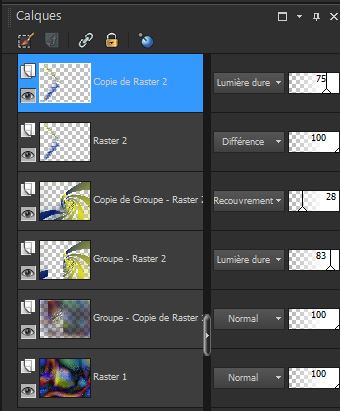
Layer Palette look like this now
32. Layers- Merge- Merge Visible
33. Layers- Duplicate
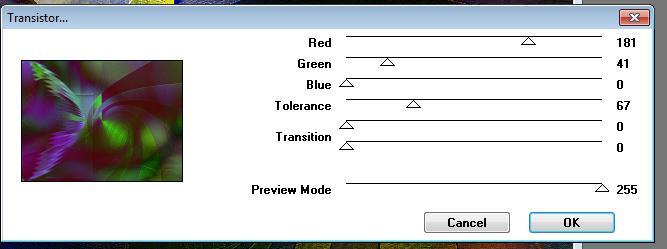
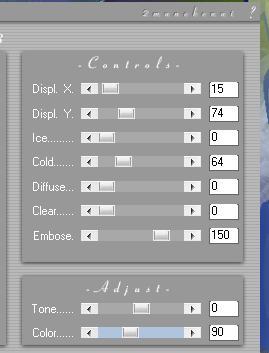
34. Effects-Plugins - VM Toolbox- Transistor use settings below
- Set the layer opacity of this layer to 55%
35. Layers- Merge- Merge Down
36. Selections –load/save selection –load selection from disc and choose my selection: "@renee-look3"
-Selections- Promote selection to Layer
37. Effects-Plugins -
Flaming Pear - Flood use settings below
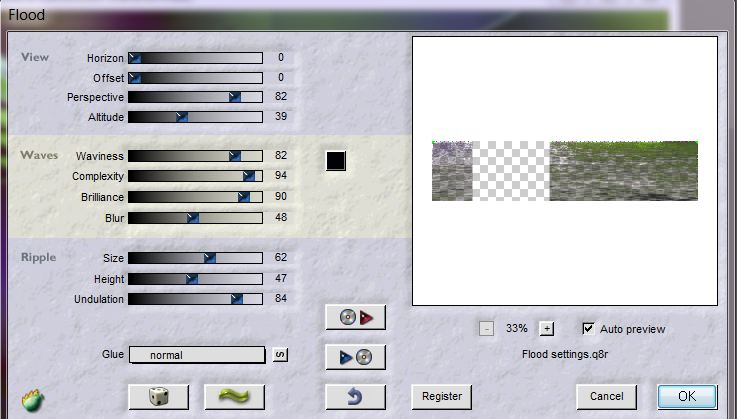
38. Selections- Deselect All
39. Set the layer opacity of this layer to 59%
- Activate the bottom of the layer palette ( = Merged Layer )
40. Selections –load/save selection –load selection from disc and choose my selection:'' @renee-look4''
- Selections- Promote selection to Layer
41. Effects-Plugins -VM Extravaganza- Transmission use settings below
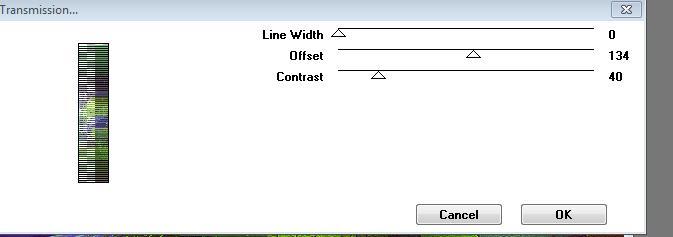
- Selections- Deselect All
41. Layer Palette - Double click on this Layer and set the Blend Mode to Luminance-Legacy "
42. Image Flip
43. Effects-Plugins -
Flaming pear -Flood
(with the same settings but horizon a 72)
44 Layers- Arrange- Bring to Top
45. Layers- New Raster Layer
46. Selections –load/save selection –load selection from disc and choose my selection: ''@renee-look3''
47.
Color Palette:Set your foreground to gradient 'Foreground-background' -Sunburst -configured like this.
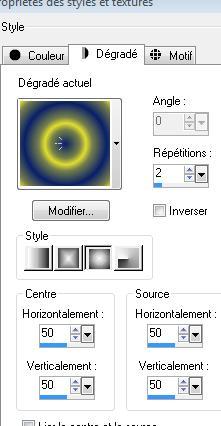
- Activate Flood Fill Tool and fill the selection with the gradient
Selections- Deselect All
48. Image Flip
49. Effects- Geometric Effects
/Circle /transparent
50. With select tool (K) scale mode / back and stretch like this picture
51. Effects-Plugins -
Eyecandy 5-Impact /Glass / using the default settings
51. Layers- Duplicate
52.Effects-Image Effects- Offset with these settings H= 0 and V = -25
- Layer Palette - Double click on this Layer and set the Blend Mode to "Luminance-Legacy "-Set the layer opacity of this layer to 79%
53. Layers- Merge Merge Down
54. Layer Palette - Double click on this Layer and set the Blend Mode to "Luminance "-Set the layer opacity of this layer to 92%
55. Effects-Plugins
-Eyecandy 5 Impact- Perspective shadow- Preset" renee_changer
de look''
To import presets Eye Candy 5 / Double click on the file it will automatically move in the setting file Filter)
56. Activate the tube
" claudiaviza-fantasia27 "/Image Resize to 80%
- Edit/ Copy-Edit - Paste as new layer on your working image
-Activate your Pick Tool (K) and move as shown in the example below
57. Activate the tube
« claudiaviza -mujer 1501 «
- Image Resize to 60%
- Edit/ Copy-Edit - Paste as new layer on your working image-(Move to the left )
58. Adjust-Brightness and Contrast -Brightness -18 and Contrast = 5
59. Activate the tube "
oiseau -raster 2"
- Edit/ Copy-Edit - Paste as new layer on your working image( Move to the right )
60. Activate the tube "nicole -porte
manteau"
- Image Resize to 40%
- Edit/ Copy-Edit - Paste as new layer on your working image and move
61. Activate the tube
« oiseaux-calque raster 1 »
Image Resize to 35% / Edit/ Copy-Edit - Paste as new layer on your working image and move
62. Layers- Duplicate /Layers- Arrange -Move Down /-Set the layer opacity of this layer to 89%
63.
Effects-Distortion Effects-Wind/Winddirection From right 100
64. Layers- Merge- Merge Visible
65. Effects-Plugins
Flaming pear flood with the same settings but horizon a 94
The setting of the filter depends on where the tube is placed
66. Image - Add borders-Symmetric checked: 5
pixels FG-Color
67. Image - Add borders-Symmetric checked:
50 pixels #ffffff
68. Image - Add borders-Symmetric checked: 5 pixels FG-Color
69. Activate the Magic Wand and select the white border of 50 pixels
- Activate Flood Fill Tool and fill the selection with the gradient
Warning do not try to install this filter for the PSP versions from the 13 it may cause problems
If your filter Mezzo force Ice does not give the same result- image is into the zipfile and paste as a new layer on your working area and move
70. Effects- Plugins -
Manekenai /mezzoforce /preset freezme now use settings below
71. Selections- Promote selection to Layer
72. Effects-Edge Effects- Enhance
- Selections- Deselect All
73. Click on your Text Tool/(font
Satisfaction )
-(Font included in the zip ) Write your Text-Effects- 3D Effects- Inner Bevel with the foreground color
74. Layers- Merge- Merge All
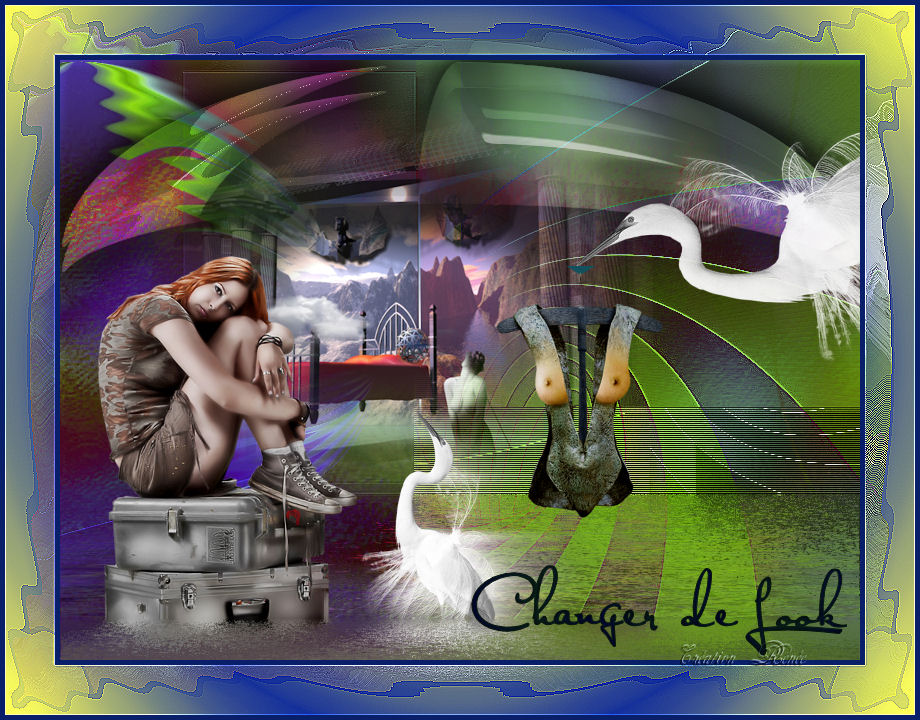
Save as JPEG
I hope you enjoyed this lesson
Renée
This lesson was written by Renée 2008
Edited and Update
April 2008
*
Any resemblance with an existing lesson is a coincidence
* Do not forget to thank the people who work with us and for us I have appointed the tubeurs and translators
Thanks Renée
*
| 
 Translations


 When you see this logo the filter is imported in Unlimited

 All rights reserved