|
New
Translations
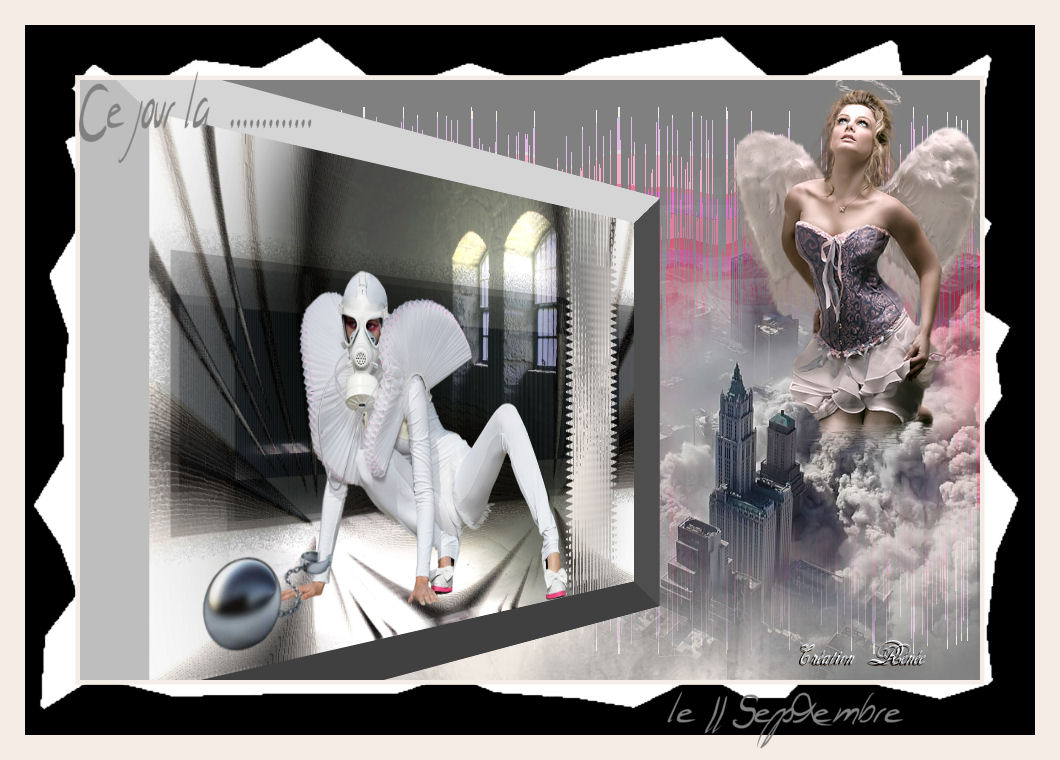
That day ... . September 11
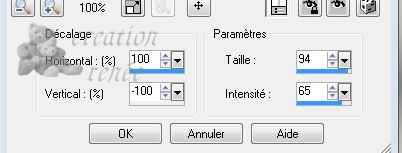
Let's start the lesson. 1. Color-palette:Set your foreground color to color #f5ede5 -Set your background color to color #808080 2. Set your foreground to gradient 'Foreground-background' - Radial - Angle 145 - Repeats 12- Invert not checked. 3.File: Open een new transparent image 900 x 600 pixels -Activate Flood Fill Tool and fill the layer with the gradient 4. Effects- Distortion Effects- Warp use settings below
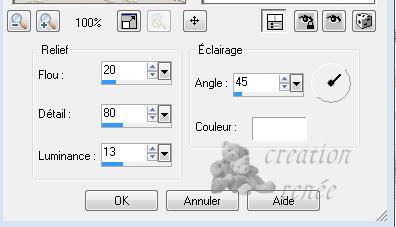
5. Layers- Duplicate- Image Mirror-Set the layer opacity of this layer to 50% 6. Layers- Merge- Merge Layers Down 7. Effects- Texture Effects- Sandstone use settings below
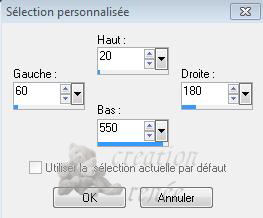
8. Open the tube "femme masque "« Edit/ Copy-Edit - Paste as new layer on your working image and move 9. Open the tube « boulet « Edit/ Copy-Edit - Paste as new layer on your working image and move 10. Activate Selection Tool -Custom Selection (S) -Rectangle with these settings
- Activate Flood Fill Tool and fill the selection with the gradient 11. Selections- Deselect All 12. Effects- Distortion Effects- Wave use settings below
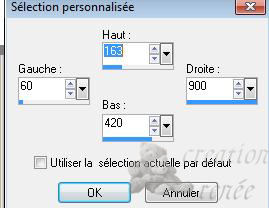
13. Image Mirror 14. Activate Selection Tool -Custom Selection (S) -Rectangle with these settings
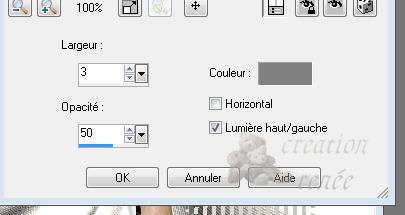
15. Layers- New Raster Layer - Activate Flood Fill Tool and fill the selection with the backgroundcolor 16. Selections- Modify-Contract 10 pixels 17. Activate Flood Fill Tool and fill the selection with the foregroundcolor 18. Effects- Texture Effects- Blinds use settings below -backgroundcolor
19. Selections- Deselect All 20. Effects- Plugins -Toadies /what are you a /20/20 21. Layers- Duplicate 22. Effects- Plugins -Toadies /Blur'em 17/25 23. Layers- Arrange- Move Down - Activate top layer in the Layer palette 24. Layers- Merge- Merge Layers Down -Make copy of raster 5 active //Layer Palette - Double click on this Layer and set the Blend Mode to " Difference " - You should have this result as shown in the print screen below
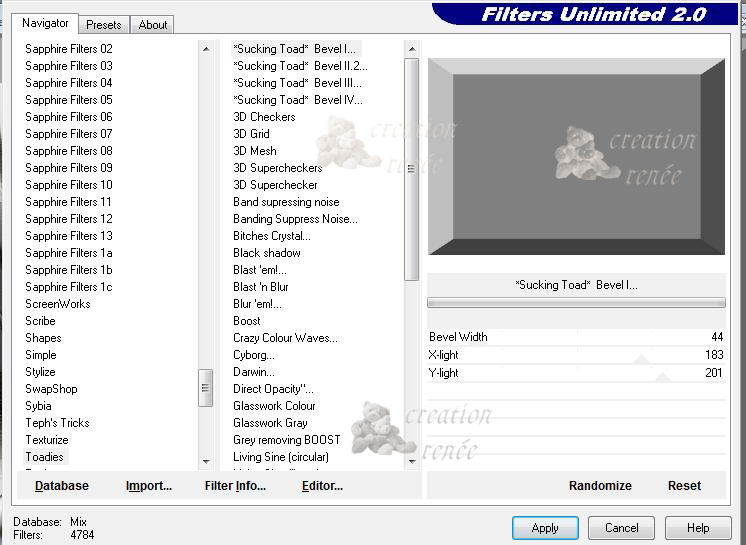
- Stay on this layer =copy of raster 5 25. Open the tube « AAABIBICHE3FENETRES « / Edit/ Copy-Edit - Paste as new layer on your working image - do not move !! /Layer Palette - Double click on this Layer and set the Blend Mode to "Hard Light " Set the layer opacity of this layer to 73% 26. Layers- Merge- Merge Layers Visible 27. Image Resize to 85% all layers not checked 28. Layers- New Raster Layer/ Activate Activate Flood Fill Tool and fill the layer with the background color 29. Effects- Plugins-Unlimited - Toadies /Sucking Toad Bevel use settings below
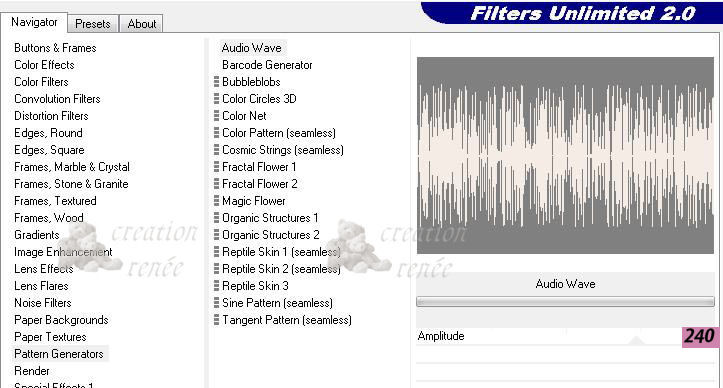
- Repeat this filter with the same settings 30. Layers- Merge- Merge Layers Visible 31. Effects - Plugins -Andromeda perspective - preset /it open close 32. Set your foreground to gradient 'Foreground-background' - Linear - Angle 0- Repeats 0 - Invert checked. 33. Layers- New Raster Layer Layers- Arrange- Move Down/ Activate Activate Flood Fill Tool and fill the layer with the gradient 34. Layers- Duplicate- Activate the layer underneath 35. Effects- Plugins - Unlimited Pattern Generators/Audio wave/240
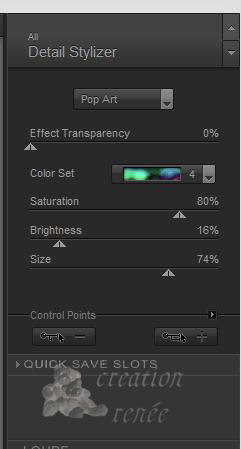
- To replace the top of the Layer Palette/Effects- Plugins - Unlimited Pattern Generators/Audio wave/ 188 36. Effects- Plugins -Nick color effex pro.3/détail stylizer/pop art >>> number 4
- Layer Palette - Double click on this Layer and set the Blend Mode to " Difference " 37. Open the Brush image ''want6'' /in your PSP File- Export Custom Brush (Give it a name) - Layers- New Raster Layer - Activate Brush Tool and select my file in the list ''want6'' with these settings -Rotation = 90// Stamp your brush 3x at the bottom right side by using your foreground color and on the bottom left 1x
38. Open the tube « 11septembre// Edit/ Copy-Edit - Paste as new layer on your working image and move to the bottom right side Layers-Arrnage - Move Down *If you find the tube it is too dark applied the mask 20/20 39. Open the tube '' woman460-ByHebe'' / Image Resize to 55% / Edit/ Copy-Edit - Paste as new layer on your working image and move 40. Layers- Merge-Merge Layers Visible 41. Image - Add borders-Symmetric checked: 5 pixels foreground color 42. Image - Add borders-Symmetric checked: 50 pixels background color Activate the Magic Wand and select the border of 50 pixels 43. Open the tube « masker underground" /Edit- Copy- Edit Paste into selection 44. Selections- Deslect All 45. Image - Add borders-Symmetric checked: 25 pixels foreground color
11 September 2008
I am part of the Tutorial Writers Inc. My tutorials are registered regularly ReneeGraphisme_All rights reserved
*
|
 Translations


.png)