|
Let's begin
1.
File; Open the image ''fond_billiard_composition / Promote to background layer =Raster 1
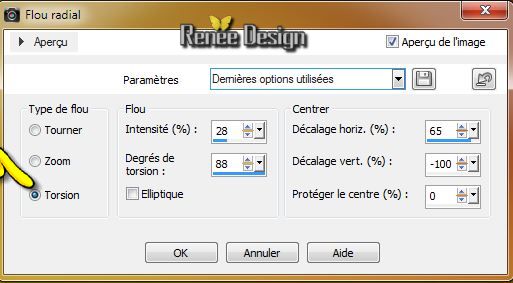
2. Adjust-Blur-Radial Blur. (we do not see a great transformation.For a better distribution of colors)
3.
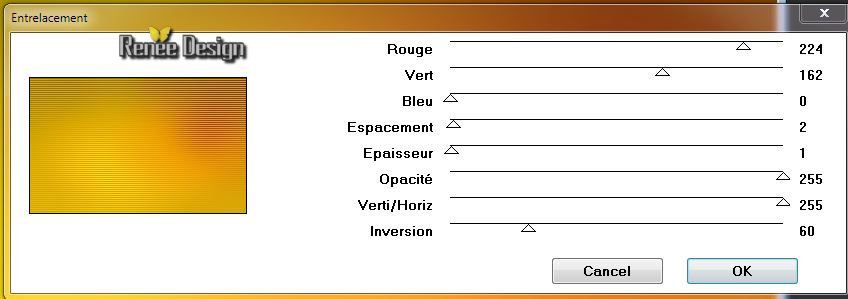
Effects -Plugins- Jeux de lignes
-Entrelacement
4.
Adjust-Sharpness-Sharpen
5.
Layers- Duplicate
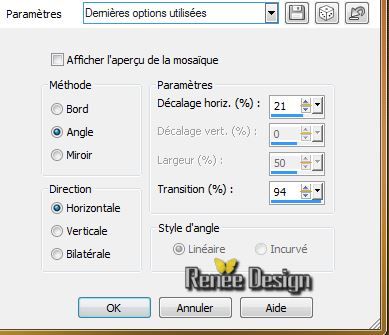
6.
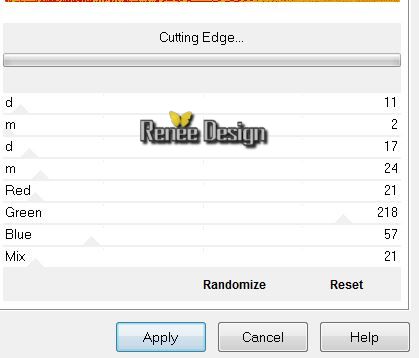
Effet - Unlimited - Plugins AB 22 / Cutting
Edge
5.
Layer-Palette: Change the Blend Mode to : "Luminance Legacy"
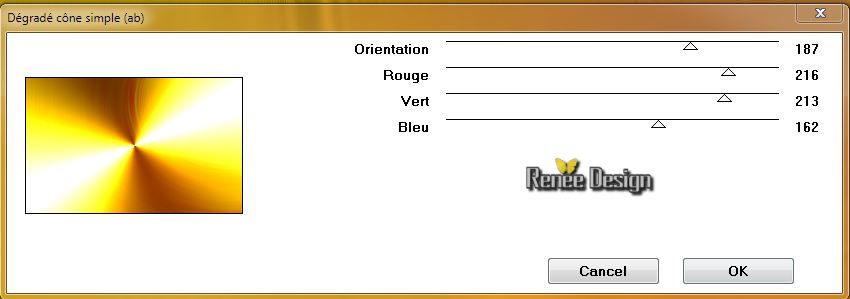
6.
Effects - Plugins -Dégradé - Cônes Simple
7.
Effects -Plugins - Transparency - Eliminate
White
8.
Adjust-Blur-Gaussian Blur; Radius: 100
9.
Effects- Image Effects-Seamless Tiling
10.
Layer-Palette: Change the Blend Mode to : "Hard Light"
11.
Layers- New Raster layer
12.
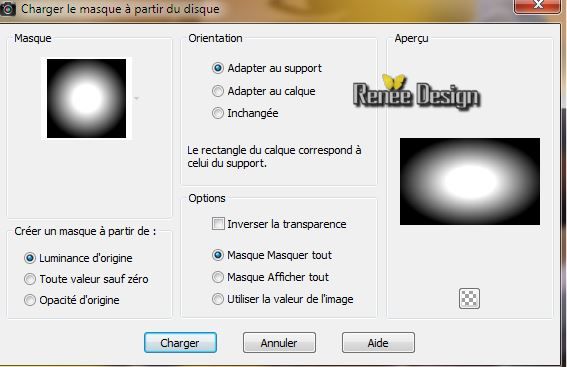
Selections - load/save selection - load selection from disk and choose:
''billiard_1"
13.Material Properties: Foreground color to color: black.Flood Fill tool : fill the selection with your FG-Color .Click 3 times into selection
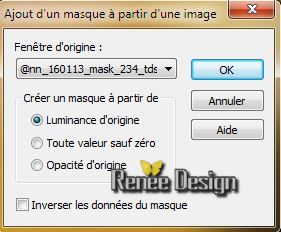
14.
Layers- New Mask Layer From Image and choose Mask:''image@nn_160113_mask_234_tdstudio''
15.Layers- Merge- Merge - Group
16.
Selections - Deselect all
17.
Layers- Duplicate/Image Flip
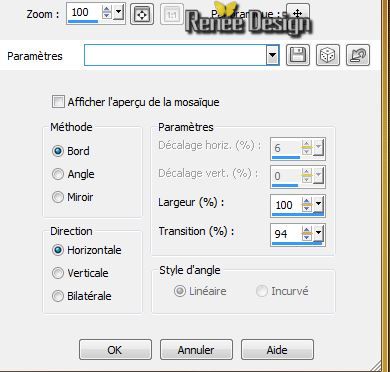
18.
Layers- Merge- Merge - Down
19.
Layer-Palette: Change the Blend Mode to : "Hue"
Your Layer Palette looks like this now

20.
Effects - Image Effects-Seamless Tiling
21.
"Layers- New raster layer
22.
Selections - load/save selection - load selection from disk and choose: "billiard_2'' /FG-Color :
#928c48 .Flood Fill Tool: fill the selection with the FG-Color .Click 3 times into selection
22.
"Layers- New raster layer
23.
Activate the tube ''billiard_composition-514747''/ Edit/copy-Edit paste into selection
Keep selection
24.
Layer-palette: Activate the layer underneath (raster2)
25.
Effects- 3D Effects- Drop Shadow: 1/1/85/14 black
Selections - Deselect all
26.
Stay on this layer /Effects -Plugins /Toadies - What
are you 66/20
27.
Activate the tube ''billiard_composition_texte_1 '' /Edit/copy -Edit/paste as a new layer
Pick Tool (K) Put it in place like below
Aktivate the top of the layer palette
28.
Materials-Properties: Forground color to color #e4d23a Background color to color: #928c48
29.
Text Tool; Font: ''123_GO''
Size
:72 >> write '' 16''/Convert to raster layer
Size: 36>> write '' Billiard - Composite
''/ Convert to raster layer. With your move tool place your text in the left corner
(You can also use a different font to your liking and make sure it's a similar effect.If necessary, use the blend mode and put on "difference" or change the opacity )
30.
Layers- Merge- Merge Down
31.
Effects -3D Effects- Drop Shadow: with the same settings
32.
Layer-Palette: Change the Blend Mode to : "Soft Light"
33.
Layer-Palette: Be placed on the layer (copie de Raster 1) (the second bottom layer)
34.
Activate the tube ''billiard_composition_effet_1.pspimage''/-Edit/copy-Edit/paste as a new layer
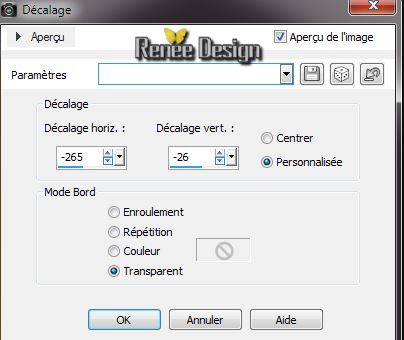
35.
Effects - Image Effects -Offset
36.
Layer-Palette: Change the Blend Mode to : "Overlay"
Aktivate the top of the layer palette
37.
Layers- New raster layer
38.
Selections - load/save selection - load selection from disk and choose:''
billiard_3''/Flood Fill Tool: fill the selection with black .
39.
Calque nouveau de masque a partir d'une image
''billiard_composition_masqueRenee.jpg''
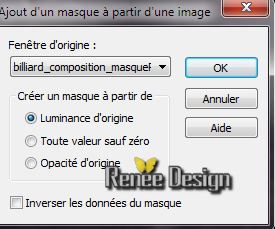
40.
Layers- Merge- Merge- Group
41.
Effects - Edge Effects - Enhance
42.
Selections - Deselect all /Layers- Duplicate (for a stronger effect)
43.
Layers- New Raster layer
44.
Selections - load/save selection- load selection from disk and select my file ''billiard_4''/ Flood Fill Tool: fill the selection with this color: #005a37
Selections- Deselect All
45.
Effects- Plugins -Icnet Filter Unlimited/ Paper Textures - Paper
kasy1 to 64 / 110
46.
Effects- Distortion Effects -Wind from left -100
47.
Layers- New Raster layer
48.
Selections - load/save selection - load selection from disk and select my file : ''billiard_5'' /
Flood Fill Tool: fill the selection with this color: #9a5b0b
49.
Effects - Plugins -EyeCandy 5 Textures/Wood -in the settings tab, click on the preset ''billiard_composition_textures''
50.
Selections- Deselect All
51.Effects- 3D Effects- Drop Shadow: with the same settings
52.
Layers- Merge- Merge Down
53.
Activate the tube '' billiard_composition_face'' / Edit/copy -Edit/paste as a new layer With your move tool place it in the right place
54.
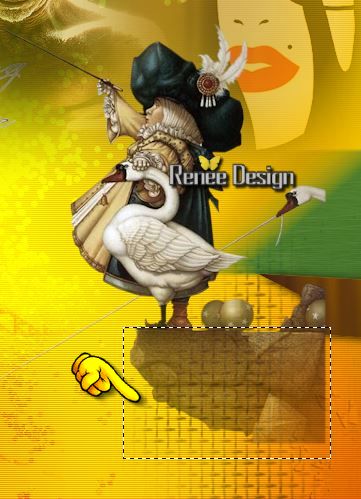
Layer-Palette: Change the Blend Mode to : "Hard Light" .Lower the opacity down to 38%
55.Layers-Merge- Merge Visible
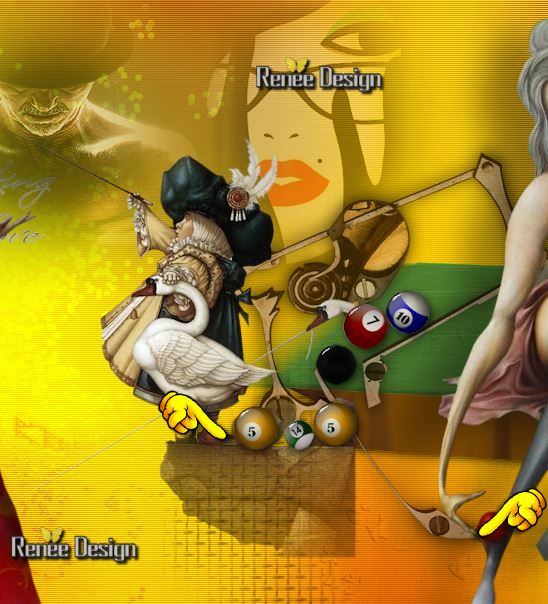
This is the result

56.
Activate the tube ' KRYSSUREALIME-01-05-14-176'' Activate the layer of woman ( raster 4)/Edit/copy -Edit/paste as a new layer. With your move tool place it in the right place
57.
Effects - Plugins -EyeCandy 5 Impact -Perspective
shadow -in the settings tab, click on the preset ''billiard_composition_shadow''
58.
Activate the tube ''FBR_leda's daughter 1997_michael
parkes 4-2-07 504 KB.psp'' /Image
Resize 75% /Edit/copy -Edit/paste as a new layer .With your move tool place it in the right place
59
.Selection Tool : rectangle (select this part
)
60.
Layers- Load/save maske-Load mask from disk ''20-20''
61.Layers- Merge- Merge - Group /Opacity of the layer down to
77%
62.
Selections - Deselect all
63.
Activate the tube
''billiard_composition_renee_boules_diverses''/ Select the balls to your own taste . Resize between 50 and 75% / Edit/copy -Edit/paste as a new layer .With your move tool place it in the right place
64.
Merge the layer balls in one single layer
65.
Effects - Plugins - EyeCandy 5 - Glass
in the settings tab, click on the preset
''billiard_boules_glass''
66.
Activate the tube ''KRYSSUREALIME-01-05-14-175.pspimage''
/Edit/copy -Edit/paste as a new layer.With your move tool place it to the left
67.
Be placed on the bottom layer (le fusionné)
68.
Activate the tube ''montage _Billiard_composition''/
Edit/copy -Edit/paste as a new layer .With your move tool place it in the right place
Put it in place like below
69.
Opacity of the layer down to 75%
70.
Activate the tube ''billiard_composition_renee_boules_diverses''/
Select the ball to your own taste (I chose raster 10) / Edit/copy -Edit/paste as a new layer.With your move tool place it in the hand of the woman on the left
71.
Effects - Plugins - EyeCandy 5 - Glass in the settings tab, click on the preset
''billiard_boules_glass''
72.
Be placed on the bottom layer (fusionné)
73.
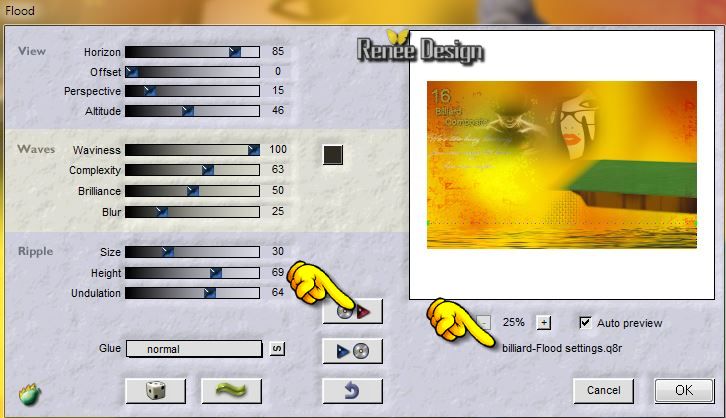
Effects -Plugins -Flaming Pear Flood: click on the red arrow ''
and choose my preset "billiard-Flood_settings"
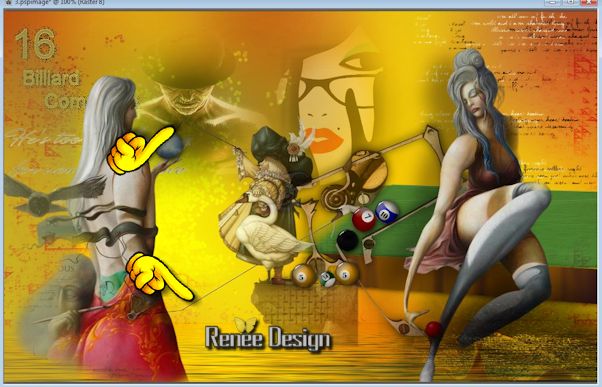
74.
Layers- New raster layer
75.
Aktivate your Paint Brush " billiard_pinceau" File: Export-Custom Brush enter a name.
Materials-Properties: Foreground color to color: black and your Background color to color white.
Open your Paint Brush: "Billard_pinceau. stamp on the top right with your FG-Color 1x and Background color 1x

76. Layers- Arrange- Move Down(above the merged)
77.
Aktivate the top of the layer palette
78.
Selections - load/save selection - load selection from disk and choose: ''billard_6''
79. Pot of paint opacity 60% .FG-Color to color : #928c48/ Flood Fill Tool: fill the selections with the FG-Color
80.
Selections - Deselect all
81. Activate the tube ''Marif_2006_octobre_misted_fleurs0100.pspimage''/Edit/copy -Edit/paste as a new layer.With your move tool place it in the lower right corner
82. Layer-Palette: Change the Blend Mode to : Multiply .Opacity of the layer down to 93%
83.
Aktivate the Pen Tool: Foreground color to color black /Style solid line /Size 1,00

Draw a line like this
84. Layer-New raster layer .
Open your Paint Brush: "Billard_pinceau. stamp on the bottom with your black color.
85.Image - Add Borders - Symmetric checked : 1 pixels black
86.Image - Add Borders - Symmetric checked : 30 pixels white
87.Image - Add Borders - Symmetric checked : 2 pixels black
88.Image - Add Borders - Symmetric checked : 2 pixels white
89.Image - Add Borders - Symmetric checked : 2 pixels black
I hope you enjoyed this lesson
Renée
This lesson was written by Renée the 15/04/2014
Created the
05/2014
*
Any resemblance with an existing lesson is merely a coincidence
*
Don't forget to thank the people who work for us and with us. I named the tubeurs - Testers and the translators.
Thanks Renée. | 
 Translations