|
Let's start the lesson.
Vacances …on en rêve/
Vacation dreams

-Preparation
- Material Properties: Set your foreground color to color # 222230= 1 – Set your background color to color # 7fa2bb=2
- Set your Foregroundcolor to foreground-background linear radial gradient configured like this
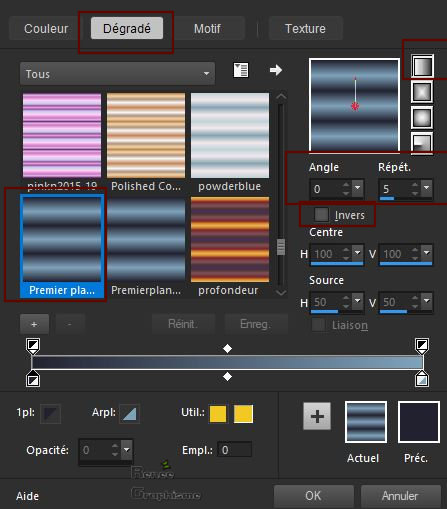
1. File: Open a new Transparent image 1005 x 665
2. Flood Fill Tool– Fill the layer with the gradient
3. Adjust- Blur- Gaussian Blur: Radius 18
4. Effects– Plugins– Medhi – Vibrations use the settings below
Colors 4 / 1 /
2
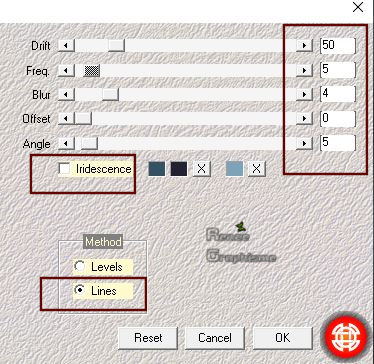
5. Layers- Duplicate
6. Effects-Distortion Effects - Wave use the settings below
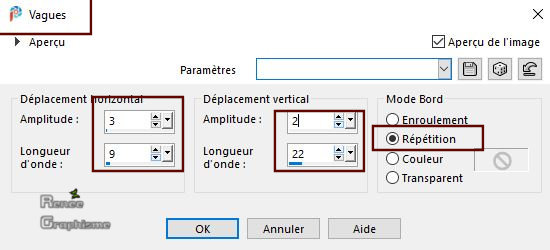
7. Layers-Properties-Change the Blend Mode to " Overlay " and Lower the Opacity to 32
8. Layers- Merge - Merge Down
9. Effects –Plugins-
Unlimited 2.0 – Graphic Plus- Quick Tile II
130/32/132/65
10. Layers- Duplicate
11. Effects- Plugins – Medhi – Sorting Tiles use the settings below
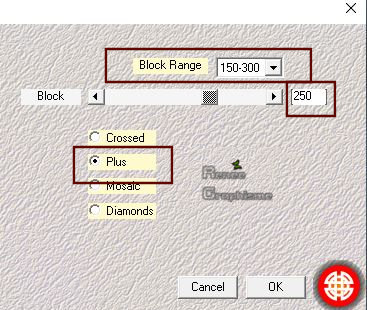
12. Effects – Edge Effects -Enhance More
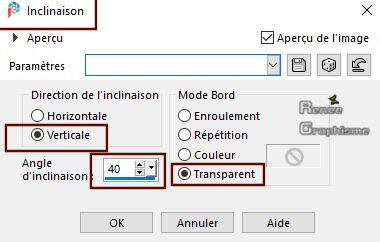
13. Effects –
Geometric Effects – Skew use the settings below
14. Effects - 3 D Effects – Drop Shadow with these settings : 8/ - 8 / 59 /60 Color Black
15. Effects –
Distortion Effects – Pinch - Strength : 60
16. Layers-Properties-Change the Blend Mode to " Hard Light "
17. Effects –Plugins-
Unlimited 2.0 – Toadies - *Sucking Toad* Bevel II.2...
115/62/43
18. Selections –load/save selection –load selection from disc and select my selection: ‘’vacance-ete 1’’
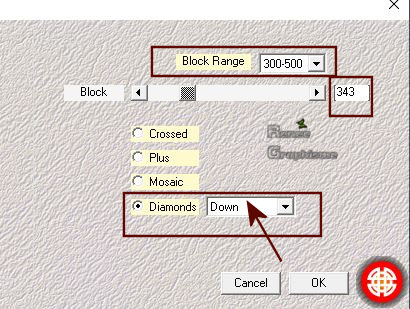
19. Effects – Plugins – Medhi – Sorting Tile use the settings below
Selections- Deselect All
20. Layers- Duplicate
21. Image - Mirror - Mirror Horizontal (Image - Mirror in older versions of PSP)
22. Activate the middle layer in the Layer- Palette
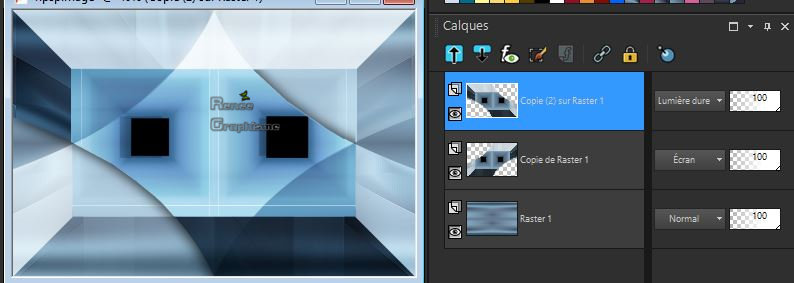
–Layers-Properties-Change the Blend Mode to " Screen "
- Your work and Layer Palette look like this now-You should have this result
- To replace the top of the Layer-Palette
23. Layers- Merge - Merge Down
- Layers-Properties-Change the Blend Mode to " Normal "
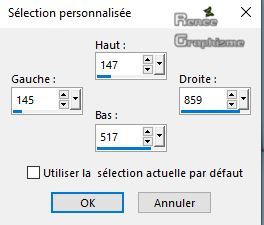
24. Activate Selection Tool -Custom Selection (S) -Rectangle with these settings
25. Selections- Promote Selection to Layer
Attention - Close eye of the Top Layer (promoted selection layer )
- Activate the middle layer in the Layer- Palette ( Copy of Raster 1)
26. Adjust- Blur- Gaussian Blur: Radius 35
27. Effects –Plugins
Unlimited 2.0 – Toadies - *Sucking Toad* Bevel
II.2... 75/135/117
28. Effects- Edge Effects- Enhance More
29. Selections –
Modify – Contact 25 Pixels
30. Effects – Plugins - AAA Frame Foto Frame with these settings
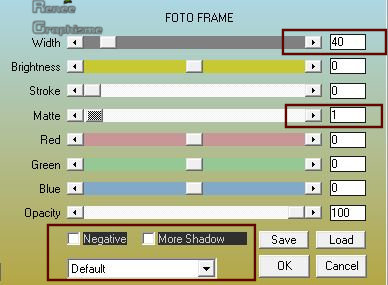
31. Selections -
Modify – Contact 18 pixels
32. Effects –3D Effects – Chisel with these settings- Color White
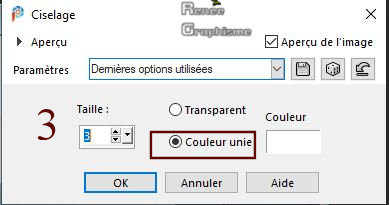
Selections- Deselect All
- Open the eye of the Top Layer in the Layer- Palette and activate
33. Effects – Plugins – Mura’s Meister – Perspective Tiling using the default settings
34. Effects – Image Effects- Offset use the settings below
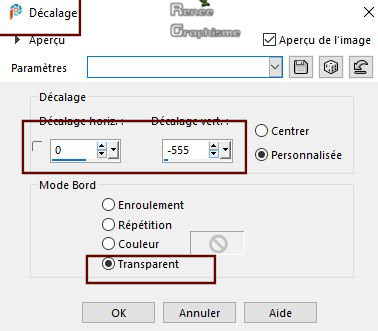
35.Selections –load/save selection –load selection from disc and select my selection: ‘’vacance-ete 2’’
36. Selection -
Modify – Expand 2 Pixels
DELETE ( 2 or 3 times)
Selections- Deselect All
-Activate the middle layer in the Layer- Palette
37.Selections –load/save selection –load selection from disc and select my selection: ‘’vacance-ete 3’’
38. Selections -
Promote Selection to Layer
39. Effects –
Texture Effects-Blinds use the settings below –Color # 7fa2bb= 2
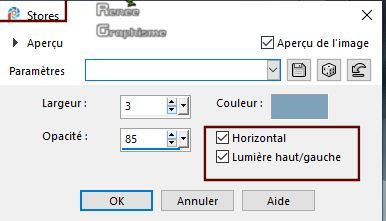
Selections- Deselect All
40. Effects –Plugins -
Unlimited 2.0 - VM Experimental – TeeWee : 167/0
41. Effects –Plugins-
Unlimited 2.0 -VM Stylize – Zoom Blur 39/60
42. Effects – 3 D Effects –
Drop Shadow with these settings : 22/ 1/ 34 /6 Color Black
- In the Layer-Palette-Activate Copy of Raster 1
43. Layers- New Raster Layer
44. Selections –load/save selection –load selection from disc and select my selection: ‘’vacance-ete 4’’
45. Color Palette-Close the Gradient-Set your foreground color to color # 66c1f5=5
Activate Flood Fill Tool – Flood fill the selection with the foreground color =5 (2 clicks)
Selections- Deselect All
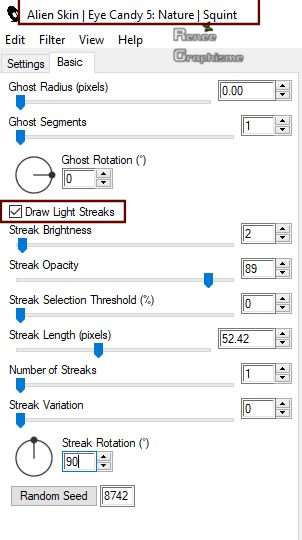
46. Effects – Plugins – Alien skin Eye Candy 5 – Nature- Squint use the settings below
- To replace the top of the Layer-Palette
47. Open the tube ‘’Vacances-Nuage’’ -Edit - Copy- Activate your work -Edit - Paste as a new layer
-
Place up against the edge of your image
48. Layers- New Raster Layer
49. Selections –load/save selection –load selection from disc and select my selection: ‘’vacance-ete 5’’
50. Set your foreground color to color #fff76b=6
Activate Flood Fill Tool – Flood fill the selection with the foreground color =6
Selections- Deselect All
51. Adjust- Blur- Gaussian Blur -Radius 21
52. Layers- Duplicate
53. Layers- New Raster Layer
54.Selections –load/save selection –load selection from disc and select my selection: ‘’vacance-ete 6’’
55.Set your foreground color to color #ffffff=7
Activate Flood Fill Tool – Flood fill the selection with the foreground color = 7 (2 clicks)
Selections- Deselect All
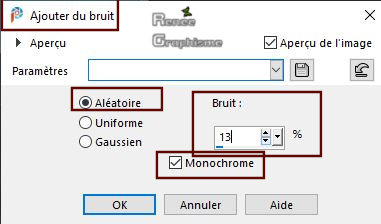
56.Adjust-Add/Remove Noise- Add Noise with these settings
57. Layers- New Raster Layer
58. Selections –load/save selection –load selection from disc and select my selection: ‘’vacance-ete 7’’
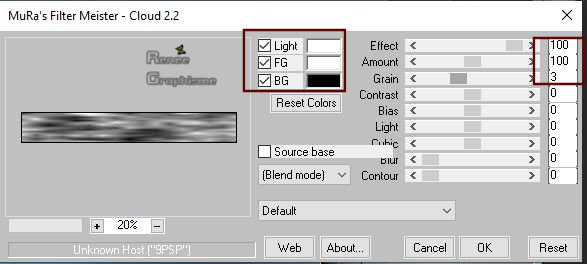
59. Effects – Plugins – Mura’s Meister – Cloud use the settings below Colors -White/White and Black
60. Effects – Edge Effects- Enhance
61. Effects-
Artistic Effects- Hot Wax Coating
62. Effects – Edge Effects- Enhance
Selections- Deselect All
63. Open the tube ‘’Vacances_Velo.’’ Edit - Copy- Activate your work -Edit - Paste as a new layer
64. Pick Tool: (K) on your keyboard -Enter these parameters for the X: 171,00 and Y:32,00 positions on the Toolbar
 171
/32
Hit the "M" key of your Keyboard to deselect the Tool
65. Open the tube ‘’Vacances_Image2’’ -Edit - Copy- Activate your work -Edit - Paste as a new layer
-With your Move Tool place it in the right place ( see finished image )
66. Open the tube ’’
Renee_TUBES_Vacances 2020’’ -Edit - Copy- Activate your work -Edit - Paste as a new layer
- With your Move Tool place it in the right place
67. Effects – Plugins – Alien Skin EyeCandy 5-Impact – Perspective
shadow Tab- Settings- User/Settings– and select my file Preset : ‘’vacances-shadow’’
68. Layers- New Raster Layer
69. Set your foreground color to color # ffcb99=8
Activate Brush Tool and select my file: ‘’Tampon- vacance’’
Apply in the middle of your work with the foreground color =8,
Activate your Move Tool (M) place on the left side (see finished image )
- Effects – 3D Effects –Drop Shadow with these settings:
1/1/100/1 Color Black
70. Open the tube ‘’ Titre Hello Summer’’ - Edit - Copy- Activate your work -Edit - Paste as a New Layer
71. Image - Add borders-Symmetric checked: 1 Pixel - Black
- Edit- Copy !!!!!
72. Open the tube "Cadre" -With your Magic Wand,(add shift) select the inside of that frame.
Edit- Paste Into Selection (Image is still in your PSP memory)
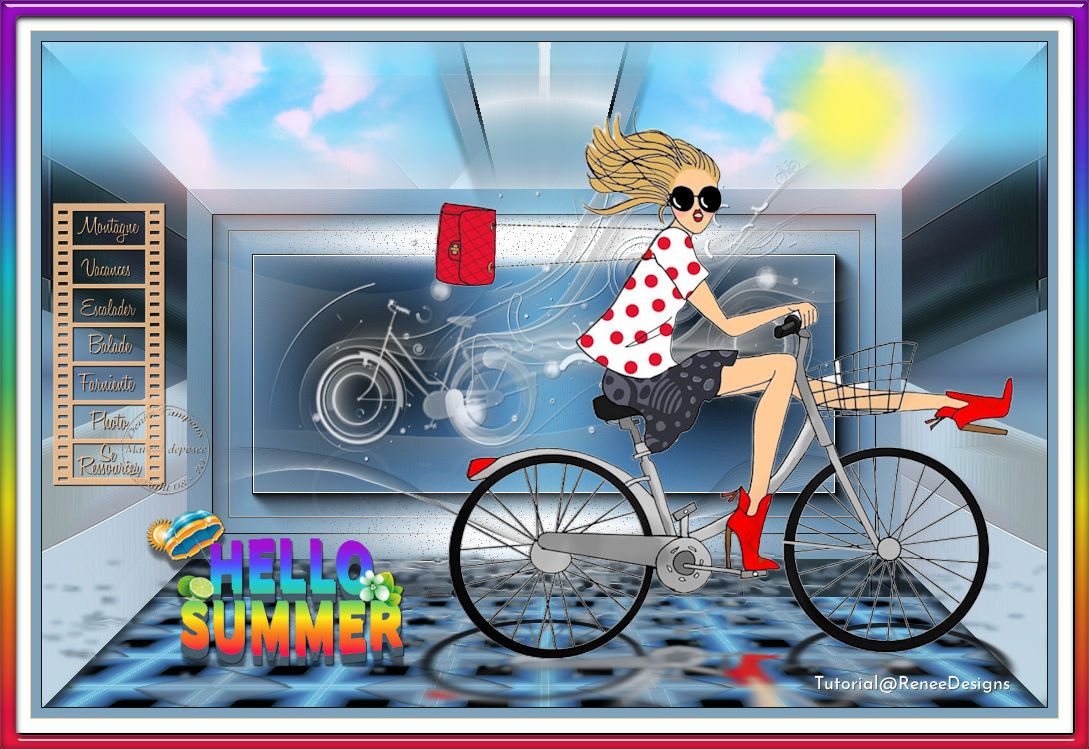
Selections- Deselect All
Safe as JPG

I hope you enjoyed this lesson
Renée
This lesson was written by Renée 05/04/2020
Edited and Update
2020
*
Any resemblance with an existing lesson is a coincidence
* Do not forget to thank the people who work with us and for us
I have appointed the tubeurs and translators
Thanks
*
|

 Translations


 ( 2 or 3 times)


