|
Let's start the lesson
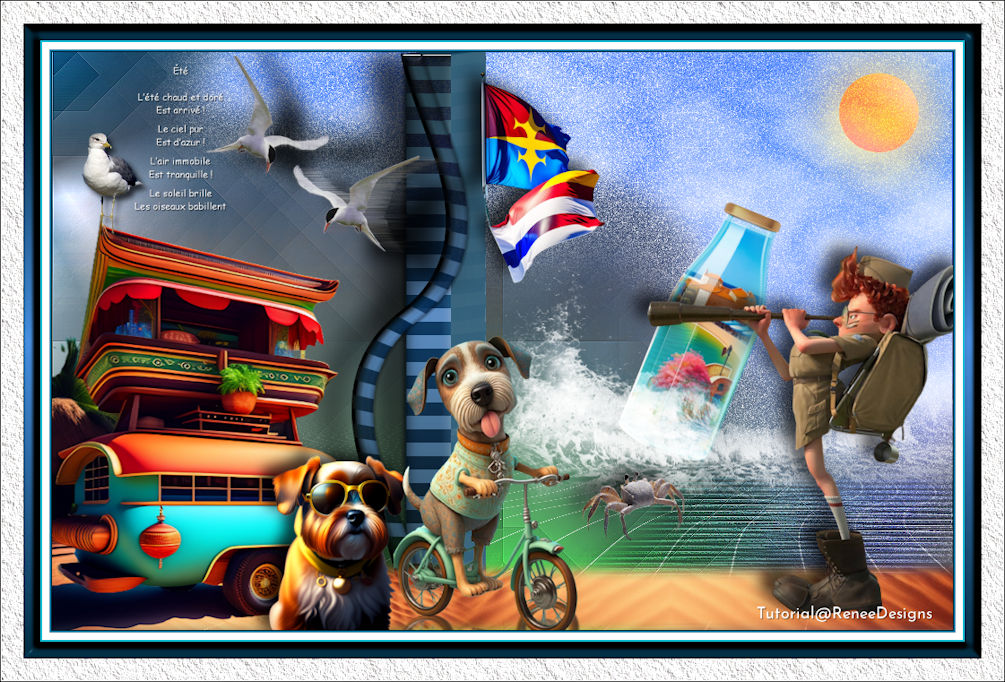
Vacation 2023

1. Open the Background Image ‘’ Renee-Vacances-2023-
Fond’’- Promote Background Layer =Raster 1
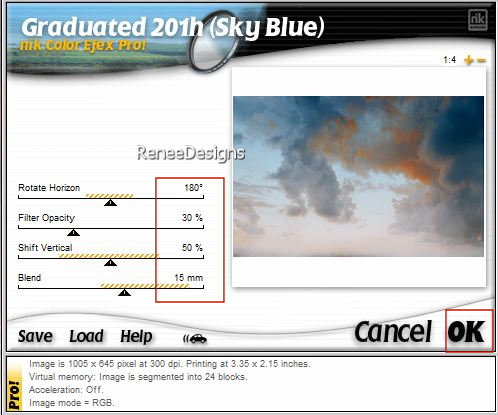
2. Effects – Plugins – Nik Color Efex Pro 1– Graduated 201h Sky Blue use the settings below
3. Layers- New Raster Layer
4. Material Properties: Set your foreground color to color #ffffff=Color 1
Flood Fill Tool  –
Fill the layer with the Foreground color =1 –
Fill the layer with the Foreground color =1
5. Layers-Properties-Set the Blend Mode to "Soft Light "
6. Layers- Merge- Merge Down
7. Effects - Plugins - Filters in Unlimited 2.0 - &<Background
Designers IV>- sf10 Slice N Dice
8. Effects - Plugins - Filters in Unlimited 2.0 - It@lian Editors
Effect - Effetto Fantasma: 20/20
9. Effects - Plugins - Filters in Unlimited 2.0 - &<Bkg Designer sf10
I> - Corner Half Wrap
10. Effects – Edge Effects – Enhance
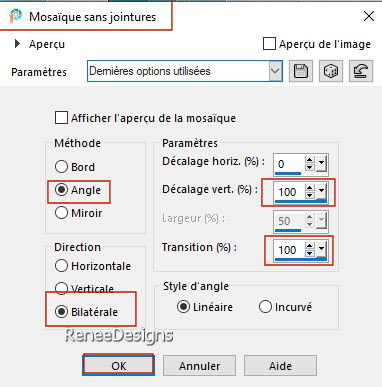
11. Effects – Image Effects- Seamless Tiling use the settings below
12. Effects - Plugins - Filters in Unlimited 2.0 - ICNET-Filters -
Color Filters - Blue Sky : 207/ 103
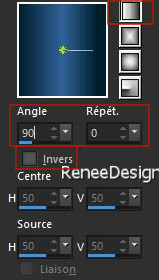
13. Effects- Illumination Effects –Lights - take my preset - Renee-Vacances-2023’’ ( put in the default settings folder)

- Material Properties: Set your Foreground color to gradient and select ‘’ bkgr10’- Style Linear with these settings
14. Layers- New Raster Layer
15.
Selections –load/save selection –load selection from disc and select my selection: ‘’vacances-2023-1’’
16. Flood Fill Tool
–
Fill the selection with the gradient

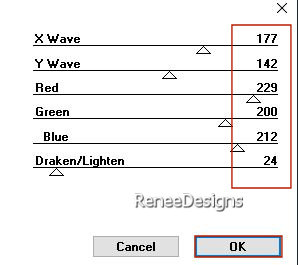
17. Effects – Plugins or preferably in the Unlimited– VideoRave - Nail art use the settings below
18. Effects – Plugins or preferably in the Unlimited– VideoRave – Old Film 2 -change the setting to 116
19.
Selections –load/save selection –load selection from disc and select my selection: ‘’vacances-2023-2’’

20. Layers-Properties-Set the Blend Mode to " Screen "
- Material Properties: Set your Background color to color #6c84ff=3
21. Layers- New Raster Layer
22.
Selections –load/save selection –load selection from disc and select my selection: ‘’vacances-2023-3’’
23. Flood Fill Tool
–
Fill the selection with the background color #6c84ff=3
24. Effects - Plugins - Filters in Unlimited 2.0 - ICNET-Filters -Render
- Clouds (fore-/background color)change the settings to 229 /183
25. Layers-Properties-Set the Blend Mode to " Hard Light "
-
Activate Raster 1 in the Layers Palette
26.
Selections –load/save selection –load selection from disc and select my selection: ‘’vacances-2023-4’’
27. Selections- Promote Selection to Layer
28. Layers- Arrange- Bring to Top
29. Effects – Edge Effects – Enhance More (repeat a second time)
30. Layers-Properties-Set the Blend Mode to " Hard Light "
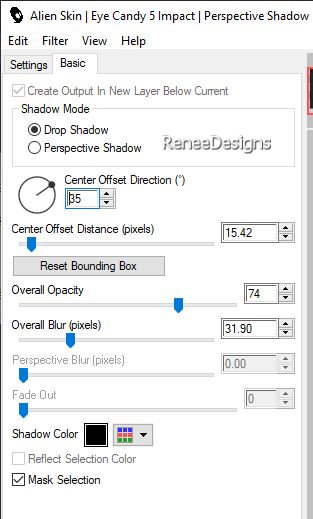
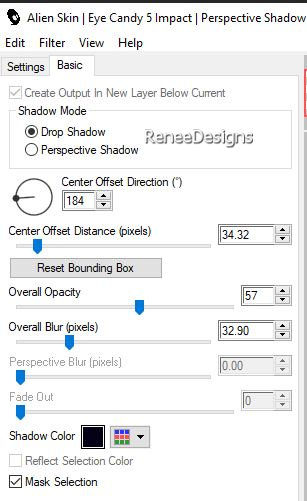
31. Effects - Plugins - Alien Skin EyeCandy 5 – Impact- Perspective
Shadow use the settings below
32. Layers- New Raster Layer
33.
Selections –load/save selection –load selection from disc and select my selection: ‘’vacances-2023-5’’
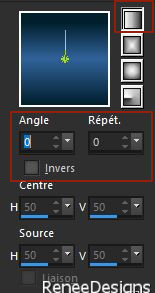
34. Properties- Foreground-Change the settings of the linear gradient :0/0
Flood Fill Tool
– Fill the selection with the gradient
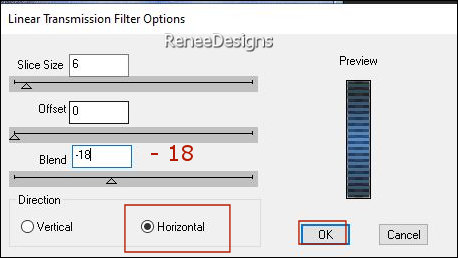
35. Effects – Plugins – dsb Flux- Lineair Transmission use the settings below
-On the same layer
36.
Selections –load/save selection –load selection from disc and select my selection: ‘’vacances-2023-6’’
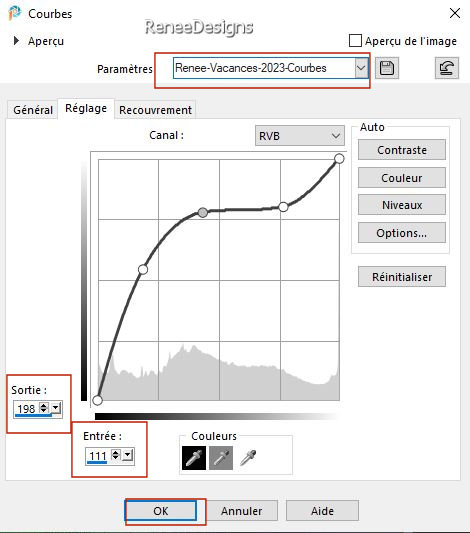
37. Layers- New Adjustment Layer – Curves –Load my preset ‘’ Renee-Vacances-2023-Courbes’’(put in the default settings folder)
38. Layers- Merge- Merge Down
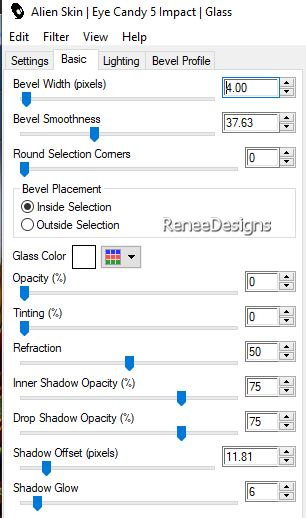
39. Effects - Plugins - Alien Skin EyeCandy 5 - Impact - Glass use the settings below
40.
Selections –load/save selection –load selection from disc and select my selection: ‘’vacances-2023-7’’
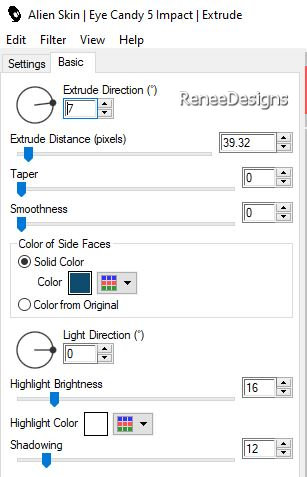
41. Effects - Plugins - Alien Skin EyeCandy 5 - Impact - Extrude use the settings below–
Colors #0f4b6c and White
42.
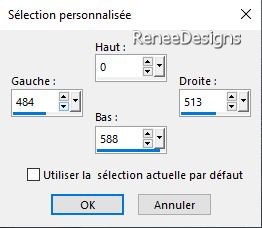
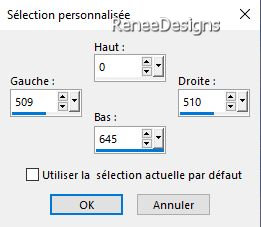
Activate Selection Tool -Custom Selection (S) -Rectangle with the same settings
43.
Effects - 3D -Effects-Inner Bevel use the settings below

44. Edit - Cut
45. Edit- Paste as new layer
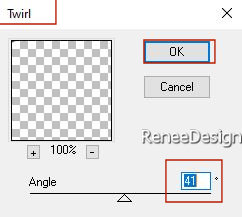
46. Effects – Plugins – Distort - Twirl use the settings below
47. Pick Tool: (K) on your keyboard -Enter these parameters on the toolbar
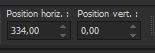 334 / 0
Press ( M ) to close the Pick Tool
Make it coincide like this
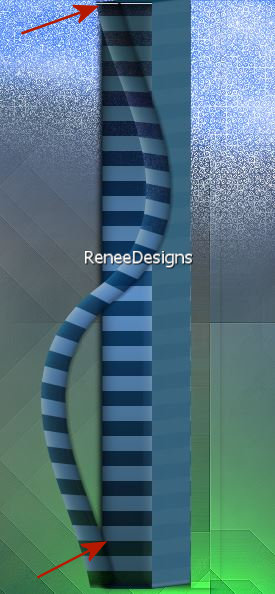
-Activate the layer underneath (Raster 4)
48.
Selections –load/save selection –load selection from disc and select my selection: ‘’vacances-2023-8’’
49. Effects - Plugins- Alien Skin EyeCandy 5 - Impact -Perspective
Shadow use the settings below
- Activate the layer above (Raster 5)
50. Repeat: Effects - Plugins- Alien Skin EyeCandy 5 - Impact -Perspective
Shadow with the same settings
51. Layers- Merge- Merge Down
52.
Open the Tube ‘’Vacances-2023-Image-Mobil-Home’’ - Edit - Copy- Activate your work -Edit - Paste as a new layer
- Place it well at the bottom left of the work( see finished image )
53. Layers- New Raster Layer
54. Activate Selection Tool -Custom Selection (S) -Rectangle with the same settings
55. Material Properties: Set your Foreground color to color #ffffff=1
Flood Fill Tool
–
Fill the selection with the Foreground color =1(zoom in if necessary)
56. Effects– Distortion Effects–Twirl- Grad 50
57. Layers – Duplicate
58. Layers- Merge- Merge Down
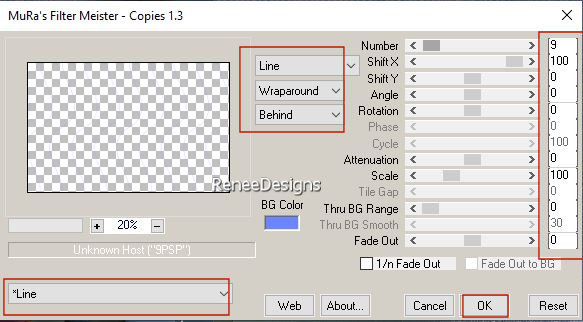
59. Effects – Plugins – Mura’s Meister- Copies use the settings below
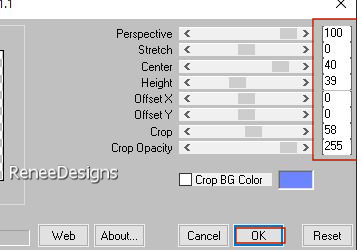
60. Effects – Plugins – Mura’s Meister – Perspective Tiling use the settings below
61. Layers- Arrange -Move Down – above raster 1 in the Layers Palette
62. Layers-Properties-Set the Blend Mode to " Screen "
63. To replace the top of the layer-palette
- Open the Tube ‘’
Vacances-2023-Image-oiseaux’’
- Select the birds - paste as a new layer on your work and place
- Drop shadows of your choice
64. Layers- New Raster Layer
65.
Selections –load/save selection –load selection from disc and select my selection: ‘’vacances-2023-9’’
66. Flood Fill Tool
–Fill the selection with the Foreground color =1
Put the image aside for now, we will need it later
--If you don't want to make the bottle yourself there are bottles in the folder
- Then paste the chosen bottle as a new layer on your work and put in the right place
- Then proceed directly to line 86
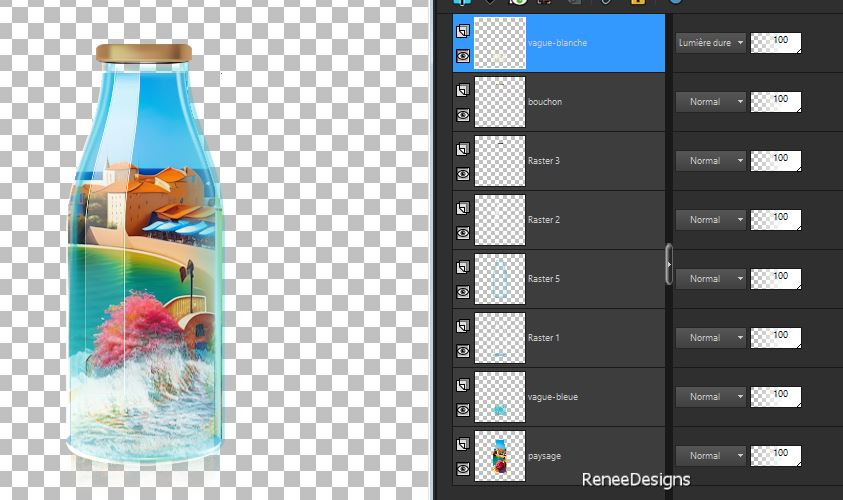
67. File: Open a new transparent image in this size: 560
x 560 Px
68. Selections –load/save selection –load selection from disc and select my selection: ‘’ vacances-bouteille1’’
69. Flood Fill Tool
– Fill the selection with the Foreground color =1
70. Selections –load/save selection –load selection from disc and select my selection: ‘’ vacances-bouteille2’’
71. Material Properties: Set your Foreground color to color #0d82ae=6
Flood Fill Tool
–
Opacity 40% -
Fill the selection with the Foreground color =6
72. Layers- New Raster Layer
73. Selections –load/save selection –load selection from disc and select my selection: ‘’ vacances-bouteille3’’
74. Material Properties: Set your Foreground color to color #ffffff=1
Flood Fill Tool
– Opacity 100% –
Fill the selection with the Foreground color =1 ( a few clicks)
75. Layers- New Raster Layer
76. Selections –load/save selection –load selection from disc and select my selection: ‘’ vacances-bouteille4’’
77. Material Properties: Set your Foreground color to color #000000=4
Flood Fill Tool
–
Opacity 100% –Fill the selection with the Foreground color =4
78. Layers- New Raster Layer
79. Selections –load/save selection –load selection from disc and select my selection: ‘’ vacances-bouteille5’’
80. Open the Tube ‘’Bouchon Bouteille ‘’ - Edit - Copy- Activate your work -Edit - Paste into Selection
-
Activate Raster 1 in the Layers Palette
81. Layers- New Raster Layer
82. Selections –load/save selection –load selection from disc and select my selection: ‘’ vacances-bouteille6’’
83. Material Properties: Set your Foreground color to color #0d82ae=6
Flood Fill Tool
–
Opacity 50 –
Fill the selection with the Foreground color =6
84. Decorate the bottle with a wave tube and a picture of your choice (erase the overhang of your image to center it in the bottle ,nothing should protrude)
Your work and Layer Palette look like this now-You should have this result
85. Layers- Merge Merge Visible
86. Effects – 3 D-Effects –Drop Shadow with these settings: 0/075/75 Color Black
- Edit- Copy !
- Activate the Image you minimized at step 66/67
87. Edit - Paste as a new layer
88. Image - Resize 68%- Resize all Layers not checked
89. Image- Free Rotate
22° to the right
-Place the bottle in the wave ( see finished image)
90. Layers- Arange- Move Down
91. Open the Tube ‘’Vacances-2023-Image-drapeaux’’ -Edit - Copy- Activate your work -Edit - Paste as a new layer
- Move it in the right place
-To replace the top of the layer-palette
92. Now for the embellishment of our work.
Renée has a separate folder with tubes that you can use, or a tube of your own - add it as a new layer on your work/ resize it if necessary/ place it as you like
Drop Shadow to your own choice
93.Open the Tube ‘’
Vacances-2023-Image-texte’’- Edit - Copy- Activate your work -Edit - Paste as a new layer
and move
Or write your own text
Everything is in place
94. Image - Add borders-Symmetric checked: 1 Pixel -Color #000000=4
95. Image - Add borders-Symmetric checked: 2 Pixels -Color #0d82ae=6
Edit- Copy
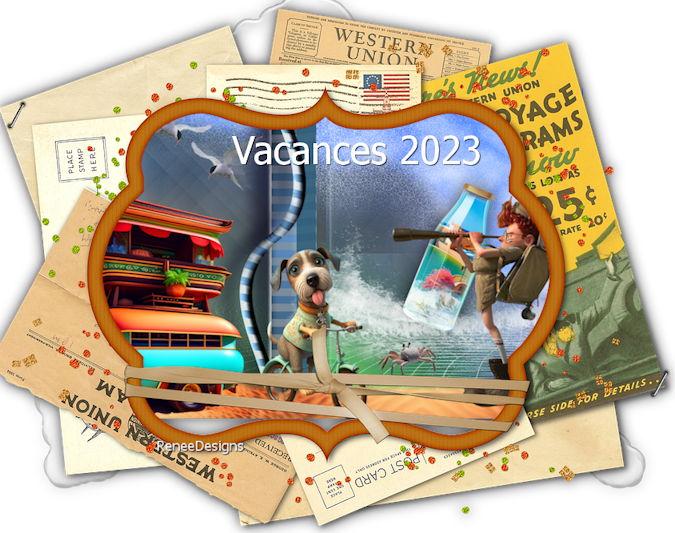
96. Open the Tube frame/ cadre
97. Edit - Paste as a new layer
98. Paste the author's watermark on your work and your own watermark
99. Layers- Merge- Merge All (flatten)
100. Image - Resize 1005 Pixels Width-Resize all Layers checked
Save as JPG

I hope you enjoyed this lesson
Renée
11/04/2023
Edited and Update
in 2023
*
Any resemblance with an existing lesson is a coincidence
* Do not forget to thank the people who work with us and for us -I have appointed the tubeurs and translators
Thanks
*
|
 Translations