|
Let's start the lesson.
-
Color-palette:Set your foreground color to color#901b1f
-Set your background color to color #ffffff

1.
File: Open a New Image – Transparent –1005 x 645 pixels
2.
Activate Flood Fill Tool and fill the layer with the foreground color #901b1f
3.
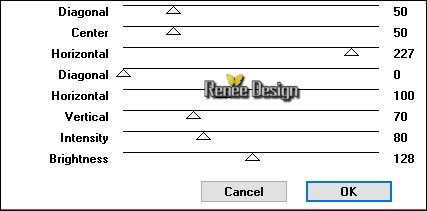
Effects- Plugins – Graphic plus – Cross
shadow use settings below
4.
Layers- New Raster Layer
5.
Selections –load/save selection –load selection from disc and choose my selection: ‘’Strange spider
blood_1’’
6.Activate Flood Fill Tool and fill the selection with the background color #ffffff

Selections- Deselect All
7. Open the tube ‘’ Strange spider
blood_image_1.pspimage »
- Edit/ Copy-Edit - Paste as new layer on your working image
8.
Effects- Image Effects- Offset with these settings: H = 0 and V = -
166 Transparent
-Leave the Blend Mode to "Hard Light "
9.
Effects –Plugins-Unlimited - MuRa's Seamless-Mirror Diagonal...
216
10. Open the tube ‘’ Strange spider blood_image_2.pspimage’’
- Edit/ Copy-Edit - Paste as new layer on your working image
- Do not move it is in the right place
11. Layers- New Raster Layer
12. Selections –load/save selection –load selection from disc and choose my selection: ‘’Strange
spider blood_2’’
13.Activate Flood Fill Tool and fill the selection with the background color #ffffff
14.
Selections- Modify - Contract 4 pixels
15. Layers- New Raster Layer
- Color- Palette: Set your background color to color
#bdc3c3
16. Activate Flood Fill Tool and fill the selection with the background color
17.
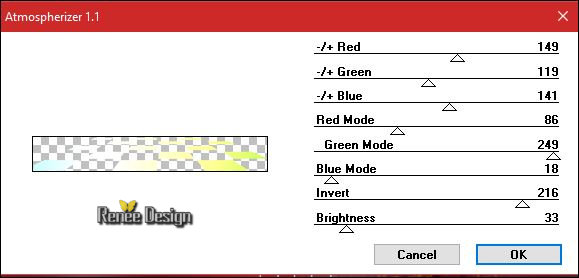
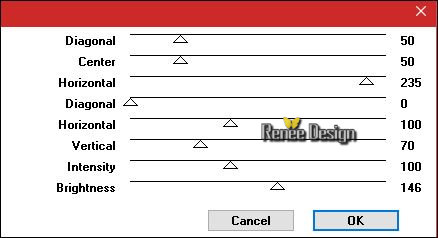
Effects- Plugins in Unlimited – Color rave –
Atmospherizer 1.1 use settings below
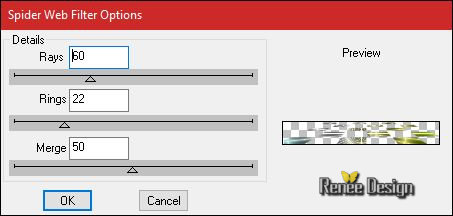
18. Effects- Plugins – DBS Flux – Spider Web Filter Options
19. Effects- 3 D Effects- Drop Shadow with these settings: 1/1/100/15 black
Selections- Deselect All
20. Layers- Merge- Merge Layers Down
21. Effects- 3 D Effects- Drop Shadow with the same settings
22. Layers - Arrange - Send to the second layer of the layer palette (above raster 1)
- Layer Palette -double click on this layer and set the Blendmode to "Soft Light "
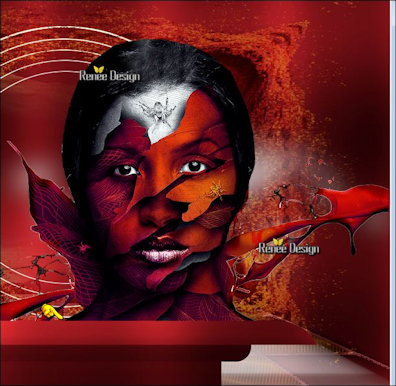
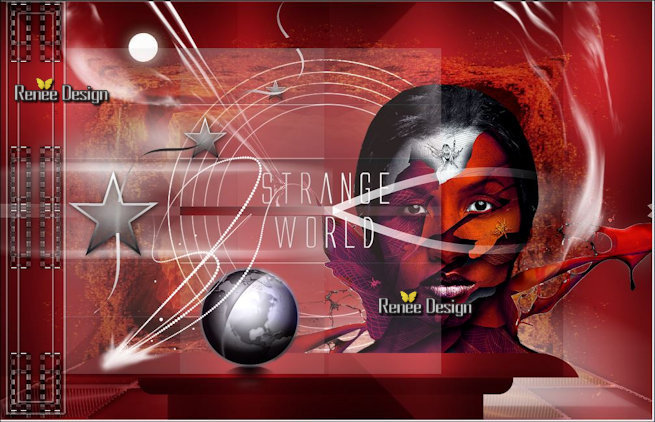
Your work and Layer Palette look like this now-You should have this result

- Activate the top of the layer palette
- Color-Palette: Set your background color to color #ffffff
23. Layers- New Raster Layer
24. Selections –load/save selection –load selection from disc and choose my selection: ‘’Strange
spider blood_3’’
25. Activate Flood Fill Tool and fill the selection with the background color #ffffff (2 clicks )
Selections- Deselect All
26. Effects- Plugins – EyeCandy 5 Impact – Motion Trail use settings below
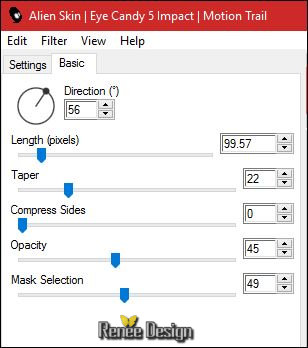
Set the layer opacity of this layer to 77%
27. Layers- New Raster Layer
28. Activate Flood Fill Tool and fill the layer with the foreground color #901b1f
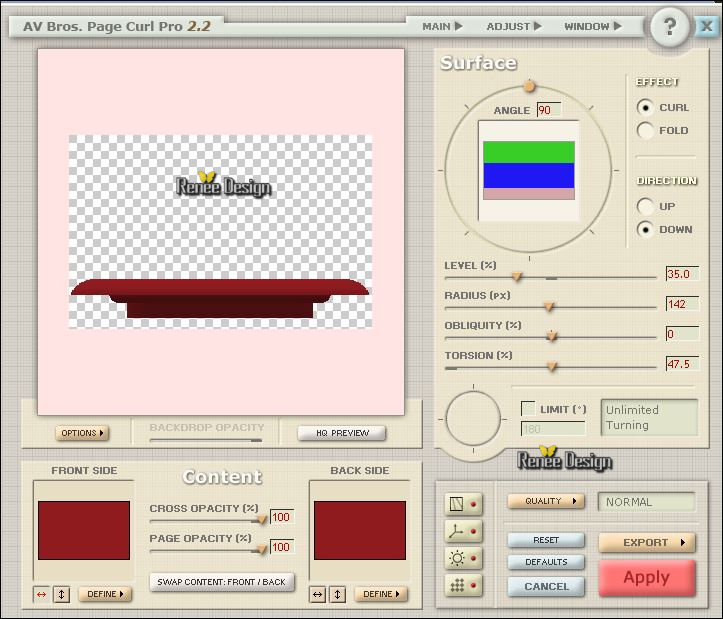
29. Effects- Plugins – AVBros –Page curl 2.2/
Preset
‘’ Strange spider blood”
1. Click Main
2. Click Load setting (relative) click to open (can be used in any folder of your choice by clicking it.)>so you can see the preset« strange
3.
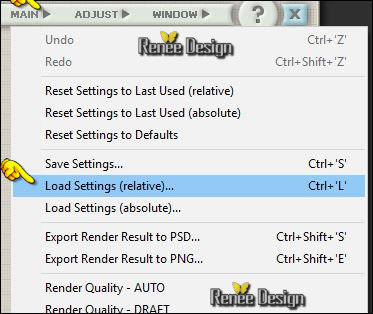
4. 
5. Click Apply and it is OK (
Or manual settings as shown in the example below )
30. Image
Resize to 78% -Resize all Layers not checked
31. Effects- Image Effects- Offset with these settings: H = 0 and V = -101 Transparent
32. Effects- Plugins – Graphic plus - Cross shadow use settings below
33. Open the tube ‘’ Renee_tube_girl-spider-blood.pspimage’’
- Image
-Resize to 68%
- Edit/ Copy-Edit - Paste as new layer on your working image
- Activate Move Tool (M) move it the right place as shown in the example below
34. Layers- New Raster Layer
35. Selections –load/save selection –load selection from disc and choose my selection: « Strange
spider blood_4 »
36.Activate Flood Fill Tool and fill the selection with the background color #ffffff (2 clicks)
Selections- Deselect All
Warp Brush Tool and click Deformation map

This window will open
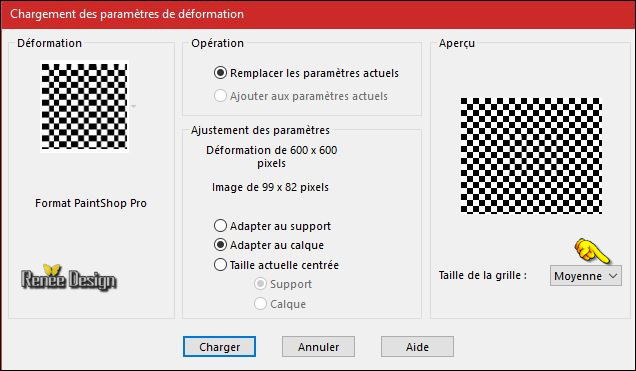
Click on load and the effect will apply
Warning: the tester Flo noticed that some PSP curling effect like this as shown in the example below 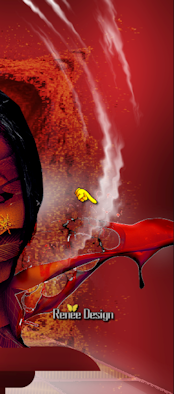
your filter gives the same result –delete your layer and replace it with ‘’Strange spider
blood_effet_Miroir deformant ’’ The effect is included with the material and paste as a new layer and move
38. Layers-Duplicate – Image Mirror
39. Effects- Distortion Effects- Warp use settings below

- Layer Palette -double click on this layer and set the Blendmode to " Screen "
40. Open the tube ‘’Strange spider blood_Lune.png»
- Edit/ Copy-Edit - Paste as new layer on your working image
- With the move tool, move it in the upper left
41. Open the tube ‘’ Strange spider blood_Texte.png
- Edit/ Copy-Edit - Paste as new layer on your working image
- Do not move it is in the right place
42. Layers- New Raster Layer
43. Selections –load/save selection –load selection from disc and choose my selection: ‘’Strange
spider blood_5’’
44.Activate Flood Fill Tool and fill the selection with the background color #ffffff
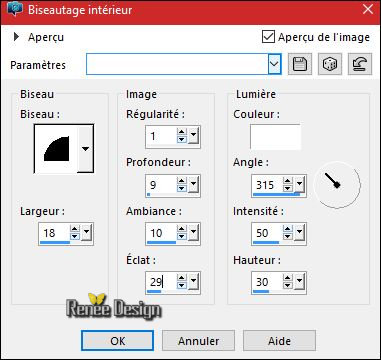
45. Effects- 3 D Effects- Inner Bevel use settings below
Selections- Deselect All
-
Set the layer opacity of this layer to 44%
46. Open the tube ‘’ Strange spider blood_image11.png’’
- Edit/ Copy-Edit - Paste as new layer on your working image
47. Effects- Image Effects- Offset with these settings: H = - 447 and V = 5 Transparent
48. Layers-Arrange- Move Down
- To replace the top of the layers palette
49. Layers- New Raster Layer
50.
Pot of Paint: Change the opacity of the color at 50%/
Activate Flood Fill Tool and fill the layer with the background color #ffffff
51. Effects –Plugins- Unlimited - Alf's Power Grads- 4 Linear
Grads......
64
52. Effects- Plugins – Simple – Pizza slice Mirror
- Layer Palette -double click on this layer and set the Blendmode to "Soft Light " and set the layer opacity of this layer to
57%
53. Selections –load/save selection –load selection from disc and choose my selection: ‘’Strange
spider blood_6’
54.
Selections- Promote Selection to Layer
55. Effects- Plugins Simple – 4 Way average
Selections- Deselect All
56.
Effects- Plugins - L and K’s
Sanne 255 /0
- Layer Palette -double click on this layer and set the Blendmode to "Soft Light " and set the layer opacity of this layer to 100%
57. Layers- New Raster Layer
58. Pot of Paint: Change the opacity of the color at 100% Activate Flood Fill Tool and fill the layer with the foreground color #901b1f
59. Image-
Resize to 40% Resize all Layers not checked
60.
Effects- Plugins - AAA Frame Foto
frame use settings below

61.
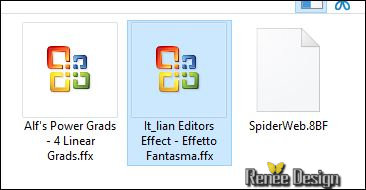
Effects –Plugins-Unlimited - It@lian Editors Effect - Effetto
Fantasma 46/ 97
62. Effects- Image Effects- Offset with these settings: H = - 114 and V =
0 Transparent
63. Layers- New Raster Layer
64.
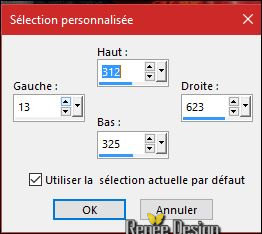
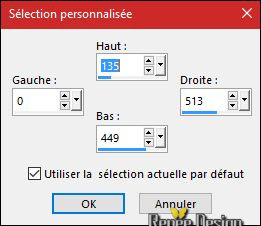
Activate Selection Tool -Custom Selection (S) Rectangle with these settings
65. Activate Flood Fill Tool and fill the selection with the background color #ffffff
Selections- Deselect All
66. Effects- Plugins - L and K’s – Sanne 0/185
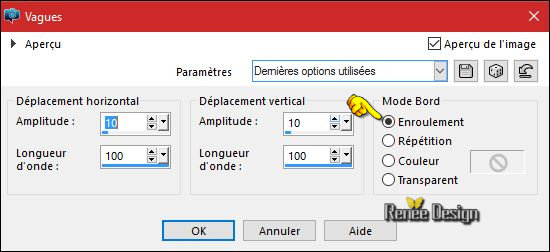
67. Effects- Distortion Effects- Wave use settings below
68. Layers- Duplicate –Image Flip
69. Layers- Merge- Merge Layers All
70.
Activate Selection Tool -Custom Selection (S) Rectangle with these settings
71.
Effects- Plugins - L and K’s – Sanne
0/185
Selections- Deselect All
72. Open the tube ‘’ Strange spider blood_terre.png’’
- Edit/ Copy-Edit - Paste as new layer on your working image
73. Effects- Image Effects- Offset with these settings-Wrap

74. Layers- New Raster Layer
75. Selections –load/save selection –load selection from disc and choose my selection: « Strange
spider blood_7 »
76. Activate Flood Fill Tool and fill the selection with the background color #ffffff
Selections- Deselect All
77. Layers- Merge- Merge Layers Visible
78. Open the tube « Strange spider
blood_Etoile.png »
79. Edit/ Copy-Edit - Paste as new layer on your working image
- Effects- Image Effects- Offset with these settings: H = - 328 and V = -3 Transparent
80. Layers- Duplicate
- Image
-Resize to 50% Resize all Layers not checked
- Effects- Image Effects- Offset with these settings: H = -23 and V = 115 Transparent
81. Layers- Duplicate
- Image
Resize to 50% Resize all Layers not checked
- Effects- Image Effects- Offset with these settings: H= 15 and V = 130 Transparent
82. Layers- New Raster Layer
83. Effects- Image Effects- Offset with these settings: ‘’Strange
spider blood_8’’
-
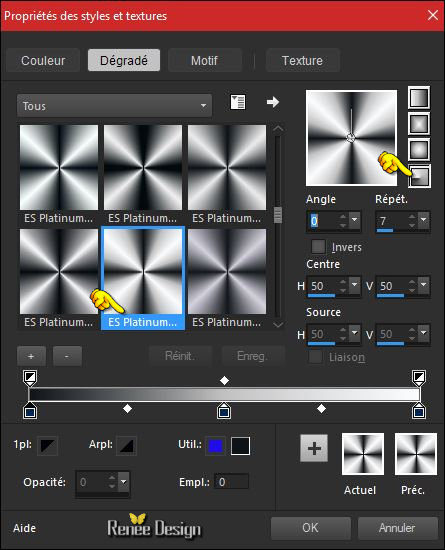
Properties Foreground : Change foreground material into gradient and select ‘’ES Platinum
17’’
-
Put your foreground on the radial gradient with settings below
84. Activate Flood Fill Tool and fill the selection with the gradient
Selections- Deselect All
(Check the placement of your stars for this)
85. Layers- New Raster Layer
86. Selections –load/save selection –load selection from disc and choose my selection: ‘’Strange
spider blood_9’’
87. Activate Flood Fill Tool and fill the selection with the gradient
Selections- Deselect All
88. Effects- 3 D Effects- Drop Shadow with these settings: 0/-7/55/12 black
89.
Image - Add Borders - Symmetric checked 1 pixel #ffffff
90. Image - Add Borders - Symmetric checked 10 pixels black
91.
Activate the Magic Wand and select the black border of 10 pixels
92. Activate Flood Fill Tool and fill the selection with the gradient
93.
Selections - Invert
94. Effects- 3 D Effects- Drop Shadow with these settings: 0/0/55/48 black
Selections- Deselect All
95. Image - Add Borders - Symmetric checked 1 pixel black
96. Image - Add Borders - Symmetric checked 50 pixels #ffffff
-
Selections- Select All
97.
Selections Modify- Contract 15 pixels
98.
Effects- 3 D Effects- Drop Shadow with the same settings: 0/0/55/48 black
Selections- Deselect All
99. Open the Text ... ore write your own text
Click on your Text Tool/Font-784 Included into the zipfile (You will see this font 784 in PSP as "computer amok ')
Save as JPEG
I hope you enjoyed this lesson
Renée
This lesson was written by Renée 24/05/2016
Edited and Update
2016
*
Any resemblance with an existing lesson is a coincidence
* Do not forget to thank the people who work with us and for us I have appointed the tubeurs and translators.
Thanks Renée
*
| 
 Translations


 When you see this logo the filter is imported in Unlimited

 All rights reserved