|
Let's start the lesson .

1. Open your background image
''fond_steampunk_22.jpg"- Promote background layer =raster 1
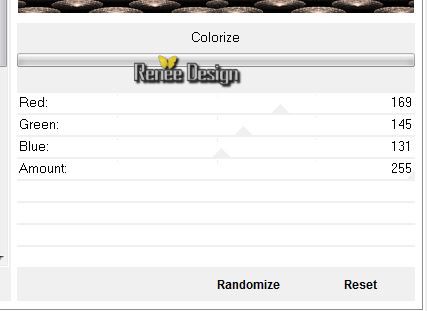
2. Effects- Plugins - Unlimited 2.0
- &<Sandflower Special °V° >- Colorize
3.
Activate image ''steampunk_22_renee_image1''/ Copy -Edit - Paste as new layer on your working area
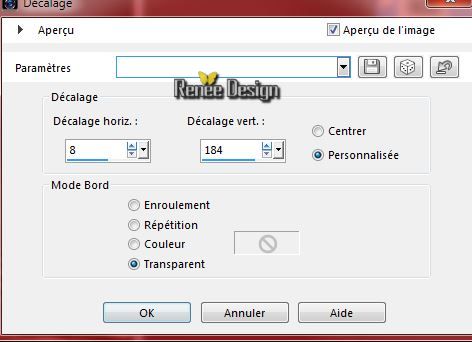
4.
Effects- Image Effects- Offset with these settings
5.
In the Color Palette:Set foreground to color #3e5480 and background to: #000000
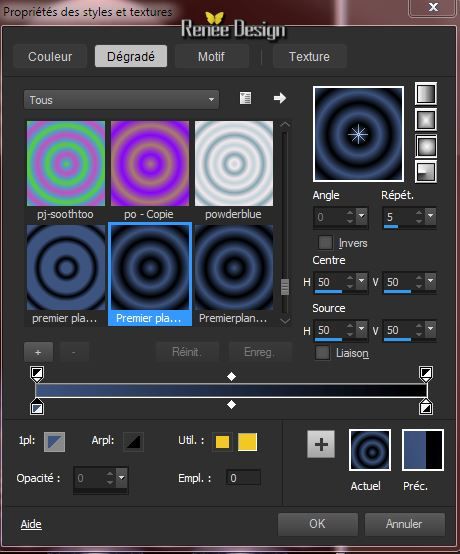
-
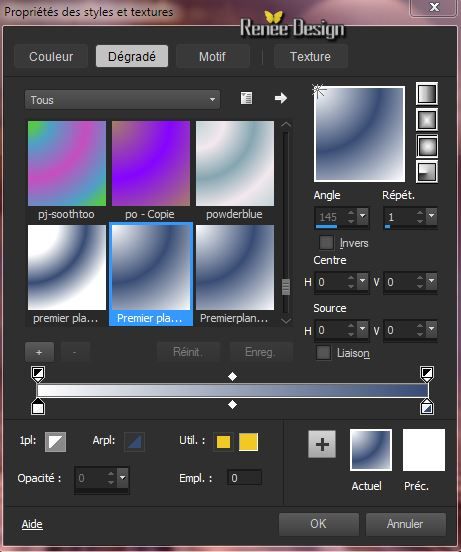
Put your foreground/background into a sunburst gradient as configured
6.
Layers - New raster layer
-Activate Flood Fill Tool and fill the layer with the gradient
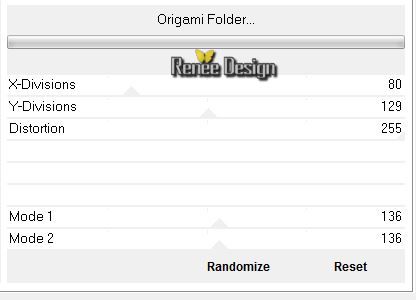
7.
Effects- Plugins - VM Instant art- Origami
Folder
8.
Layer Palette -Double click on this Layer and set the Blend Mode to"Screen "
9.
Layers- Duplicate-Image-Flip
10.
Effects- Image Effects- Offset with these settings

11.
Layers- Merge- Merge-Down
12.
Effects- Distortion Effects- Wind/Wind direction From left 100°
13.
Layers - New raster layer
-Activate Flood Fill Tool and fill the layer with color white
14.
Layers-New Mask Layer From Image and choose Mask:
''masque_renee_steampunk22.jpg''
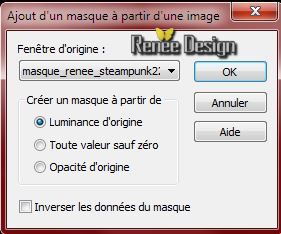
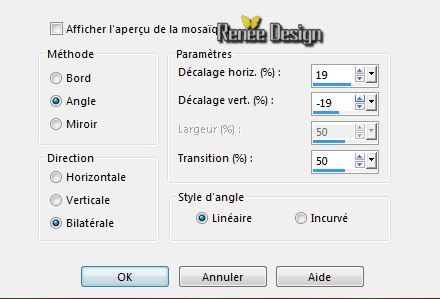
-Layers- Merge- Merge- Group
15.Effects- Image Effects- Seamless Tiling with these settings
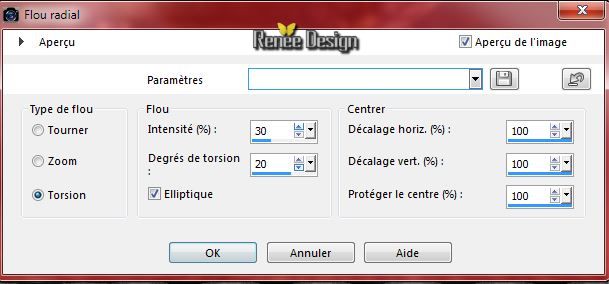
16.
Adjust-Blur-Radial Blur use settings below
17.Layers - New raster layer
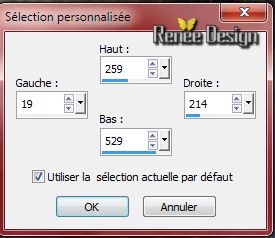
18.Selections-Custom Selection with these settings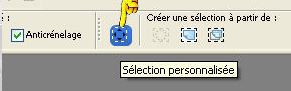
19 .
Activate the tube ''steampunk_22_renee_image2.pspimage''
-
Edit - Copy -Edit - Paste Into Selection
20.
Layer Palette -Double click on this Layer and set the Blend Mode to "Luminance-Legacy " Reduce the opacity of this layer to:
55
Selections- Deselect All
21.
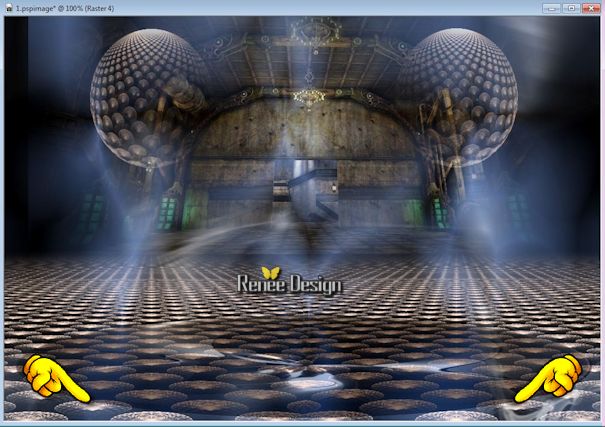
Activate Pick Tool (K) and move to the bottom like this
22.
Effects- Plugins -Unlimited 2.0 - Tronds II -Lighty

23.
In the Color Palette:Set foreground to color #ffffff and background to #384c74
24.Put your foreground/background into a sunburst gradient as configured
25.
Layers - New raster layer- Activate Flood Fill Tool and fill the layer with the gradient
26.
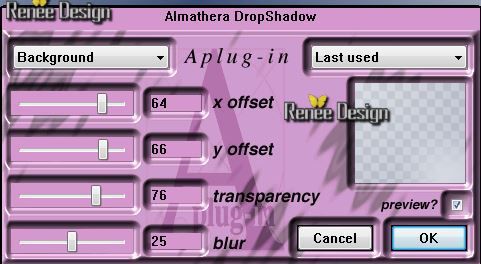
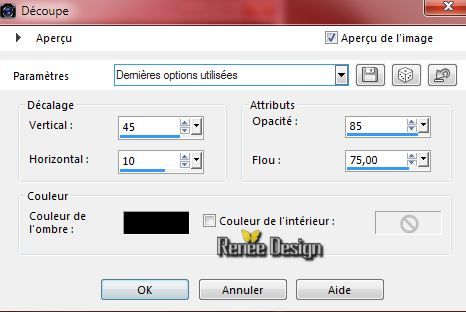
Effects- Plugins - Almathera- Drop Shadow
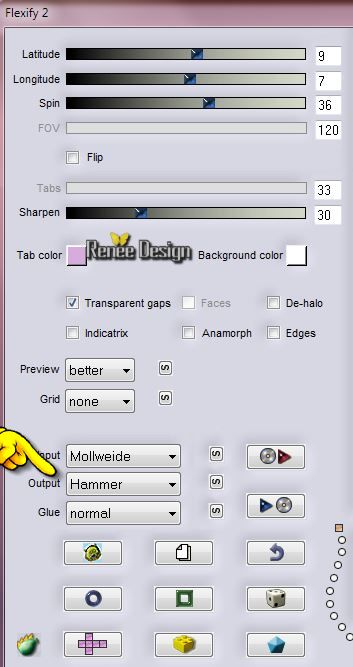
27.Effects- Plugins -Flaming Pear Flexify2
28.
Layers- Arrange- Move Down under raster 2
-Layer Palette -Double click on this Layer and set the Blend Mode to "Soft Light "
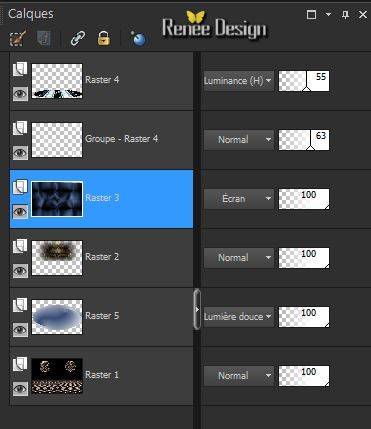
Your Layer Palette look like this now:
- Activate the top of the layer-palette
29.
Layer-New Raster Layer
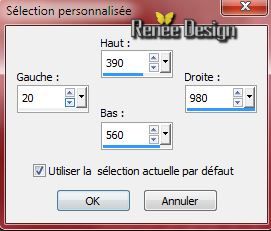
30.Selections-Custom Selection with these settings
31.
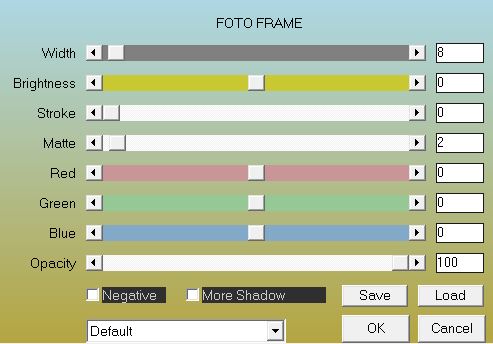
Pot of Paint Opacity: 35% - Activate Flood fill tool and fill the selection with color white
32.
Selections- Modify-Contract 18 pixels
33.
Effects - 3D Effects - Drop shadow-Default settings
-
Repeat Drop shadow: -10/-10 black
34.
Selections- Modify-Contract 8 pixels
35.Effects- 3D Effects- Cutout withe these settings
Selections- Deselect All
36.
Layers- Duplicate -Image Mirror
37.
Layers- Merge- Merge Down
38.
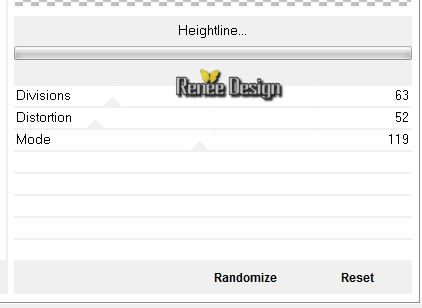
Effects- Plugins -Unlimited 2.0 -VM Extravaganza -Heightline
39.
Layers - New raster layer
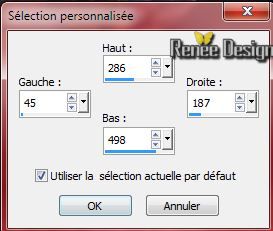
40.Selections-Custom Selection with these settings
41.
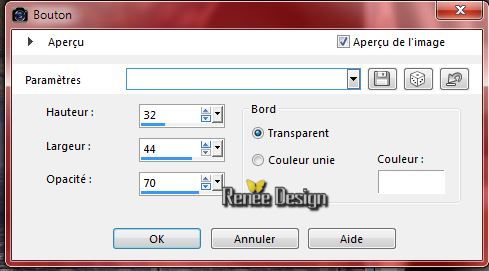
Effects-3D Effects-Buttonize white these settings
42.
Layers - New raster layer
43.
Activate the tube '' mou_keyinhand.pspimage''
-
Edit - Copy -Edit - Paste Into Selection
Keep Selected
44.
Layers- Arrange-Move Down
45.
Layer- Palette: activate layer 7 (Raster 7)
46. Effects- Plugins - Eyecandy 5 - Motion trail and under tab SETTINGS choose my preset: "steampunk-22_Motion Trail"
-
Layer Palette -Double click on this Layer and set the Blend Mode to"Screen "
Selections- Deselect All
-Layer- Palette: activate layer Raster 4
47.
Activate the tube ''Alies_570-woman_navada-18072011.pspimage''
-Image Resize at 60 %
-
Edit/copy-Edit paste as a new layer on your working area
48.
Effects- Image Effects- Offset with these settings

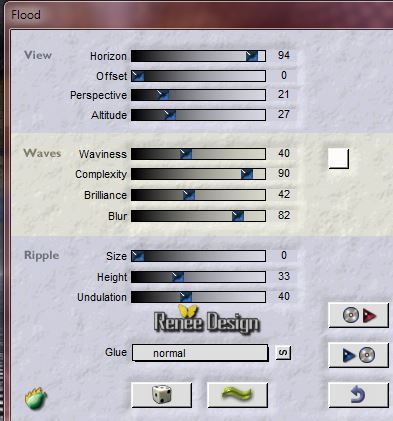
49. Effects- Plugins -Flaming Pear -Flood
50.
Layer-New Raster Layer
51.
Selections - load/save selection - load selection from disk and choose my selection: ''steampunk_22_1''
52.Pot of Paint- Opacity 100%- Activate Flood fill tool and fill the selection with color white
Selections- Deselect All
53.
Effects- Edge Effects- Enhance
-
Reduce the opacity of this layer to: 63%
54.
Layers- Merge- Merge Visible
Fore those who encounter difficulties with this filter, I add the effect to my download map
So, if you prefer not not to use the plugin, proceed as follows:
Open
''Effet_Redfield-LatticeXP ''paste a new layer and place like this
55. Effects- Plugins - Ulead Effects Gif_X2.0
Attention: Your effect might be a little bit different from mine. But don’t worry you may even choose the effect you like best
This Plugin works like this:
-Effects-
Filter Ulead Effects
Gif_X2.0
-
Tic>>Light = 1
- Here I choose effet Spotlight =2
-Tic on Gallery = 3
-
In the window: choose>>Spotlight 1=4
In the window: Tic OK on the right
Do not close the Filter
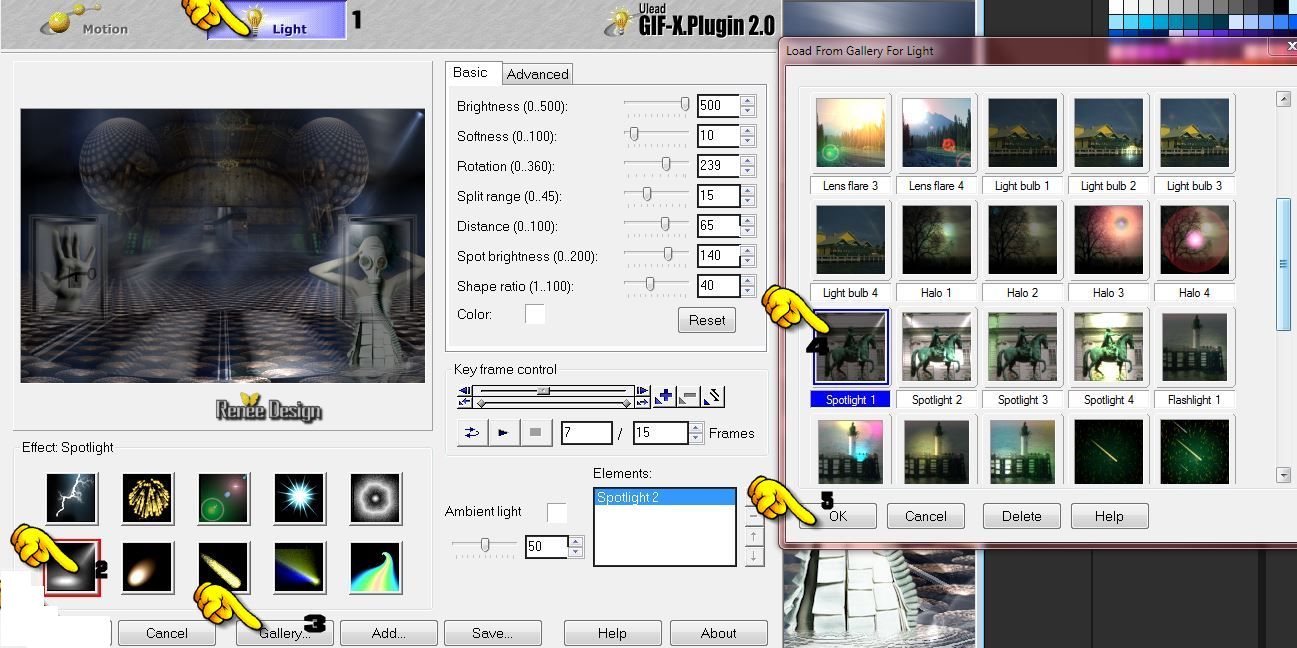
Tic on and choose effet Flashlight = 2
-
-Tic on Gallery = 3
-Choose effect in the window at the right = Flashlight =4
-Ok in the window at the right
-If you want to save this effect with extention “gif” you have to save it as such before you tic the final OK button
-OK and close the Filter
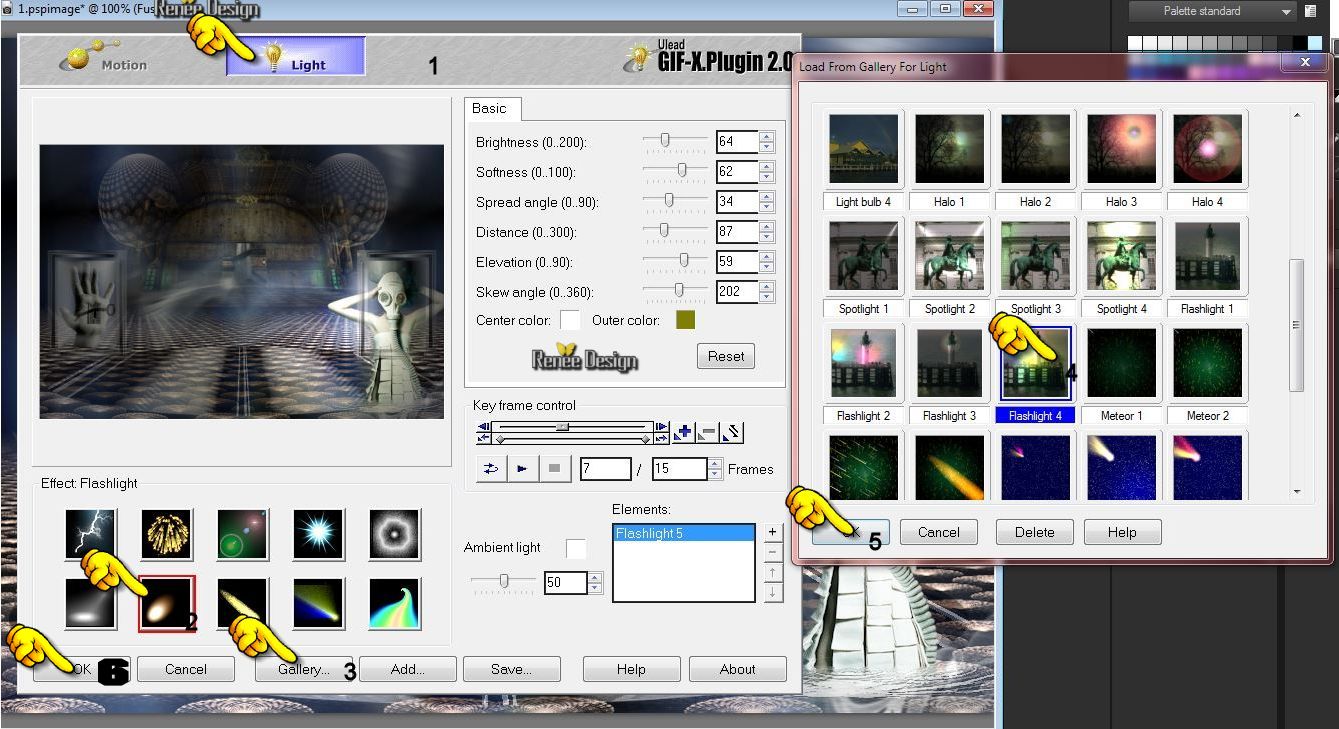
ok
and now your image will have the same effect as mine
56.
Activate the tube "steampunk_22_image_2" - Edit/copy-Edit paste as a new layer on your working area and move
- Layer Palette -Double click on this Layer and set the Blend Mode to "Luminance-Legacy "
57. Activate the tube ''Cold
Love JuliS-misted tube of A PSP Devil.pspimage''-
-Edit/copy-Edit paste as a new layer on your working area
-
With your move tool move to the bottom
58.
Layer Palette -Double click on this Layer and set the Blend Mode to "Luminance-Legacy " Reduce the opacity of this layer to:81%
59.
Activate Freehand Selection: Selection Type Point to Point and draw a selection like this
60 .Eraser Tool with these settings :Activate Eraser Tool: erase the two parts ( see Example)

Selections- Deselect All
61.
Layers- Merge- Merge All
62.
Image - Add borders-Symmetric checked: 1 pixel color black
63.
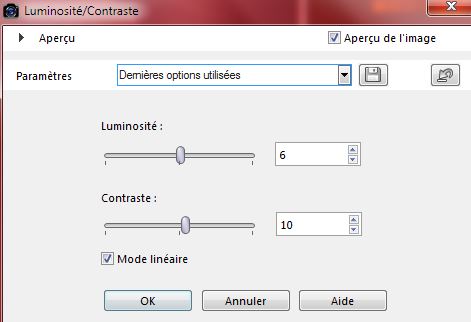
Adjust-Brightness and Contrast-Local Tone Mapping with these settings: (In 10 and 12 )(exemple 2) Adjust-Brightness and Contrast- Brightness and Contrast withe these settings

64.
Edit-Copy
65.
Image - Add borders-Symmetric checked: 60 pixels color white
66.
With the magic wand select the white border of 60 pixels
67.
Layers - New raster layer
68.
Edit-Paste into Selection (
Image is still in your PSP memory)
69.Adjust- Blur- gaussian Blur - Radius: 28
70.
Selections- Invert
-
Layer Palette-Activate the layer underneath
71.
Effects - Plugins -AAA Frame - Foto Frame
72.
Selections- Invert
-
Activate the top of the layer-Palette
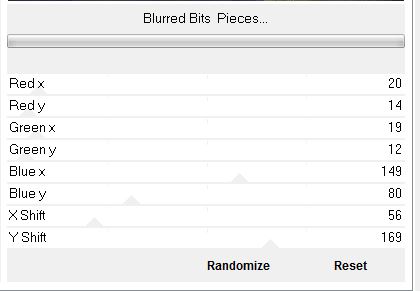
73. Effects- Plugins - Unlimited 2.0 -
Andrew's Filter 6 - Blurred Bits & Pieces
74.
Effects- Edge Effects- Enhance More
75.
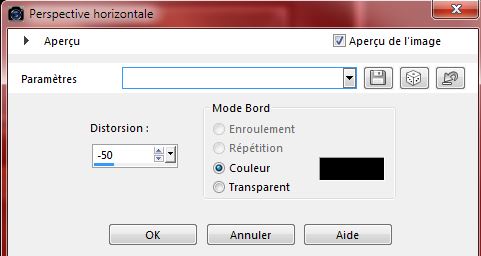
Effects- Geometric Effects -Perspective Horizontal
Selections- Deselect All
76.
Image - Add borders-Symmetric checked: 5 pixels color white
77.
Activate the tube Text: Edit - Copy -Edit - Paste as new layer on your working area and move/ Ore write your own text
78.
Layers- Merge- Merge All
79.
Image Resize at 995 pixels Width
Save as JPG
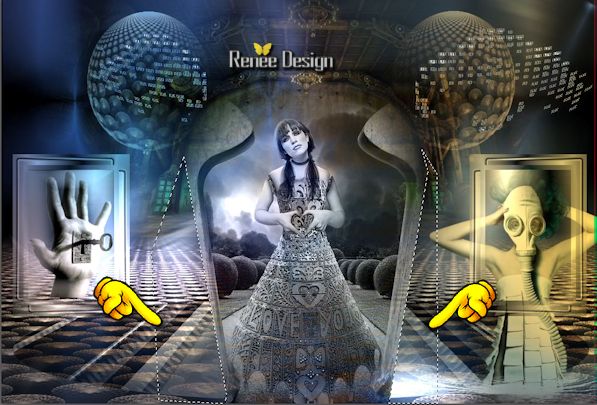
I hope you enjoyed this lesson
Renée
This lesson was written by Renée 29/09/2014
Created the
10/2014
*
Any resemblance with an existing lesson is merely a coincidence *
*
* Don't forget to thank the people who work for us and with us. I named the tubeurs - Testers and the translators.
Thanks Renée. |
 Translations


 All rights reserved