|
Let's start the lesson . –Magical breath
1.
Open your background image ''fond_souffle_magique'' Promote background layer = raster 1
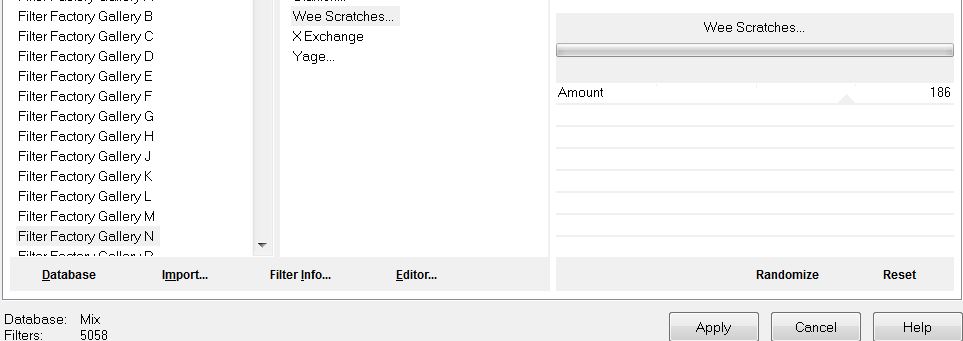
2. Effects- Plugins -Unlimited Factory Gallery N - Wee
Scratches
3. Layers- Duplicate
4. Image Resize 88% (Resize all the layers not checked)
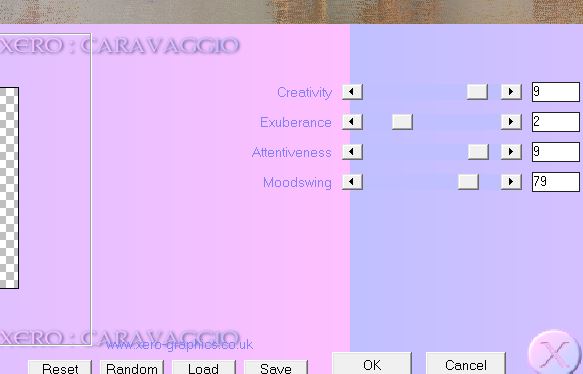
5. Effects- Plugins – Xero - Caravaggio
6. Effects- Plugins -EyeCandy 5- Impact – Perspective shadow -tab Settings/User Settings and choose my preset
-''renee_magie_future_persp''
7. Effects- Plugins Factory Gallery N - Wee Scratches : 132
8. Layers- Duplicate
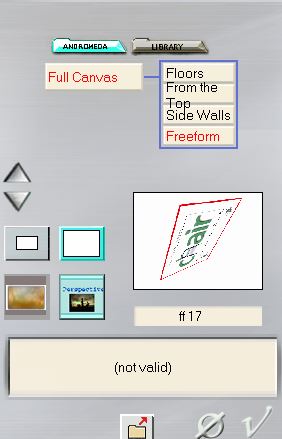
9. Effects- Plugins - Andromeda – Perspective - Freeform -
ff17
10. Effects- Geometric Effects- Circle-Transparent
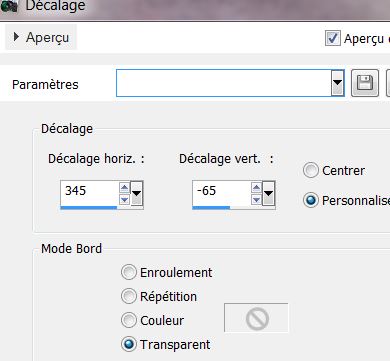
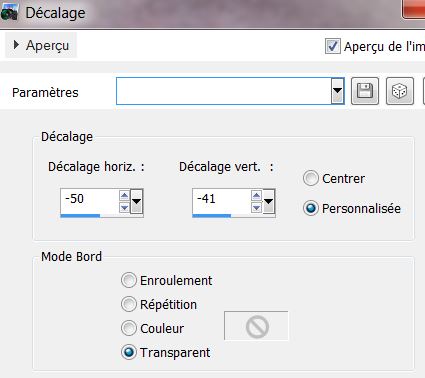
11. Effects- Image Effects- Offset with these settings
12. Layers- Duplicate /Effects- Image Effects- Offset with these settings
13.
Effects- Textur Effects- Fine Leather with these settings
14.Layer Palette -Double click on this Layer and set the Blend Mode to "Luminance-Legacy " Reduce the opacity of this layer to:
63%
15. Activate the top of the layer-palette
16. Open the tube ''logane-masque-deco1_06aout2012". Edit/copy-Edit paste as a new layer on your working area
17.Effects- Image Effects- Offset with these settings
18. Layers- Arrange- Move Down
19. Layer Palette -Double click on this Layer and set the Blend Mode to "Luminance-Legacy "
20. Activate the top of the layer-palette
21. Open the tube ''logane_formebulle2-30Mai2012''
22. Edit/copy-Edit paste as a new layer on your working area. (do not move it is in the right place)
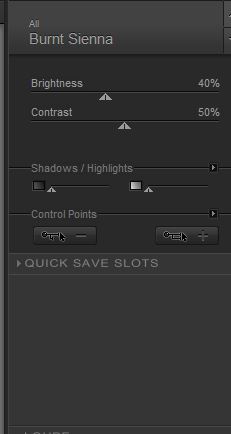
23. Effects- Plugins - Nick Color effex .Pro 3- Burnt Sienna
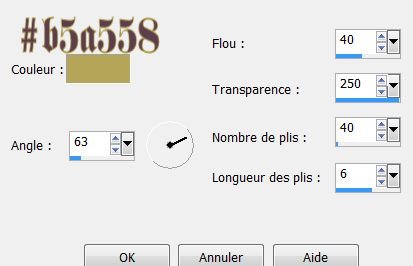
24. Layer Palette -Double click on this Layer and set the Blend Mode to "Soft Light "
25. Layers- Duplicate
26. Effects- Plugins - Simple -Pizza Slice Mirror
27. Effects- Plugins - Simple 4 way average
28. Layer Palette -Double click on this Layer and set the Blend Mode to "Normal "
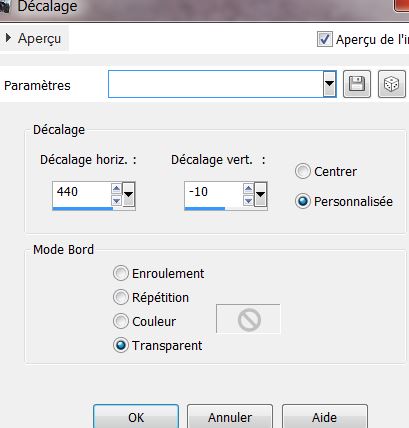
29. Effects- Image Effects- Offset with these settings H= - 250 and V = 0
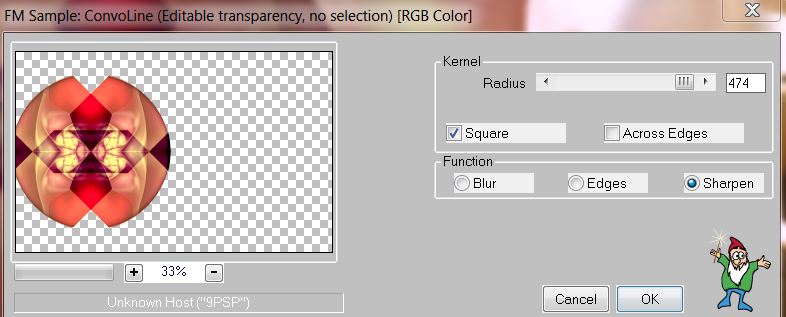
30. Effects- Plugins - Meister- FM Sample -
Convoline (checked- Square et sharpen)
31. Effects- Plugins Two moon – Wish it would rain : 69/243/64
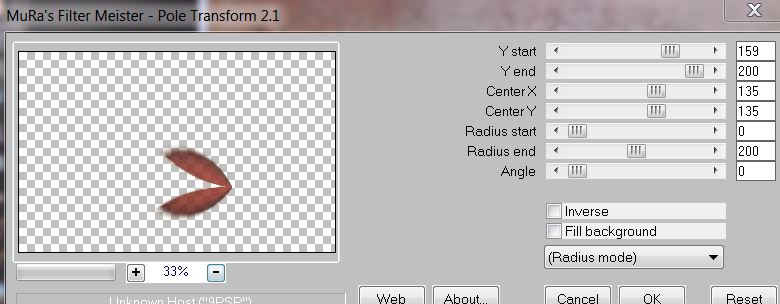
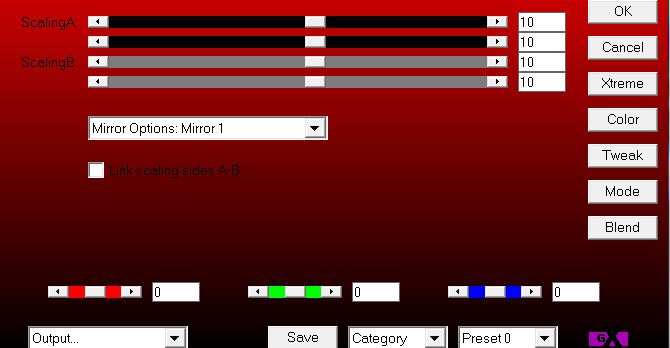
32. Effects- Plugins Mura's Meister - Pôle Transformation use settings below
33. Layer Palette -Double click on this Layer and set the Blend Mode to "Dodge "
34. Activate the top of the layer-palette
35. Layers- New raster layer
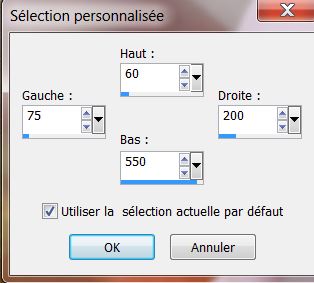
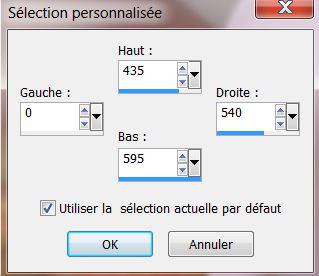
36. Selections-Custom Selection with these settings
37.
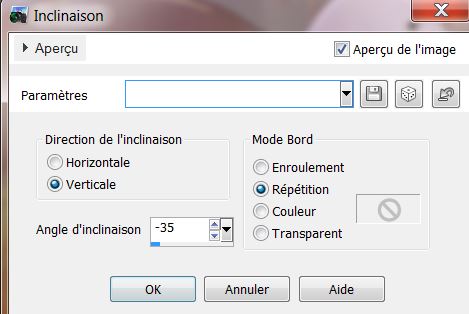
Activate Flood fill tool and fill the selection with : #cd3d06
38. Selections- Deselect All
39. Effects- Plugins - Toadies - What are you : 0/24
40. Layers- Duplicate
41. Effects- Image Effects- Offset with these settings H= -63 and V = 45
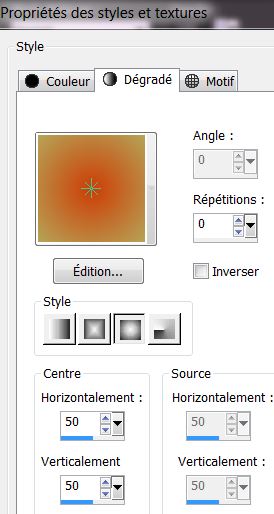
42. Layers- Merge- Merge- Down
43. Effects- Plugins Toadies -What are you :
20/20
44. Effects- Edge Effects- Enhance More
45.
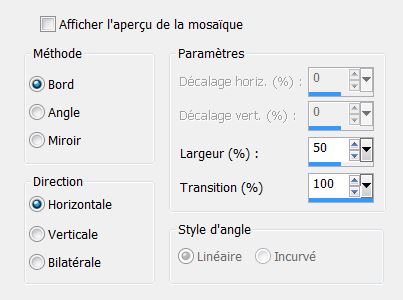
Effects- Image Effects- Seamless Tiling with these settings
46. Effects- Geometric Effects-Skew with these settings
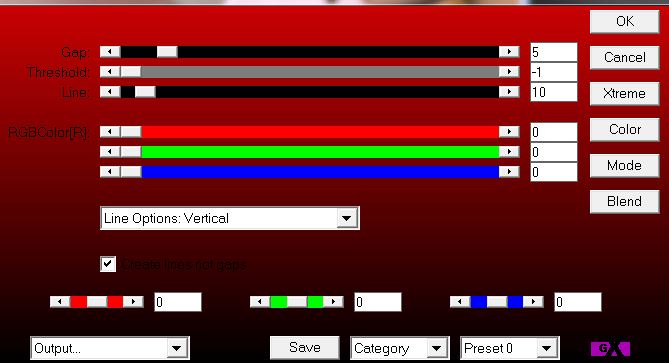
47. Effects- Plugins -AP01- (Innovation) - Lines Silverling
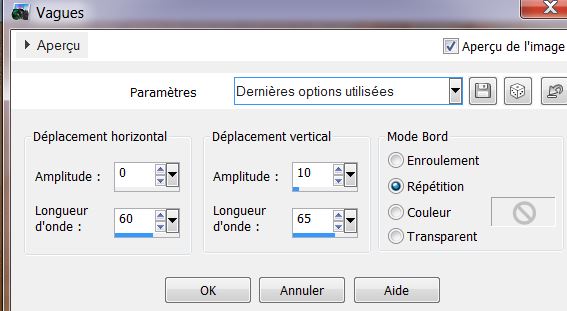
48. Layers- New raster layer
49. Selections-Custom Selection with these settings
50. Color Palette: Foreground color tot color #cd3d06 Background color to color : #b5a558
51. Put your foreground/background into a sunburst gradient as configured
52. Activate Flood Fill Tool and fill the selection with the gradient
53. Selections- Deselect All
54.
Effects- Plugins - Simple - Center Tiles
55.
Effects- Plugins - Toadies – What are you: 25/25
56. Effects- Edge Effects- Enhance
57. Effects- Plugins - Vanderlee Unplugged X- Defocus

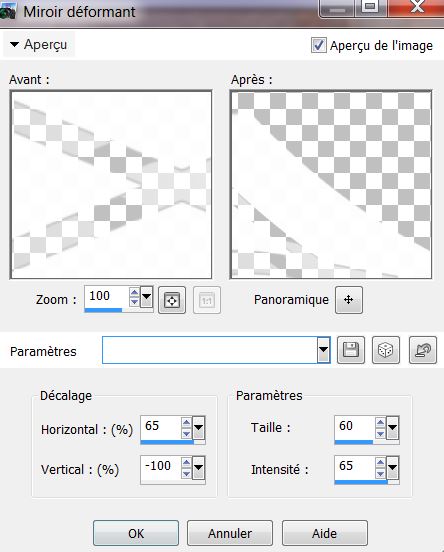
58. Effects- Edge Effects- Enhance More
59. Effects- Distortion Effects- Wave with these settings
60. Layers- Arrange - Move Down under raster 2 (under the tube logane
visage)
61.Layers- Merge- Merge Visible
62. Layers- New raster layer
63.Selections - load/save selection - load selection from disk and choose my selection: ''renee_magie_future_1''
64. Activate Flood Fill Tool and fill the layer with the gradient .
Selections- Deselect All
65. Effects - 3D Effects - Drop shadow with these settings: 18/10/66/5 black
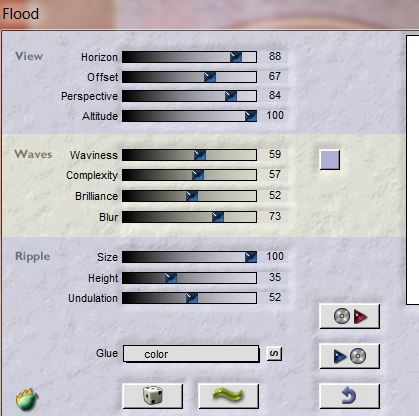
66.Effects- Plugins Flaming Pear- Flood use settings below
67. Layers- New raster layer
68. -Activate Flood Fill Tool and fill the layer with color white
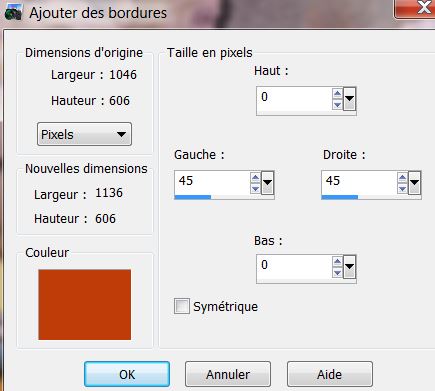
69.
Layers-New Mask Layer From Image and choose Mask: ''218-kris''

70. Layers- Merge- Merge - Group
71. Effects- Distortion Effects- Warp use settings below
72. Image
Resize 75% (Resize all the layers not checked)
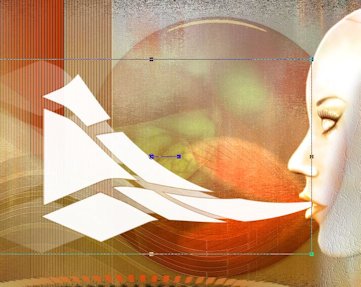
- Move tool - Place it as shown below:
73. Layer Palette :Double click on this Layer and set the Blend Mode to "Overlay "
74. Effects - 3D Effects - Drop shadow with these settings:
5/11/66/5 black
75.
Open the tube ''0_8775e_35a4aa56 /Edit/Copy-Edith paste as a new layer on your working aera and move '
76. Effects - 3D Effects - Drop shadow with these settings:5/8/70/5 black
77. Open the tube ''image_abstrait_souffle_magique'' Edit/Copy-Edith paste as a new layer on your working aera and move
78. Open the tube ''nicole-etrange10-2013'' Edit/Copy-Edith paste as a new layer on your working aera and move
79.
Effects- Plugins – Alf's Border FX- Mirror Bevel 128/64
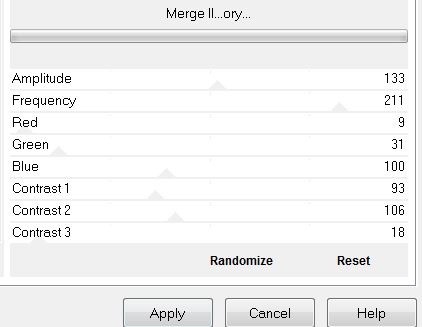
Ore: Effects- Plugins Alf's Power
Sines/ Merge II...ory(qui donne le même effet )/
80. Effects - 3D Effects - Drop shadow with these settings 5/8/70/5 black
81. Open the tube ''fantaisy31'' Image Resize 78%
Edit/copy-Edit paste as a new layer on your working area and move (Eraser Tool: Erase the parts on the right side )
82. Effects - 3D Effects - Drop shadow with these settings: 5/8/70/5 black
83.
Layers- Merge- Merge All
84. Image - Add borders-Symmetric checked:3 pixels white
85. Image - Add borders-Asymmetric with these settings- Color #BF3C08
86 With the magic wand select Asymmetric border
87. Effects- Plugins -AP 01-(Innovation) -Mirror Réflection
88. Adjust- Blur- Gaussian Blur: Radius: 38%
89. Selections- Deselect All
90. Open the tube ''image_souffle_magie_bande '' Edit/copy-Edit paste as a new layer on your working area and move to the left -Opacity 53%
91. Open the tube Text . Edit/copy-Edit paste as a new layer on your working area and move
Save as a JPG file
I hope you enjoyed this lesson
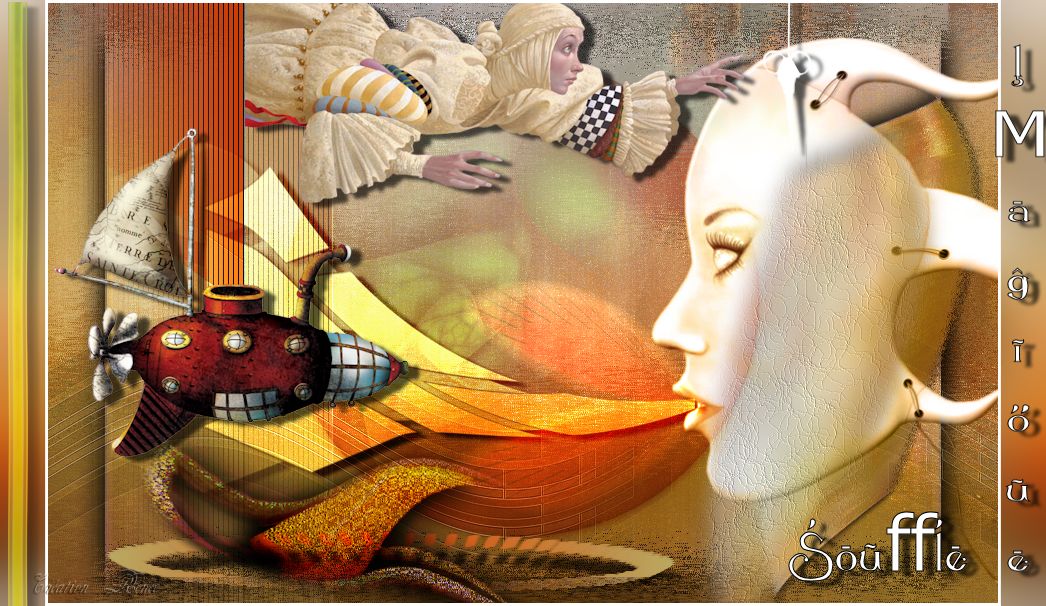
This lesson was written by Renée 17/04/2013
|

 Translations