|
Let's start the lesson. Open the Color-Palette
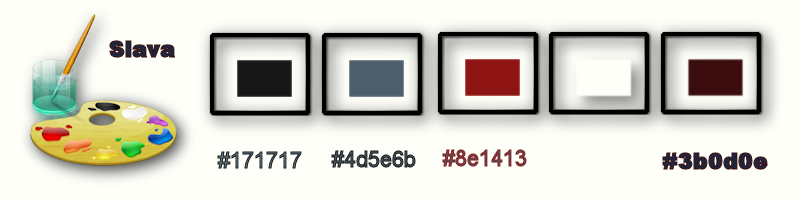
- -Material Properties: Foreground color to this color:#171717 Background color to this color #4d5e6b
1. File - New - New Transparent Image: 995
x 625
-Food Fill Tool :fill the layer with the foregroundcolor
2. Layers- New raster layer
- Food Fill Tool :fill the layer with the backgroundcolor
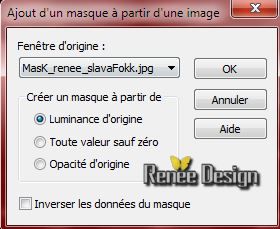
3. Layers- New Mask Layer from Image and choose Mask:
''Mask_renee_slavaFokk.jpg''
-
- Layers- Merge- Merge - Group
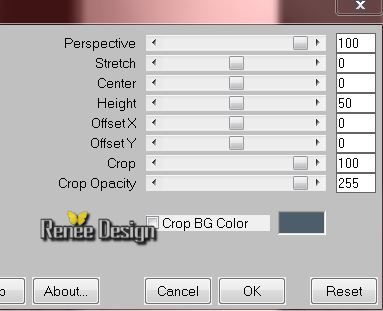
4. Effects- Plugins - Mura's Meister -Perspective Tilling use settings below
5. Layers- New raster layer
-Food Fill Tool :fill the layer with color white
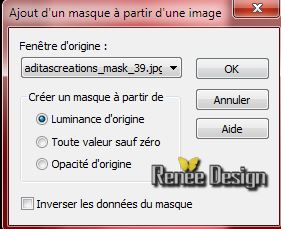
6. Layers- New Mask Layer from Image and choose Mask:
''aditascreations_mask_39.jpg''
-7.
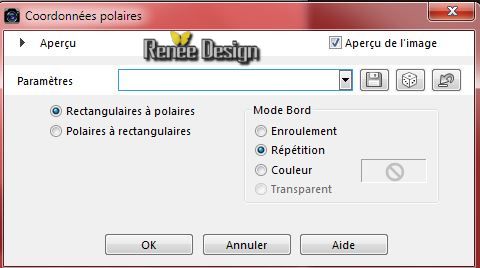
Effects- Distortions Effects-Polar Coordinates-Rectangular to Polar-Repeat checked
-
Layers- Merge- Merge - Group
8. Selections - load/save selection - load selection from disk and choose my selection:'' SlavaF_1''
- Selections- Promote selection to layer
9. Layer Palette: activate the layer underneath ''Group-Raster 2''- -
Hit the delete Key of your Keyboard
-Selections- Deselect All
- Activate the top of the layer Palette( promoted selection )
10. Effects - 3D Effects - Drop shadow
using the default settings
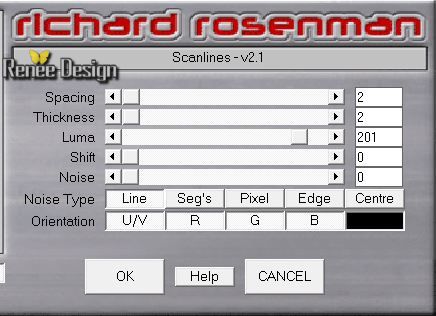
11. Effects- Plugins - Richard Rosenman -Scanlines
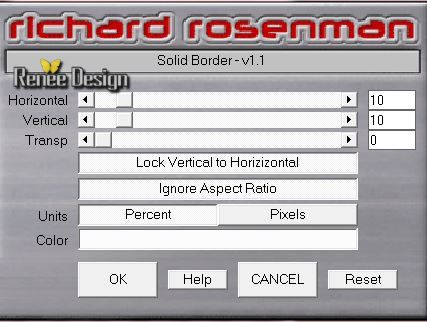
12. Effects- Plugins - Richard Rosenman - Solid Border
13. Effects-Edge Effects- Enhance More
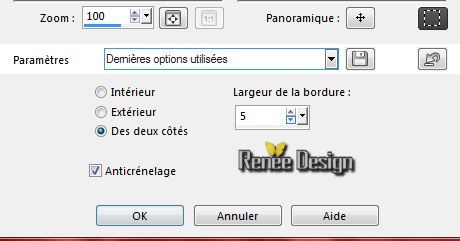
14.
Effects- Plugins -Vanderlee -Unplugged X- Defocus

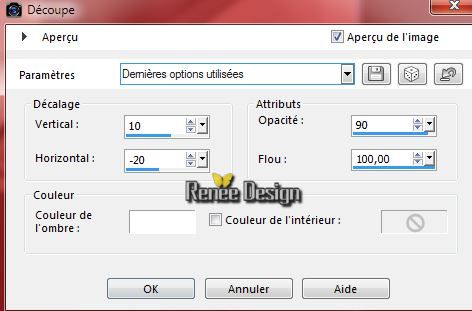
-Material Properties: Foreground color to this color:#8e1413
15.
Layers- New raster layer
16.
Selections - load/save selection - load selection from disk and choose my selection:''SlavaF_2''
-
Food Fill Tool :fill the selection with the foregroundcolor
17. Effects- Plugins -EyeCandy 5 Impact - Blacklight -
tab Settings/User settings choose my preset:"Slava_Blacklight_renee"
Selections- Deselect All
18. Effects- Plugins -Unlimited 2.0 -Distorsion
Filters - Black Hole to 123
19.
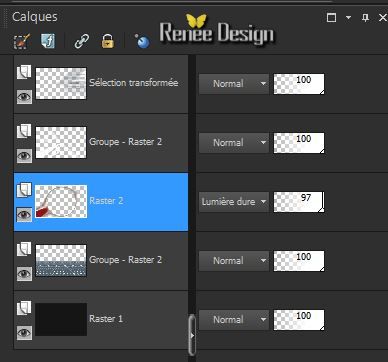
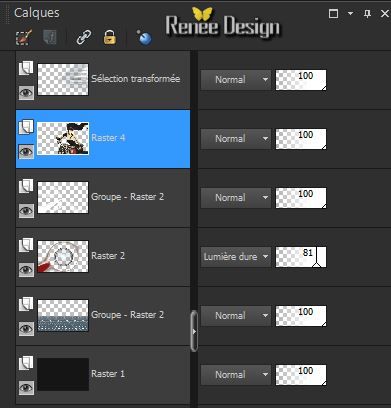
Layer Palette -Double click on this layer and set the Blendmode to Hard Light -and set the layer opacity of this layer to 83%
20.
Layers- Arrange- Move Down and Repeat
-
Layer palette look like this now
It is possible the magnifying glass effect that you need to add a new layer /Layer-New raster layer !!
21.
Effects-Artistic Effects-Magnifying Lens- choose my preset:''
Slava_effet_loupe'' ( preset included in the zip )
Or manual settings below
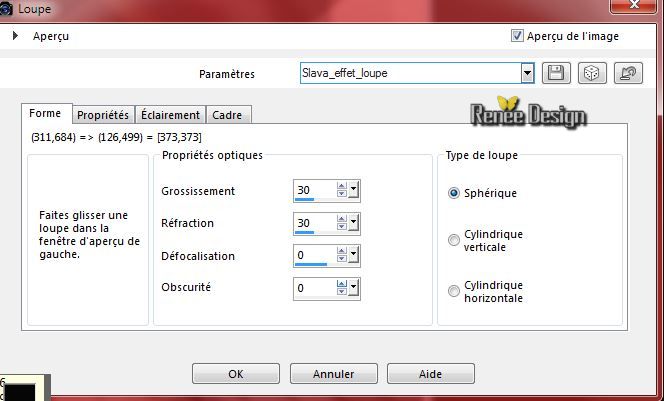 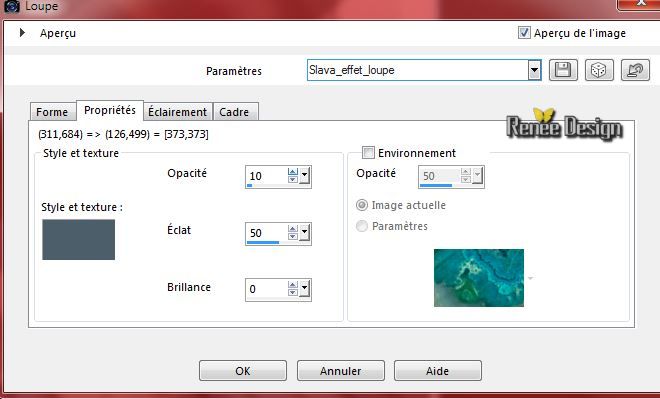
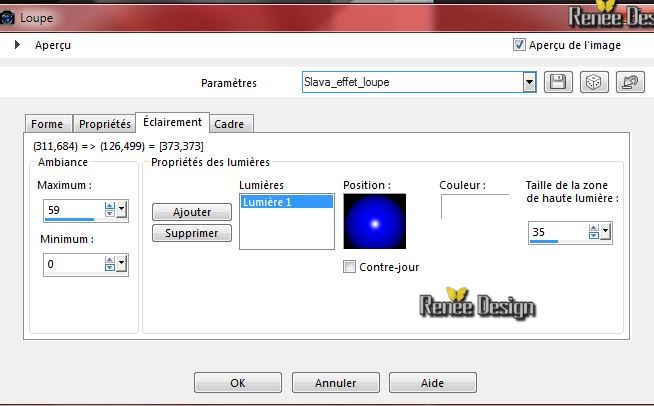 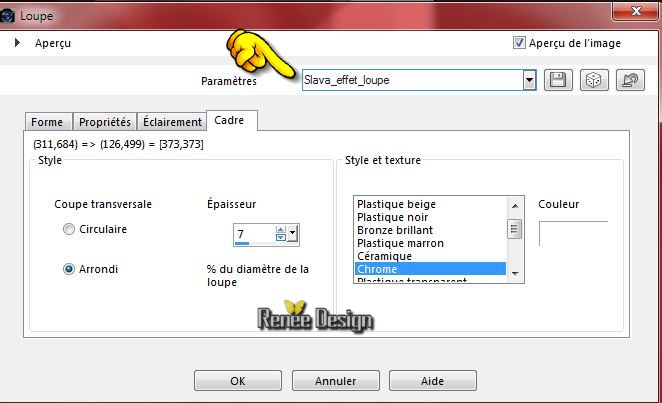
- Activate the top of the layer Palette
22.
Activate the tube ''Renee_tube_slava-fokk3''
-
Edit/copy-Edit paste as a new layer on your working area
23.
On the same tube ''''Renee_tube_slava-fokk3'' activate layer " ''bras"
-
Edit/copy-Edit paste as a new layer on your working area
-
Good placed under the black arm
-
Back to the woman's layer
-
Activate Freehand Selection Tool: select the excess black see screen/Activate your Pick Tool (K) Mode Scale place it in the right place /see what is best for you !
-And than: Hit the delete key
24. Layers- Merge- Merge Down
25.
Image Resize 85% (Resize all the layers not checked) With your move tool move to the right side
26.
layers- Arrange- Move Down
Layer palette look like this now
-Activate the top of the layer Palette
27.
Layers- New raster layer
28.
Selections - load/save selection - load selection from disk and choose my selection:''SlavaF_3''
29.
Pot of Paint:
Change the opacity of the color to 60% Activate Flood Fill Tool and fill the selection with the background color
30.
Effects- Plugins - Carolaine and Sensibility -
CS_LDots 50/3/2
31.
Effects-Edge Effects- Enhance
32.
Selections-Modify-Select-Selection Borders with these settings
33.
Layers- New raster layer
34.
Effects- 3D Effects- Cutout with these settings
35.
Effects - 3D Effects - Drop shadow -11/16/50/30 black
Selections- Deselect All
36.
Layers- Merge- Merge Down
37.
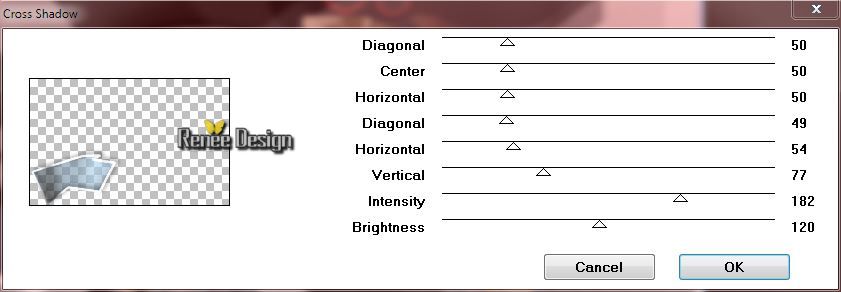
Effects- Plugins - Graphic Plus - Cross Shadow use settings below
38.
Set the layer opacity of this layer to 83%
39.
Activate the tube ''Slava_cubes"
-
Edit/copy-Edit paste as a new layer on your working area -move to the left
-
Layer Palette -Double click on this layer and set the Blendmode to Multiply
40.
Layers- New raster layer
41.
Selections - load/save selection - load selection from disk and choose my selection:''SlavaF_4''
42.
. Pot of Paint: Change the opacity of the color to 100% - Activate Flood Fill Tool and fill the selection with this color #4d5e6b
43.
Effects- Plugins - AAA Frame - Foto Frame
using the default settings
44.
Effects- Plugins -EyeCandy 5 Impact - Glass-
tab Settings/User settings choose ''Blue Flattened using the default settings in the basic using the backgroundcolor
-
Repeat -Effects Eyecandy Glass with the same settings
Selections- Deselect All
45.
Layers- New raster layer
46.
Selections - load/save selection - load selection from disk and choose my selection:'''SlavaF_5"
47.
Activate ''image cameron30.jpg''
-
Edit/copy-Edit-paste into selection
48.
Layer Palette -Double click on this layer and set the Blendmode to Hard Light -and set the layer opacity of this layer to 65%
Selections- Deselect All
49.
Layers- Merge- Merge Visible
50.
Layers- New raster layer
- Activate Flood Fill Tool and fill the layer with color white
51.
Effects- Plugins - Mock - Bevel to 45
52.
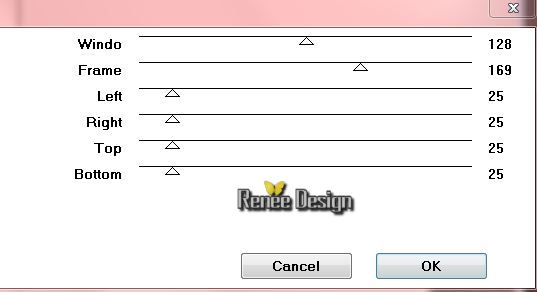
Effects- Plugins -Mock - Window use settings below
On the same layer
53.
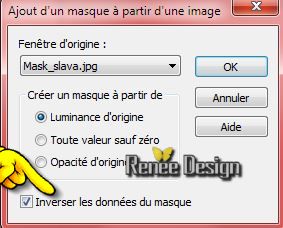
Layers- New Mask Layer from Image and choose Mask:""mask_slava''
54.
Effects-Edge Effects- Enhance
-
- Layers- Merge- Merge - Group
55.
Effects - 3D Effects - Drop shadow with these settings: 2/4/55/20 black
56.
Effects- Plugins Transparency - Eliminate white (Only if you get the same effect in Unlimited -if it is not the same effects .Then do not!!)
57.
Layer Palette -Double click on this layer and set the Blendmode to Screen-and set the layer opacity of this layer to 73%
58.
Image - Add borders-Symmetric checked: 1 pixel black
59.
Image - Add borders-Symmetric checked: 60 pixels white
60.
Image - Add borders-Symmetric checked: 1 pixel black
61.
Image - Add borders-Symmetric checked: 20 pixels white
62.
Selections - load/save selection - load selection from disk and choose my selection:''SlavaF_6''
63.
Selections- Promote selection to layer
64.
Effects - 3D Effects - Drop shadow with these settings: 8/8/45/20 black
65.
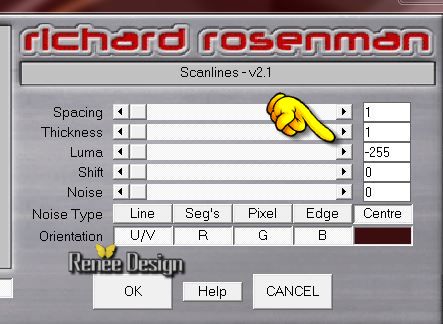
Effects- Plugins -Richard Rosenman - Scanlines
color #3b0d0e
66.
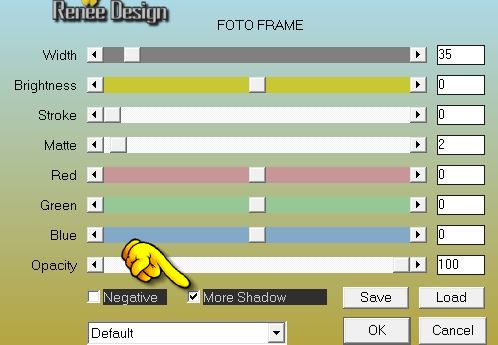
Effects- Plugins - AAA Frame - Foto Frame-More Shadow checked
Selections- Deselect All
67.
Activate the tube ''slava_deco""
-Edit/copy-Edit paste as a new layer on your working area and move to the left
-
Layers- Merge- Merge Down
68.
Layers- Duplicate-Image Mirror
69.
Activate the tube titre ''Slava Fokk _ My Art- Edit/copy-Edit paste as a new layer on your working area and move/Ore write your own text
70.
Layers- Merge- Merge All
71. Image Resize 995 Pixels Width
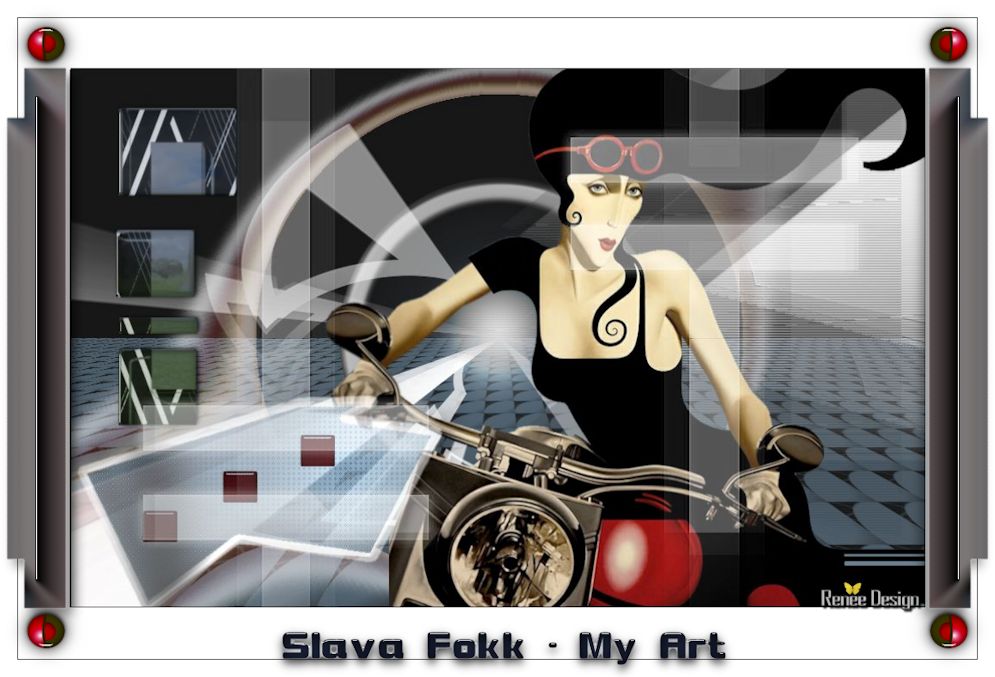
I hope you enjoyed this lesson
Renée
This lesson was written by Renée 18/11/2014
placing
12/2014
*
Any resemblance with an existing lesson is merely a coincidence *
* Don't forget to thank the people who work for us and with us. I named the tubeurs - Testers and the translators.
Thanks Renée.
*
|
 Translations


 All rights reserved