|
Let's start the lesson.
Saint_Valentin_2018

-
Preparation/ - Color Palette: Set your foreground color to #ab0302 -Set your background color to #ffffff
1.
Open the Image ‘’Fond_STValentin_2018.jpg’’/Window - Duplicate (or shift+D) - Close the original and proceed on the copy -Promote Background Layer =Raster 1
2.
Layers- Duplicate
3.
Effects-Plugins – Unlimited - Alf's Power Toys - The
CubeSpin...
4. Layers- Duplicate
–Image - Mirror - Mirror Horizontal (Image - Mirror in older versions of PSP)-Set the Opacity of this layer to 50%
5. Layers- Merge- Merge Down
6. Effectes- Edge Effects- Enhance More
7. Layers- Duplicate
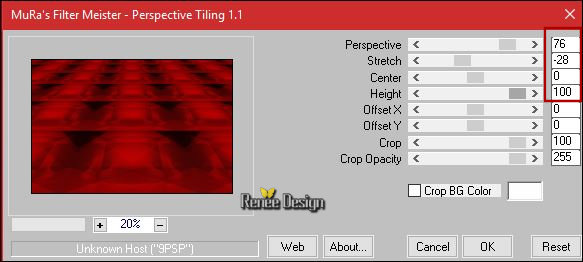
8. Effecte- Plugins– Mura’s Meister - Perpective
Tilling use the settings below
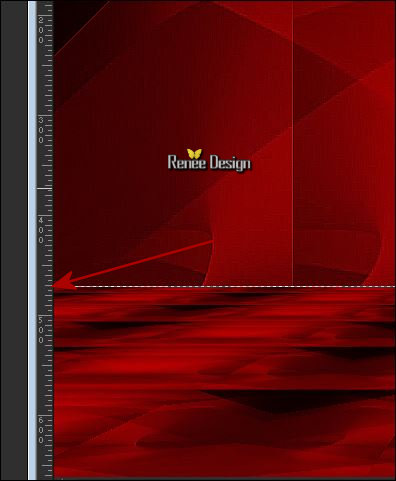
9. Activate the Pick Tool/Deformation tool (K) Mode Scale Pull the Top Node down to 470 px as shown in the example below
In the Layer-Palette- Activate the bottom layer =Raster 1
10. Layers- Arrange- Bring to Top
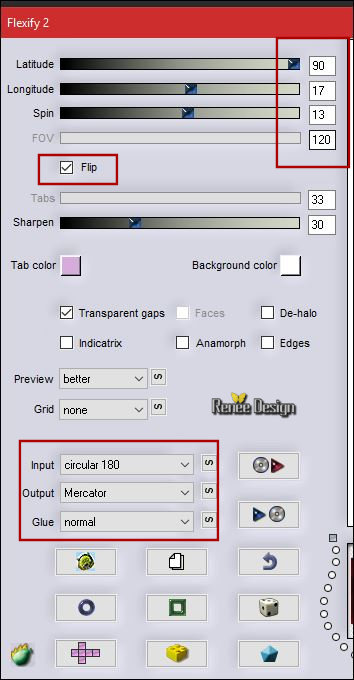
11. Effects
– Plugins – Flaming Pear –Flexify 2 use the settings below
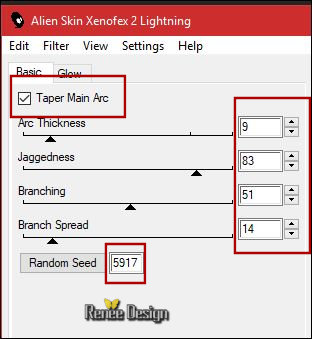
12. Effects
– Plugins – Alien skin Xenofex 2 –
Lightning use the settings below
13. Effects- 3 D Effects- Drop Shadow with these settings: Color white

- Opacity 63
- Color Palette: Change the foreground color into #b9cad6
14. Layers- New Raster Layer
15.
Selections –load/save selection –load selection from disc and select my selection: ‘’
STValentin_2018_1’’
16. Activate the Flood Fill Tool and fill the selection with the foreground color#b9cad6
Selections- Deselect All
17.
Effects –Plugins- ICNETFILTERS /unlimited - Paper Textures-
Canvas Fine: 66/ 173
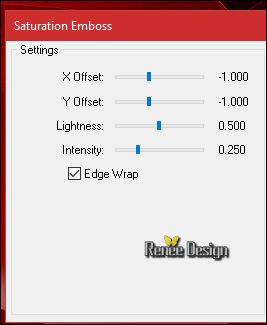
18.
Effects – Plugins – FM Tile Tools – Saturation
emboss
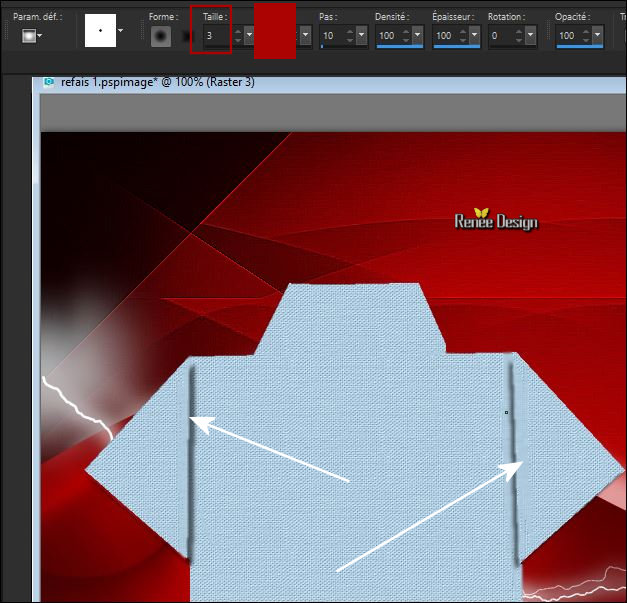
19. Activate your Soften Tool Brusch with these settings
Click and drag the mouse pointer over the area you want to soften.(2x)
Your result will depend on these moves as shown in the example below
20.
Selections –load/save selection –load selection from disc and select my selection: ‘’
STValentin_2018_2’’
21.Effects- 3 D Effects- Drop Shadow with these settings: 6/6/50/5 color black
Selections- Deselect All
22.
Selections –load/save selection –load selection from disc and select my selection: ‘’
STValentin_2018_3’’
23. Effects- 3 D Effects- Drop Shadow with these settings: 5/ -4 /50 / 5 color black
Selections- Deselect All
24. Layers- New Raster Layer
25.
Selections –load/save selection –load selection from disc and select my selection: ‘’
STValentin_2018_4’’
26. Effects- 3 D Effects- Cutout with these settings (interior color in harmony with your proper color choice)
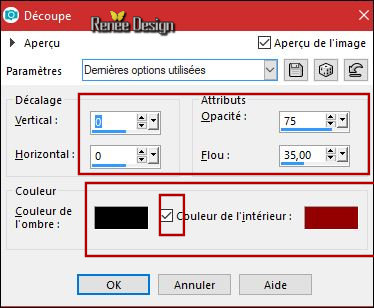
27. Effects- 3 D Effects- Drop Shadow with these settings: 1/2/50/9 color black
28. Layers- New Raster Layer
29. Activate the Brush Tool and select my file ‘’BrushTip_Dense Dots 100.PspScript’’
If you do not have this effect? The effect is included with the material (effet pinceau png )and past as a new layer calque

-
Color Palette: Change the foreground color into black . Stamp with the foreground color back (see example)

- Layers- Arrange- Move Down
- To replace the top of the layers palette ( on the layer of the heart)
30. if you use this filter (Eye Candy 5 ) take a new layer !!!!
Effects –Plugins – Eyecandy 5 Nature –Fire- tab Settings/User settings and choose my Preset ‘’ SaintValentin
2018.f1s’’
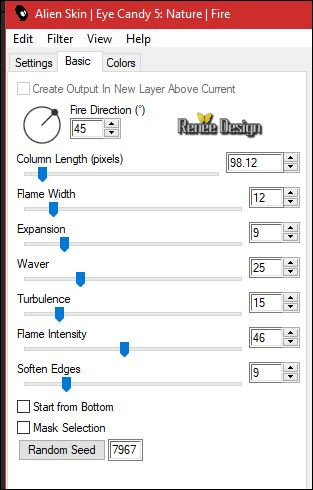
- For those who have the Alien skin- Eye Candy filter 6 use these settings (I used Eye Candy 6)
 
31.
Set the Opacity of this layer to 69 (only for eye candy 5 !! (with Eyecandy 6 do not change the opacity)
32. Open the tube’’
Renee_tubes_STValentin_2018_cravate.png’’
- Edit - Copy- Activate your work -Edit - Paste as a new layer
33. Effects- Image Effects- Offeset with these settings: H = - 188 and V =
21
34.
Effects - Plugins – Adjust variation – More blue (1
click) Ok
35. Layers- Merge 3 times down (
(One layer for the T-shirt, tie and heart).
-Your work and Layer Palette look like this now-You should have this result

36. Effects
– Plugins – Eyecandy 5 - Impact – Perspective
Shadow use the settings below

37. Open the tube ‘’ Renee_tubes_STValentin_2018_lampe.png’’
- Edit - Copy- Activate your work -Edit - Paste as a new layer
- Move Tool / place your tube at the top right side of your image
38. Open the tube ‘’ Renee_tubes_STValentin_2018_nuage.png’’
- Edit - Copy- Activate your work -Edit - Paste as a new layer
- Move Tool / place your tube at the top right corner of your image
39. Open the tube
‘’Renee_tubes_STValentin_2018_loveinair.png’’
- Edit - Copy- Activate your work -Edit - Paste as a new layer
- Move Tool / place your tube at the bottom (some letters on the T-Shirt)
40. Open the tube’’ Renee_tubes_STValentin_2018_texte.png’’
- Edit - Copy- Activate your work -Edit - Paste as a new layer
-Move Tool / place your tube at the top left corner of your image
41. Open the tube ‘’
Renee_tubes_STValentin_2018_les_amoureux.png
- Edit - Copy- Activate your work -Edit - Paste as a new layer
- Move Tool / place your tube at the bottom right corner of your image
42.
Set the Opacity of this layer to 46
43. Image - Add borders-Symmetric checked 1 pixel #ab0302
44. Image - Add borders-Symmetric checked 55 pixels #ffffff
45. Image - Add borders-Symmetric checked 1 pixel #ab0302
46. Image - Add borders-Symmetric checked 10 pixels #ffffff
Open the tube Text/ Ore write your Text. Save as JPG

I hope you enjoyed this lesson
Renée
This lesson was written by Renée Januar 2018
Edited and Update
14 Februar 2018
*
Any resemblance with an existing lesson is a coincidence
* Do not forget to thank the people who work with us and for us I have appointed the tubeurs and translators
Thanks
*
| 

 Translations


 If a plugin supplied appears with this icon it must necessarily be imported into Unlimited *