|
Let's start the lesson
Saint Valentin/Valentine's Day 2023

- Preparation
-Material Properties:
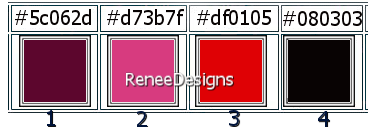
Set your Foreground color to color #5c062d=color 1 – Set your Background color to color #d73b7f=color 2
Valentine's Day Tubes
Here OU
Here
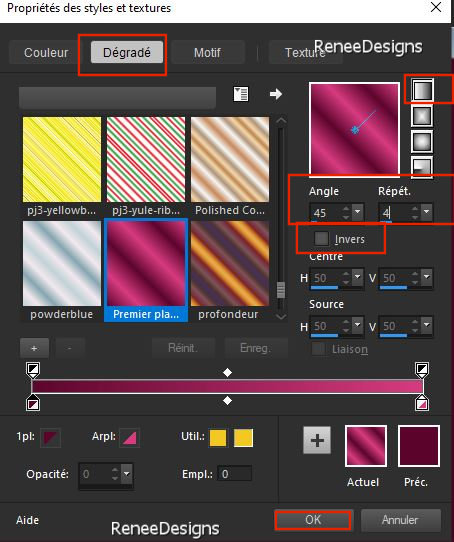
- Properties Foreground- Prepare a Foreground/Background linear Gradient configured like this
1. File: Open a transparent image in this size: 999
x 649 Pixels
2. Flood Fill Tool
 –
Fill the layer with the gradient –
Fill the layer with the gradient
3. Effects –Plugins– DC Special – PaternEditDo
4. Selections –load/save selection –load selection from disc and select my selection:’’ Saint-Valentin-2023-1
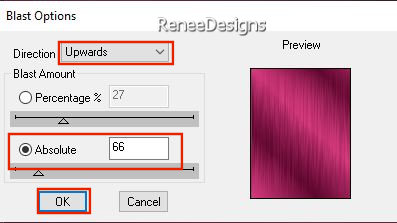
5. Effects – Plugins - Dsb Flux- Blast…use the settings below
6. Effects – Edge Effects
– Enhance More
7. Selections –load/save selection –load selection from disc and select my selection:’’ Saint-Valentin-2023-2’’
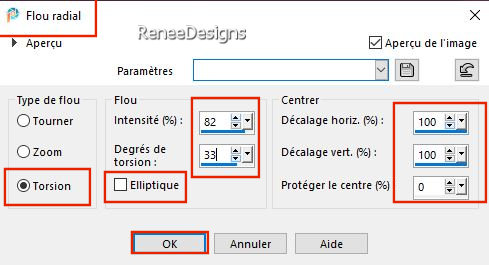
8. Adjust- Blur- Radial Blur use the settings below
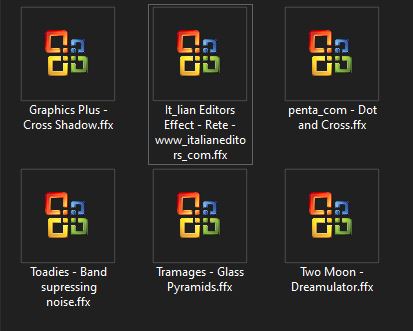
9. Effects - Plugins- Filters in Unlimited 2.0- Penta com - Dot and
Cross using the default settings: 72/10/2

10. Layers– Duplicate
11. Effects - Plugins - Filters in Unlimited 2.0 - Two Moon -
Dreamulator... using the default settings: 237/245/209/203
12. Layers-Properties-Set the Blend Mode to " Overlay "
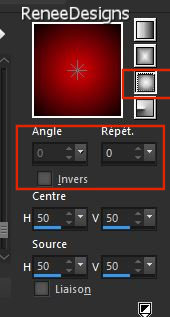
13. Effects – Plugins– Simple – Pizza Slice Mirror
14. Layers- New Raster Layer
15. Selections –load/save selection –load selection from disc and select my selection:’’ Saint-Valentin-2023-3’’
16. Flood Fill Tool
–
Fill the selection with the Foreground color #5c062d=1
17. Adjust- Blur- Gaussian Blur- Radius 40%.
18. Layers- New Raster Layer
19. Selections –load/save selection –load selection from disc and select my selection:’’ Saint-Valentin-2023-4’’
20. Flood Fill Tool
–
Fill the selection with the Background color#d73b7f =2
21. Effects - Plugins- Filters Unlimited 2.0 – Tramage - Glass
Pyramids...: 59
22. Layers-Properties-Set the Blend Mode to "Hard Light " - Reduce the Opacity of this layer to 61%
23. Effects – Plugins – Carolaine & Sensibility - Cs-LDots with these settings: 255/3/2
24. Open the Tube ‘’Renee-TUBES_STV-2013-Image 1’’ -Edit - Copy- Activate your work -Edit - Paste as a new layer
25. Objects - Align –
Left
26.
Effects - Plugins - Filters in Unlimited 2.0 –
Toadies - Band
supressing noise : 117
27. Layers-Properties-Set the Blend Mode to " Overlay "
28. Layers - Duplicate
-Material Properties:
Set your Foreground color to color #df0105=color 3 – Set your Background color to color #080303=color 4
- Properties Foreground- Prepare a Foreground/Background Sunburst Gradient configured like this
29. Layers- New Raster Layer
30. Selections –load/save selection –load selection from disc and select my selection:’’ Saint-Valentin-2023-5’’
31. Flood Fill Tool
-
Fill the selection with the gradient
32. Effects – 3D-Effects – Drop Shadow with these settings: 2/ 0/ 80 /5 Black
33. Activate Selection Tool (S) - Rectangle
-select the heart as shown in the example below

34. -Edit - Copy- Activate your work -Edit - Paste as a new layer
35. Image- Resize - 35% -Resize All Layers - Not Checked
36. Effects - Plugins - Filters in Unlimited 2.0 - Graphic Plus - Cross
Shadow using the default settings:
Place on the large heart (to your taste)
37. Layers- New Raster Layer
38. Selections –load/save selection –load selection from disc and select my selection:’’ Saint-Valentin-2023-6’’
39. Flood Fill Tool
-
Fill the selection with the gradient
40. Effects – 3D-Effects – Drop Shadow with these settings: 1/1/100/2 Black
41. Open the Tube ‘’Renee-TUBES_STV-2013-Image 2’’ -Edit - Copy- Activate your work -Edit - Paste as a new layer
- Place at the top near the text-see finished image
42. Layers- New Raster Layer
43. Selections –load/save selection –load selection from disc and select my selection:’’ Saint-Valentin-2023-7’’
44. Flood Fill Tool
-
Fill the selection with the gradient
45. Effects - Plugins - Alien Skin EyeCandy 5 - Impact – Extrude –Tab- Settings-User Settings -choose my file-
Preset : ‘’STValentin-Renee2023’’
46. Effects - Plugins - Filters in Unlimited 2.0 - It@lian Editors
Effect - Rete -
www.italianeditors.com with these settings: 35/78
47. Open the Tube ‘’
’Renee-TUBES_STV-2013-Image 3’’
- Image -Resize to 65 % -Resize all layers checked
- Edit - Copy- Activate your work -Edit - Paste as a new layer
- Place on the left side of the stairs
48. Effects – 3D-Effects – Drop Shadow with these settings: - 15/
30 / 42 /2 Black
49. Open the Tube
‘’Renee-TUBES_STV-2013-Image 4’’
If you want to use this tube you can change the text and the tube
If you use this as it is made then.....
50. Layers- Merge- Merge Visible
51. Image - Resize this constructed image of the book to your liking.
52. -Edit - Copy- Activate your work -Edit - Paste as a new layer
- Place to your liking on your work
53. Open the Tube
‘’Renee-TUBES_STV-2013-Image 5’’
- Select 1 bird
-Edit - Copy- Activate your work -Edit - Paste as a new layer and place it to your liking (optional)
54.Open the Tube ‘’Renee-TUBES_STV-2013-Image
6’’
Place on the right side of your work
Renée has a separate folder with decorations you can use
55.Layers- Merge- Merge Visible
56
. Edit- Copy !!!
57. Open the Tube ‘’
Cadre-Renee-Saint-Valentin-2023’’
-Edit - Paste into Selection
58. Image - Resize - to 85% - Resize all layers checked
59. Paste the author's watermark on your work and your own watermark.
60. Layers- Merge- Merge All (flatten)
Save as JPG
.png)
I hope you enjoyed this lesson
Renée
This lesson was written by Renée
14/01/2023
Edited and Update
in 2023
*
*
Any resemblance with an existing lesson is a coincidence * Do not forget to thank the people who work with us and for us.
I have appointed the tubeurs and translators
Thanks
|


 Translations