|
Let's start the lesson
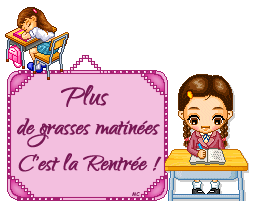
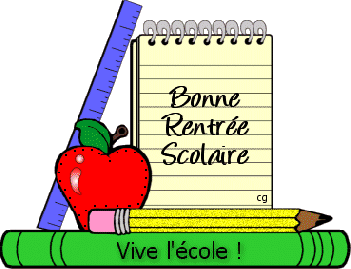
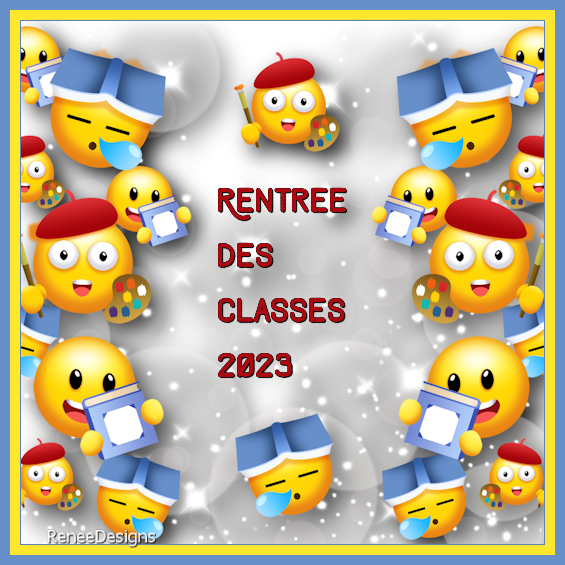
Rentrée des classes/ Back to school 2023
- Preparation
-Material Properties: Set your Foreground color to color #ff53d9=Color 1 – Set your Background color to color #0058f0= 2

1. File: Open a Transparent Image in this size : 995 x 625 Px
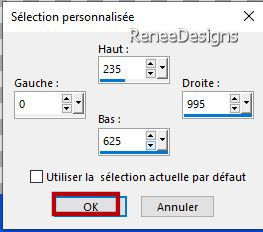
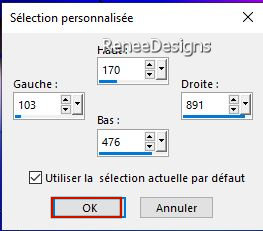
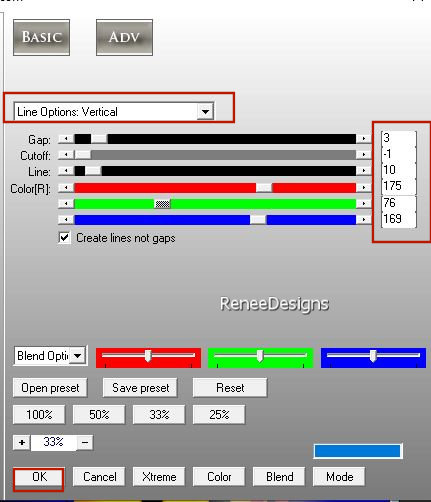
2.Activate Selection Tool -Custom Selection (S) -Rectangle with these settings
3. Flood Fill Tool
 –
Fill the selection with the Background color #0058f0=2 –
Fill the selection with the Background color #0058f0=2
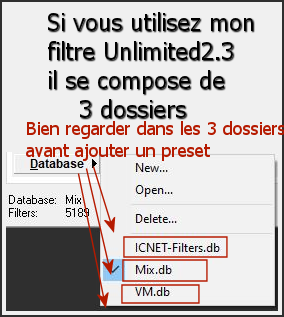
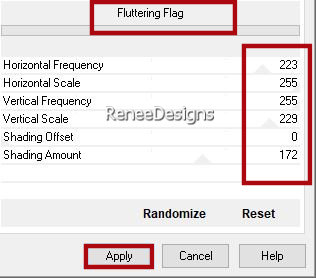
4. Effects - Plugins-
Filters in Unlimited 2.0 - Filter Factory Gallery B -
Fluttering Flag..use the settings below.
5. Selections - Invert
6. Flood Fill Tool
–
Fill the selection with the Foreground color #ff53d9=1
7. Effects – Plugins –
Vanderlee - Unplugged X- Finish Flag use the settings below


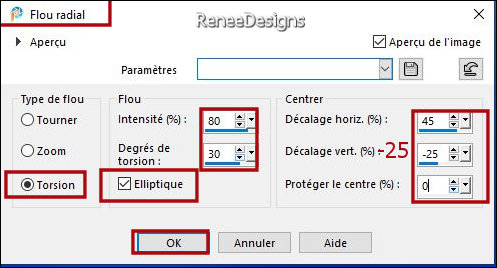
8. Adjust- Blur- Radial Blur use the settings below
9. Layers – Duplicate
10.
Image - Mirror - Mirror Horizontal (Image - Mirror in older versions of PSP)
11. Layers-Properties-Set the Blend Mode to " Overlay "
12. Layers- Merge- Merge Down
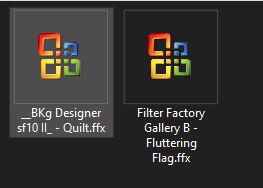
13. Effects -Plugins-
Filters in Unlimited 2.0 -&<BKg Designer sf10 II> - Quilt
using the default settings ( 5/5)
14. Effects – Edge–
Enhance
15. Layers – Duplicate
16. Effects - Plugins -
Filters in Unlimited 2.0 - Dégradés - Dégradé cône simple
(ab) with these settings: 252 /65/48/173
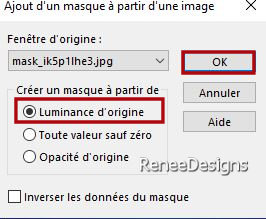
17. Layers- New Mask Layer -From Image and select Mask : ‘’mask_ik5p1lhe3’’
- Layers- Merge- Merge Group
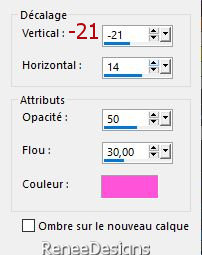
18. Effects – 3D-Effects – Drop Shadow with these settings: 5/5/100/25 Color Black
- Repeat : Effects – 3D-Effects –Drop Shadow with the same settings
19. Layers-Properties-Set the Blend Mode to "Hard Light "
20. Activate Selection Tool -Custom Selection (S) -Rectangle with these settings
-The mask layer is activated

- Activate the bottom of the Layer Palette=Raster 1
21. Selections – Promote selection to layer
- Material Properties: Foreground color remains on color 1 #ff53d9 – Set your Background color to color #ffffff=4
22. Effects – Plugins –
Rayflect – Four saisons (If this does not work, you can find the appropriate tube in the material-Paste into selection and continue to point 23)
Open the filter
1. Click here (see red arrow )
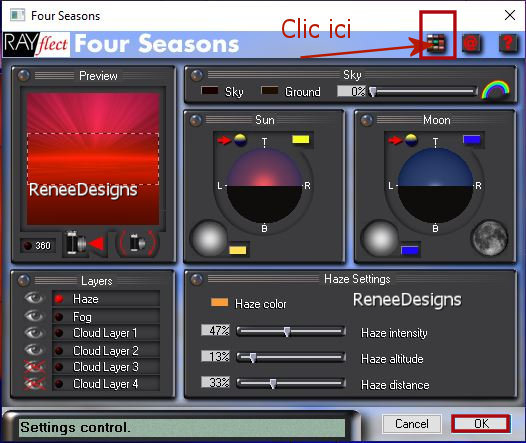
This table opens
– Choose Alien skies
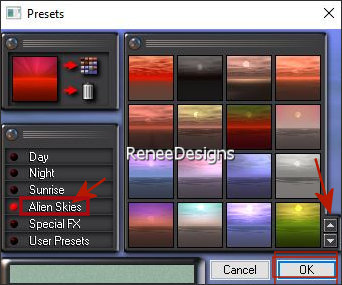
- use the arrows to scroll down the menu and select the desired image
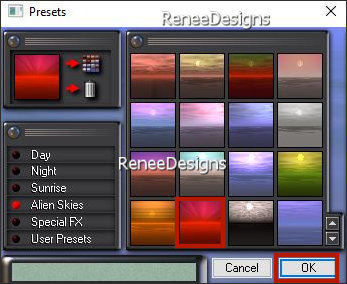
- Click OK
Then in these tables
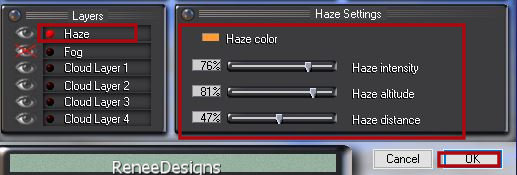
Check= HAZE with these parameters
Check= FOG with these parameters
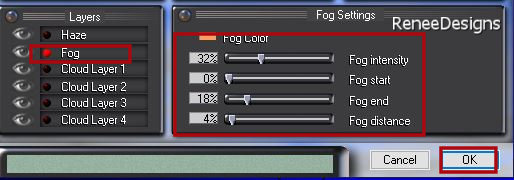
OK
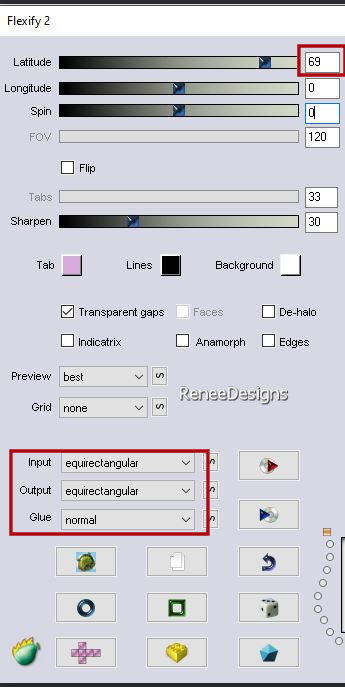
23. Effects – Plugins –
Flaming pear – Flexify 2 use the settings below
24. Effects – 3D-Effects – Drop Shadow with these settings: 5/5/100/25 Color Black
Repeat- Drop Shadow with these settings
-5 /-5
- Color Palette-Set your Background color to color #000000
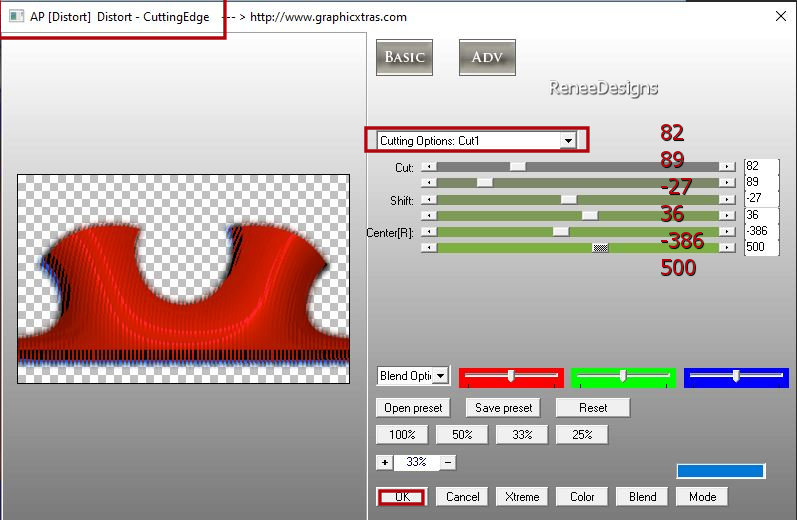
25. Effects - Plugins– AP[Distot]
Distort- CuttingEdge use the settings below
- Activate the top of the Layer Palette
26. Layers- New Raster Layer
27. Selections –load/save selection –load selection from disc and select my selection: ’’ RDesClasses-2023-1’’
28. Color Palette-Set your foreground color to color #b51a00=3
Flood Fill Tool
-
Fill the selection with the Foreground color #b51a00=3
29. Effects – 3D-Effects – Drop Shadow with these settings: 1/1/100/1 Color Black
30. Open the Tube ‘’ Rentree-2023-Image1’’ -Edit - Copy- Activate your work -Edit - Paste as a new layer
31. Pick Tool: (K) on your keyboard -Enter these parameters on the toolbar
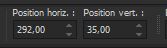 292 / 35
-Press ( M ) to close the Pick Tool
32. Layers- New Raster Layer
33. Selections –load/save selection –load selection from disc and select my selection: ’’ RDesClasses-2023-2’’
34. Color Palette-Set your Foreground color to color #0058f0=2
Food Fill Tool
-Fill the selection with the Foreground color
Color #0058f0=2
35. Effects – 3D-Effects – Drop Shadow with these settings: 1/1/100/1 Color Black
36. Activate your Text Tool-Renée chose the font "Adrift Shortened" -Size 48 Px (Included in the material)
Close the Foreground color-Background color to black
Write the text ‘’ Rentree des
classes 2023

- Place your text in the circle
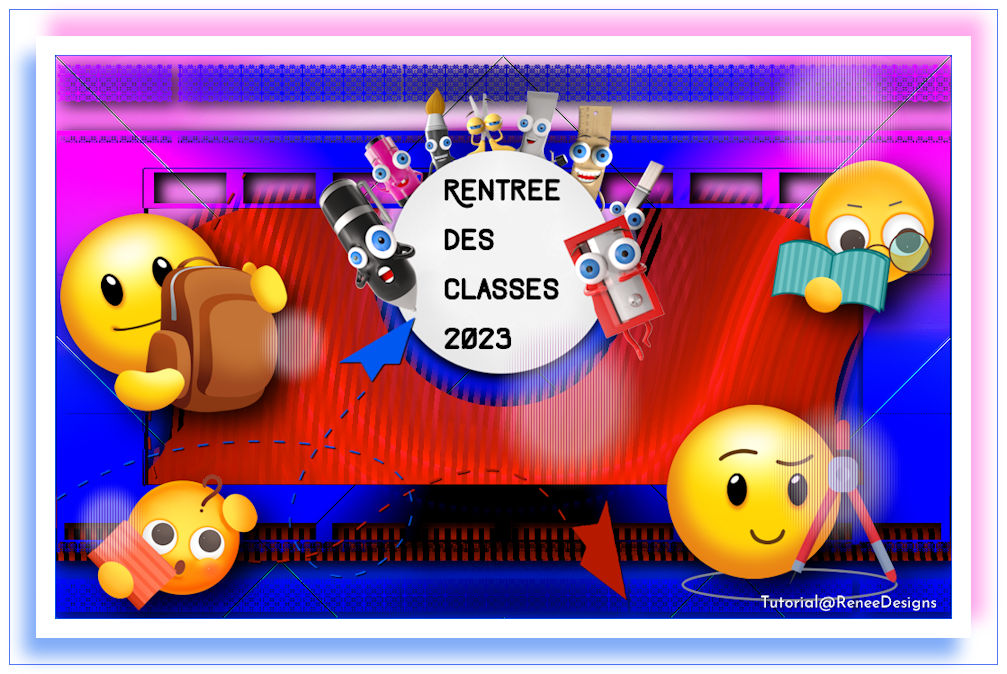
37. Open the Tube ‘’ Renee-Tubes-Rentree-Classes-2023’’
-I have several tube to use – Paste as a new layer and place the decorative elements individually according to your taste .
-Drop shadow to your own choice
38. Open the Tube ‘’ Rentree-classes 2023- Image-2’’ -Edit - Copy- Activate your work -Edit - Paste as a new layer- Place to your own taste
39. Effects -Plugins - AP[Lines]
Lines – Silverlining use the settings below
40. Image - Add borders-Symmetric checked:
1 Pixel-Color #0058f0=2
Image - Add borders-Symmetric checked:
50 Pixels -Color #ffffff=4
Image - Add borders-Symmetric checked:
1 Pixel -Color #0058f0=2
Image - Add borders-Symmetric checked:
10 Pixels -Color #ffffff=4
41. Selections – Select all
42. Selections – Modify – Contract 40 pixels
43. Effects – 3D-Effects – Drop Shadow with these settings-Color #0058f0=2

44. Effects – 3D-Effects – Drop Shadow with these settings-Color #ff53d9=1
45.Paste the author's watermark on your work and your own watermark
46. Layers- Merge- Merge All (flatten)
47. Image - Resize - to 90 % - Resize all layers- Checked
Save as JPG
I hope you enjoyed this lesson
Renée
This lesson was written by Renée
18/07/2023
Edited and Update
in 2023
*
*
Any resemblance with an existing lesson is a coincidence
* Do not forget to thank the people who work with us and for us -I have appointed the tubeurs and translators
Thanks
|
 Translations