Let's begin
1. Open ''fond_protection'' - Window/ Duplicate and
close the original - Layers - promote to raster layer
2. Layers - Duplicate
3. Effects - Filters Unlimited 2.0 <& BkgDesigner sfI01>
/ AFS Tangent Waves
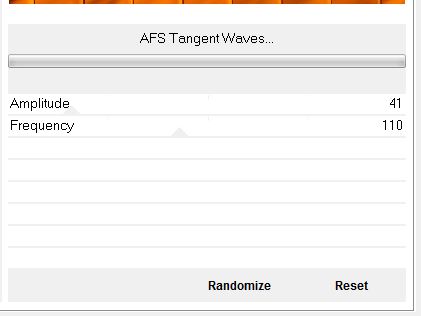
4. Repeat with the same settings
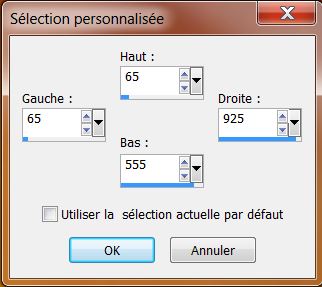
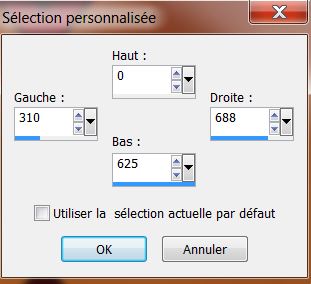
5. Selection tool - custom selection

6. Delete
KEEP THE SELECTION
7. Effects - Eye Candy 5 - Bevel / Preset "Protection_
bevel"
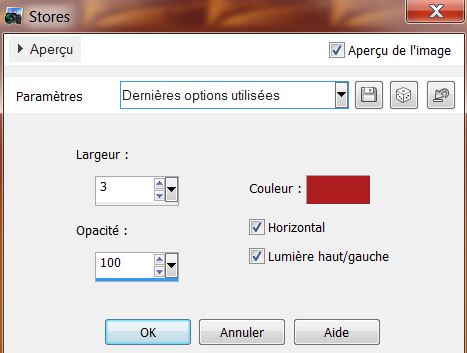
8. Effects - texture effects - blinds with the color
#ad1e1f
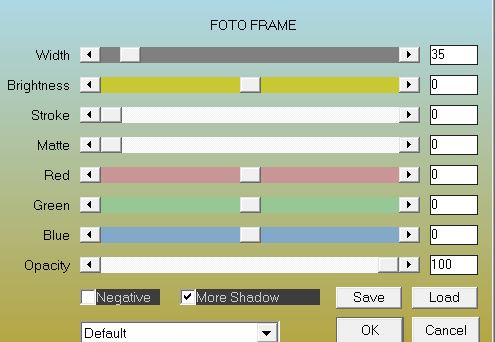
9. Effects - AAA frame - photo frame
10. Selections - select none
11. Open tube "protection_1" - paste as a new layer
12. Effects - Simple - top left mirror
13. Selection tool - custom selection
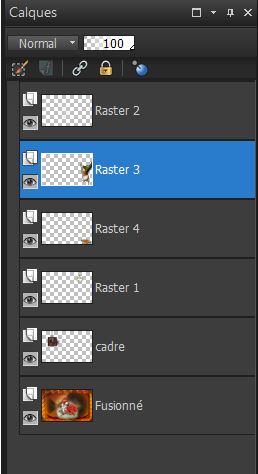
14. Selections - promote selection to layer
So now your layer palette looks like this
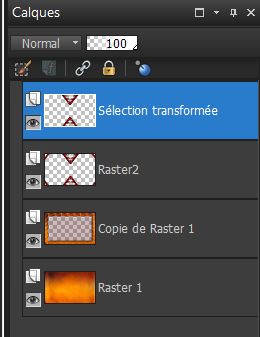
15. Back on Raster 2 / Delete
16. Selections - select none
17. Click to activate the top Layer (Selection
transformed)
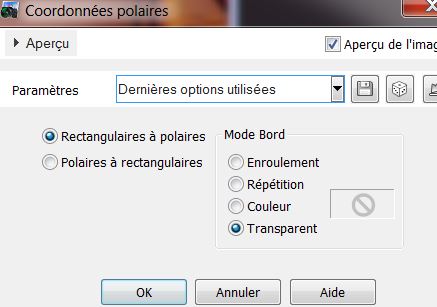
18. Effects - Distortion effects / Polar Coordinates
19. Selection tool - rectangle (S) select like this

20. Delete
21. Selections - Deselect
22. Back on Raster 2 / Effects - Eyecandy 5/ Nature -
Rust / Preset ''protection_rust''
23. Paste the tube ''protection _2'' as a new layer, do
not move it is in the right place
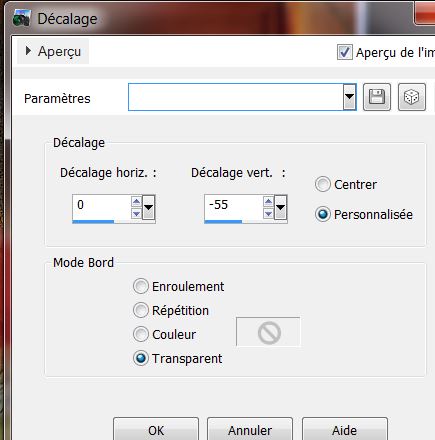
24. Effects - geometric effects - circle - transparent
box selected
25. Image - Resize to 80% - all layers unchecked
26. Change the layer mode to Overlay
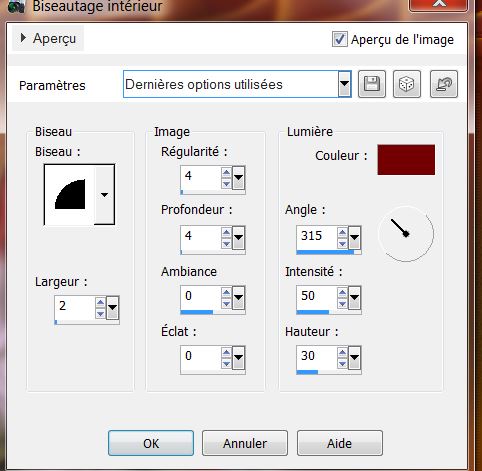
27. Click to activate Copy of Raster 1
28. Open the tube ''JHanna_685" - copy and paste as a
new layer
29. Layers - duplicate
30. Effects - Simple - Pizza slice Mirror
31. Effects - EyeCandy 5 - Perspective shadow - preset
''Protection_persp'' / Repeat
32. Open the tube "jhanna_521N Ceccoli" - image - resize
80% - all layers unchecked - paste as a new layer
33. Effects - image effect/ Offset
34. Layers - Merge Visible
35. Selections - load a selection from disk
''protection_1''
36. Selections - promote selection to layer
37. Effects - 3-D effects - Inner Bevel/ color #730000
38. Effects - EyeCandy 5 Impact - Glass / Preset ''protection_glass''
39. Selections - Deselect
40. Click to activate the bottom layer
41. With the selection tool (S) rectangle / draw a
rectangle like this
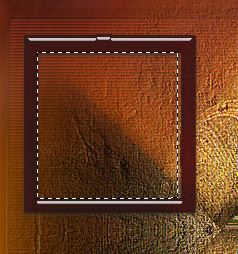
42. Selections - transform
selection to layer
43. Adjust - Blur Gaussian Blur at 10
44. Effects - IcnetFilters Unlimited / Paper Textures /
Kasy1 (can be imported from your download folder)
45. Layers - new raster - open tube "yoka_forest3" paste
into selection
46. Effects - Edge effects - enhance
47. Layers - add a new layer
48. Open tube "prisonner densenmanya_devils tube" -
paste into the selection
49. Selections - select none
50. Close the eye of the bottom layer (merged) / Merge
Visible (rename to something other than merged)
51. Open the tube "chaine" - paste as a new layer
52. Layers - merge down
53. Effects - EyeCandy 5 Impact - Perspective Shadow -
preset "protection_persp2"
54. Open the tube "Joelle_eII27 png" - paste as a new
layer - move into place
- open tube "screw" - paste as a new layer - see
finished image
55. Layers - merge down (To Merge these two layers)
56. Effects - Illumination effects - Projector look in
settings to locate "preset_lights_protection_projecteur"
- click ok
57. Copy and Paste in place the tube "Joelle_EII19.png''
58. Open the tube "protection_grille" - paste as a new
layer - No need to move
59. Change the layer to Overlay Mode
60. Click to activate the top of the Layers palette
61. Layers - Add a new layer
62. Selections - load selection from disk "protection_2"
- fill with color #610000
63. Effects - EyeCandy5/ Texture - Wall Stones - Preset
''protection_texture_stone''
64. Effects - Eye Candy 5 Impact Extrude - Preset
''protection_extrude_stone''
65. Selections - deselect
66. Layers - move down twice so it is under Raster 3
("Joelle_EII29.png'')
you're here:
67. Effects - 3-D effect/ Drop Shadow 5/5/30/15 black /
redo -5/-5
68. Image - add borders 1 pixel black
69. Edit - copy
70. Image - add borders 40 pixels in white / select this
border with your magic wand
71. Edit - paste into selection
72. Adjust blur / gaussian blur at 18
73. Selections - Invert selection
74. Effects - 3-D effects - Drop Shadow 5/5/30/15 black
/ redo -5/-5
75. Selections - Invert selection
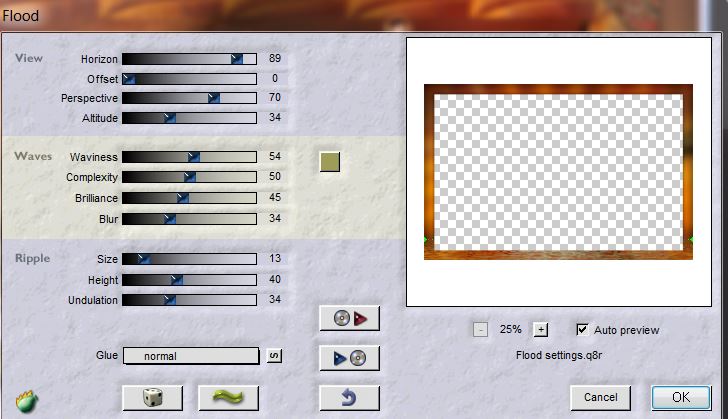
76. Effects - Flaming pear / Flood
77. Selections - Select none
78. Image - add borders 3 pixels black
79. Using the font "2 nelson sho card fat dna" write
something of your choice or - Open the tube "texte" and
paste as a new layer
80. * I redid a flood effect on text / same parameters
except play with the horizon to suit your title *
81. Layers - Merge all
*
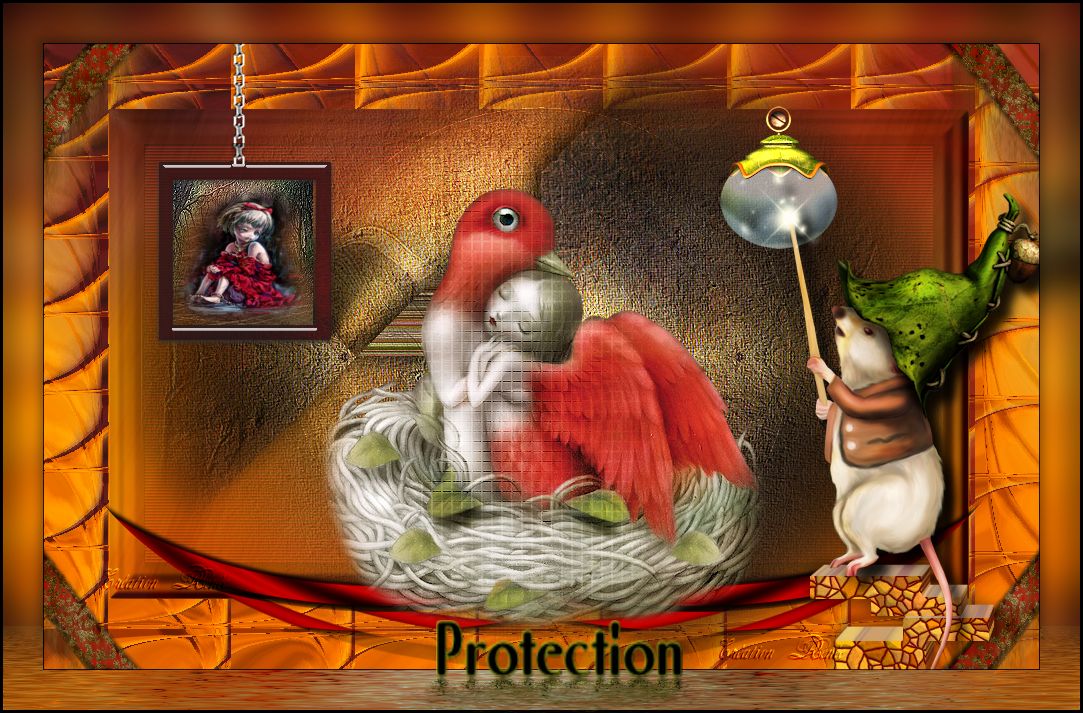
All Finished
Thanks Sally

|