|
Let's start the lesson
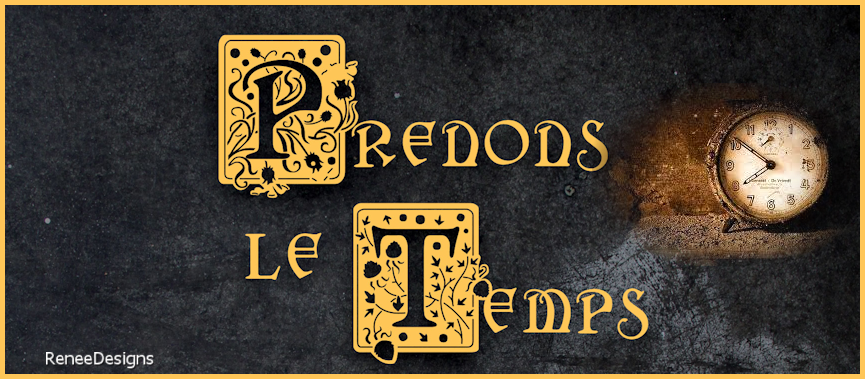
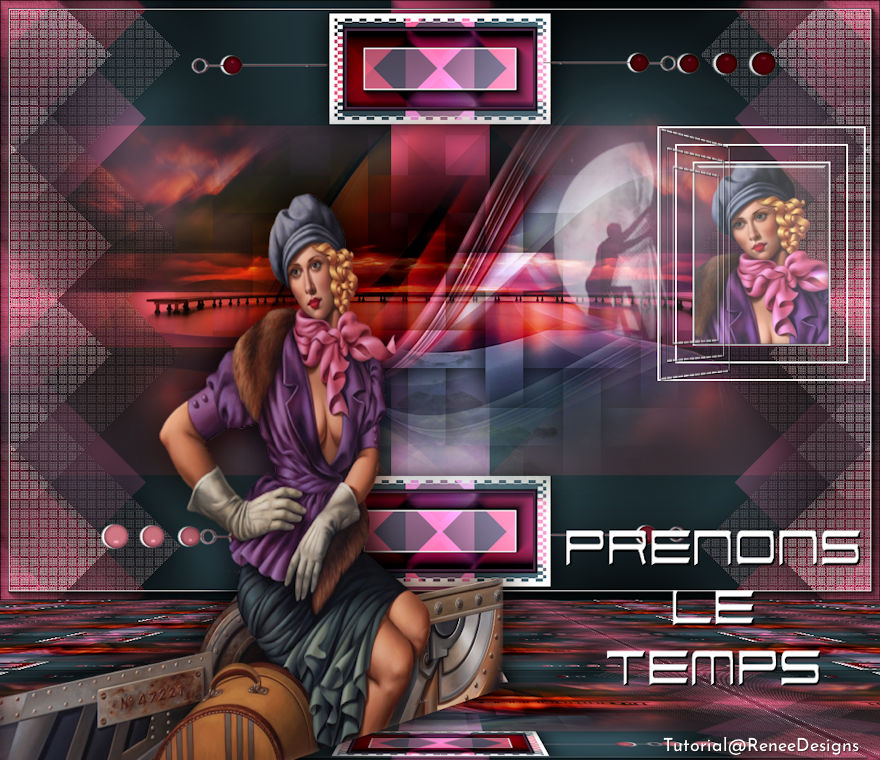
Prenons le temps/Let's take the time
- Preparation
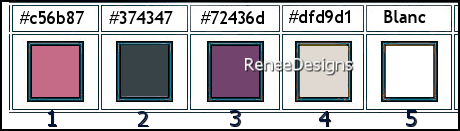
-Material Properties: Set your foreground color to color #c56b87 =color 1 – Set your background color to color #374347= 2
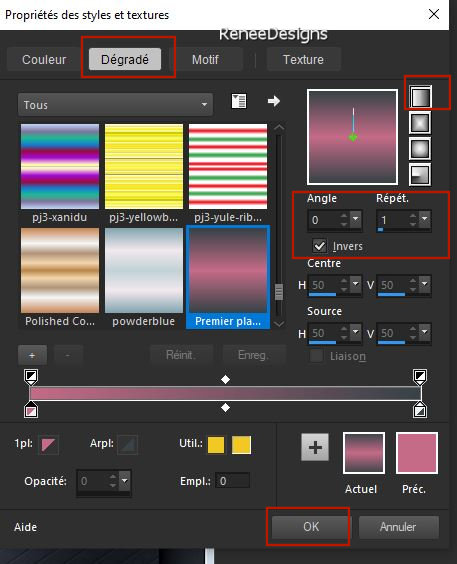
- Prepare a foreground/background linear gradient configured like this
1. File: Open a transparent image in this size 1100
x 750 Pixels
2. Flood Fill Tool
 –
Fill the layer with the background color #374347=color 2 –
Fill the layer with the background color #374347=color 2
3. Layers- New Raster Layer – Fill the layer with the gradient
4. Effects- Plugins – Photoshop Fun II – Russel with these settings: 142 / 0
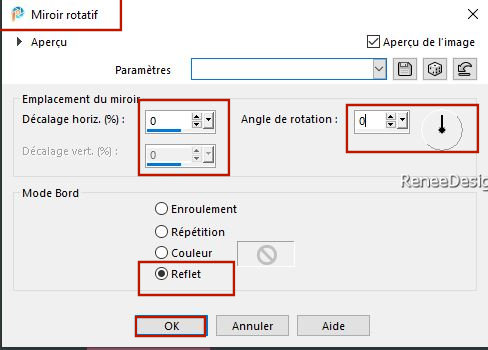
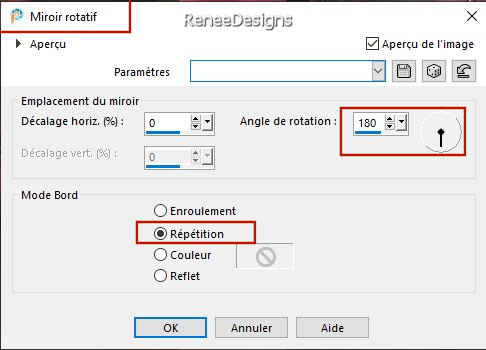
5. Effects – Reflection Effects – Rotating Mirror use the settings below
6. Layers – Duplicate
7. Image - Mirror - Mirror vertical ( Image - Flip in older versions of PSP)
8. Layers-Properties-Change the Blend Mode to " Overlay"
9. Layers- Merge- Merge Down
10. Selections –load/save selection –load selection from disc and select my selection: ’’’Prenons-temps 1’’
11. Selections- Promote selection to layer

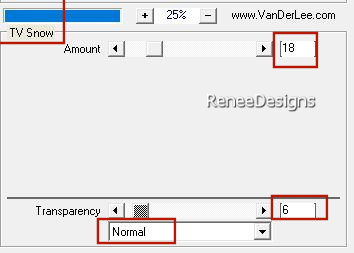
12. Effects – Plugins – Vanderlee – Unplugged X - TVSnow use the settings below
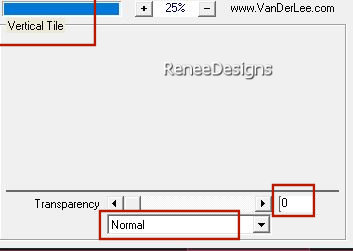
13. Effects – Plugins – Vanderlee – Unplugged X- Vertical Tile use the settings below
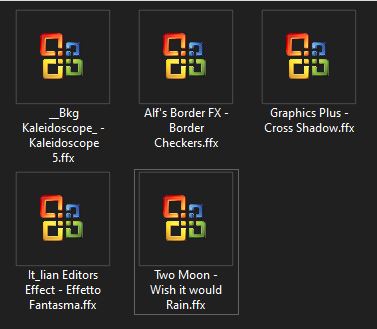
14. Effects - Plugins - Filters in Unlimited 2.0 - It@lian Editors
Effect - Effetto Fantasma with these settings: 20/0
15. Effects -Plugins
– Carolaine and Sensibility - CS-LDots use the settings below

16. Adjust – Sharpness –
Sharpen
17. Effects – 3D -Effects-
Drop Shadow with these settings: 0/0/100/45 Color Black
- Activate the layer underneath =Raster 2
18. Effects - Plugins - Filters in Unlimited 2.- &<Bkg Kaleidoscope> -
Kaleidoscope 5 with these settings: 228/ 56
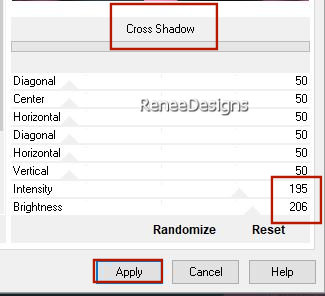
19. Effects - Plugins - Filters in Unlimited 2- Graphic Plus – Cross
Shadow use the settings below
20. Layers- Merge- Merge Visible
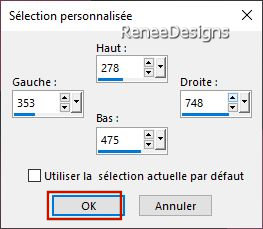
21. Activate Selection Tool -Custom Selection (S) with these settings
22. Selections- Promote selection to layer
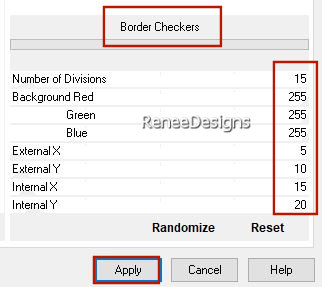
23.
Effects - Plugins - Filters in Unlimited 2.0 -
Alf's Border
FX- Border Checkers use the settings below
24. Selections – Modify –
Contract with 30 Pixels
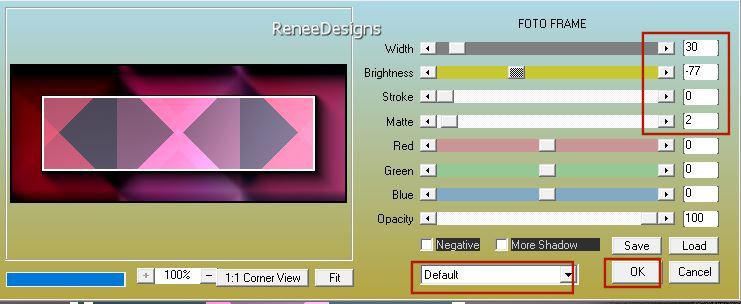
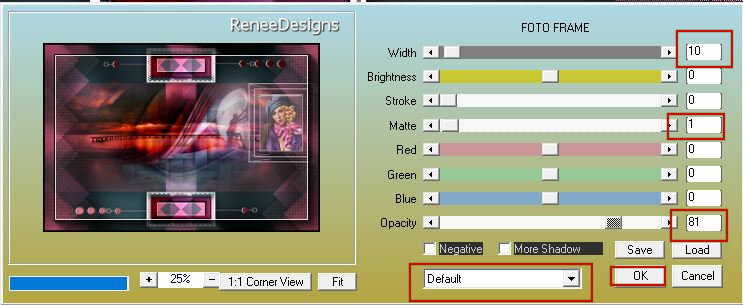
25. Effects – Plugins – AAA Frame – Foto Frame use the settings below
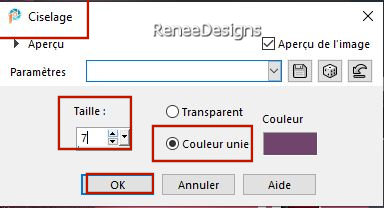
26. Effects – 3D -Effects–
Chisel use the settings below -Color #72436d= Color 3
27. Image - Resize by 70% - Uncheck - Resize all layers
28. Pick Tool: (K) on your keyboard -Enter these parameters on the toolbar
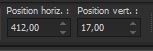 412/
17 412/
17
Press ( M ) to close the Pick Tool
29. Layers – Duplicate
30. Image - Mirror - Mirror vertical ( Image - Flip in older versions of PSP)
31. Layers- Merge- Merge Down
32. Effects – 3D -Effects- Drop Shadow with these settings:
0/0/0100/45 Color Black
33.Open the Tube ‘’Renee-TUBES-
Prenons-le-temps-Image1’’ -Edit - Copy- Activate your work -Edit - Paste as a new layer –Do not move, it is in the right place
34. Layers- Duplicate
35. Effects – Plugins – PhotoshopFunII – Kylie with these settings: 33/0
36. Effects – 3D -Effects- Drop Shadow with these settings: 0/0/100/45 Color Black
37. Open the Tube ‘’Renee-TUBES-
Prenons-le-temps-Image2’’ -Edit - Copy- Activate your work -Edit - Paste as a new layer
- Do not move, it is in the right place
38. Layers-Properties-Change the Blend Mode to " Hard Light"(choose the Blend Mode to match your colors)
- Activate the top of the layer palette
39. Layers- New Raster Layer
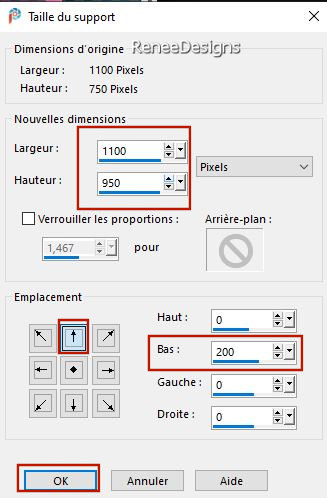
40. Selections –load/save selection –load selection from disc and select my selection: ’’’Prenons-temps 2’’
41. Properties Foreground: set your foregroundcolor to color #dfd9d1=Color 4
Flood Fill Tool
–
Fill the selection with the foreground color #dfd9d1=Color 4
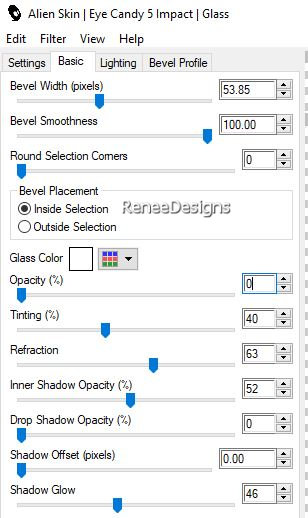
42. Effects - Plugins - Alien Skin EyeCandy 5 - Impact -Tab-Settings- User Settings and select my file- Preset :Prenons-temps-
Glass’’ or take the settings below
43. Layers – Duplicate
44. Image - Mirror - Mirror Horizontal (Image - Mirror in older versions of PSP)
45. Image - Mirror - Mirror vertical ( Image - Flip in older versions of PSP)
46. Layers- Merge- Merge Down
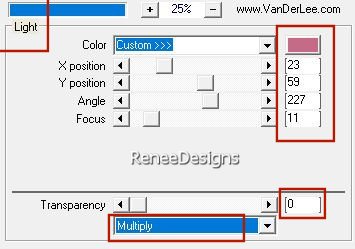
47. Effects –Plugins – Vanderlee Unplugged X- Light use the settings below– Color #c56b87=Color 1
48. Effects – 3D -Effects- Drop Shadow with these settings: 0 / - 3 / 100 / 2 Color WHITE !
49. Layers- New Raster Layer
50. Selections –load/save selection –load selection from disc and select my selection: ’’’Prenons-temps 3’’
51. Properties Foreground-Set your foreground color to color #ffffff=Color 5
Flood Fill Tool – Fill the selection with the foreground color #ffffff=Color 5
52. Selections - Modify - Contact with 2 Pixels

- Selections - Modify - Contact by 20 Pixels
- Flood Fill Tool
–Fill the selection with the foreground color #ffffff=Color 5
- Selections - Modify - Contact with 2 Pixels
53. Selections - Modify - Contact with 20 Pixels
- Flood Fill Tool
-
Fill the selection with the foreground color #ffffff=Color 5
- Selections - Modify - Contact with 2 Pixels
54. Selections - Modify - Contact with 20 Pixels
- Flood Fill Tool -Fill the selection with the foreground color #ffffff=Color 5
- Selections - Modify - Contact by 2 Pixels
55. Layers- New Raster Layer
56. Open the Tube ‘’Renee-TUBES-Juillet-2022-26’’ -Edit - Copy- Activate your work -Edit - Paste into selection
57. Effects -Plugins - Alien Skin EyeCandy 5 - Impact-Tab-Settings- User Settings and select my file- Preset :Prenons-temps-
Glass-2’’

- Activate the layer underneath (Cadre)
58. Layers- Duplicate
59. Layers- Arrange- Bring to Top
60. Pick Tool (k) – Mode-Scale-CTRL key, push up a little at the bottom right- push down a little at the top right- then the node in the middle, push in until you have the model.
In case of problems there is an image under the name ''cadre-perspective'' at the material and paste as a new layer on your image and put it in the right place
- Material Properties:Foreground color remains at color #ffffff=Color 5-Set your background color to color #c56b87 =Color 1
61. Effects - Plugins - Filters in Unlimited 2.0- Twoo Moon - Wish it
would Rain..withthese settings: 101/190/60
62. Effects – 3D -Effects- Drop Shadow with these settings: 1/1/100/1 Color Black
63. Open the Tube ‘’Renee-TUBES-
Prenons-le-temps-Image3’’ -Edit - Copy- Activate your work -Edit - Paste as a new layer
64. Pick Tool: (K) on your keyboard -Enter these parameters on the toolbar
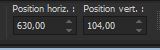 630
/104 630
/104
Press ( M ) to close the Pick Tool
65. Layers-Properties-Change the Blend Mode to " Screen" – Reduce the opacity of this layer to 75%
66.Layers- Merge- Merge Visible
67. Effects – Plugins- AAA Frame – Foto Frame use the settings below
68. Window- Duplicate (Shift+D)
69. Edit - Copy
- Activate your work
70. Image - Canvas Size use the settings below
71. Activate the Magic Wand - Select the bottom empty area
72. Layers- New Raster Layer
73. Edit - Paste Into Selection (Image is still in your PSP memory)
74. Effects – Reflection Effects- Rotating Mirror use the settings below
75. Effects – Plugins – Mura’s Meister – Perspective Tiling using the default settings
76. Open the Tube ‘’Renee-TUBES-Juillet-2022-28’’
- Activate layer "
pour tuto' of the Tube
77. Edit - Copy- Activate your work -Edit - Paste as a new layer
78. Place at the bottom left corner
79. Layers– Duplicate
80. Adjust- Blur- Gaussian Blur: Radius 22
81. Layers- Arrange- Move Down
82. Layers-Properties-Set the Blend Mode to "Multiply"
- Activate the top of the layer palette
83. Take my text or write your own ( font is included with the material) (
it is the background color that gives the writing color)
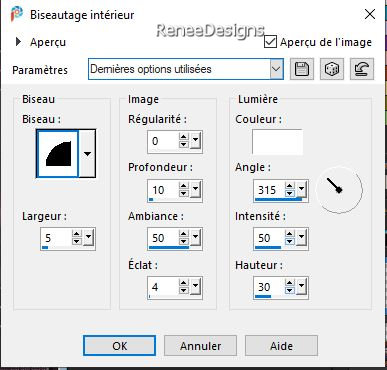
84. Optional - Effects –
3D-Effects –Inner Bevel use the settings below
85. Layers- Merge- Merge Visible
86. Image - Resize to 80% - Resize all layers checked
87. Paste the author's watermark on your work and your own watermark.
Save as JPG
That's it - Thank you / I hope you enjoyed this lesson
Renée
This lesson was written by Renée
31/07/2022
Edited and Update
in 2022
*
Toute ressemblance avec une leçon existante est une pure
coïncidence
*
Any resemblance with an existing lesson is a coincidence
* Do not forget to thank the people who work with us and for us
-I have appointed the tubeurs and translators
Thanks
|
 Translations