|
Let's start the lesson.
Small summer design
1.
Open the Image ‘Fond_petite_conception_ete.jpg’’-
Window - Duplicate (or shift+D) - Close the original and proceed on the copy -Promote Background Layer =Raster 1
2.
Activate the tube ‘’
Conception_ete_Image 1’’
-
Edit - Copy- Activate your work -Edit - Paste as a new layer
- Do not move, it is in the right place
2.
Layers-Properties-Set the Blend Mode to " Hard Light "
3.
Layers- New Raster Layer
4.
Selections –load/save selection –load selection from disc and select my selection: ‘’Conception_ete’’
-
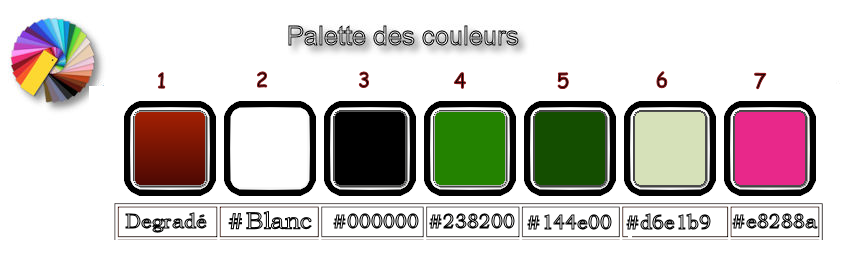
Properties foreground: - Change foreground material into gradient and select :
‘’@nn_010914_GR_Autumn_tdstudio’’
– Prepare a linear gradient configured like this.
5.
Activate Flood Fill Tool
 –
Flood Fill the selection with the gradient –
Flood Fill the selection with the gradient
Selections- Deselect All
6.
Adjust- Blur- Gaussian Blur- Radius 5
-
Color Palette: Set your foreground color to color black
7.
Layers- New Raster Layer
8.
Selections –load/save selection –load selection from disc and select my selection: ‘’Conception_ete_1’’
9.
Activate Flood Fill Tool
–
Flood Fill the selection with the foreground color black (zoom in if necessary)
10.
Layers- Duplicate
11.
Layers- Merge- Merge Down
Selections- Deselect All
12.
Layers-Properties-Set the Blend Mode to " Multiply "
-
Preparation/ Material Properties: Set your foreground color to #238200 - Set your background color to #ffffff
13.
Layers- New Raster Layer
14.
Selections –load/save selection –load selection from disc and select my selection: ‘’Conception_ete_2’’
15.
Activate Flood Fill Tool
–
Flood Fill the selection with the foreground color
Selections- Deselect All
16.
Layers- Duplicate
17.
Layers-Properties-Set the Blend Mode to " Darken"
18.
Layers- New Raster Layer
19.
Selections –load/save selection –load selection from disc and select my selection: ‘’Conception_ete_3’’
20.
Activate Flood Fill Tool
-
Flood Fill the selection with the background color #ffffff
Selections- Deselect All
-
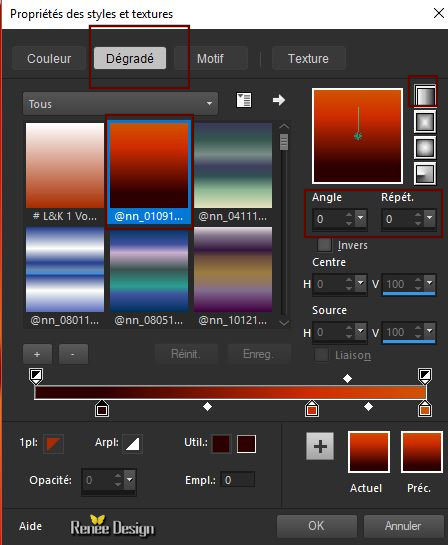
Properties foreground: - Change foreground material into gradient and select : ‘’Reneemer’’
Prepare a linear gradient configured like this.
21.
Layers- New Raster Layer
22.
Selections –load/save selection –load selection from disc and select my selection: ‘’Conception_ete_4’’
23.
Activate Flood Fill Tool
–
Flood Fill the selection with the gradient
Selections- Deselect All
24.
Effects –3D- Effects – Drop Shadow with these settings : 5/ - 17 /40 / 29 color black
25.
Activate the tube ‘’Conception_ete_origami.png’’
-
Edit - Copy- Activate your work -Edit - Paste as a new layer
26.
Effects- Image Effects- Offset with these settings H = -385 and V = 175
27.
Effects –3D- Effects – Drop Shadow with these settings : 83/ - 55/ 65 /29 color black
28.
Layers- New Raster Layer
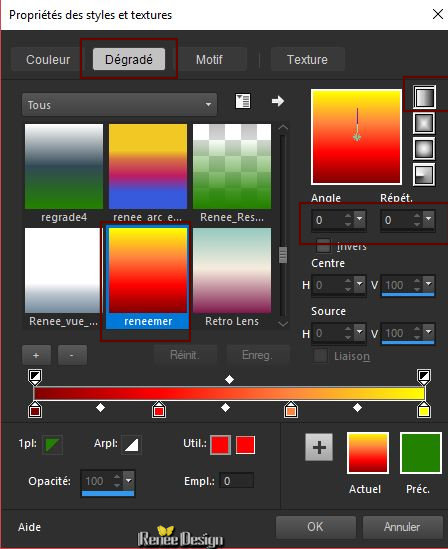
29.
Activate Selection Tool -Custom Selection (S) -Rectangle with these settings
30.Color Palette: Set your foreground color to color 5 #144e00
Activate Flood Fill Tool
-Flood Fill the selection with color 5 #144e00
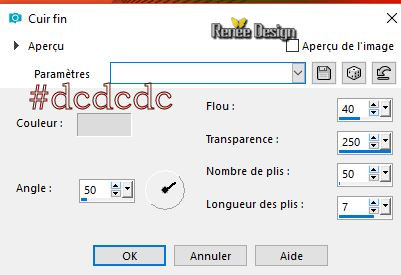
31.Effects- Texture Effects- Fine Leather use the settings below
32.
Selections- Modify-Contract with 32 Pixels
33.
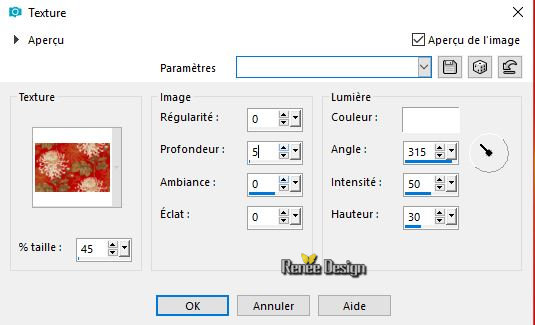
Effects – Texture Effects – Texture (make your own choice, it is not important )
34.
Selections –load/save selection –load selection from disc and select my selection: ‘’Conception_ete_5’’
35.
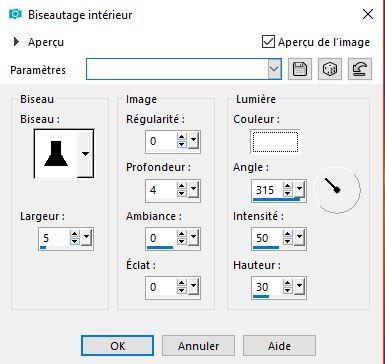
Effects- 3 D Effects- Inner Bevel use the settings below
Selections- Deselect All
36.
Effects –3D- Effects – Drop Shadow with these settings : 0/0/100/12 color black
37.
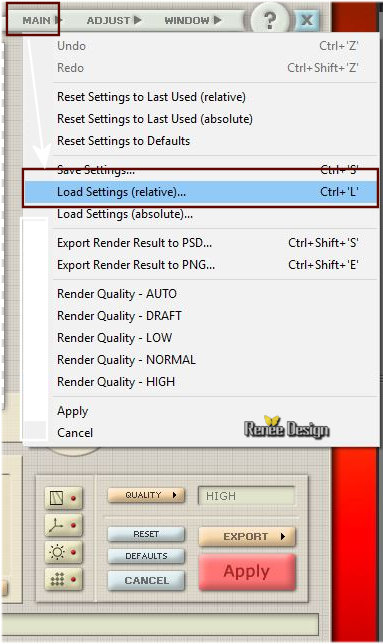
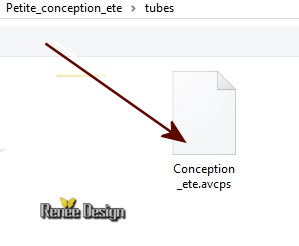
Effects – Plugins – AV.Bros Page Curl pro2.2 –
Preset ‘’
Conception _ete.avcps’’
_
First: Click on the Icon Main >>>Load settings (relative) >
>
select my Preset ‘’
Conception _ete.avcps’ can be used in any folder of your choice by clicking it.
And Apply
38.
Effects- Image Effects- Offset with these settings: = H – 229 and V = 347
Layers-Properties-Set the Blend Mode to " Screen "( if necessary duplicate the layer )
39.
Layers-Duplicate
40.
Image - Mirror - Mirror Horizontal (Image - Mirror in older versions of PSP)
41.
Layers- Merge- Merge Down
42.
Activate the tube ‘’
conception_Image 1.png’’
43. Edit - Copy- Activate your work -Edit - Paste as a new layer
44.
Effects- Image Effects- Offset with these settings H =- 45 and V = -78
45.
Effects –Plugins – Eyecandy 5 Impact –
Perspective shadow use the settings below
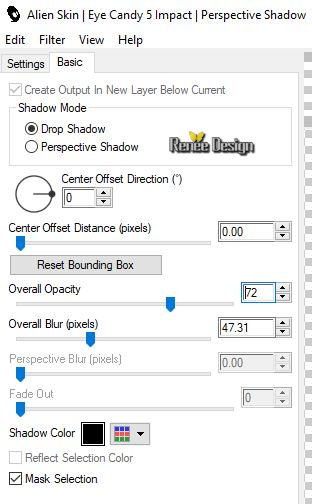
-
Color Palette: Set your foreground color to color 6 #d6e1b9
46.
Layers- New Raster Layer
47.
Selections –load/save selection –load selection from disc and select my selection: ‘’Conception_ete_6’’
48.
Activate Flood Fill Tool
–
Flood Fill the selection with the foreground color #d6e1b9
Selections- Deselect All
49.
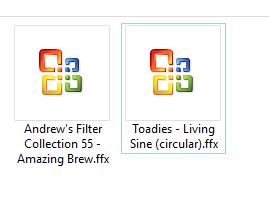
Effects –Plugins - Unlimited 2.0 - Andrew's Filter Collection 55 -
Amazing Brew..use the settings below .

50.Layers-Properties-Set the Blend Mode to " Color Legacy "
51.
Effects- Edge Effects- Enhance
52.
Layers- New Raster Layer
53.
Selections –load/save selection –load selection from disc and select my selection: ‘’Conception_ete_7’’
54.Color Palette: Set your foreground color to color black
Activate Flood Fill Tool
–Flood Fill the selection with the foreground color black
Selections- Deselect All
55.
Effects –Plugins -Unlimited 2.0 – Toadies- Living Sine (circular)
using the default settings
56.
Effects –Plugins – Eyecandy 5 Impact –
Perspective Shadow/ Preset ‘’Drop shadow Blurry’’
57.
Layers- New Raster Layer
58.
Selections –load/save selection –load selection from disc and select my selection: ‘’Conception_ete_8’’
59.
Color Palette: Set your foreground color to color 7 #e8288a
Activate Flood Fill Tool
-
Flood Fill the selection with the foreground color 7
Selections- Deselect All
60.
Effects –3D- Effects – Drop Shadow with these settings : 1/1/35/3 color black
61.
Activate the tube ‘’
Conception_ete_Image 2.png’’
-
Edit - Copy- Activate your work -Edit - Paste as a new layer
-
Place it in the upper right corner
62.
Lower the Opacity of the layer to 59%
- Layer-Palette-Make Raster 7 active
63.
Activate the tube ‘’
conception_Image _chaussure.png
-
Edit - Copy- Activate your work -Edit - Paste as a new layer
64.
Objects-Align- Right
65.
Activate the tube ‘’
Conception_ete_lampes
-
Edit - Copy- Activate your work -Edit - Paste as a new layer
-
Place it in the upper left corner
66.
Layers- New Raster Layer
67.
Selections –load/save selection –load selection from disc and select my selection: ‘’Conception_ete_9’’
68.Color Palette: Set your foreground color to color 2 #ffffff
Activate Flood Fill Tool
–Flood Fill the selection with the foreground color #ffffff
Selections- Deselect All
69.
Effects –3D- Effects – Drop Shadow with these settings : 1/-8/42/2 color black
70.
Activate the tube ‘’
conception_ete_rideau’’
-
Edit - Copy- Activate your work -Edit - Paste as a new layer
71.
Image - Add borders-Symmetric checked 1 pixel color 4 # 238200
72.
Image - Add borders-Symmetric checked 40 pixels color #ffffff
73.
Image - Add borders-Symmetric checked 1 pixel color black
74.
Image - Add borders-Symmetric checked 30 pixels color #ffffff
75.
Activate the "titre"-Edit - Copy- Activate your work -Edit - Paste as a new layer and move
76.
Layers- Merge- Merge All ( flatten)
77.
Image Resize to 999 Pixels width.
Save as JPG
I hope you enjoyed this lesson
Renée
This lesson was written by Renée 6 July 2018
Edited and Update
2018
*
Any resemblance with an existing lesson is a coincidence
* Do not forget to thank the people who work with us and for us I have appointed the tubeurs and translators
Thanks
*
|


 Translations


 If a plugin supplied appears with this icon it must necessarily be imported into Unlimited *