|
Let's start the lesson
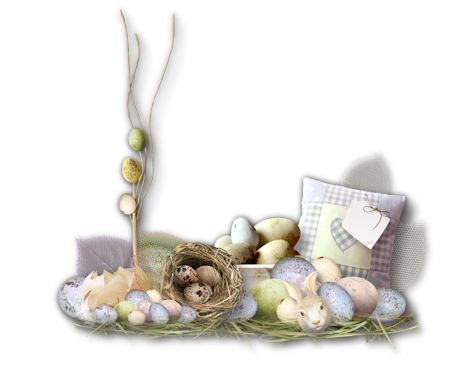
Pâques-2023/Easter 2023
- Preparation
- Material Properties:
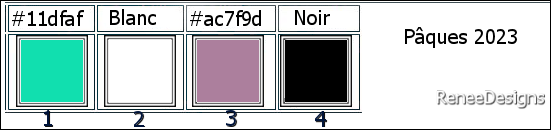
Set your Foreground color to color #11dfaf=color 1 – Set your Background color to color #ffffff=color 2
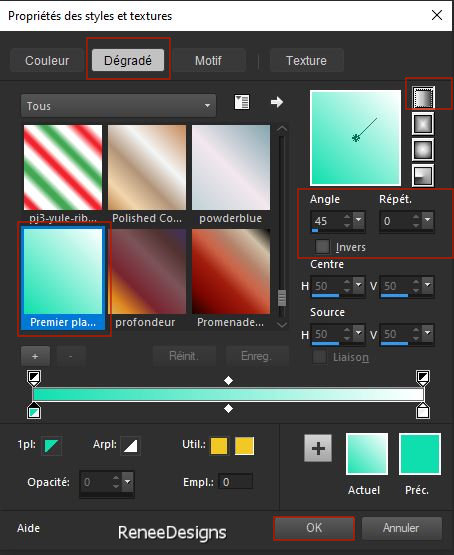
- Properties Foreground- Prepare a Foreground/Background linear Gradient configured like this
1. File: Open a Transparent Image in this size : 1000
x 700 Pixels
2. Flood Fill Tool
 –
Fill the layer with the gradient –
Fill the layer with the gradient
3. Effects - Plugins - Filters in Unlimited 2.0 – Toadies – Weaver with these settings:
90/76/222
4. Effects – Edge Effects– Enhance More
5. Layers – Duplicate
6. Image - Resize to 90%- Resize all Layers Not checked.
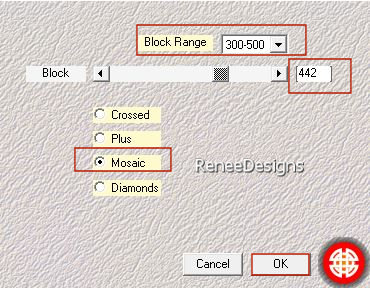
7. Effects - Plugins – Medhi – Sorting Tiles use the settings below
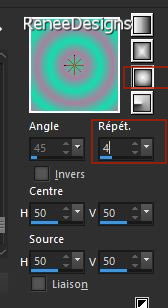
8. Effects - Plugins - Filters in Unlimited 2.0 - &<Bkg Kaleidoscope> -
4 QFlip UpperL
9. Effects – 3D-Effects – Drop Shadow with these settings: 0/ 4 /70 /45 Color Black
10 Layers- New Raster Layer
11. Selections –load/save selection –load selection from disc and select my selection: ‘’Paques-2023-1’’
12. Flood Fill Tool
-Fill the selection with the gradient

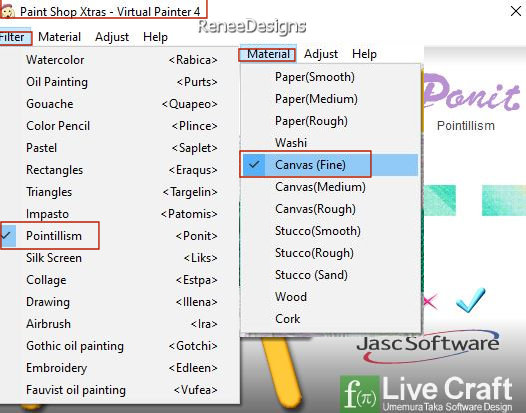
13. Effects – Plugins – Virtual Painter 4
Filter=Pointillism/
Material = Canvas(Fine)/Adjust all to normal
- Effects – 3D-Effects – Drop Shadow with the same settings
14. Layers-Properties– Reduce the Opacity of this layer to 69%
15. Adjust- Sharpness-Sharpen More
16. Effects - Plugins - Filters in Unlimited 2.0 - Alf's Border FX –
Border fade II using the default settings
-
Material Properties:
Set your Foreground color to color #11dfaf=color 1 – Set your Background color to color #ac7f9d=color3
- Properties Foreground- Prepare a Foreground/Background sunburst Gradient configured like this
17. Layers- New Raster Layer
18. Selections –load/save selection –load selection from disc and select my selection: ‘’Paques-2023-2’’
19. Flood Fill Tool
- Fill the selection with the gradient (click 4 times in the selection)
20. Effects – 3D-Effects – Drop Shadow with these settings: 2/2/70/12 Color Black
21. Layers-Properties-Set the Blend Mode to " Multiply "
22. Effects - Plugins - Alien Skin EyeCandy 5 - Impact - Glass
-–Tab- Settings- User Settings and select my file-Preset :''Paques-2023' -or put the settings in manually
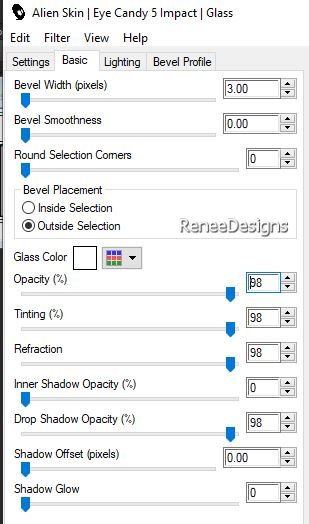
- Activate the bottom of the Layers palette=Raster 1
23. Layers – Duplicate
24. Layers- Arrange-Bring to Top
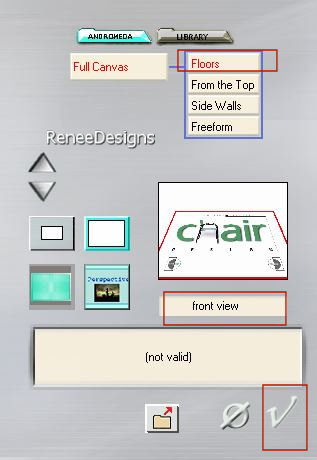
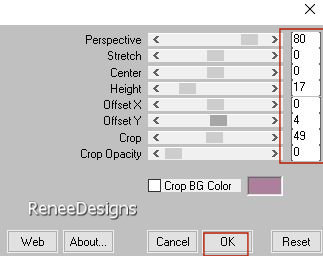
25. Effects – Plugins– Andromeda – Perspective use the settings below
26. Effects - Plugins - Filters in Unlimited 2.0 - Filter Factory
Gallery G – Panel Stripes: 15/72/126
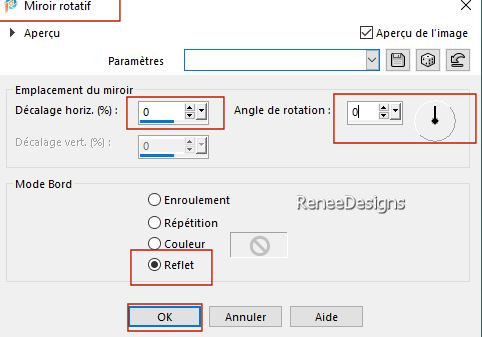
27. Effects- Reflection Effects-Rotating Mirror use the settings below
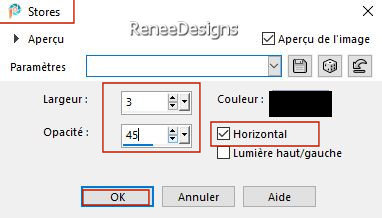
28. Effects – Texture Effects – Blinds with these settings – Color Black
29. Effects- Plugins – Mura’s Meister – Perspective Tiling use the settings below
30. Effects – 3D-Effects – Drop Shadow with these settings: - Color #ffffff=2

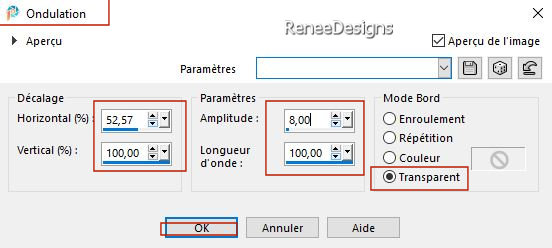
31. Effects -
Distortion Effects– Ripple use the settings below
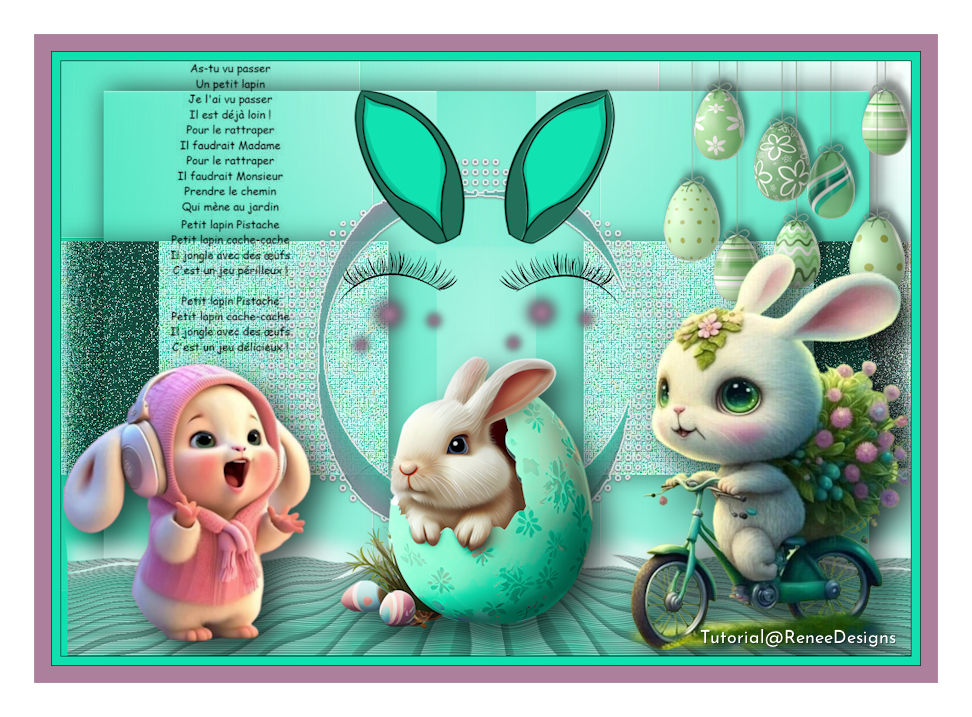
32. Open the Tube ‘’ Paques-2023-Image1 - Edit - Copy- Activate your work -Edit - Paste as a new layer
- Move see finished image
33. Layers- New Raster Layer
34. Selections –load/save selection –load selection from disc and select my selection: ‘’Paques-2023-3’’
35. Material Properties: Set your Foreground color to color #000000=4 – Set your Background color to color #ac7f9d=3
Food Fill Tool -
Fill the selection with the foreground color #000000=4 ( click 3 times in the selection)
36. Layers- New Raster Layer
37. Selections –load/save selection –load selection from disc and select my selection: ‘’Paques-2023-4’’
38. Food Fill Tool
Click once with the foreground color#000000=4
Click once with the background color #ac7f9d=3
39. Adjust- Blur-Gaussian Blur-Radius 3
40.Open the Tube ‘’ Renee-Texte-Paques2023’’ -Edit - Copy- Activate your work -Edit - Paste as a new layer
- Place at the top left ( see finished image)
41. Open the Tube ‘’ Paques-2023-Image-tubes-3’’ -Edit - Copy- Activate your work -Edit - Paste as a new layer
- Place at the top right( see finished image)
42. Effects – 3D-Effects – Drop Shadow with these settings: -11 / 5/ 45
/10 Color Black
43. Now for the embellishment of our work.
Open a tube of your choice - add it as a new layer on your work
Renée chose these tubes ‘’Paques-2023-Image-tubes-2.’’
And a folder ‘’Reserves-Tubes-Paques2023 ‘’
- Resize it if necessary/ place it as you like
- Drop shadow to your own choice
Image - Add borders-Symmetric checked: 1 Pixel -Color Black=4
Image - Add borders-Symmetric checked: 10 Pixels -Color #11dfaf=1
Image - Add borders-Symmetric checked: 1 Pixel -Color Black=4
Image - Add borders-Symmetric checked: 20 Pixels -Color ac7f9d=3
Image - Add borders-Symmetric checked: 40 Pixels - Color #ffffff=2
- Paste the author's watermark on your work and your own watermark
-
Layers- Merge- Merge All (flatten)
- Image - Resize to 85%- Resize all Layers checked.
Save as JPG
I hope you enjoyed this lesson
Renée
This lesson was written by Renée 08/03/2023
Edited and Update
in 2023
*
Any resemblance with an existing lesson is a coincidence * Do not forget to thank the people who work with us and for us.
-I have appointed the tubeurs and translators
Thanks
|
 Translations