|
Let's start the lesson
Pâques 2021/Easter 2021

1.Open the Background image
‘’Fond-paques-2021’’- Promote to Raster Layer = Raster 1
2. Layers- Duplicate
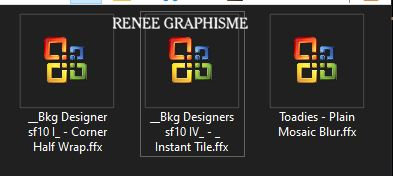
3. Effects -Plugins-
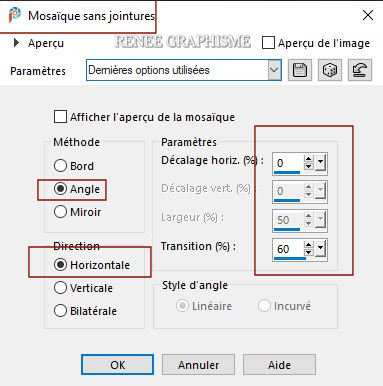
Unlimited 2.0 – Toadies - Plain Mosaic Blur... 22/22/18
4.
Selections –load/save selection –load selection from disc and select my selection: ‘’paques-2021-1’’
SELECTIONS- INVERT
DELETE
Selections- Deselect All
5. Effects – 3D-Effects – Drop Shadow with these settings: 5 / - 5/ 80 /42 Color Black
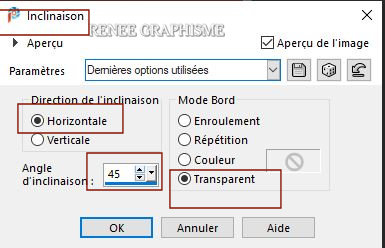
6. Effects – Geometric Effects – Skew use the settings below
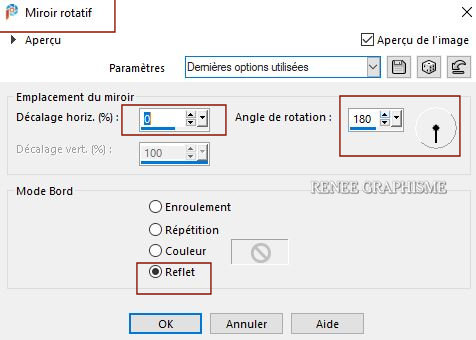
7. Effects – Reflection Effects – Rotating Mirror use the settings below
8.
Pick Tool: (K) on your keyboard -Enter these parameters on the toolbar
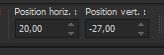 20
/ - 27 20
/ - 27
- Press ( M ) to close the Pick Tool
- Activate the bottom of the layer palette= Raster 1
9. Layers- Duplicate
10. Image - Mirror - Mirror Horizontal (Image - Mirror in older versions of PSP)
11. Layers-Properties-Set the Blend Mode to " Soft Light "
- Layers- Merge- Merge Down
12. Layers- Duplicate
- Stay on this layer ( Copy of Raster 1)
13. Effects-Plugins- Unlimited 2.0 - &<Bkg Designer sf10 I>
-Corner Half Wrap
14. Effects – Edge Effects – Enhance
15. Effects-Plugins- Unlimited 2.0 - &<Bkg Designers sf10 IV>- @
Instant Tile using the default settings
16. Activate the Pick Tool (K) –Default setting and select my file ‘’
paques-2021-perspective’’
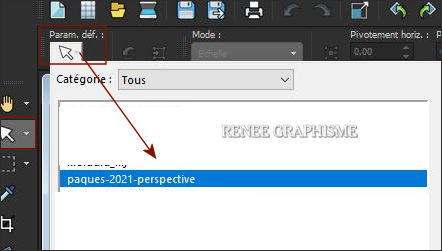
– Apply
-
Press ( M ) to close the Pick Tool
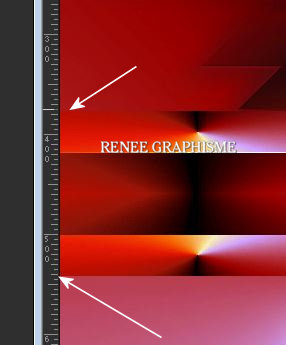
- Or manual settings as shown in the example below
Activate the Pick Tool (K) Mode Scale -Pull the top node down to 380 PX
Pull the bottom node up to 545 PX high as shown in the example below
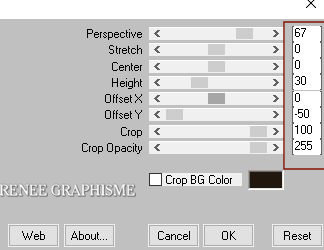
17. Effects – Plugins – Mura’s Meister – Perspective Tiling use the settings below
Activate the bottom of the layer palette =Raster 1
18. Open the tube ‘’
Paques-2021-Image1’ -Edit - Copy- Activate your work -Edit - Paste as a new layer
- Do not move, it is in the right place
19. Effects – Image Effects– Seamless Tiling use the settings below
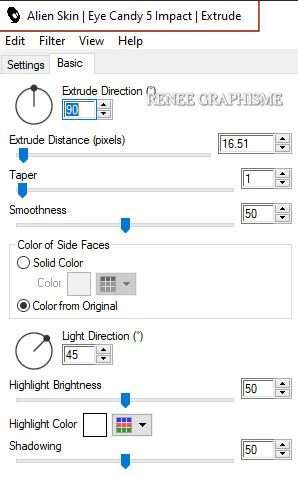
20. Effects – Plugins – AlienSkin EyeCandy5 -Impact - Extrude use the settings below
- Stay on this Layer
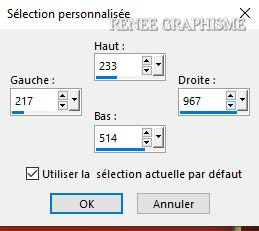
21. Activate Selection Tool -Custom Selection (S) -Rectangle with these settings 
22. Effects – Plugins – Carolaine and Sensibility- CS-LDots with these settings:
145/20/2
Adjust- Sharpness-Sharpen More
Selections- Deselect All
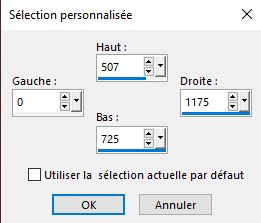
23. Activate Selection Tool -Custom Selection (S) -Rectangle with these settings
You can't see anything at the moment it's normal
- Selections- Promote selection to layer
Selections- Deselect All
24. Effects- Distortion Effects-Polar Coordinates-Rectangular to Polar-Warp
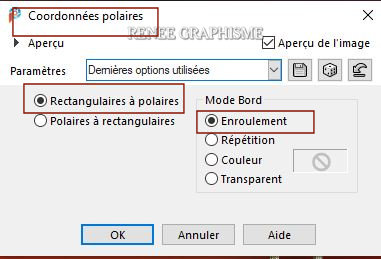
- Your work and Layer Palette look like this now-You should have this result
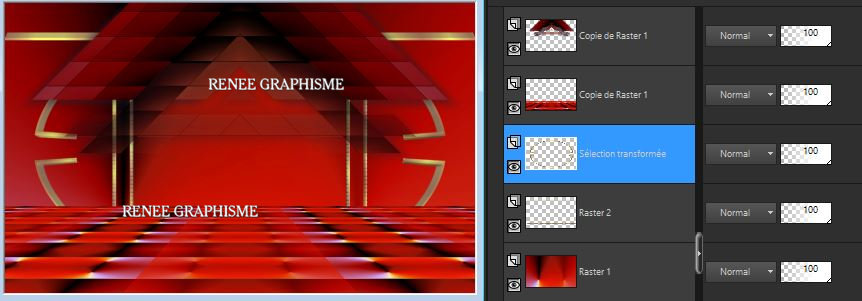
- Activate the top of the layer palette
25. Layers- New Raster Layer
26.
Selections –load/save selection –load selection from disc and select my selection: ‘’paques-2021-2’’
- Material Properties: Set your Foreground color to gradient and select gradient ‘’mqc Devil’’ - Style Radial configured like this
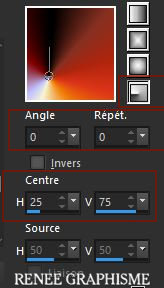
27. Flood Fill Tool
 -
Fill the selection with the gradient -
Fill the selection with the gradient
28. Effects – Plugins– Alien Skin EyeCandy 5 Impact – Glass-Tab Settings/User settings select my file- Preset :’’
Paques-2021-GLASS’’
29. Layers- New Raster Layer
30.
Selections –load/save selection –load selection from disc and select my selection: ‘’paques-2021-3’’
Do not fill with color
31. Effects – Plugins – AlienSkin eyeCandy 5 Impact – Glass-Tab Settings/User settings select my file-Preset :
‘’Glass-Paques-2021’’
Selections- Deselect
32. Layers- Duplicate
33. Effects- Distortion Effects– Wave with these settings
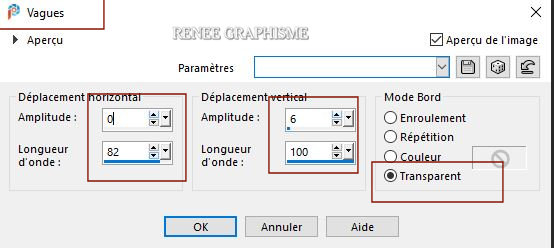
34. Layers- Merge- Merge Down
- Activate the bottom of the layer palette =Raster 1
35.
Selections –load/save selection –load selection from disc and select my selection: ‘’paques-2021-4’’
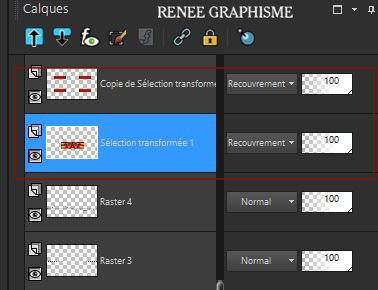
36. Selections- Promote selection to layer
37. Layers- Arrange- Bring to Top
38. Effects – Plugins – Carolaine and Sensibility – CS HLines with these settings:
115/0/10
39. Effects– Edge Effects-Enhance More
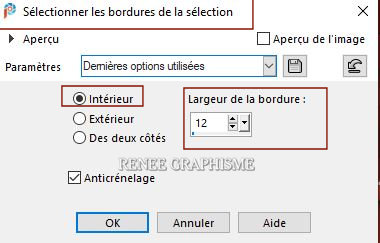
40. Selections- Modify- Select Selection Borders with these settings
41. Effects – Plugins - AP[Lines] Lines
Silverling use the settings below
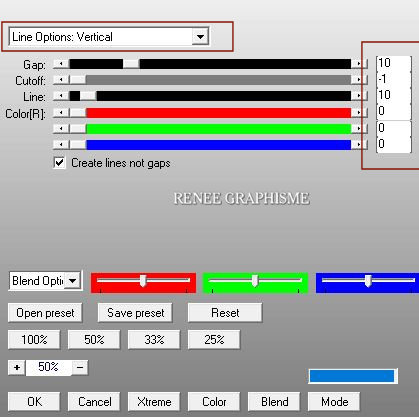
- Repeat –Effects – Plugins - AP[Lines] Lines
Silverling But-
Line Options : Horizontale !!
42.
Effects – Plugins – AlienSkin
EyeCandy 5 Impact – Glass-Tab Settings/User settings select my file-Preset : ‘’Glass-Paques-2021’’
Selections- Deselect All
43. Layers- Duplicate
44. Effects –Plugins-
Unlimited 2.0 - &<Bkg Designers sf10 IV>- @ Instant Tile with these settings:
224/116
- Activate the layer underneath (Promoted Selection 1 )
45. Effects –Plugins-
Unlimited 2.0 - Sapphire Filters 09 -
SapphirePlugin_0814...using the default settings
-On both layers- Set the Blend Mode to " Overlay "
46. Open the tube ‘’ Renee_TUBES-2021-Paques-tuto’’ -Edit - Copy- Activate your work -Edit - Paste as a new layer and move
I have several tube layers to use – Paste as a new layer and place the decorative elements individually according to your taste .Resize to your liking
47. Activate both texts - "Happy Easter" and "Joyeuses Paques" - Edit - Copy- Activate your work -Edit - Paste as a new layer .
Move Tool (M) place it in the right place (see finished image)
48. Open the tube "Pretty tube paqeus" -Edit - Paste as a new layer Move Tool (M) place it in the right place (see finished image) You can use your own tube
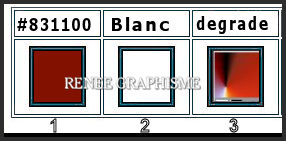
49. Image - Add borders-Symmetric checked: 1 Pixel Color #831100-Red
- Image - Add borders-Symmetric checked: 10 Pixels Color #ffffff=White
- Image - Add borders-Symmetric checked: 1 Pixel Color #831100-Red
- Image - Add borders-Symmetric checked: 40 Pixels Color #ffffff=White
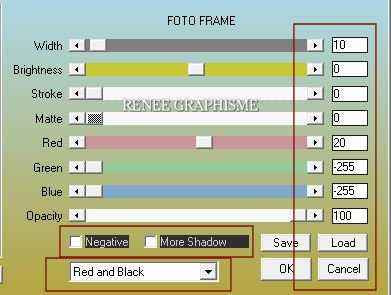
50. Effects – Plugins -AAA Frame - Foto frame use the settings below
51. Open the my Copyright- Edit-Copy-Edit - Paste as a new layer and Move
Image - Resize - 985 Pixels Width
Save as JPG

I hope you enjoyed this lesson
Renée
This lesson was written by Renée 14/01/2021
Edited and Update
2021
*
Any resemblance with an existing lesson is a coincidence
* Do not forget to thank the people who work with us and for us
I have appointed the tubeurs and translators
Thanks
*
|


 Translations