|
Let's start the lesson.
Color-
Palette
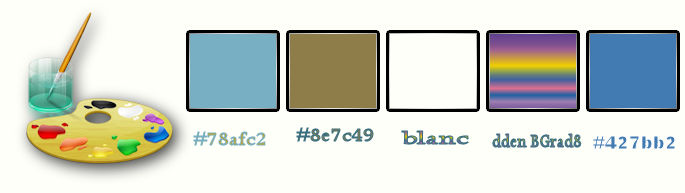
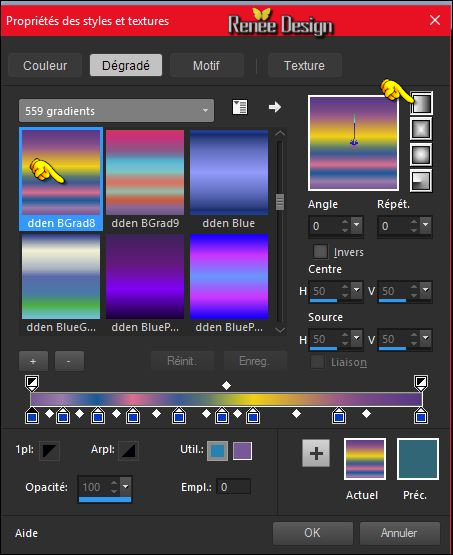
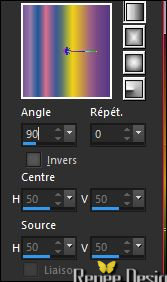
- Properties foreground:Set your foreground material into gradient and and select my file in the list : ‘’dden BGrad8’’ Prepare a linear gradient configured like this.
Set your background color to color #ffffff
1.
Open the image ‘’ Fond_Nos pensees.jpg’’ – Window - Duplicate (or shift+D) - Close the original and proceed on the copy -Promote Background Layer =Raster 1
2.
Effects- Distortion Effects- Twirl – Degrees a
585
3.
Adjust-Blur- Gaussian Blur : Radius 55
4.
Layers- New Raster Layer
5.
Activate Flood Fill Tool and fill the layer with the gradient
6.
Effects- Plugins – Alphaworks- Radial Fade Out
255
7.
Effects- Plugins – Mock – Bevel 60
8.
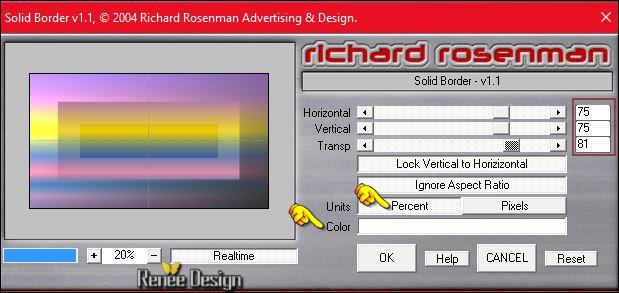
Effects- Plugins – Richard Rosenman – Solid Border use settings below -
Color white
9.
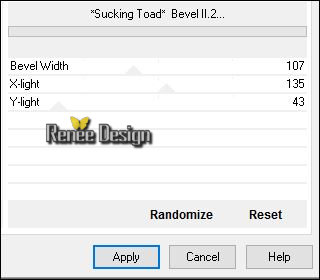
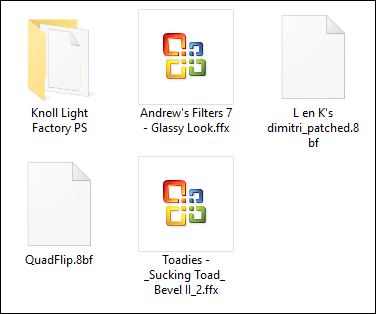
Effects –Plugins- Unlimited – Toadies - *Sucking Toad* Bevel
II.2..with these settings .
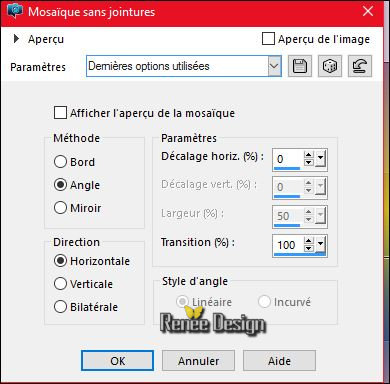
10. Effects-Image Effects-Seamless Tiling use the settings below
11. Effects-Edge Effects- Enhance More
- Layer Palette - Double click on this Layer and set the Blend Mode to "Hard Light "
12.
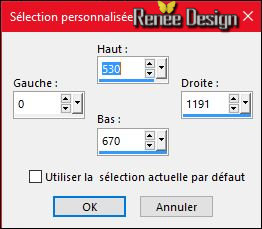
Activate Selection Tool -Custom Selection (S) Rectangle with these settings
13. Layers- New Raster Layer
14. Color-palette:Change the settings of the linear gradient into these settings
15. Effects- Plugins - Unlimited – Mirror Rave –
Quadrant Flip using the default settings
123/120/125/122
16.
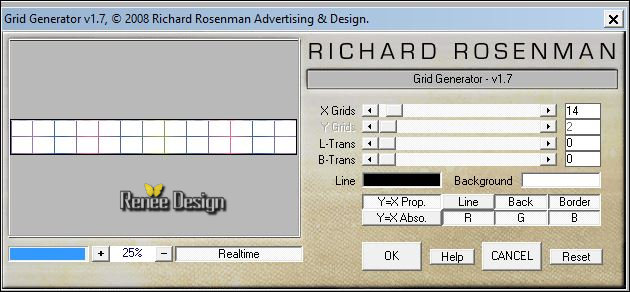
Effects- Plugins – Richard Rosenman – Grid
Generator use settings below - Color-Black and White
Selections- Deselect All
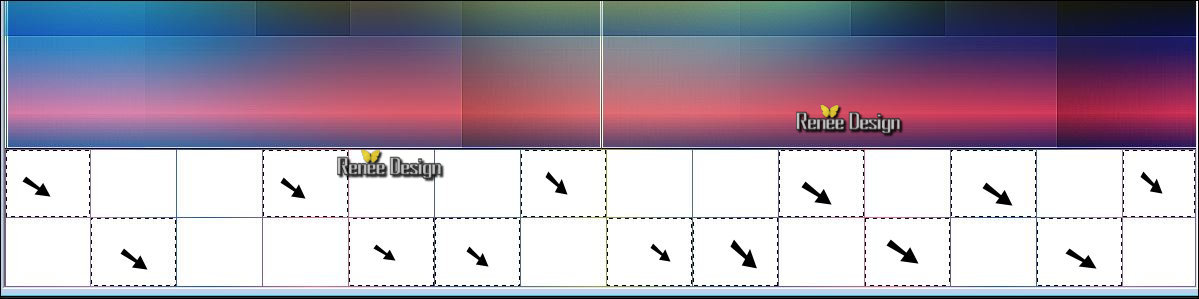
17. Activate your Magic Wand with these settings

-
Select these parts (as indicated by the arrows)
18. Layers- New Raster Layer
19. Activate Flood Fill Tool and fill the selection with the foreground gradient
20.
Selections Invert
21. Effects- 3 D Effects- Cutout with these settings - Color Black
22. Effects- 3 D Effects- Drop Shadow with these settings: 2/2/50/5 black
Selections- Deselect All
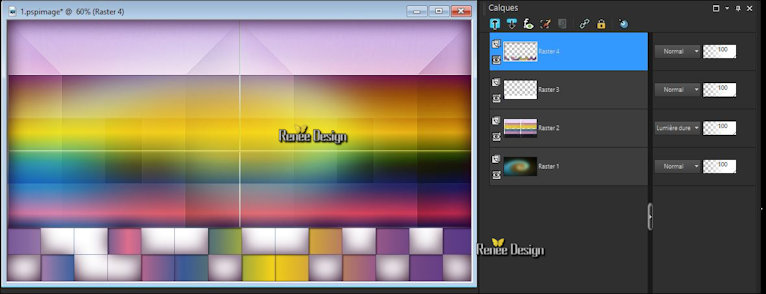
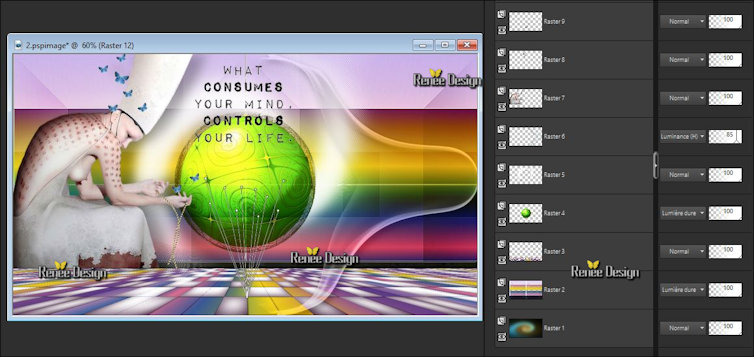
Your work and Layer Palette look like this now
23. Layers- Merge- Merge Down (The result )
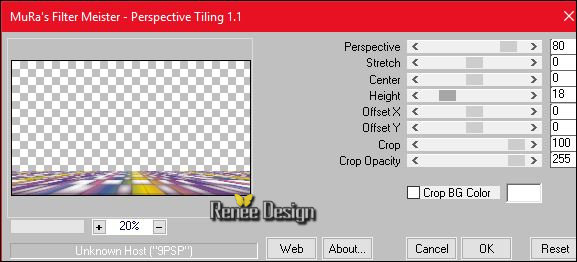
24. Effects
-Plugins – MuRa’s Meister – Perspective
Tilling use settings below
25.
Activate Selection Tool -Custom Selection (S) Rectangle with these settings

26.
Effects- Plugins –EyeCandy 5 Impact – Glass- Settings-Preset
‘’Clear with Reflection
Selections- Deselect All
27.
Open the tube ‘’
nos_pensees_image1.pspimage’’
- Edit/ Copy-Edit - Paste as new layer on your working image
- Do not move it is in the right place
28. Effects- 3 D Effects- Drop Shadow with these settings:1/1/100/5 white
- Properties foreground - put the foregroundcolor to:#78afc2- Your background color #ffffff
29.Layers- New Raster Layer
30.
Selections –load/save selection –load selection from disc and choose my selection: ‘’ Nos_pensees_1 »
31. Activate Flood Fill Tool and fill the selection with the backgroundcolor #ffffff (2 clicks )
Selections- Deselect All
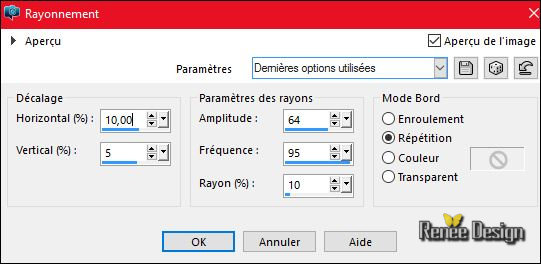
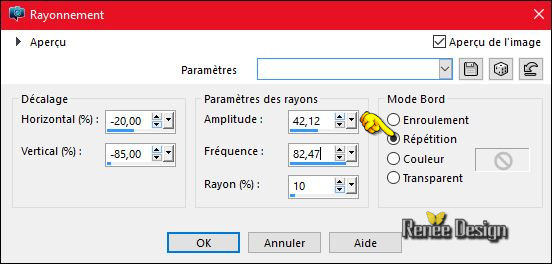
32. Effects- Distortion Effects- Spiky Halo use settings below-Repeat checked
33. Layers- New Raster Layer
34.Selections –load/save selection –load selection from disc and choose my selection: ‘’Nos_pensees_2’’
35. Pot of Paint: Change the opacity of the color at 60%
-Activate Flood Fill Tool and fill the selection with the foregroundcolor (1 click)
Activate Flood Fill Tool and fill the selection with the backgroundcolor (1
click )
Selections- Deselect All
36. Layer Palette - Double click on this Layer and set the Blend Mode to "Luminance -Legacy "- Set the layer opacity of this layer to 85%
37. Effects- Plugins –EyeCandy 5 Impact –perspective
shadow -tab Settings/User settings choose my -Preset ‘’ Nos_pensees_shadow”
38. Open the tube ‘’ Renee_tube_385.pspimage’’
- Image
Resize to 80%
- Edit/ Copy-Edit - Paste as new layer on your working image
-Activate your Pick Tool (K)-Mode Scale -move on the left side and pull upwards, if necessary
39. Effects- Plugins –EyeCandy 5 Impact –Perspective shadow- -tab Settings/User settings choose my
Preset ‘’ Nos_pensees_shadow_2”
40. Open the tube ‘’ Nos_pensées_DECOS’’
-Do not close we need it later for the rest of the work
- Activate the layer- Raster 1 of the tube
- Edit/ Copy-Edit - Paste as new layer on your working image
- Activate Move Tool (M) place in the middle at the top of your image
41. Back on the tube ‘’DECOS »
- Activate the layer -Raster 2 of the tube
- Edit/ Copy-Edit - Paste as new layer on your working image
- Activate Move Tool (M) move as shown in the example below
Your work and Layer Palette look like this now
42. Layers- New Raster Layer
43.
Selections –load/save selection –load selection from disc and choose my selection: ‘’
Nos_pensees_3’
-Properties foreground: Change foreground material into gradient and select :‘’dden
BGrad8’’- Put your foreground on the sunburst gradient with settings below

44. Pot of Paint: Change the opacity of the color at 100% / Activate Flood Fill Tool and fill the selection with the foreground gradient ( 2 clicks )
Selections- Deselect All
- Layer Palette - Double click on this Layer and set the Blend Mode to "Hard Light "
45. Layers Duplicate
46.Effects- Distortion Effects- Spiky Halo use settings below-Repeat checked
- Activate the layer underneath in the layer palette = Raster 10
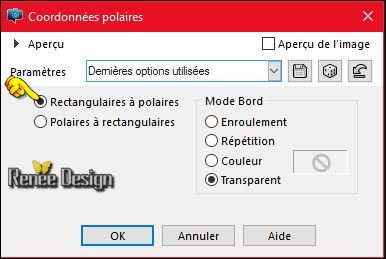
47. Effects- Distortions Effects-Polar Coordinates-Rectangular to Polar-Transparent
48. Effects- 3 D Effects- Drop Shadow with these settings:0/0/100/30 black
- To replace the top of the layers palette
49. Back on the tube ‘’decos’’
- Activate the layer Raster 3 of the tube
- Edit/ Copy-Edit - Paste as new layer on your working image
50. Effects-Image Effects-Offset with these settings H = 350 und V = 70 /Transparent
- Properties foreground - put the foregroundcolor to:#427bb2 - Your background color =#ffffff
51. Layers- New Raster Layer
52. Activate Flood Fill Tool and fill the layer with the background color white
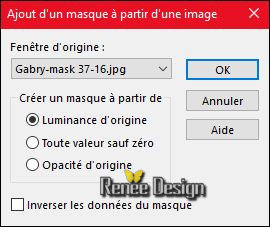
- Open the Maske ‘’Gabry-mask 37-16.pspimage’’ in psp
53.
Layers- New Mask layer from Image and choose Mask:« Gabry-mask 37-16.pspimage »
- Layers- Merge- Merge Group
- Double click on this Layer and set the Blend Mode to "Soft Light"
54.Layers- New Raster Layer
55.
Selections –load/save selection –load selection from disc and choose my selection: ‘’
Nos_pensees_4’’
56. Activate your Airbrush with these settings

- With the foreground color –Put your cursor as in the example// Go lightly against the edge
To obtain this effect as shown in the example below
57. Adjust- Blur- Gaussian Blur : Radius 35
Selections- Deselect All
58.
Effects-Plugins - Knoll- Knoll Lens Flare
1. I will explan how this filter is working
First: By Filter opening - is the setting 1.70
2.
Please put these settings (put your mouse on the name,
you can change the settings)
Brightness 151.32 and scale 0.59
3.
Than Click on Flare Style
4.
These are the setting:
Settings Brightness 1.70 and Scale 1.00>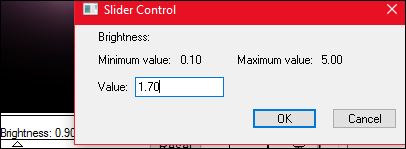 click on Poly Spread into the right window click on Poly Spread into the right window
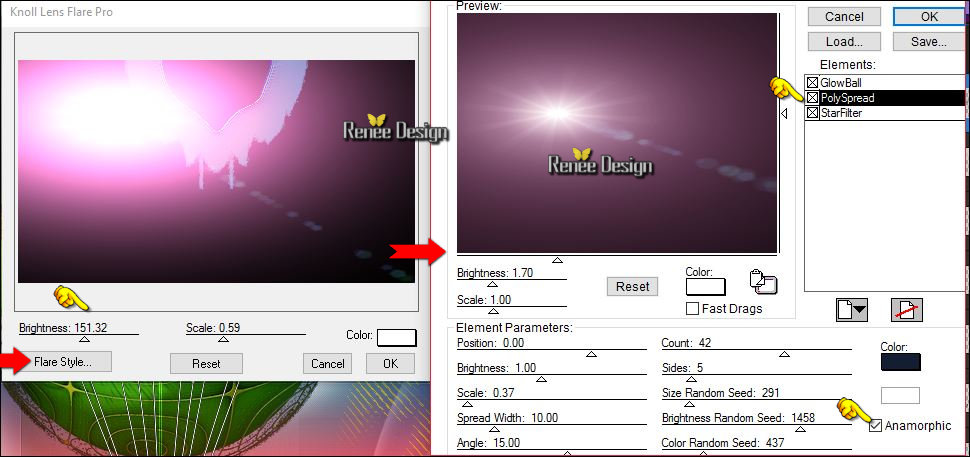
then click ~ OK and OK
59.
Set the layer opacity of this layer to 71
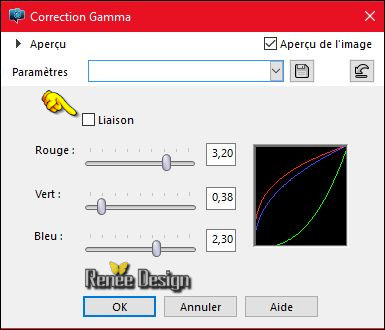
60. Gamma Correction with these settings
-
typing on your keyboard (Shift + G ) and it will open
61.Layers- Duplicate
- Image -
Flip (CTRL+I)
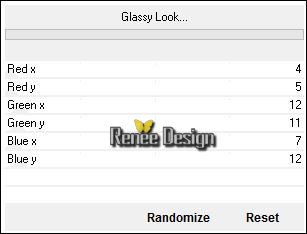
62. Effects
–Plugins- Unlimited -Andrew's Filters 7- Glassy Look..using the default settings
63.
Effects- 3 D Effects- Drop Shadow with these settings:
64.
Effects- Geometric Effects –Skew use settings below
65. Layers- New Raster Layer
66.
Selections –load/save selection –load selection from disc and choose my selection:
‘’Nos_pensees_5’’
67. Activate Flood Fill Tool and fill the selection with the foreground (3
clicks )
68. Effects- Plugins –L & K’s – Dimitri 49
Selections- Deselect All
68. Layers Duplicate – Image Mirror (CTRL+B)
69. Layer Palette - Double click on this Layer and set the Blend Mode to "Difference "
70.Open the Brush image ‘'Pinceau_nos_pensees’’ in your Psp
- File- Export Custom Brush
- Give it a name
- Activate Brush Tool and select my file in the list ‘'Pinceau_nos_pensees’’ with these settings

71.
Layers- New Raster Layer
Place the brush with the foregroundcolor as in example below

72. Effects- Plugins – Mura’s Meister – Perspective Tilling with these settings
73.
Selections –load/save selection –load selection from disc and choose my selection:
‘’Nos_pensees_6’’
DELETE

Selections- Deselect All
74. Layer Palette - Double click on this Layer and set the Blend Mode to "Overlay"- Set the layer opacity of this layer to 69%
75.
Layers- New Raster Layer
76.
Selections –load/save selection –load selection from disc and choose my selection:
‘’Nos_pensees_7’’
77. Activate Flood Fill Tool and fill the selection with the backgroundcolor #ffffff
Selections- Deselect All
78. Layers- Duplicate
79. Effects- Plugins –EyeCandy 5 Impact – Glass / Preset ‘’
Nos_pensees_glass »
80.
Set the layer opacity of this layer to 42%
81. Image - Add borders-Symmetric checked: 1 pixel #8e7c49
82. Image - Add borders-Symmetric checked: 40 pixels #ffffff
83. Image - Add borders-Symmetric checked: 1 pixel #8e7c49
84. Image - Add borders-Symmetric checked: 5 pixels #ffffff
85. Image - Add borders-Symmetric checked: 1 pixel #8e7c49
86. Open the tube ‘’titre’’-Edit/ Copy-Edit - Paste as new layer on your working image and move
87.Layers- Merge- Merge All
88. Image Resize to 999 Pixels width
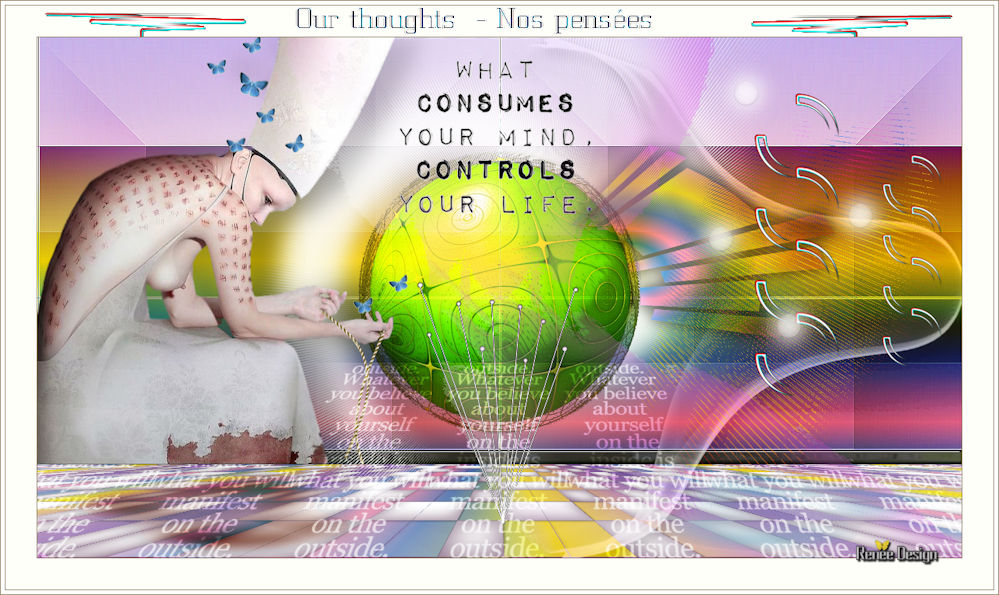
Save as JPEG
I hope you enjoyed this lesson
Renée
This lesson was written by Renée 04/01/2016
Edited and Update
2016
*
Any resemblance with an existing lesson is a coincidence
* Do not forget to thank the people who work with us and for us I have appointed the tubeurs and translators
Thanks Renée
*
| 
 Translations


 When you see this logo the filter is imported in Unlimited

 All rights reserved