|
Copy the
selections to your Selections folder.
Copy the preset to your Presets folder
*-*-*
Let's begin
1. Open an image of 1025 x 685 pixels in black
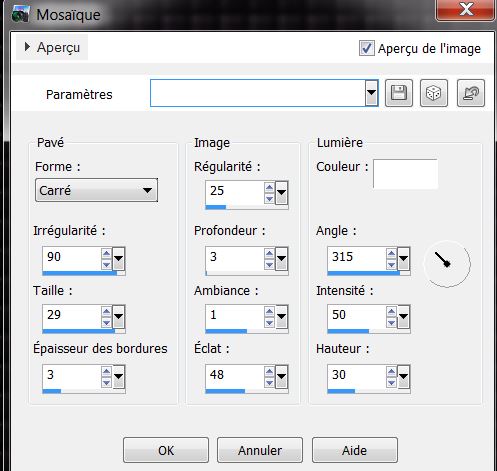
2. Effects - texture effects - Tiles
3. Effects - Edge effect/ enhance more
4. Effects - Simple/ Pizza Slice Mirror. Repeat
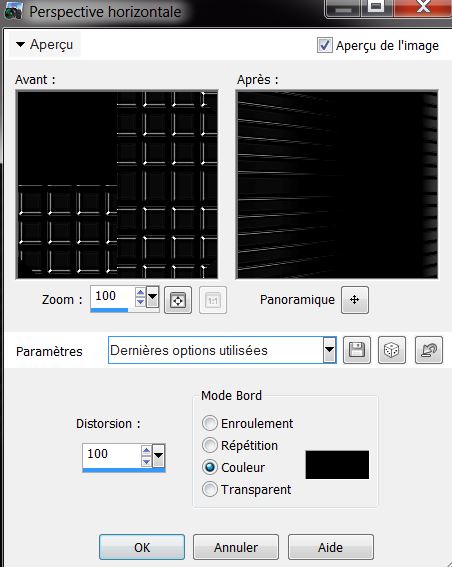
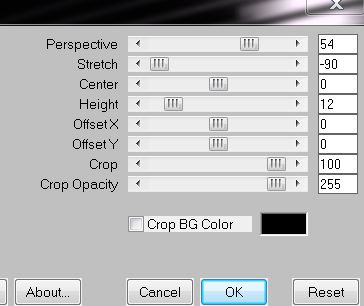
5. Effects - Geometric Effect - Horizontal Perspective
6. Selections - load selection/ ''noir_1''
7. Selections - promote the selection to a layer
8. Selections - select none
9. Duplicate the layer / Mirror Image
10. Layers - Merge Down
11. Effects - Graphic plus/ Cross shadow - Default (repeat)

12. Layers - Duplicate
13. Effects - Mura's Meister - Perspective Tiling
14. Effects - Edge effects/ enhance
15. Effects - 3-D effects/ Drop Shadow
16. Selections - load selection "noir_2"/ Delete
17. Selections - deselect
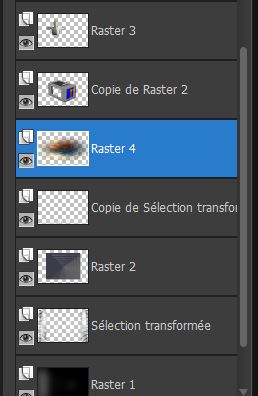
you have this in your layers palette

18. Go to the bottom layer/ Adjust - Blur - Gaussian
Blur/ 85
19. Go to layer = Promoted selection
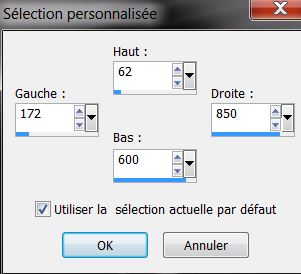
20. Selection tool - Custom selection
21. Layers - add a new layer
22. Set your foreground color to #6b6b6b and background
to #3c3c49
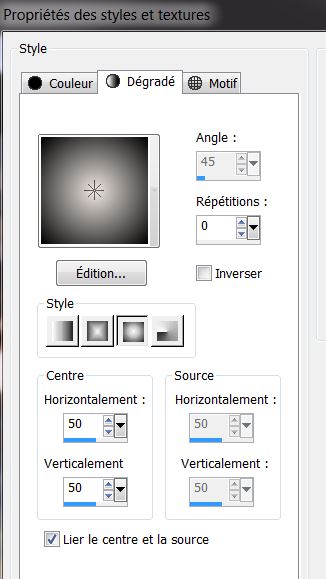
23. Prepare a linear gradient configured like this
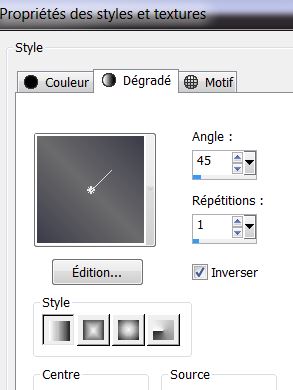
24. Fill the
selection with the gradient
25. Selections - deselect
26. Layers - duplicate
27. Go back to the original layer/ the one below
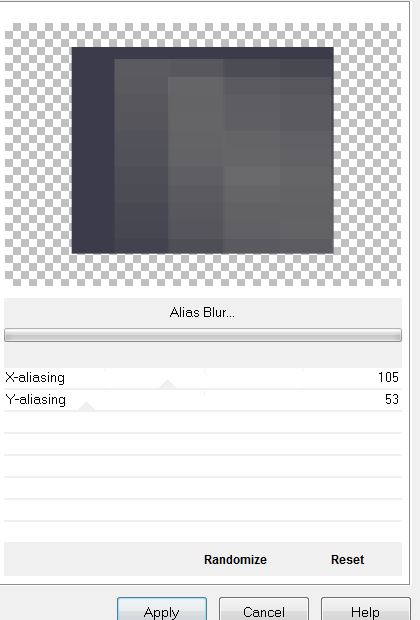
28. Effects - Filters Unlimited 2.0 / Factory Gallery H
- Alias Blur
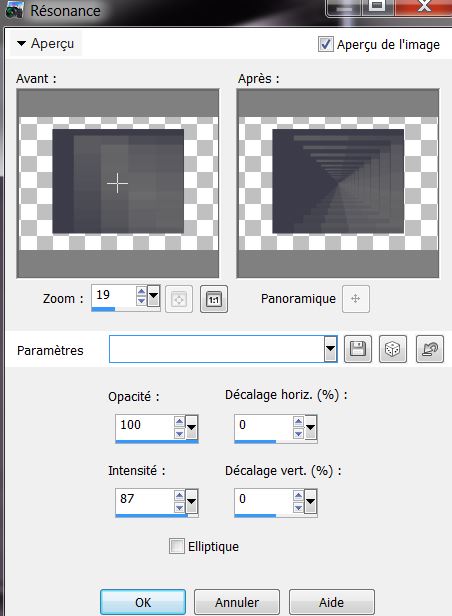
29. Effects - Reflection effect - Feedback
30. Back to the copied raster layer
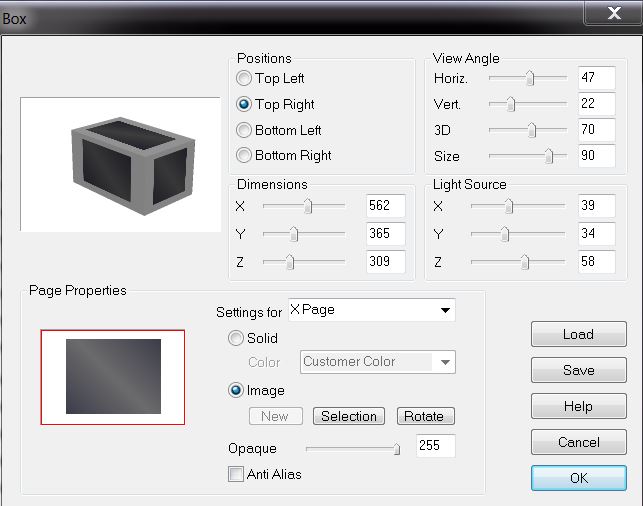
31. Filter effect Vizros - Box
See here how to properly install your filter * click on
the track above*
*if problems with Vizros / if
white line
select all / select Modify / Contract by 2 pixels /
selection invert / delete / deselect
32. With the magic wand click in the white part - press
Delete
33. Selection - deselect
34. Image Resize to 85%/ resize all layers unchecked
35. Layers - arrange/ bring to top
36. Change the blend mode to hard light
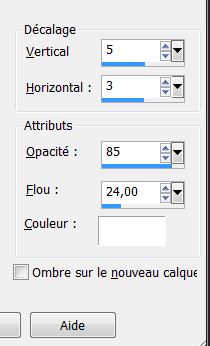
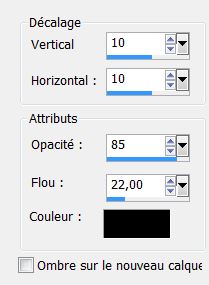
37. Effects - 3-D effects/ Drop Shadow
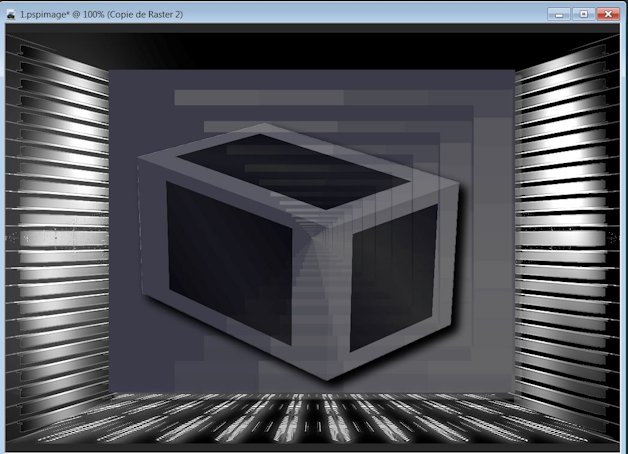
** Move the created Vizros box tube to a suitable place
/ see finished
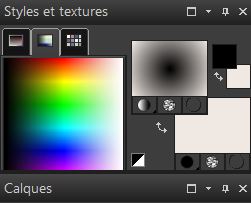
- Your palette looks like this
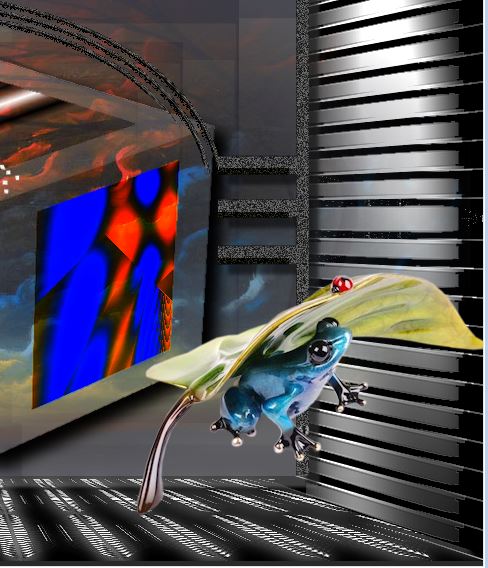
- And your work like this
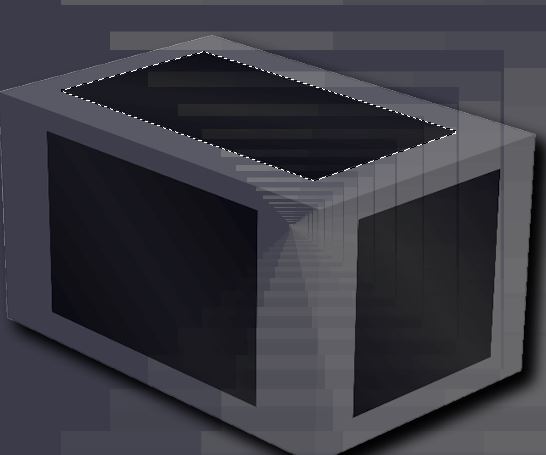
38. With the magic wand / (approx.20 Tolerance) - Select
the black top part like this
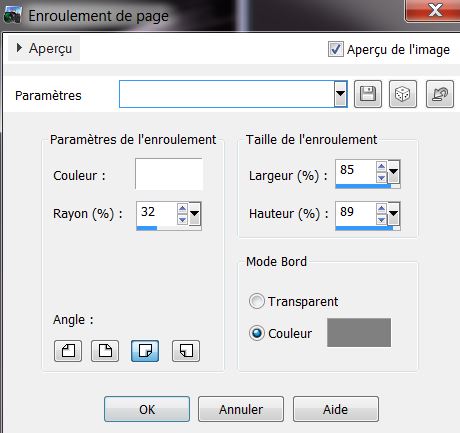
39. Effects - Image effects - Page curl / color #808080
40. Selections - deselect
41. With the magic wand (tolerance approx 10) select the
black part on the lower right
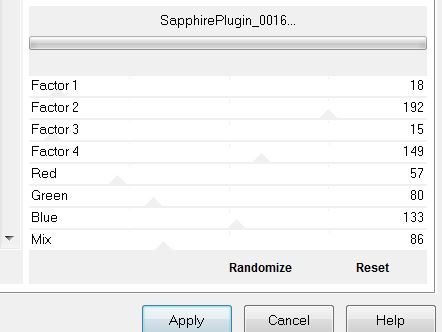
42. Effects - Filters Unlimited 2.0 - Sapphire Filters
01/Sapphire Plugin _0016
43. With the wand (tolerance approx 10) - select the
black part mid left
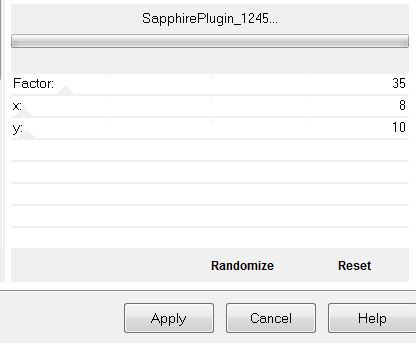
44. Effects - Filters Unlimited 2.0 / Sapphire Filters
13/Sapphire Plugin_1245
45. Selections - Modify - Contract by 10 pixels
46. Effects - 3D Effects - Cutout
- DO NOT DESELECT
47. Open the tube "nicole-etrange12-2013" copy/ edit
paste as a new layer
Place like this
Effects - Reflection effect - Feedback/Selections - deselect
48. Open the tube "verlaine24" - paste as a new layer /
It is in the right place
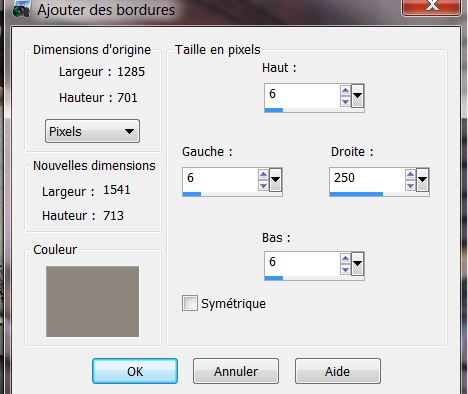
49. Layers - Arrange/ Move down 2x
- You have this
50. Go to the top of the Layers palette
51. Layers - add a new layer
52. Selections - load selection "noir_3" fill color
#000000
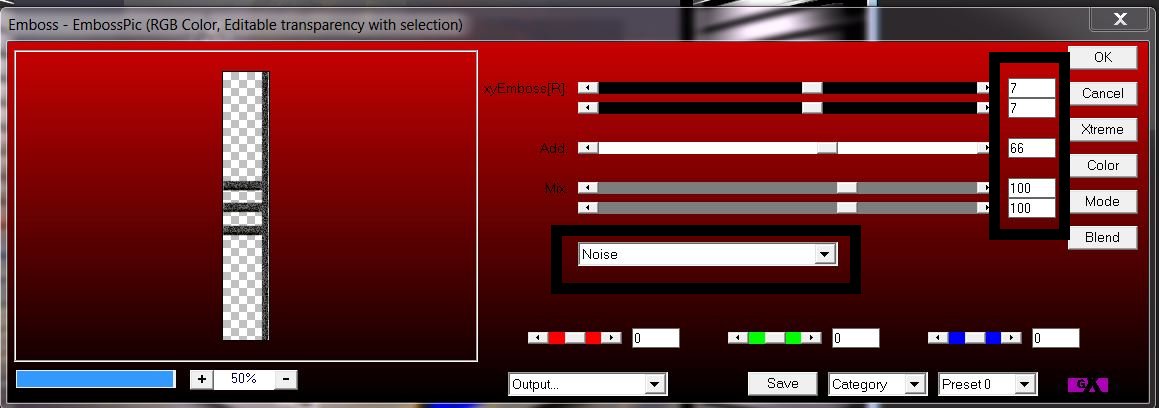
53. Effects - AP01 [Innovation] Emboss - Emboss Pic
54. Selections - deselect
55. Effects - 3-D effect/ Drop Shadow 10/10/50/5 black
56. Layers duplicate / Mirror Image
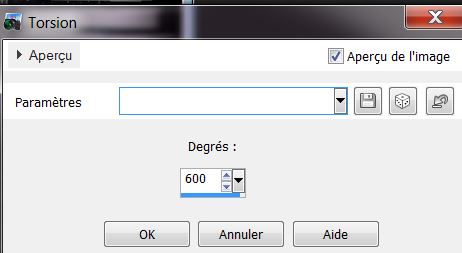
57. Effects - Distortion effects - Twirl @ 600
58. Set the blend mode to Dissolve
59. Layers - add a new layer
60. Selections - load selection "noir_4"
61. Prepare a sunburst gradient with foreground color
#efe8e3 and a black background
62. Fill the selection with the gradient
63. Selections - select none
64. Invert color palette (black foreground)
65. On the same layer / selections - load the selection
"Noir_6" fill with the new gradient
66. Selections - deselect
67. Effects - EyeCandy 5 Impact - Glass - Preset / Clear
68. Open tube "noir_nuages" copy and paste move to the
left as shown
69. Open the tube ''grenouille sous sa feuille _Odette''
- resize to 50% and paste as a new layer
A good place is this
70. Layers - Merge Visible
71. Layers - add a new layer
72. Selections - load selection "noir_5" / Select modify
/ expand - number of pixels = 10

73. Your color palette is like this /
Linear gradient Angle 45 and Repeat 3 / Invert unchecked
74. With your flood fill tool configured like this / -
RGB value, tolerance 20 and opacity 30

75. Fill with the background color
76. Selections modify / contract by 10 pixels / and fill
with the gradient
77. Effects - texture effects/ blinds

78. Selections - deselect
79. Open the text tube ''texte_noir'' copy and paste as
a new layer
80. Image - add borders 2 pixels black
81. Image - add borders/ asymmetric color #8c867c
82. Open the tube
"homme_etrange_by_thafs"/ resize to 85% - paste as a new
layer and place as shown
83. Open the tube ''renee_noir_coccinelle" / resize to
65% - paste as a new layer and place as shown
84. Image add borders 2 pixels black
85. Image Resize to 1125 pixels wide
*
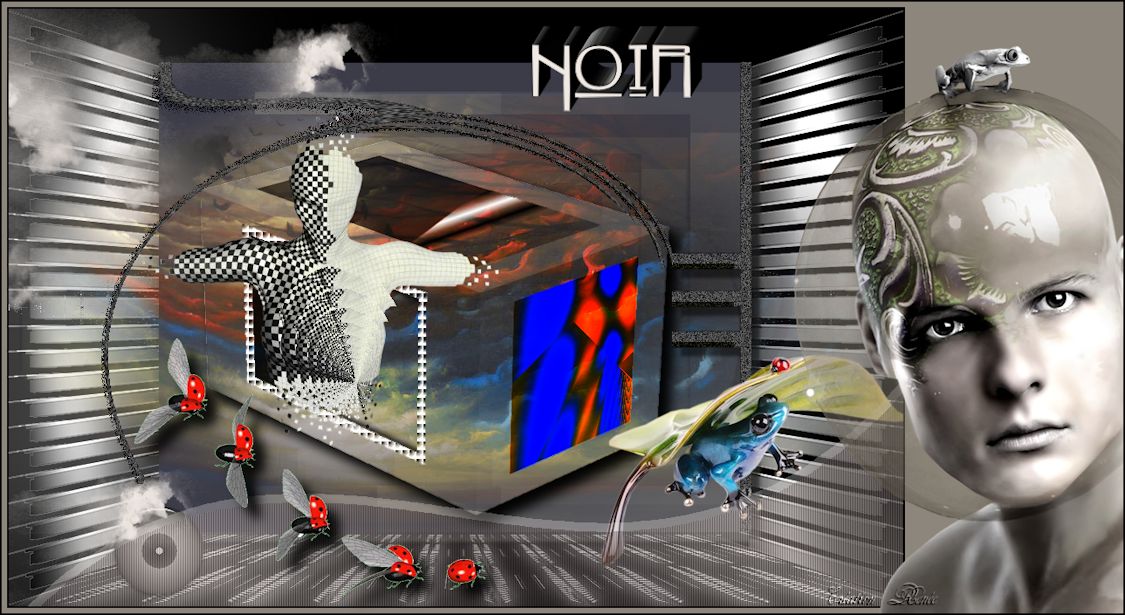
All finished
Thanks Sally

|