|
Let's start the lesson

Motus et Bouche
cousue/Lips are sealed
1. Open the BG-Image – ‘’Fond-bouchecousue’’-
Promote Background Layer =Raster 1
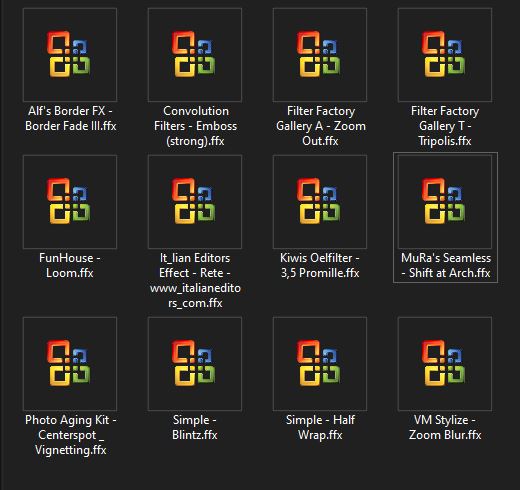
2. Effects –Plugins-
Unlimited 2.0 – Simple – Blintz
3. Effects –Plugins-
Unlimited 2.0 – Simple – Half Wrap
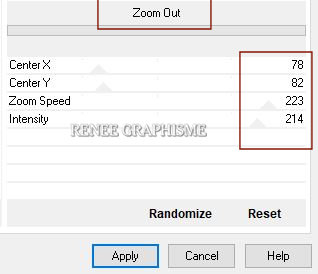
4. Effects –Plugins-
Unlimited 2.0 - Filter Factory Gallery A - Zoom Out use the settings below
5. Effects – Edge Effects- Enhance
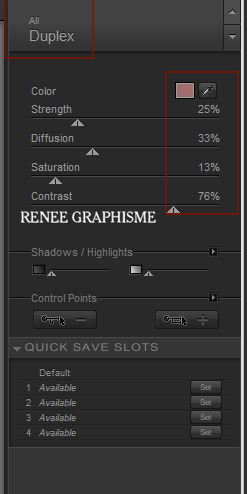
6. Effects – Plugins – Nick Software - Color Effex Pro 3 – Duplex use the settings below-Color #a36d6d
7. Layers- Duplicate
8. Effects –Plugins-
Unlimited 2.0 - Filter Factory Gallery T- Tripolis à
122/38/46/88/95
9. Effects –Plugins-
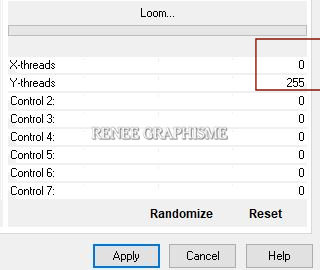
Unlimited 2.0 - FunHouse - Loom use the settings below( or plugins factory M)
10. Effects -Edge Effects –Enhance
11. Layer Palette -Double click on this layer and set the Blendmode to "Overlay"
- Activate the bottom layer of the layer palette
12. Effects –Plugins-
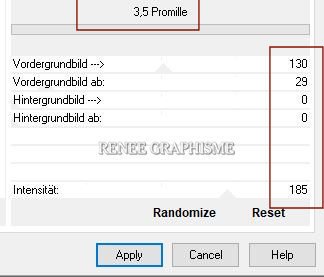
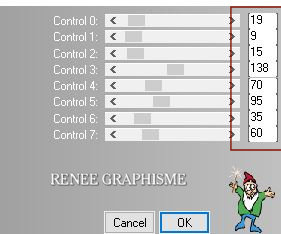
Unlimited 2.0 - °v° Kiwi`s Oelfilter - 3,5 Promille use the settings below
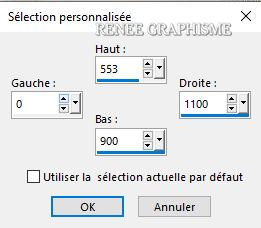
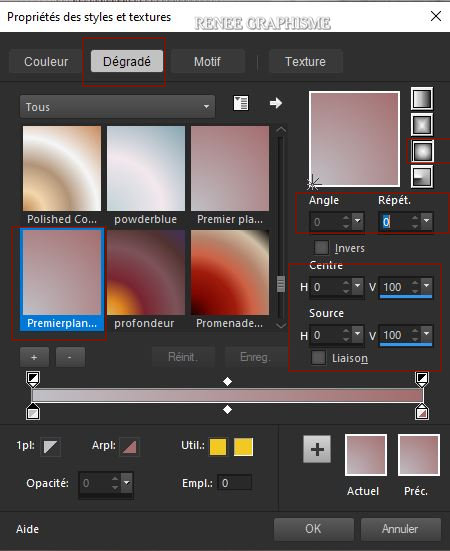
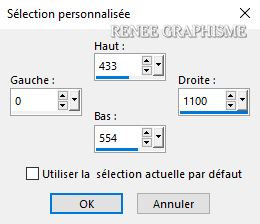
13. Activate Selection Tool -Custom Selection (S) -Rectangle with the same settings 
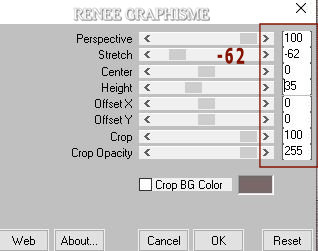
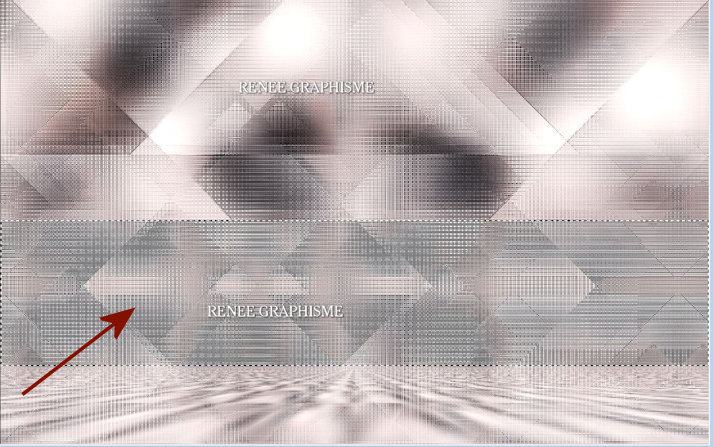
14. Effects- Plugins– Mura’s Meister – Perspective Tiling use the settings below
Selections- Deselect All
- Stay on this Layer
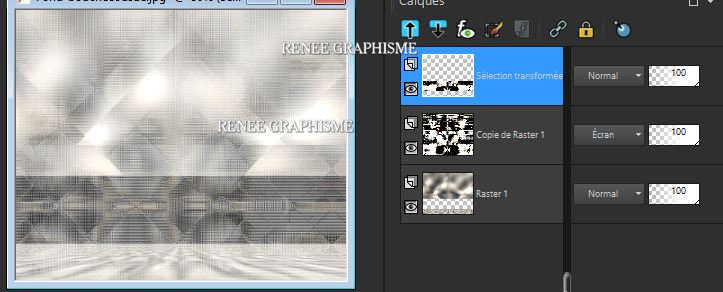
15.Activate the magic wand / click in the transparent part

- Activate Copy of Raster 1 in the Layer palette
16. Selections- Promote selection to layer
KEEP SELECTION
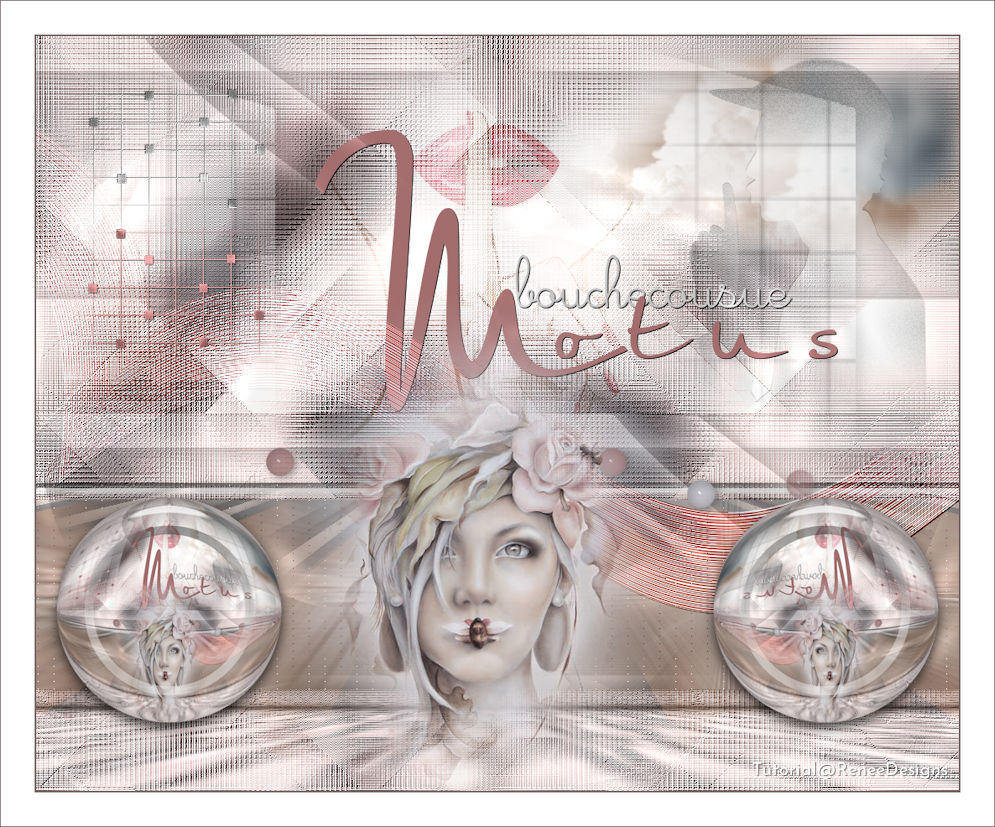
- Your work and Layer Palette look like this now-You should have this result
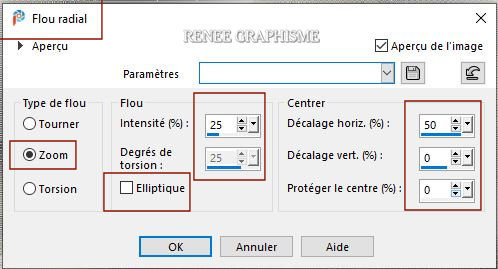
17. Ajust-Blur- Radial Blur use the settings below
18. Effects - Plugins – Alien Skin EyeCandy 5 Impact – Glass use the settings below

19. Effects- 3 D-Effects- Drop Shadow with these settings: 2/2/50/28 Color Black
Selections- Deselect All
20. Effects-Plugins – L& K – Zitah use the settings below
21. Layers-Duplicate
22. Adjust - Hue and Saturation-Colorize-Hue= 18-Saturation= 68
23. Effects –Plugins-
Unlimited 2.0 - VM Stylize – Zoom Blur: 39/60
24. Layers-Properties-Change the Blend Mode to " Overlay " and Lower the Opacity to 53%
- Activate Copy of Raster 1 in the Layer palette
25. Effects –Plugins-
Unlimited – ICNET-Filters- Convolution Filters - Emboss
(strong) : 206
- Activate the top layer in the layer palette
26. Open the tube ’’ Motus-BC-Image 1’’ -Edit - Copy- Activate your work -Edit - Paste as a new layer
27.
Pick Tool: (K) on your keyboard -Enter these parameters on the toolbar
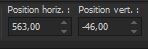 563 /- 46
Press ( M ) to close the Pick Tool
28.
Selections –load/save selection –load selection from disc and select my selection: Motus-BC-image 1’’
29. Adjust- Blur -Gaussian Blur-Radius 8
30. Adjust - Hue and Saturation-Colorize-Hue= 141-Saturation= 25
Selections- Deselect All
31. Effects –Plugins-
Unlimited 2.0- Photo Aging Kit - Centerspot / Vignetting
: 192
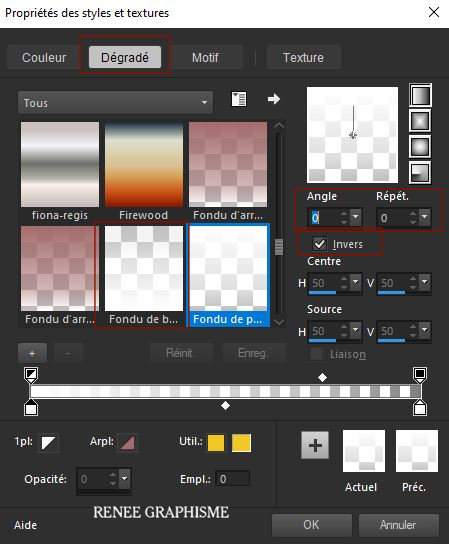
- Properties foreground: - Change foreground material into gradient and select : Fading white (corel 06- 028)
Put your foreground on the linear gradient with these settings
32. Layers- New Raster Layer
33. Selections –load/save selection –load selection from disc and select my selection: ‘’Motus-BC-image 2’’
34. Flood Fill Tool
 –
Fill the selection with the fading white gradient –
Fill the selection with the fading white gradient
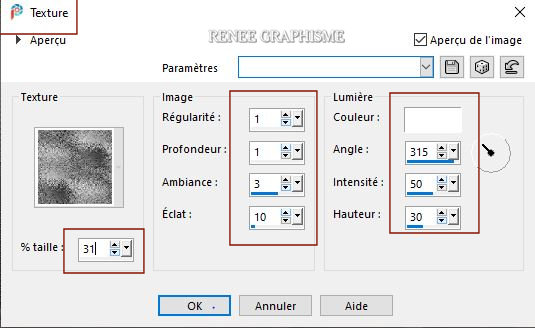
35. Effects – Textureffects – Texture/ select
‘’@nn_021012_TXT_108_tdstudio’’ - with these settings
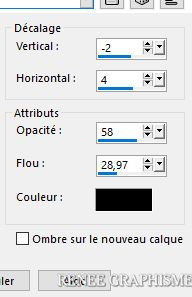
36. Effects- 3 D-Effects- Drop Shadow with these settings- Color Black
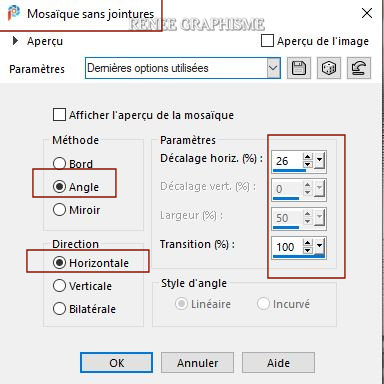
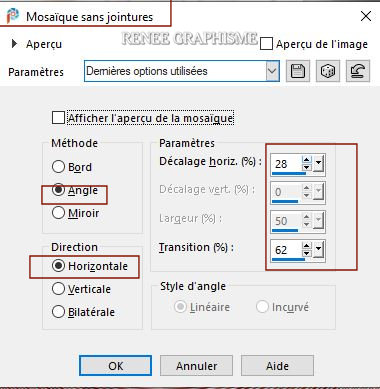
37. Effects- Image Effects- Seamless Tiling use the settings below
Selections- Deselect All
38. Effects –Plugins-
Unlimited 2.0 -It@lian Editors Effect - Rete -
www.italianeditors.com: 35/27
39. Layers- New Raster Layer
40. Selections –load/save selection –load selection from disc and select my selection: Motus-BC-image 3’’
41. Flood Fill Tool
–
Fill the selection with the Fading white gradient
42. Effects-3 D Effects-Drop Shadow with these settings: – 1 / 0/ 58/ 0 Color Black
43. Effects –Plugins
Unlilmited 2.0 - Alf's Border FX - Border Fade III :
107/137
Selections- Deselect All
44. Layers-Properties- Lower the Opacity to 53 %
45. Open the tube ‘’ Motus-BC-Image 2’’ - Edit - Copy- Activate your work -Edit - Paste as a new layer
46. Pick Tool: (K) on your keyboard -Enter these parameters on the toolbar
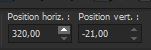 320 / - 21
Press ( M ) to close the Pick Tool
47. Layers-Properties-Change the Blend Mode to " Overlay " and Lower the Opacity to 71%
48. Open the tube ’’ Motus-BC-Image 3’’-Edit - Copy- Activate your work -Edit - Paste as a new layer
- Place the tube to your own taste
49. Activate your text tool and set it as below - Font
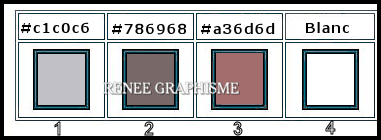
Al Charisma – FG-Color #a36d6d=3
- Write M
- Font size 500 Pixels (Convert to raster layer.)
- Change the font size 200 Pixels

- Write ‘’otus’’ (
Covert to raster layer . )
-Move the text in the right place (see finished image )
-These two texts are to be merged into one layer
50. Effects-3 D Effects-Drop Shadow with the same settings
-Preparation
- Material Properties:
Set your foreground color to color #c1c0c6= 1 – Set your background color to color # a36d6d=3
- Prepare a foreground/background sunburst gradient configured like this
51.Layers- New Raster Layer
52. Activate Selection Tool -Custom Selection (S) -Rectangle with the same settings
53. Flood Fill Tool
–
Fill the selection with the gradient
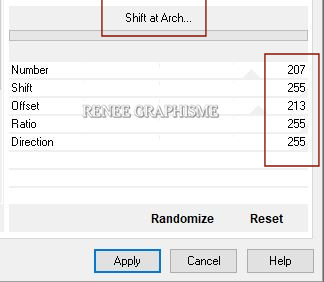
54. Effects –Plugins
Unlimited 2.0 – Mura’s Seamless – Shift at Arch use the settings below
55. Effects - Edge Effects – Enhance More
Selections- Deselect All
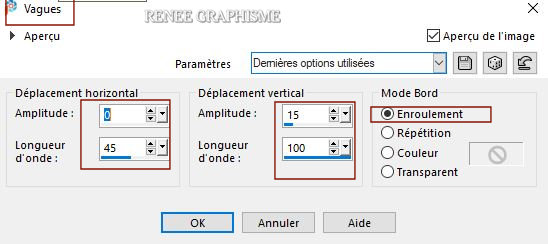
56. Effects – Distortion Effects– wave with these settings
57. Effects- Reflection Effects- Rotating Mirror us the settings below
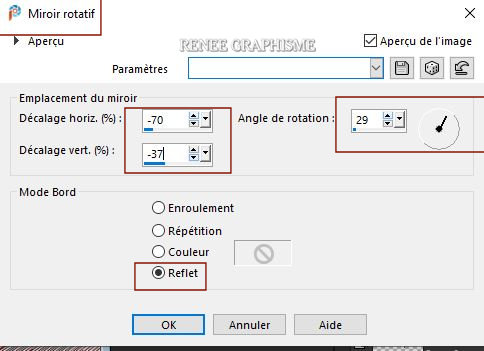
58. Effects-3 D Effects-Drop Shadow with the same settings
59. Layers-Properties-Change the Blend Mode to " Overlay "
60. Edit - Copy- Activate your work -Edit - Paste as a new layer ’’ Motus-BC-Image 4’’
61. Layers-Properties-Change the Blend Mode to " Dodge " and Lower the Opacity to 40 %
62. Open the tube’’ Motus-BC-Image 5’’ -Edit - Copy- Activate your work -Edit - Paste as a new layer
- Pick Tool: (K) on your keyboard -Enter these parameters on the toolbar
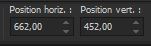 662
/ 452
662
/ 452
63. Effects- Image Effects- Seamless Tiling use the settings below
64. Open the tube ’’ Motus-BC-Image 7’’-Edit - Copy- Activate your work -Edit - Paste as a new layer
65. Layers- Arrange- Move Down
- Activate the top layer in the layer palette
66. Open the tube ’’ Motus-BC-Image 6’’-Edit - Copy- Activate your work -Edit - Paste as a new layer
Move Tool - place at the top left
67.Open the tube
Renee-TUBES-Motus-et-bouchecousue.’’
Activate layer "pour le tuto motus 'of the tube
- Edit - Copy- Activate your work -Edit - Paste as a new layer
– Place at the bottom in the middle against the edge (see finished image)
68. Edit-Copy-Special- Copy Merged
- Activate your work -Edit - Paste as a new layer
69. Effects – Geometric Effects - Circle - Transparent
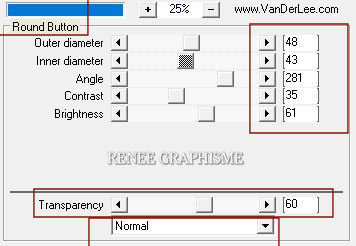
70. Effects – Plugins – Vanderlee Unplugged X- Round Button use the settings below
71. Image –
Resize 30% - Resize all layers not checked
72. Effects – Plugins – Alien Skin Eye Candy 5 – Impact – Glass –Tab Settings/User settings select my file-
Preset : Motus-Glass
-Move to the left (see finished image)
73. Layers-Duplicate
74.
Image - Mirror - Mirror Horizontal (Image - Mirror in older versions of PSP)
-Image - Add borders-Symmetric checked: 2 Pixels Color #786968=2
-Image - Add borders-Symmetric checked: 40 Color #ffffff
-Image - Add borders-Symmetric checked: 1 pixel Color #786968=2
Paste the author's watermark on your work and your own watermark
Layers- Merge- Merge All (flatten)
Layers- Resize 995 Pixels width
Save as JPG
I hope you enjoyed this lesson
Renée
This lesson was written by Renée 4/03/2021
Edited and Update
2021
*
Any resemblance with an existing lesson is a coincidence *
Do not forget to thank the people who work with us and for us I have appointed the tubeurs and translators
Thanks
|
 Translations