|
Let's start the lesson
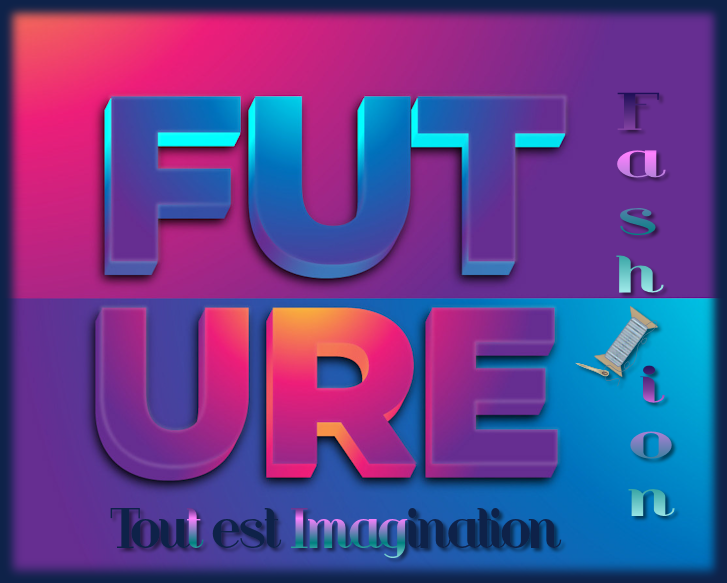
Future
Fashion – Mode Future
-
Preparation
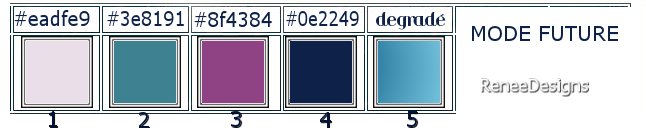
-Material Properties: Set your Foreground color to color #eadfe9=color 1 – Set your Background color to color #3e8191= 2
1.
File: Open a Transparent Image in this size : 1050 x 800 PX
2. Flood Fill Tool
 –
Fill the layer with the Foreground color #eadfe9=color 1 –
Fill the layer with the Foreground color #eadfe9=color 1
-
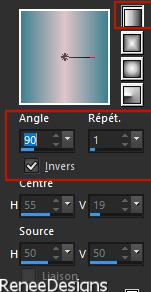
Properties Foreground- Prepare a Foreground/Background Linear Gradient configured like this
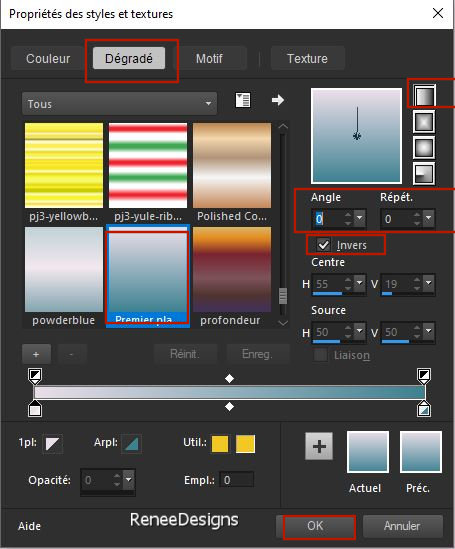
3.
Layers- New Raster Layer
4. Flood Fill Tool
–
Fill the layer with the Gradient
5.
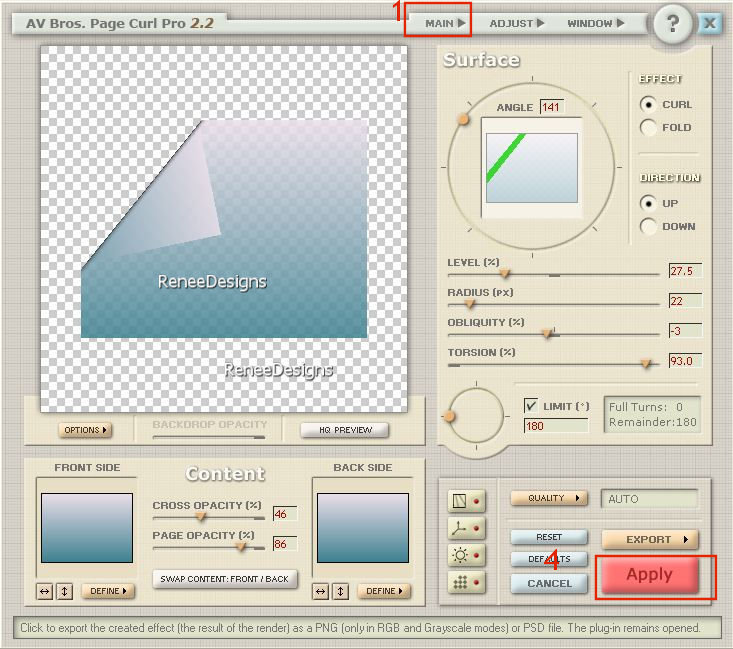
Effects – Plugins– AV.Bros - AV.Bros Page Curl
pro2.2 (see screenshots below)
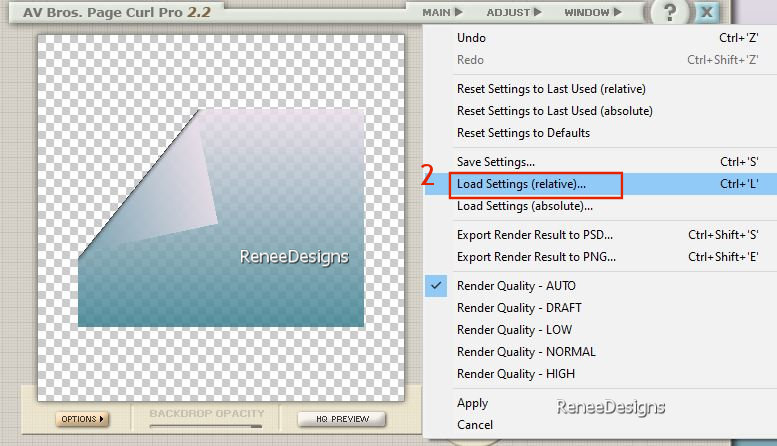
- Click on >>>Main
- Click on Load setting(relative)
-
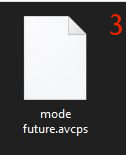
In the folder, find the preset ‘’mode
future.avcps’’
-
Click on the preset
- And then on
APPLY
6.
Image - Resize 80 %- Resize all Layers NOT checked
7.
Effects- 3D- Effects- Drop Shadow with these settings: 6 /
- 15 / 50 / 29 Color Black
-
Repeat: Effects- 3D- Effects- Drop Shadow with the same settings
8.
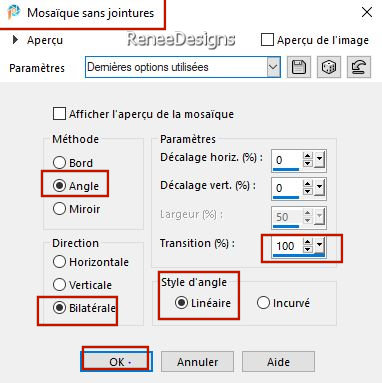
Effects- Image Effects-Seamless Tiling use the settings below
9.
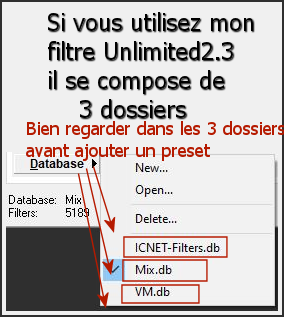
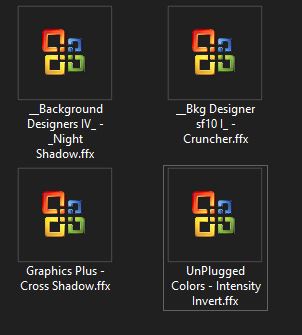
Effects - Plugins - Filters in Unlimited 2.0 - &<Bkg
Designer sf10 I> - Cruncher 20/20
10.
Effects – Edge Effects– Enhance
11.
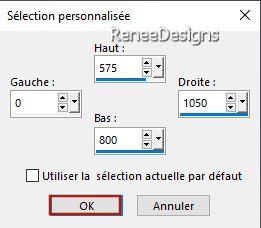
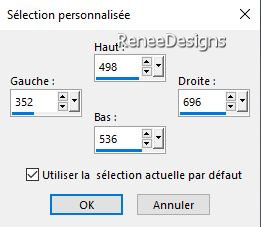
Activate Selection Tool -Custom Selection (S) -Rectangle with these settings

Continue with the tutorial, do not transform the selection into a layer at this stage, otherwise the effect will be very different (at point 15 you will see that there will be a selection layer)
12.
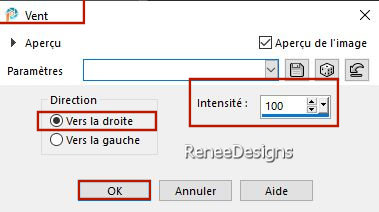
Effects – Distortion Effects– Wind Wind strenght 100 % –Wind direction From Right
-
Repeat: Effects – Distortion Effects– Wind Wind strenght 100 % –Wind direction From Left
13.
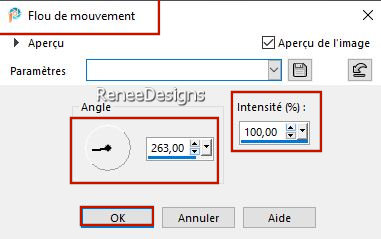
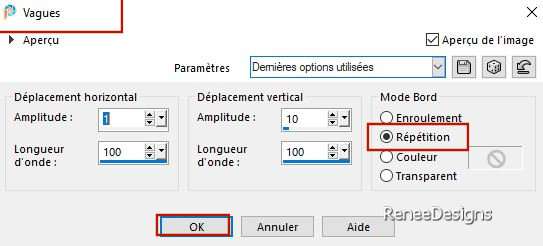
Adjust – Blur–Motion Blur use the settings below
14.
Effects – Plugins– Mura’s Meister – Perspective
Tiling using the default settings
15.
Selections - Promote Selection to Layer
16.
Layers-Properties-Set the Blend Mode to " Multiply " – Reduce the Opacity of this layer to 63%

17.
Effects- 3D- Effects- Drop Shadow with the same settings: 6 /
- 15 / 50 / 29 Color Black
Your work and Layer Palette look like this now-You should have this result
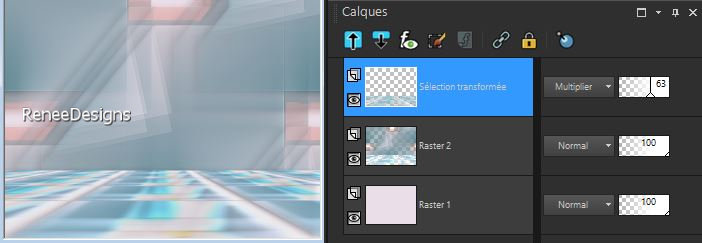
-Activate Raster 2 in the Layer Palette
18.
Selections –load/save selection –load selection from disc and select my selection:‘’Mode-Future-1’’
19.
Repeat - Adjust – Blur–Motion Blur with the same settings
-Repeat - Adjust – Blur–Motion Blur with the same settings
-Activate the Top of the Layer Palette
20.
Layers- New Raster Layer
21.
Selections –load/save selection –load selection from disc and select my selection:‘’Mode-Future-2’’
22.
Flood Fill Tool
– Fill the selection with the Gradient
23.
Effects - Plugins - Filters in Unlimited 2.0 - &<Bkg
Designer sf10 I> - Cruncher 20/20
24.
Effects – Edge Effects – Enhance
25.
Effects - Plugins - Filters in Unlimited 2.0 -
&<Background Designers IV> @Night Shadow using the default settings
26.
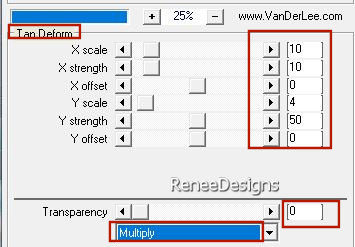
Effects – Plugins – Vanderlee – Unplugged X- Tan
Deform use the settings below
27.
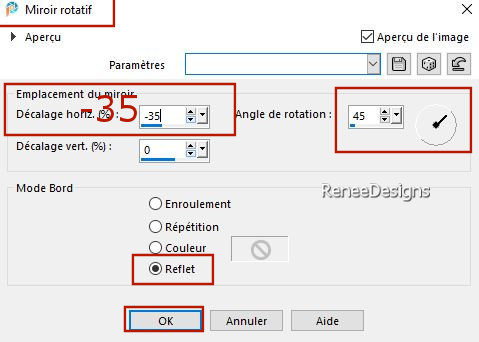
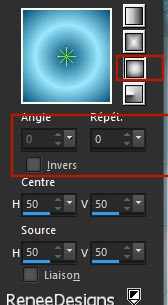
Effects – Reflection Effects - Rotating Mirror use the settings below
28.
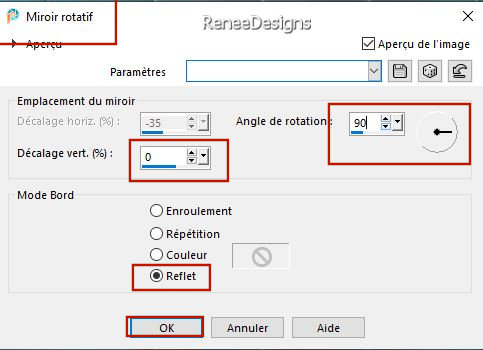
Effects – Reflection Effects - Rotating Mirror use the settings below
29.
Layers- Duplicate
30.
Image - Mirror - Mirror Horizontal (Image - Mirror in older versions of PSP)
31.
Layers-Merge- Merge Below
32.
Selections –load/save selection –load selection from disc and select my selection:‘’Mode-Future-3’’

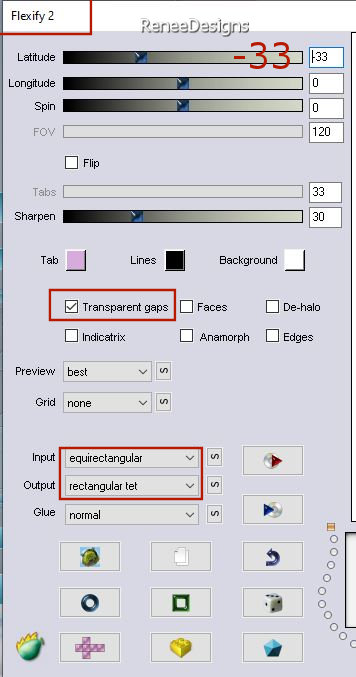
33.
Effects – Plugins – Flaming Pear – Flexify2 use the settings below
Go to Input : If you cannot find the preset, click on the letter "E" (first letter of the preset) on the keyboard and keep clicking until you see this preset in the menu.
Go to Output: Click on the keyboard and take the letter - ''R'' (initial letter of the preset). Just keep clicking until you see this preset in the menu.
34.
Pick Tool: (K) on your keyboard -Enter these parameters on the toolbar
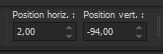 2 / - 94
Press ( M ) to close the Pick Tool
35. Effects–3D- Effects- Drop Shadow with these settings: 27 /0 /50 /19 Color Black
36. Open the Tube
‘’Mode-Future-Titre "- Edit - Copy- Activate your work -Edit - Paste as new layer (Do not move )
37.
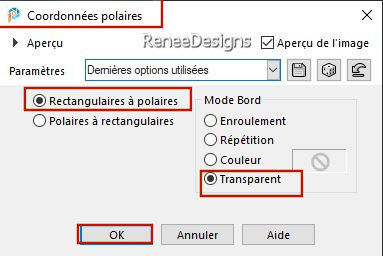
Effects – Distortion Effects– Polar Coordinates -Rectangular to Polair -Transparent
38.
Pick Tool: (K) on your keyboard -Enter these parameters on the toolbar
 252 /0
Press ( M ) to close the Pick Tool
39.Effects- 3D- Effects- Drop Shadow with these settings: 3/3/50/3 Color Black
-
Set your Foreground color to color #ffffff
40.
Layers- New Raster Layer
41.
Selections –load/save selection –load selection from disc and select my selection:‘’Mode-Future-4’’
42.
Flood Fill Tool
- Fill the selection with #ffffff (Click 2 times in the selection ) (Zoom in if necessary)
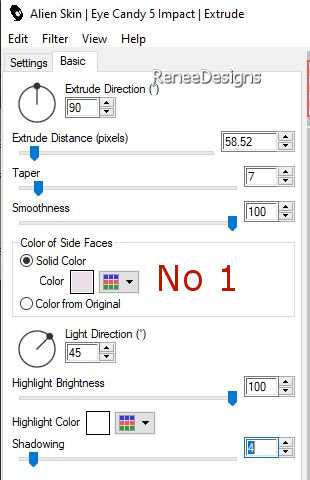
43.
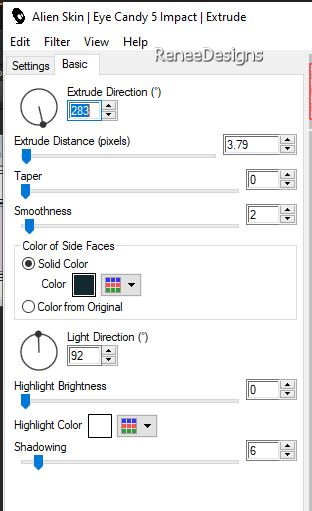
Effects - Plugins - Alien Skin EyeCandy 5 –
Impact – Extrude use the settings below– Color #13292f and Color #ffffff
44.
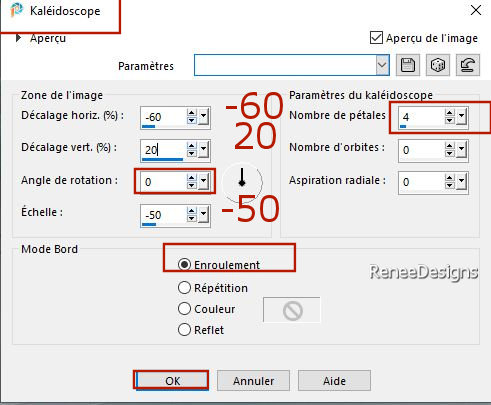
Effects – Reflection Effects – Kaleidoscope use the settings below
45.
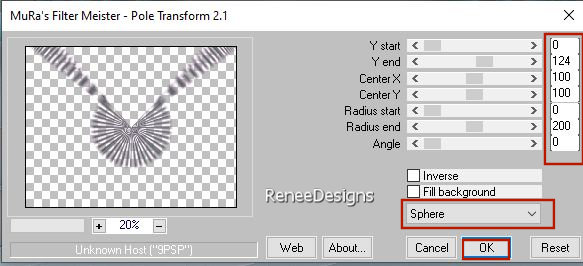
Effects – Plugins – MuRa’s Filter Meister – Pole
Transform 2.1 use the setting below
46.
Image - Resize 75 %- Resize all Layers NOT checked
47.
Selections –load/save selection –load selection from disc and select my selection:‘’Mode-Future-5’’
48.
Layers- Duplicate
49.
Image - Mirror - Mirror vertical ( Image - Flip in older versions of PSP)
50.
Layers- Merge- Merge Down
51.
Pick Tool: (K) on your keyboard -Enter these parameters on the toolbar
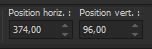 374
/ 96 374
/ 96
Press ( M ) to close the Pick Tool
52.
Effects – Plugins – Final Impact – Vivida (if you work with other colors, modify to your taste)
53. Effects- 3D- Effects- Drop Shadow with these settings: 3 / - 3 /100 /8
Color #eadfe9=1
54.
Layers-Properties-Set the Blend Mode to " Multiply " – Reduce the Opacity of this layer to 93%
-
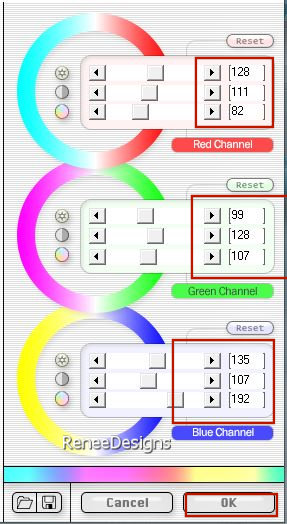
Material Properties: Set your Foreground color to color #eadfe9=color 1 – Set your Background color to color #3e8191= 2
-
Properties Foreground- Prepare a Foreground/Background Linear Gradient configured like this
55.
Layers- New Raster Layer
56.
Selections –load/save selection –load selection from disc and select my selection:‘’Mode-Future-6’’
57.
Flood Fill Tool
–
Fill the Selection with the Gradient
58.
Layers – Duplicate
59.
Image - Mirror - Mirror Horizontal (Image - Mirror in older versions of PSP)
60.
Layers- Merge- Merge Down
61.
Layers- New Raster Layer
62.
Selections –load/save selection –load selection from disc and select my selection:‘’Mode-Future-7’’
63.
Flood Fill Tool
–
Fill the Selection with the Gradient
64.
Effects - Plugins- Alien Skin EyeCandy 5 -
Impact - Extrude use the settings below
KEEP SELECTION
65.
Layers- Arrange- Move Down
-Activate the top of the Layer Palette (columns)
66.
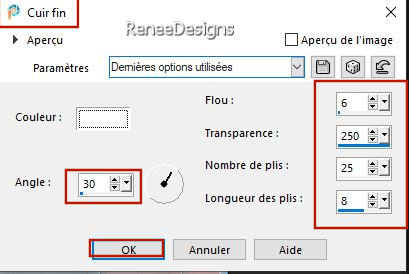
Effects –Texture Effects – Fine Leather use the settings below
-Activate the layer underneath
67.
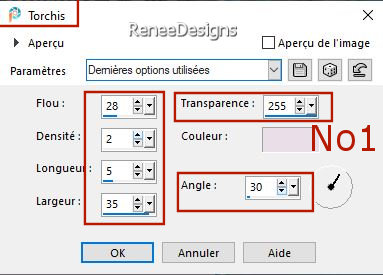
Effects –Texture Effects –Straw Wall use the settings below
68.
Effects - Edge Effects – Enhance
69.
Activate Selection Tool -Custom Selection (S) -Rectangle with these settings
70.
Effects- 3D- Effects- Drop Shadow with these settings: -10/ 3 / 100 /24
Color #3e8191=2
-Activate the top of the Layer Palette
71.
Open the Tube ‘’Renee-TUBES-Future Faschion-9.’’
-
Image - Resize 75 %
-
Edit - Copy- Activate your work -Edit - Paste as new layer /
Move it in the right place ( see finished)
-
Properties Foreground- put the Foreground on Gradient and select Gradient ‘’
bkgr23’’- Prepare a Foreground- Sunburst Gradient configured like this
72.
Layers- New Raster Layer
73.
Selections –load/save selection –load selection from disc and select my selection:‘’Mode-Future-8’’
74.
Flood Fill Tool
–
Fill the selection with the Gradient
75.
Effects - Plugins- Filters in Unlimited 2.0 –
Graphic Plus – Cross Shadow using the default settings
76.
Layers- Duplicate
77.
Effects –Distortion Effects– Wave use the settings below
78.
Effects - Plugins - Filters in Unlimited 2.0 -
UnPlugged Colors- Intensity Invert
79. Effects- 3D- Effects- Drop Shadow with these settings: 3/3/55/5 Color Black
80.
Layers-Properties-Set the Blend Mode to " Multiply "
-
Activate the layer underneath (Raster 9) – Set the Blend Mode to "Difference" or your choice (not mandatory)
- Activate the Top of the Layer Palette
81.
Open the Tube ‘’
Future-Fashion- Image 1’’Edit - Copy- Activate your work -Edit - Paste as new layer
-
Pick Tool: (K) on your keyboard -Enter these parameters on the toolbar
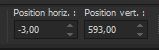 -
3 / 593 -
3 / 593
82.
Effects- 3D- Effects- Drop Shadow with the same settings
83.Activate Preset Shape Tool– Select the shape
‘’Spool’’ – Draw the shape (see finished image)(Is a bobbin of yarn)
(if you have problems to pull this thread spool ( bobbin )There is a tube "Bobine" in the folder - Paste as new layer )
-
Place on the left (see finished)
-
Convert to Raster Layer
84.
Effects- 3D- Effects- Drop Shadow with the same settings
-
Activate the third layer from the bottom in the Layer Palette ( Promoted Selection )
85.
Open the Tube ‘’Mode-Future- Bulles’’ -Edit - Copy- Activate your work -Edit - Paste as new layer
86.
Objects – Align - Bottom (Blend Mode remains on "Overlay" )
- Activate the Top of the Layer Palette
87.
Open the Tube ‘’Futur-Fashion- Image 2’’ -Edit - Copy- Activate your work -Edit - Paste as new layer
88.
Pick Tool: (K) on your keyboard -Enter these parameters on the toolbar
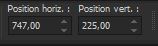 747 /225
Press ( M ) to close the Pick Tool
89.
Activate your Text Tool-Renée chose the font – ''RIOTSQUA''
- Size 30 - Color #0e2249= 4 in the Background
-
Write the 3 words: Tout est
Imagination or 3 others of your choice
- Put the words in the right place (see finished)
-
Enter a Drop Shadow of your choice or adopt the Drop Shadow already set from point 79
90.
Layers- New Raster Layer
91.
Selections –load/save selection –load selection from disc and select my selection:‘’Mode-Future-9’’
92.
Flood Fill Tool
–
Opacity 50%- Fill the selection with the Foreground color #ffffff
93.
Effects - Plugins - AAA Frame – Foto Frame Width 18
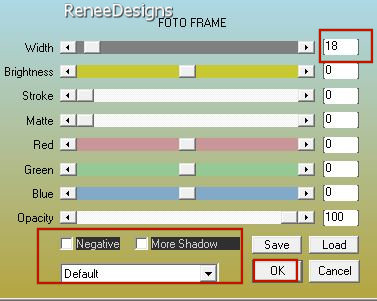
93 a.
Repeat - Effects- Plugins - AAA Frame – Foto
Frame changer Width 5
94.
Selections - Modify - Contract- 20 Pixels
-
Open a tube of your choice (from the Tubes en plus folder) -Edit - Copy- Activate your work -Edit - Paste Into Selection
95.
Now for the embellishment of our work.
Open Renée's tubes or a tube of your own choice and paste as a new layer on your work
(Renée attached many different tubes in separate folders)
- Drop Shadow to your own choice /Resize if necessary
96.
Image - Add Borders-Symmetric checked: 1 Pixel -Color #0e2249= 4
-Image - Add Borders-Symmetric checked: 10 Pixels -Color #ffffff
-Image - Add Borders-Symmetric checked: 2 Pixels -Color # 8f4384=3
-Image - Add Borders-Symmetric checked: 2 Pixels -Color # eadfe9=1
-Image - Add Borders-Symmetric checked: 2 Pixels -Color #3e8191=2
-Image - Add Borders-Symmetric checked: 45 Pixels -Color #ffffff
97.
Image - Resize -1005 Pixels width-Resize all Layers checked
98. Paste the author's watermark on your work and your own watermark
-Layers- Merge- Merge All (flatten)
Save as JPG
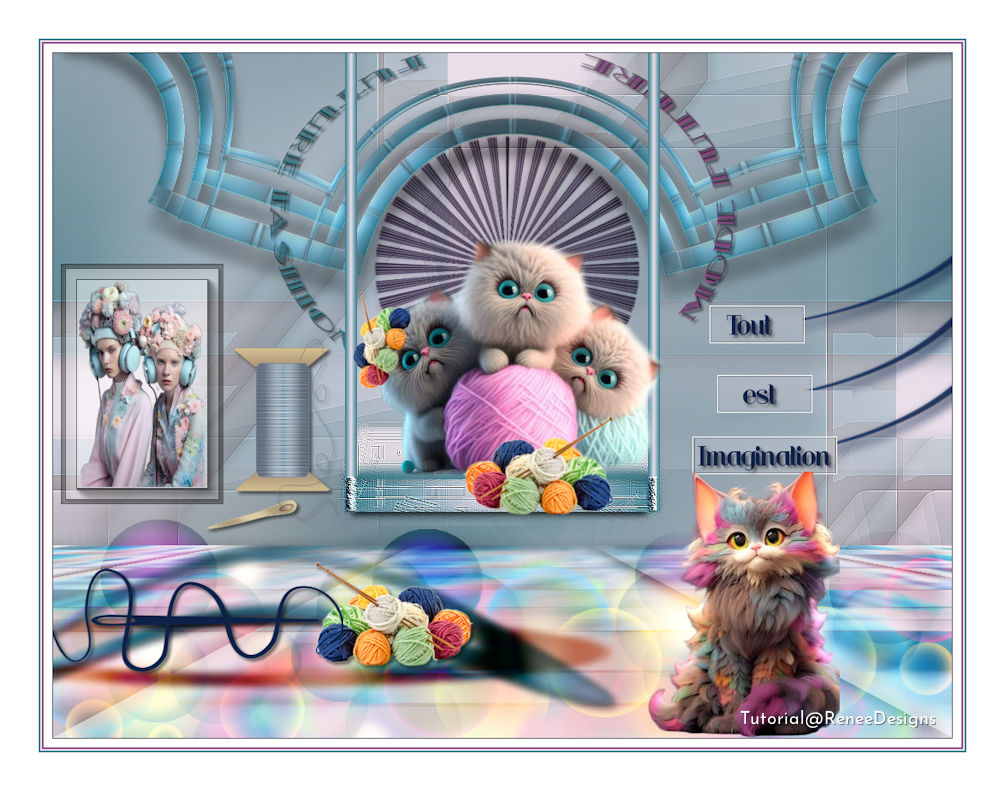
I hope you enjoyed this lesson
Renée
This lesson was written by Renée
13/08/2023
Edited and Update
in 2023
*
*
Any resemblance with an existing lesson is a coincidence
* Do not forget to thank the people who work with us and for us -I have appointed the tubeurs and translators
Thanks
|
 Translations