|
Let's start the lesson.
Merry Christmas –Joyeux Noël 2018

- Preparation
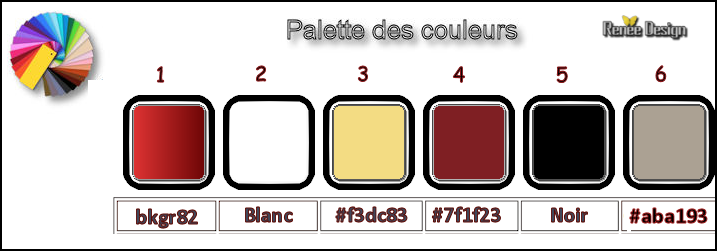
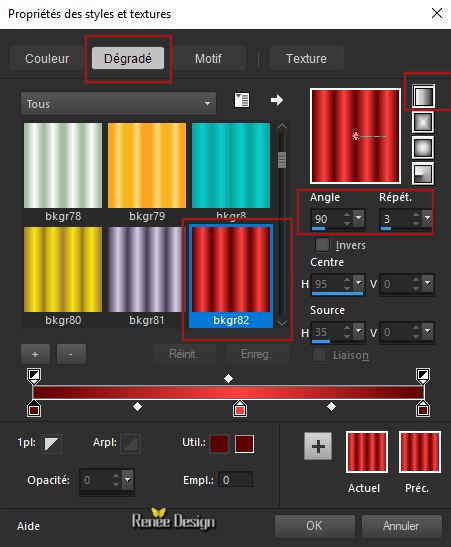
Material Properties:Foreground material into gradient and select : ‘’
bkgr82’’ -Set your background color to color #ffffff
-
Set your foreground with a linear gradient ‘’
bkgr82’’ as below
1. File: Open a new transparent image: 1259 x 732 Pixels
2. Activate the Flood Fill Tool – Flood Fill the layer with the foreground gradient
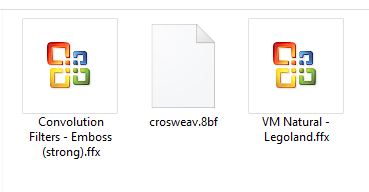
3. Effects –Plugins- Unlimited – ICNETFILTERS- Convolution
Filters- Emboss (strong) 215
4. Effects – Edge Effects- Enhance More
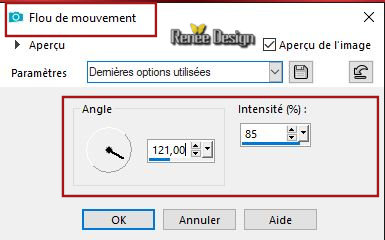
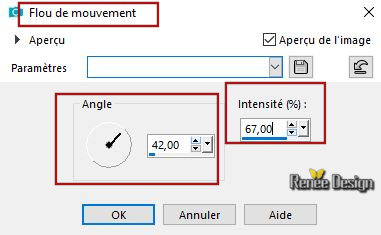
5. Adjust-Blur-Motion Blur use the settings below
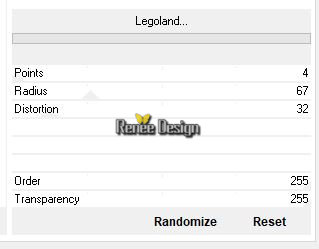
6. Effects –Plugins- Unlimited - VM Natural – Legoland
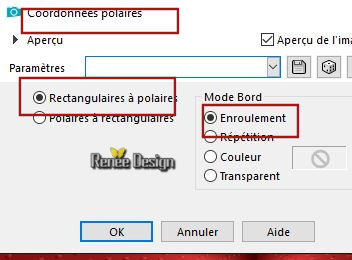
7. Effects – Distortion Effects- Polar Coordinates-Rectangular to Polar-Wrap
8. Adjust-Blur-Motion Blur use the settings below
9. Effects- Edge Effects- Enhance More
10. Layers- New Raster Layer
11. Selections –load/save selection –load selection from disc and select my selection: ‘’
Noel_2018_1’’
12.Properties Background: Set your background color to color # f3dc83= No 3
Selections- Deselect All
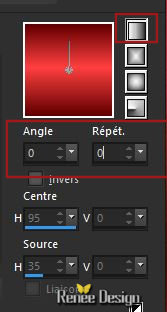
13. Effects –3 D Effects- Drop Shadow with these settings: 0/ 6/ 100/ 16,38
Color black
14. Layers- New Raster Layer
15. Selections –load/save selection –load selection from disc and select my selection: ‘’
Noel_2018_2’’
16.Properties Foreground:Change the settings of the linear gradient with these settings (‘’ bkgr82’’) -Flood Fill the selection with the gradient
Selections- Deselect All
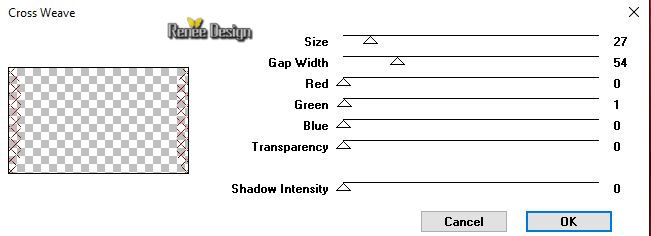
17. Effects – Plugins - VM Natural – Cross weave use the settings below
18. Layers-Properties-Set the Blend Mode to " Overlay " -Lower the Opacity of the layer to 81
19. Effects – Edge Effects- Enhance
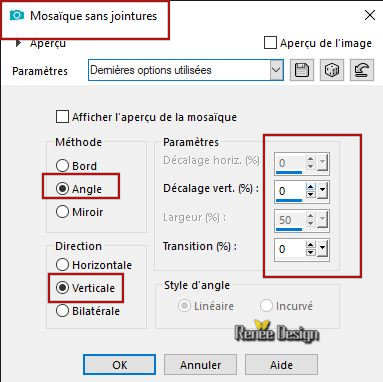
20. Effects – Image Effects-Seamless Tiling use the settings below
- Material Properties: Set your foreground color to color #7f1f23 =No 4-Set your background color to color black
21. Layers- New Raster Layer
22. Selections –load/save selection –load selection from disc and select my selection: ‘’
Noel_2018_livre_1’’
23. Activate the Flood Fill Tool – Flood Fill the selection with the background color black
Selections- Deselect All
24. Layers- New Raster Layer
25. Selections –load/save selection –load selection from disc and select my selection: ‘’
Noel_2018_livre_2’’
26.Activate the Flood Fill Tool – Flood Fill the selection with the foreground color #7f1f23 (
No 4)
Selections- Deselect All
27. Layers- New Raster Layer
28. Selections –load/save selection –load selection from disc and select my selection: ‘’
Noel_2018_livre_3’’
29. Activate the Flood Fill Tool – Flood Fill the selection with the background color black
Selections- Deselect All
30. Layers- New Raster Layer
31. Selections –load/save selection –load selection from disc and select my selection: ‘’
Noel_2018_livre_4’’
32. Activate the Flood Fill Tool – Flood Fill the selection with the background color black
Selections- Deselect All
- Material Properties: Set your foreground color to color #aba193 =No 6
33. Layers- New Raster Layer
34. Selections –load/save selection –load selection from disc and select my selection: ‘’
Noel_2018_livre_5’’
35. Activate the Flood Fill Tool – Flood Fill the selection with the foreground #aba193= No 6
Selections- Deselect All
36. Layers- New Raster Layer
37. Selections –load/save selection –load selection from disc and select my selection: ‘’
Noel_2018_livre_6’’
38. Activate the Flood Fill Tool – Flood Fill the selection with the background color black
Selections- Deselect All
- Properties Background: Set your background color to color #ffffff
We will create the right pages of the book
39. Layers- New Raster Layer
40. Selections –load/save selection –load selection from disc and select my selection: ‘’
Noel_2018_livre_7’’
41. Activate the Flood Fill Tool – Flood Fill the selection with the background color #ffffff
Selections- Deselect All
42. Layers- New Raster Layer
43. Selections –load/save selection –load selection from disc and select my selection: ‘’
Noel_2018_livre_8’’
44. Activate the Flood Fill Tool – Flood Fill the selection with the foreground #aba193= No 6 (2 or 3 clicks )
Selections- Deselect All
- Properties Background: Set your background color to color black
45. Layers- New Raster Layer
46. Selections –load/save selection –load selection from disc and select my selection: ‘’
Noel_2018_livre_9’’
47. Activate the Flood Fill Tool – Flood Fill the selection with the background color black (4 clicks)
Selections- Deselect All
48. Layers-Properties-Set the Blend Mode to " Overlay "
49. Layers- New Raster Layer
50. Selections –load/save selection –load selection from disc and select my selection: ‘’
Noel_2018_livre_10’’
51. Activate the Flood Fill Tool – Flood Fill the selection with the foreground #aba193= No 6 (5
clicks)
Selections- Deselect All
52. Layers- New Raster Layer
53. Selections –load/save selection –load selection from disc and select my selection: ‘’
Noel_2018_livre_11’’
54. Activate the Flood Fill Tool – Flood Fill the selection with the foreground #aba193= No 6 (4
clicks)
Selections- Deselect All
55. Layers-Properties-Set the Blend Mode to " Darken "
56. Layers- New Raster Layer
57. Selections –load/save selection –load selection from disc and select my selection: ‘’
Noel_2018_livre_12’’
58. Activate the Flood Fill Tool – Flood Fill the selection with the background color black
Selections- Deselect All
59. Lower the Opacity of the layer to 83
60. Layers- New Raster Layer
61. Selections –load/save selection –load selection from disc and select my selection: ‘’
Noel_2018_livre_13’’
62. Activate the Flood Fill Tool – Flood Fill the selection with the background color black
Selections- Deselect All
You have created the half part of the book. I give you the one on the left
63. Open the tube ‘’Noel 2018 – Page gauche
- Edit - Copy- Activate your work -Edit - Paste as a new layer
64. Effects – Image Effects - Offset with these settings: H = - 335 and V =
3
65. Activate the tube ‘’
Noel 2018 –paysage’’
- Edit - Copy- Activate your work -Edit - Paste as a new layer
-Place at the bottom of the book
67. Effects –3D Effects -Drop Shadow with these settings: 0/0/30/9 Color black
68. Layers- New Raster Layer
69. Selections –load/save selection –load selection from disc and select my selection: ‘’
Noel_2018_livre_14’’
70. Activate the Flood Fill Tool – Flood Fill the selection with the background color black(2 clicks )
Selections- Deselect All
- Material Properties: Set your foreground color to color #ffffff
71. Layers- New Raster Layer
72. Selections –load/save selection –load selection from disc and select my selection: ‘’
Noel_2018_livre_15’’
73. Activate the Flood Fill Tool – Flood Fill the selection with the foreground #ffffff
Selections- Deselect All
74. Adjust- Blur- Gaussian Blur: Radius 16
75. Activate the tube ‘’Noel 2018_reverbere’’
- Edit - Copy- Activate your work -Edit - Paste as a new layer ( With the move tool, move it in the upper right corner
(into the Light shades)
76. Activate the tube ‘’
Noel 2018 -etoile.png’’
- Edit - Copy- Activate your work -Edit - Paste as a new layer
With the move tool, move it in the upper right corner (see finished image )
77. Layers - Duplicate –Image -Resize to 75 %
(Resize all layers not checked )
- With the move tool, move it in the upper right corner (see finished image )
78. Open the texte ‘’ texte _noel
2018-renee.png’ -Edit - Copy- Activate your work -Edit - Paste as a new layer and move
79. With the fonts of your choice write your greetings -Or use my text and paste as a new layer on your work
80.Activate the tube ‘’Noel-2018 -Noeud ‘’–
Edit - Copy- Activate your work -Edit - Paste as a new layer and move it in the right place
81. Activate the tube ‘’ Noel 2018 –etiquette.png ‘’
- Edit - Copy- Activate your work -Edit - Paste as a new layer – place on the right of the book
( see the example below )
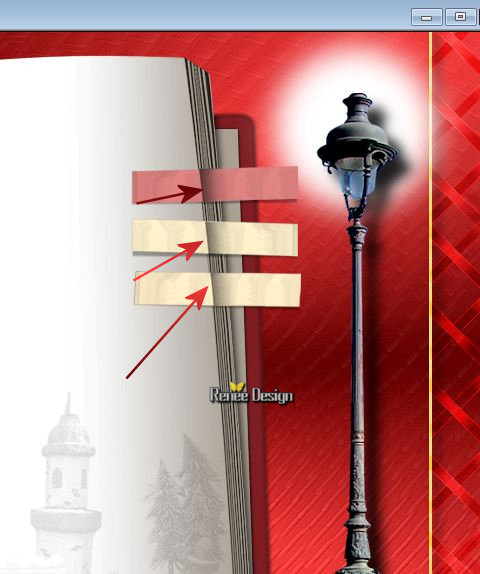
82. Activate the tube ‘’ Noel 2018 –etiquette_ombre de
pliage.png ‘’
- Edit - Copy- Activate your work -Edit - Paste as a new layer. Move as shown in the example below (see the arrows)
83. Activate and Paste as a new layer the 3 small images :
Noel-2018 -photo 1 -2 and 3 ‘’
– Place to your taste on the right page
84.On each of the 3 images
Effects- 3 D Effects- Drop Shadow with these settings : 0/ -18/ 30 /7 Color Black
85. Activate and Paste as a new layer ‘’
Noel-2018 – lutin’’ and Noel-2018 – Sapin’-and Noel 2018 boule transparent’
86. On each of the 3 tube– Effects- 3 D Effects- Drop Shadow with the same settings
- To sign your card (for me Renée)
87 Material Properties: Set your foreground color to color Red and close your background color
- Activate Text Tool -Font Backspace - Size 100 – Stroke 1
Write the first letter of your first name ( for me R)
88. Activate Text Tool -Font Annabelle - Size 96 - Stroke 1
Write the rest of your first name ( for me enée)
- Place them to your choice
89. Convert to Raster Layer- Layers- Merge- Merge Down
90. Effects- 3 D Effects- Drop Shadow with these settings : 1/1/100/7 color black
If you want to keep your book as a greeting card – Merge the layers that compose it and save it in png
91. Image - Add borders-Symmetric checked 10 pixels Color #ffffff
92. Open the tube ‘’renee_2018 ‘’Edit - Copy- Activate your work -Edit - Paste as a new layer. Or write your own text.
93. Layers- Merge- Merge All
- Resize image if necessary
I have attached a folder '' Happy Christmas letters forbidden to share thanks '' To write Joyeux Noël
Merry Christmas to everyone

It's Christmas ... Smile, dream, give, share, make wishes! The time has come to believe in the magic of celebration!
Just like the golden star that illuminates the tree, I hope that this card illuminates you and floods your life with light.
I send you all the happiness of the world.
Merry Christmas to all !
I hope you enjoyed this lesson
Renée
This lesson was written by Renée 2018
Edited and Update
2018
*
Any resemblance with an existing lesson is a coincidence
*
Do not forget to thank the people who work with us and for us I have appointed the tubeurs and translators
Thanks
*
|


 Translations


 If a plugin supplied appears with this icon it must necessarily be imported into Unlimited *