|
Let's start the lesson.

- Preparation
- Material Properties: Set your foreground color to color #ffffff = 1 – Set your background color to color #4cb0d0=2

1. Open the Image– ‘’Fond-Medical’’
–Promote Background Layer
2. Effects – Plugins – Deformations – Mosaïque de verre (hr)
0/21/100
3. Layers- Duplicate
4. Effects-Plugins- Unlimited
2.0- ICNETFTILTERS - Pattern Generators - Audio Wave 76
5. Activate the Magic Wand with these settings and select in the blue part

DELETE

Selections- Deselect All
6. Effects– 3 D Effects – Drop Shadow with these settings: 0/0/78/15 Color black
7. Layers- New Raster Layer
8. Activate Flood Fill Tool
 –
Opacity to 50% – Fill the Layer with the Foreground color =1 –
Opacity to 50% – Fill the Layer with the Foreground color =1
9. Effects –Plugins-
Unlimited 2.0 - L & K's - Trouble with these settings : 39/0/89/0/0/0
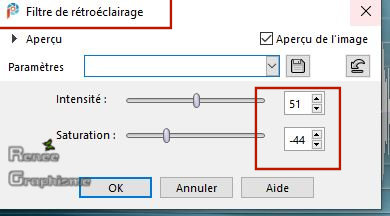
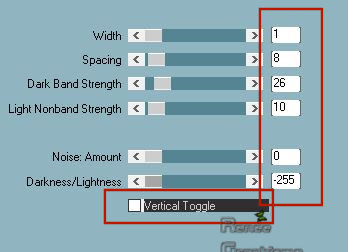
10. Adjust-Backlighting-Backlighting Filter with these settings
11.View - Toolbars - Script checked in your Psp!!
Activate toolbar Script, choose my file in the list ''Foret sinistre''-Put the Script in your Script folder –Restricted script from PSP-
Click the little blue arrow and let the script run

- Color Palette: Set your Foreground color to color #94cec7=3 – Set your Background color to color #312e1f= 4
- Set your Foregroundcolor to Foreground-background linear gradient configured like this
12. Layers- New Raster Layer
13. Selections –load/save selection –load selection from disc and select my selection: ‘’Medical-1’’
14. Activate Flood Fill Tool
-
Opacity to 60% – Fill the selection with the gradient
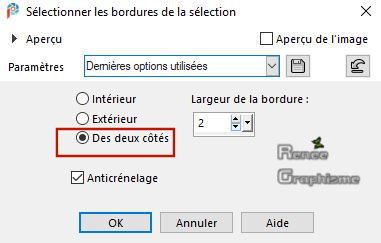
15. Selections –
Modify -Select- Selection Borders use the settings below
16. Activate Flood Fill Tool
–
Opacity to 100% – Fill the selection with the background color
17. Effects – Plugins –Alien skin EyeCandy 5 Impact – Glass--Tab- Settings- User Settings and select - Preset :
Medical_Glass’’
Selections- Deselect All
18. Effects – 3D Effects –Drop Shadow with these settings: – 2/2/52/28,74 Color black
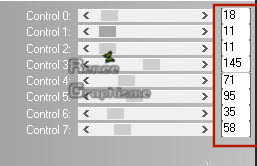
19. Effects – Plugins – PhotoEffex-Scanlines use the settings below
20. Effects – Plugins – L &K’s- Zitah use the settings below
21. Layers-Properties-Change the Blend Mode to " Hard Light " and Lower the Opacity to 63%
22. Layers- New Raster Layer
23. Selections –load/save selection –load selection from disc and select my selection: ‘’Medical_2’’
24. Set your foreground color to color #ffffff=1
Activate Flood Fill Tool
– Fill the selections with the foreground color =1
Selections- Deselect All
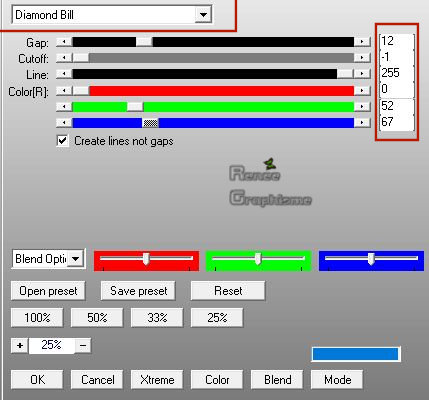
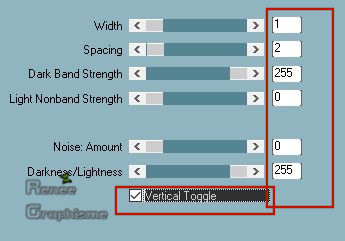
25. Effects –Plugins – AP [Lines] Lines – Silverlining use the settings below
26. Open the tube ‘’Medical-Image 1’’-Edit - Copy- Activate your work -Edit - Paste as a new layer
27. Objects – Align
- Top
You may minimize your working area for a moment, but do not close, we will need it again soon
28. File -Open a New Transparent Image 425 x425 pixels
29. Selections –load/save selection –load selection from disc and select my selection: ’’Medical_cercle’’
30. Color Palette: Set your Foreground color to color #08141e=7
Activate Flood Fill Tool
–
Fill the selection with the Foreground color= 7
31.Adjust- Blur- Gaussian Blur: Radius 35
32. Layers- New Raster Layer
33.Open the tube ’’Medical_cercle 1’’ Edit - Copy- Activate your work -Edit - Paste into Selection
Do not deselect they will be canceled with each new selection
34. Layers- New Raster Layer
35. Selections –load/save selection –load selection from disc and select my selection: ’’Medical_cercle - 1’’
36.Color Palette: Set your Foreground color to color #299bee=8
Activate Flood Fill Tool
–Fill the selection with the Foreground color=8
37. Layers- New Raster Layer
38. Selections –load/save selection –load selection from disc and select my selection: ’’Medical_cercle - 2’’
39. Color Palette: Set your Foreground color to color # daf2fc=9
Activate Flood Fill Tool
–
Fill the selection with the Foreground color= 9
40. Layers-Properties-Change the Blend Mode to " Overlay "
41. Layers- New Raster Layer
42. Selections –load/save selection –load selection from disc and select my selection: ’’Medical_cercle - 3’’
43. Color Palette: Set your Foreground color to color #ffffff=1
Activate Flood Fill Tool
–Fill the selection with the Foreground color=1
44. Layers-Properties-Change the Blend Mode to " Screen "
45. Layers- New Raster Layer
46. Selections –load/save selection –load selection from disc and select my selection: ’’Medical_cercle -4’’
43. Activate Flood Fill Tool
–Fill the selection with the Foreground color=1
44. Layers-Properties-Change the Blend Mode to " Normal " and Lower the Opacity to 81%
Selections- Deselect All
45. Open the tube ‘’Medical_cercle
2.png’ -Edit - Copy- Activate your work -Edit - Paste as a new layer
Do not move it is in the right place
46. Layers- Arrange- Move Down
- To replace the top of the layer-palette
47. Open the tube ‘’Medical_cercle
3.png’ -Edit - Copy- Activate your work -Edit - Paste as a new layer
Do not move it is in the right place
48. Layers- Merge- Merge Visible
-Edit- Copy !!!
- Activate your minimized Image of point 27
- Edit - Paste as a new layer
- Do not move it is in the right place
49. Layers-Properties-Change the Blend Mode to " Luminance ( Legacy) " and Lower the Opacity to 81%
50. Layers- New Raster Layer
51. Selections –load/save selection –load selection from disc and select my selection: ’’Medical_cercle - 5’’
52. Activate Flood Fill Tool
–Fill the selection with the Foreground color=1
53. Adjust- Blur- Gaussian Blur: Radius 19
Selections- Deselect All
54.Open the tube ‘’Medical_cercle
4.png’ - Edit - Copy- Activate your work -Edit - Paste as a new layer
- With your Move Tool place it in the right place
55. Open the tube ‘’Medical_cercle
5.png’’ - Edit - Copy- Activate your work -Edit - Paste as a new layer
- With your Move Tool place it in the right place
You may minimize your working area for a moment, but do not close, we will need it again soon (we make a syringe)
56. File- Open a New Transparent Layer 514 x 464
Color Palette: Set your Foreground color to color #1b52a7=5 – Set your Background color to color #ffffff=1
57. Selections –load/save selection –load selection from disc and select my selection: ’’Medical_3’’
58. Activate Flood Fill Tool
–
Fill the selection with the Foreground color=5 ( 3 or 4 clicks)
59. Layers- New Raster Layer
60. Selections –load/save selection –load selection from disc and select my selection: ’’Medical_4’’
61. Activate Flood Fill Tool
–
Fill the selection with the Background color=1 (2 clicks)
-Color Palette: Set your Foreground color to color # 87a7ca=6
62. Layers- New Raster Layer
63. Selections –load/save selection –load selection from disc and select my selection: ’’Medical_5’’
64. Activate Flood Fill Tool
–
Fill the selection with the Foreground color=6 (2 clicks)
Selections- Deselect All
65. Layers- Arrange- Sent to Bottom
Your work and Layer Palette look like this now-You should have this result (Arrange the layers correctly)
- To replace the top of the layer-palette
66. Open the tube ‘’Medical-Image
2.pspimage’’- Edit - Copy- Activate your work -Edit - Paste as a new layer
- Do not move it is in the right place
67. Layers- Arrange- Move Down
68. Layers- Merge- Merge Visible
69. Edit-Copy !!
- Activate your minimized Image of point 55
- Paste as a new layer
70. Pick Tool: (K) on your keyboard -Enter these parameters for the X: 628,00 and Y:235,00 positions on the Toolbar
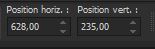 ( 628
/ 235)
( 628
/ 235)
-Hit the " M "key of your Keyboard to deselect the Tool
71. Layers- New raster Layer
72. Selections –load/save selection –load selection from disc and select my selection: ’’Medical_6’’
73.Color Palette: Set your Foreground color to color # 1b52a7=5
Activate Flood Fill Tool
–Fill the selection with the Foreground color= 5 (2 clicks)
Selections- Deselect All
74. Effects – Plugins– PhotoEffex-Scanlines use the settings below
75. Open the tube ‘’Medical-Image 3’’- Edit - Copy- Activate your work -Edit - Paste as a new layer
76. Pick Tool: (K) on your keyboard -Enter these parameters for the X: 557,00 and Y:-12,00 positions on the Toolbar
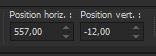 (557/-
12)
(557/-
12)
Hit the "M" key of your Keyboard to deselect the Tool
77. Open the tube ‘’Titre_Medical’’- Edit - Copy- Activate your work -Edit - Paste as a new layer
- With your Move Tool place it in the right place
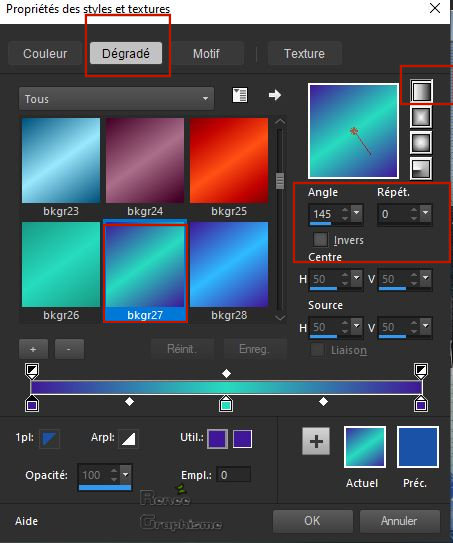
- Material of the foreground: change material of the foreground into gradient select ‘’ bkgr27’’
- Set your Foregroundcolor to Foreground-linear gradient configured like this
78. Layers- New Raster Layer
79. Selections –load/save selection –load selection from disc and select my selection: ’’Medical_7’’
80. Activate Flood Fill Tool
–
Fill the selection with the gradient
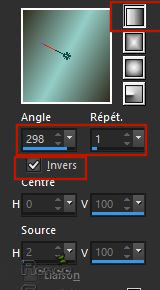
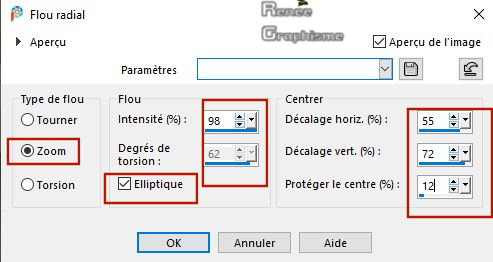
81. Adjust- Blur- Radial Blur use the settings below
KEEP THE SELECTION ACTIVE
82. Effects – Plugins – Ulead Effects- Particle
Select Cloud
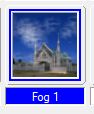
Click Load >>> Select Fog1
–
Ok
With these settings 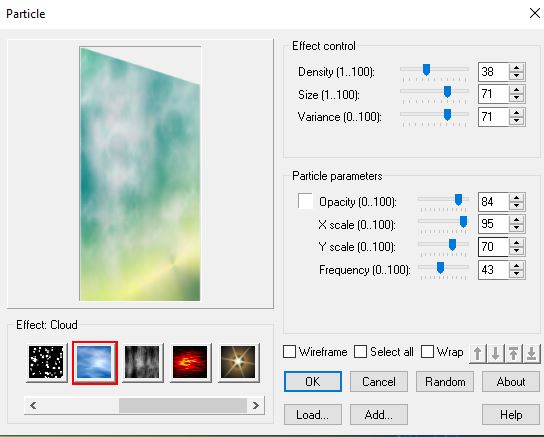
Ok
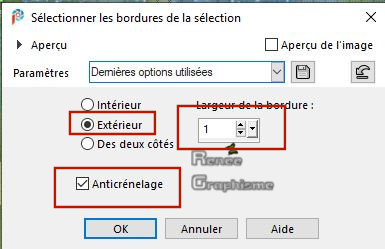
83. Selections - Modify -Select Selection Border with these settings
84. Activate Flood Fill Tool
–
Fill the selection with the Background color=1
Selections- Deselect All
85. Lower the Opacity to 42%
86. Open the tube ‘Renee_tube_Avello’’ activate the layer ’’ tuto-medical’’ of the tube
-
Edit - Copy- Activate your work -Edit - Paste as a new layer
-
Activate your Move Tool (M) place it into the frame ( see finished image )
87. Layers- Arrange- Move Down
-
To replace the top of the layer-palette
88. Layers- New Raster Layer
89. Selections –load/save selection –load selection from disc and select my selection: ’’Medical_8’’
90. Activate Flood Fill Tool
–
Fill the selection with the gradient
Selections- Deselect All
91. Effects- 3 D Effects- Drop Shadow with these settings : 1/1/100/1 Color black
92. Open the tube ‘’Medical-Image -infirmier.pspimage’’ -Edit - Copy- Activate your work -Edit - Paste as a new layer
-Activate your Move Tool (M) place it in the right place
93. In the zip ’’ reserve ’’ I still have individual tubes that you can use
94. Layers- Merge- Merge Visible
95. Activate toolbar Script, choose my file in the list Medical script. cadre -Click the little blue arrow and let the script run

96. Open the tube ‘’ cœur –deco’ -Edit - Copy- Activate your work -Edit - Paste as a new layer and move
97. Layers- Merge- Merge All ( flatten)
98. Image- Resize to 999 Pixels Width.
Save as JPG
I hope you enjoyed this lesson
Renée
This lesson was written by Renée 8/01/ 2020
Edited and Update
2020
*
Any resemblance with an existing lesson is a coincidence
* Do not forget to thank the people who work with us and for us I have appointed the tubeurs and translators
Thanks
*
|

 Translations