|
Let's start the lesson
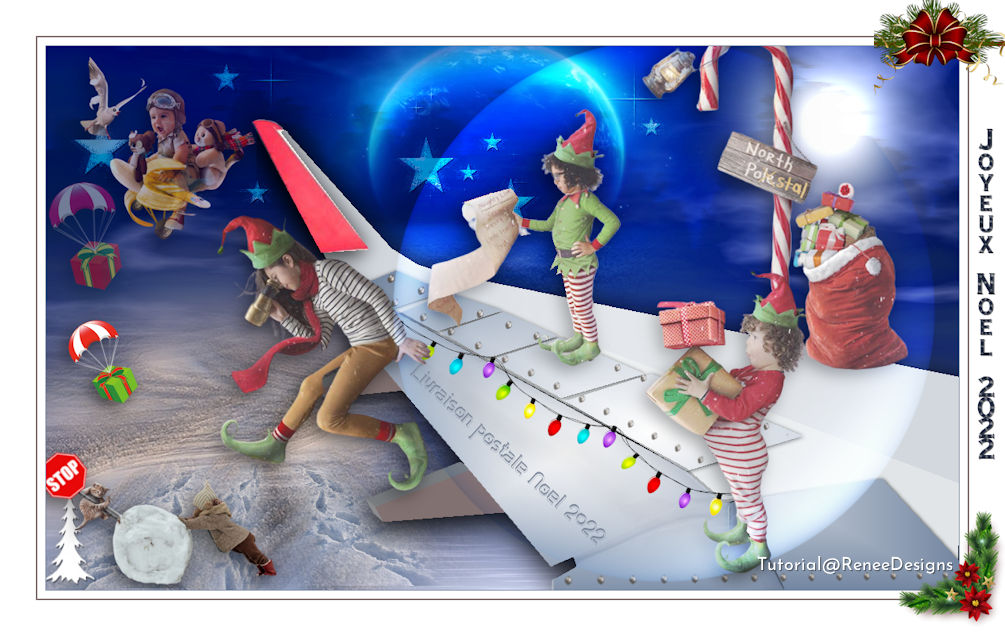
Livraison postale Noel 2022
Christmas mail delivery
- Preparation
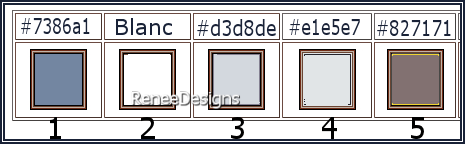
-Material Properties: Set your foreground color to color #7386a1=color 1 – Set your background color to color #ffffff=color 2
1. File: Open a transparent image in this size : 1150
x 685 Pixels
2.Flood Fill Tool  – Fill the layer with the foreground color #7386a1=color 1
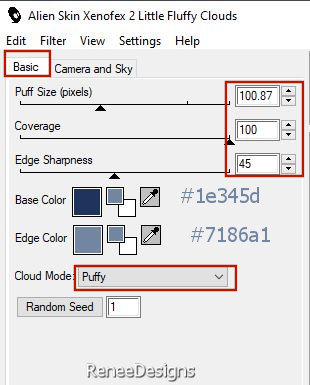
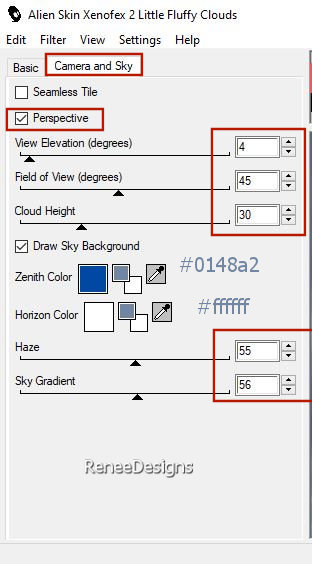
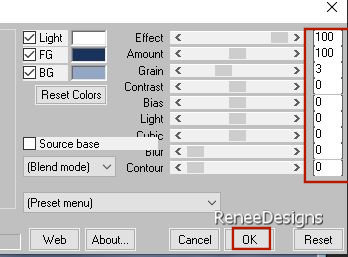
3. Effects – Plugins – Alien Skin – Xenofex 2- Little Fluffy Clouds use the settings below
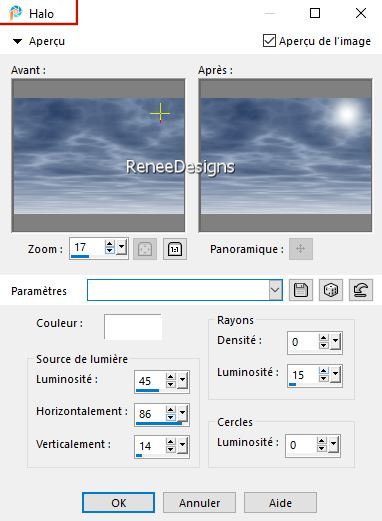
4. Effects –Illumination Effects -Sunburst use the settings below
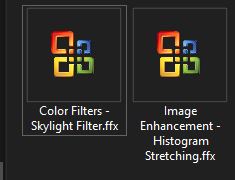
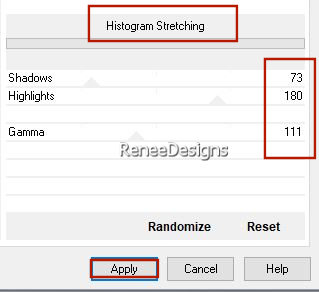
5. Effects - Plugins -[I.C.NET Software]- Filters in Unlimited 2.0 -
Image Enhancement - Histogram Stretching use the settings below
6. Open the Tube ‘’Renee-TUBES-Noel-postal2022-terre’’ -Edit - Copy- Activate your work -Edit - Paste as a new layer
7. Pick Tool: (K) on your keyboard -Enter these parameters on the toolbar
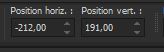 -212/
191 -212/
191
Press ( M ) to close the Pick Tool
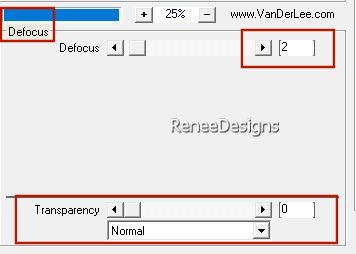
8. Effects - Plugins- Vanderlee – Unplugged X – Defocus with these settings
9. Effects – Edge Effects
- Enhance
10. Effects - Plugins-[I.C.NET Software]- Filters in Unlimited 2.0 -
Color Filters - Skylight Filter : 177
11.Open the Tube ‘’ Renee-TUBES-Noel-postal2022 -Image1’’ -Edit - Copy- Activate your work -Edit - Paste as a new layer
Objects – Align- Bottom –
Objects – Align - Left
-In the older version of psp-place in the lower left corner
12. Layers- New Raster Layer
13. Selections –load/save selection –load selection from disc and select my selection: ‘’Noel-2022-1’’
14. Effects - Plugins- Mura’s Meister – Clouds-the 3 Colors
#ffffff
#18315d
#93a6c3
15. Layers-Properties-Set the Blend Mode to " Dodge " - Reduce the Opacity of this layer to 38%
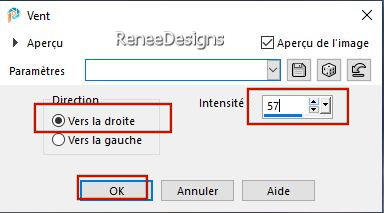
16. Effects – Distortion Effects– Wind- Wind direction from right-Wind strength 57 %
16 a. WE LEAVE THIS WORK FOR THE MOMENT( DO NOT CLOSE)
-
File: Open a transparent image in this size : 887 x
590 Pixels
17. Layers- New Raster Layer
18. Selections –load/save selection –load selection from disc and select my selection: ‘’Noel-2022-2’’
19.Properties Foreground- Set the foreground color to color #d3d8de=color 3
Flood Fill Tool -
Fill the selection with the foreground color #d3d8de=color 3
The selections will be cancelled by loading the following selection
20. Layers- New Raster Layer
21. Selections –load/save selection –load selection from disc and select my selection: ‘’Noel-2022-3’’
22. Properties Foreground- Set the foreground color to color # e1e5e7=color 4
Flood Fill Tool
-
Fill the selection with the foreground color # e1e5e7=color 4
- Material Properties:
Set your foreground color to color #ffffff=color 2 – Set your background color to color ##7386a1=color 1
- Set your foreground color to foreground-background rectangular gradient configured like this
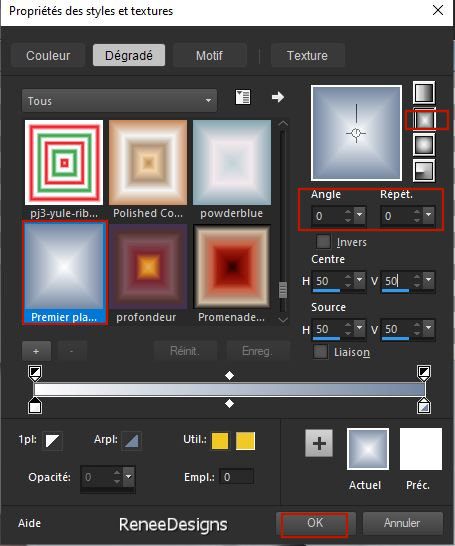
23. Layers- New Raster Layer
24. Selections –load/save selection –load selection from disc and select my selection: ‘’Noel-2022-4’’
25.Flood Fill Tool
-
Fill the selection with the gradient
26. Effects – 3D-Effects – Drop Shadow with these settings: 1/1/80/8 Color Black
27. Layers- New Raster Layer
28. Selections –load/save selection –load selection from disc and select my selection: ‘’Noel-2022-5’’
29. Open the Tube
‘’Renee-TUBES-Noel-postal2022 - Image 2’’- Edit - Copy- Activate your work -Edit - Paste into selection
30. Layers- New Raster Layer
31. Selections –load/save selection –load selection from disc and select my selection: ‘’Noel-2022-6’’
32.Properties Foreground- Set the foreground color to color # 827171=color 5
Flood Fill Tool
–
Fill the selection with the foreground color# 827171=color 5
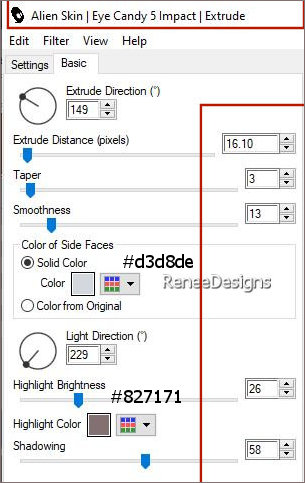
33. Effects - Plugins - Alien Skin EyeCandy 5 – Extrude use the settings below
34. Layers- Arrange-Sent to Bottom
35. Open the Tube "
rivets " -Edit - Copy- Activate your work -Edit - Paste as a new layer
(or paste my image of the rivets to have the same result as me)
36. Layers- Merge- Merge Visible
Edit-
Copy !!
- Activate your minimized image from point 16a
37. Edit - Paste as a new layer ( your aircraft wing construction)
38. Objects- Align- Bottom –
Objects -Align - Right
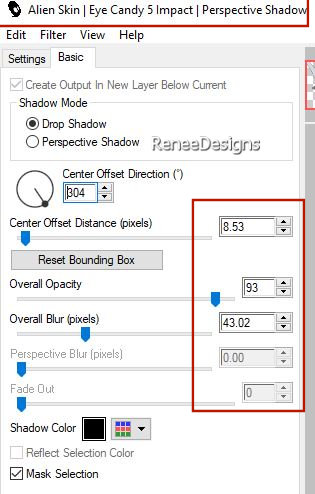
39. Effects - Plugins - Alien Skin EyeCandy 5 – Impact – Perspective
Shadow use the settings below
40. Open the Tube ‘’ Renee-TUBES-Noel-postal2022
- Image 3.’’ -Edit - Copy- Activate your work -Edit - Paste as a new layer
- Place on the tail of the aircraft
41. Activate your Text tool-Renée chose the font -.
Bodoni MT -(Included in the material) or choose your own font.
Write the text ''Livraison postale Noel
2022 '' or write your own text
42. Open the Tube‘’Renee-TUBES-Noel-postal2022- lampes’’ - Edit - Copy- Activate your work -Edit - Paste as a new layer
-Place to your liking
43. Layers- New Raster Layer
44. Selections –load/save selection –load selection from disc and select my selection: ‘’Noel-2022-7’’
45.Properties Foreground- Set the foreground color to color #ffffff=2
Flood Fill Tool
–
Fill the selection with the foreground color #ffffff=2
46.Layers-Properties-Set the Blend Mode to " Soft Light "
47. Effects – 3D-Effects – Drop Shadow with these settings: 1/1/80/1/ Color Black
48. Layers- Duplicate
49.
Effects - Plugins - Filters in Unlimited 2.0 -&<Bkg
Designer sf10 I> - Blur 'em!.with these settings: 5/0
50. Open the Tube ‘’Paysage-Luna’’ -Edit - Copy- Activate your work -Edit - Paste as a new layer
-Place to your liking
51. Layers - Arrange -Move Down - Place this layer above Raster 1 in the layer palette
- To replace the top of the layer-palette
52. We Are Going to Decorate
Open the Tube ‘’Renee-TUBES-personnages-Noel2022’’
(Or yours)
Edit - Copy- Activate your work -Edit - Paste as a new layer and place the decorative elements individually according to your taste
( Renée merged the tubes and gave the following drop shadow )
53. Layers- New Raster Layer
54. Effects – Artistic Effects – Balls and Bubbles -select my file – Preset :‘’Renee-Livraison postale
Noel 2022’’
(Copy the preset into the preset folder of your PSP))If this does not work, you can find the appropriate tube in the material
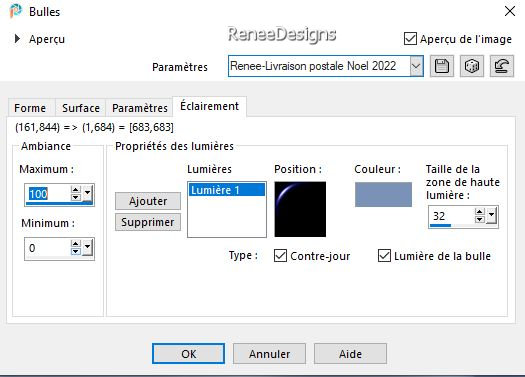 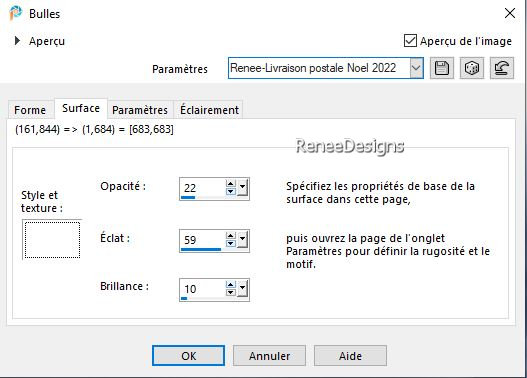
- Move the bubble to your liking
55. Layers-Properties-Set the Blend Mode to "Overlay "
56. Image - Add borders-Symmetric checked: 1 Pixel #7386a1=1
-Image - Add borders-Symmetric checked: 10 Pixels #ffffff=2
-Image - Add borders-Symmetric checked: 2 Pixels #827171=5
-Image - Add borders-Symmetric checked: 45 Pixels #ffffff=2
57. Open the Tube "déco
cadre"-Edit - Copy- Activate your work -Edit - Paste as a new layer
Paste the author's watermark on your work and your own watermark.
58.Layers- Merge- Merge All (flatten)
59. Image- Resize to 1005 Pixels width
Save as JPG
I hope you enjoyed this lesson
Renée
This lesson was written by Renée
16/10/2022
Edited and Update
in 2022
*
*
Any resemblance with an existing lesson is a coincidence
* Do not forget to thank the people who work with us and for us
-I have appointed the tubeurs and translators
Thanks
|

 Translations