|
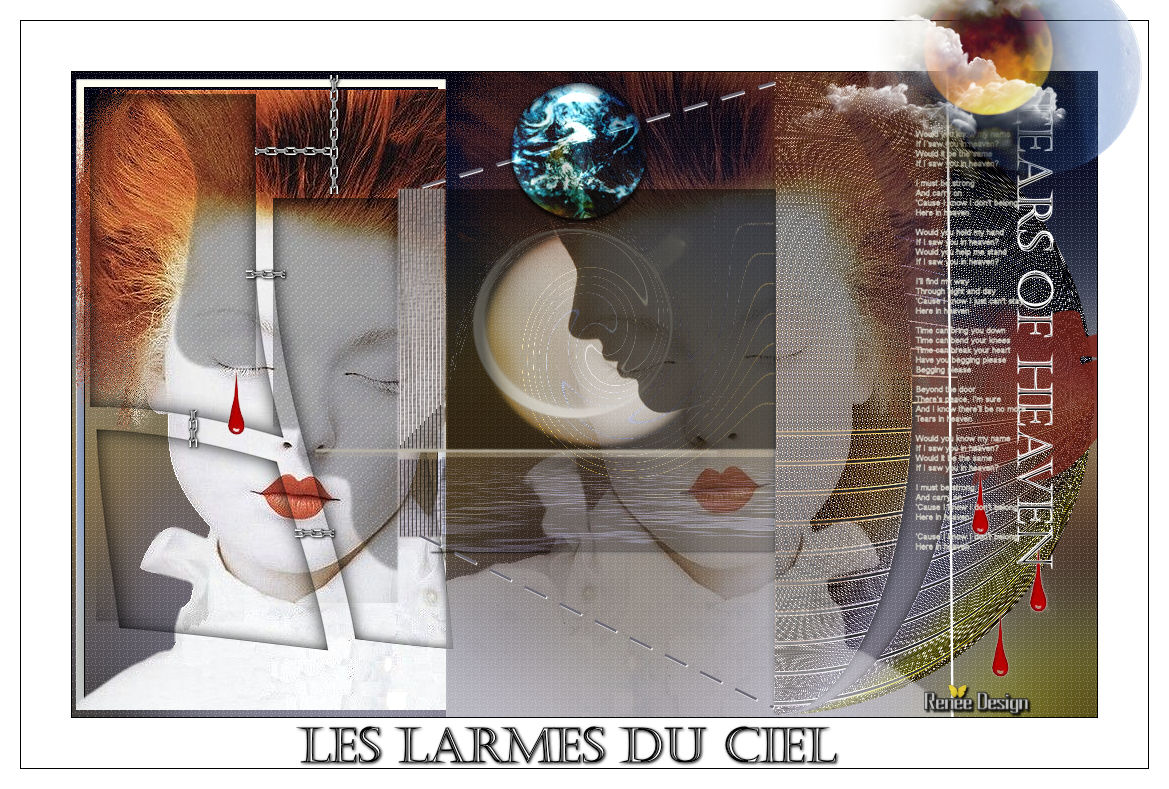
Tears of heaven- les larmes du
ciel
Let's start the lesson.
-
Color-palette:Set your foreground color to #bbb6a7- Set your background color to#878245

1.
Open the background image ’’fond_tears_of_heaven’’- Window - Duplicate (or shift+D) - Close the original and proceed on the copy -Promote Background Layer =Raster 1
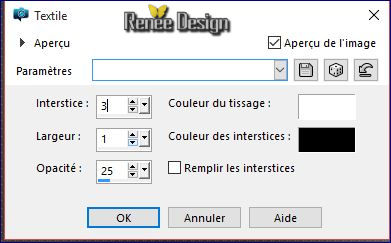
2.
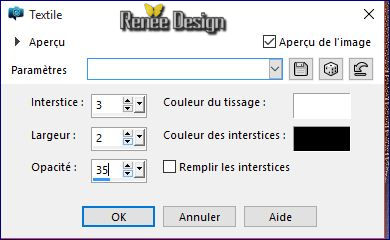
Effects- Texture Effects- Weave use setting below
3.
Layers- Duplicate
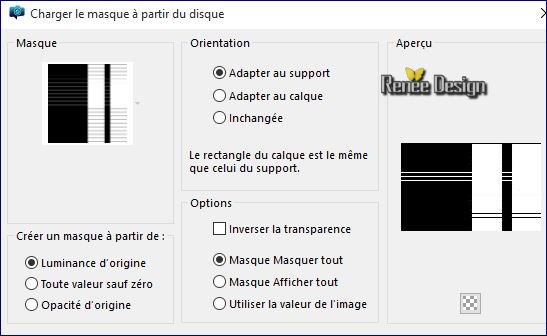
4.
Layers- Load/Save mask-Load Mask from Disk and select:
‘’ maskcameron31’’
-
Layers- Merge- Merge- Group
5.
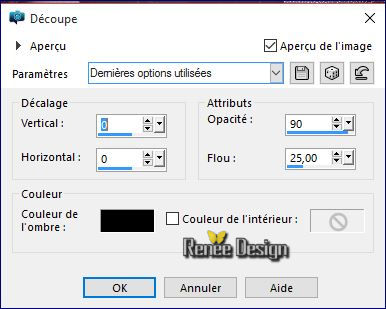
Effects- 3 D Effects- Drop Shadow with these settings: 0/0/76/35 color black
6. Effects- Edge Effects- Enhance More
7.
Effects- Geometric Effects- Circle– transparent
8.
Effects-Image Effects- Offset with these settings H = 189 and V =
0
9.
Selection Tool ( S ) Custom selection use settings below

10.
Effects- Distortion Effects- Twirl-Degrees
458
11.
Effects- 3 D Effects- Drop Shadow with these settings:1/1/100/3 color black
Selections- Deselect All
-
a horizontal black line is created (Do not remove the small black line)
12.
Layers- New Raster Layer
13.
Activate Flood Fill Tool and fill the layer with the foreground color
14.
Open the Mask ‘’ Renee_masque_tears_1’’
-
Layers- New Mask layer from Image and choose Mask: ‘’
Renee_masque_tears_1’’
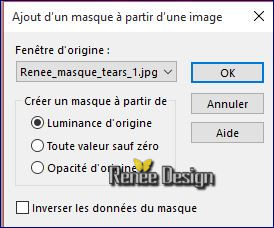
-
Layers- Merge- Merge Group
15. Open the tube
‘’renee_tube_tears1 »
-
Edit/ Copy-Edit - Paste as new layer on your working image
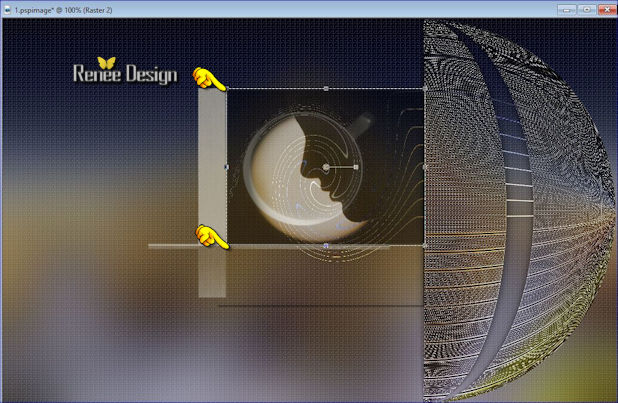
16.
Activate Pick Tool (K) move it the right place as shown in the example below
17.
Double click on this Layer and set the Blend Mode to"Luminance"-Set the layer opacity of this layer to 51%
-
Color-palette:Set your foreground color to
#696673
18.
Layers- New Raster Layer
19.
Selections –load/save selection –load selection from disc and select my selection:
‘’tears_sel1’’
20.
Activate Flood Fill Tool and fill the selection with the foreground color #696673
21.
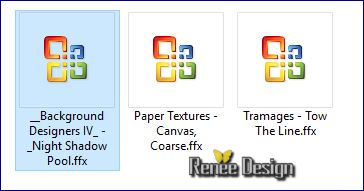
Effects -Plugins -ICNET FILTERS – Unlimited -Paper Textures-Canvas,
Coarse a 94/87
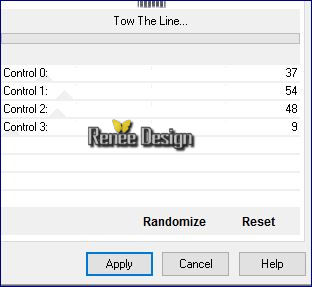
22.
Effects –Plugins- Unlimited – Tramage – Two the
lines use settings below
Selections- Deselect All
- Double click on this Layer and set the Blend Mode to"Hard Light "-Set the layer opacity of this layer to 65%
23. Activate Pen Tool –Line Style ‘’Dashed’’- with these settings -Width 3

- Draw two lines see screenshot below
-Convert to Raster Layer
24. Effects- 3 D Effects- Drop Shadow with these settings: 1/1/100/1 color white
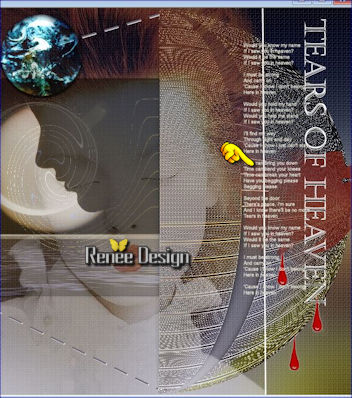
You should have this result
25. Layers- New Raster Layer
26.
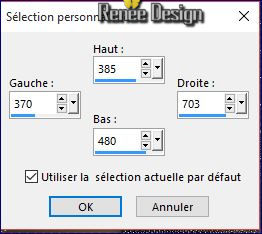
Selection Tool ( S ) Custom selection use settings below
26.Pot of Paint: Change the opacity of the color at 30 %- Activate Flood Fill Tool and fill the selection with the background color
27.
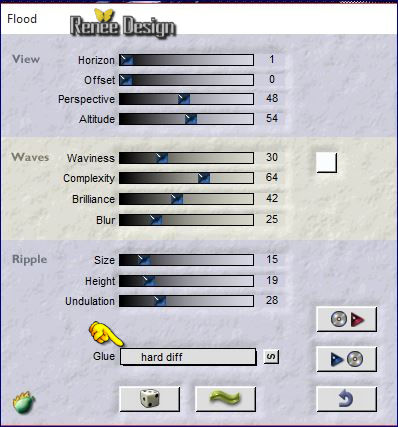
Effects- Plugins- – Faming pear –Flood with these settings / choose my Preset ‘’
Tears_Flood settings.q8r’’ Glue=Hard Diff
28. Effects- Edge Effects-Enhance
Selections- Deselect All
29. Open the tube ‘’ renee_tube_tears2’’
- Edit/ Copy-Edit - Paste as new layer on your working image
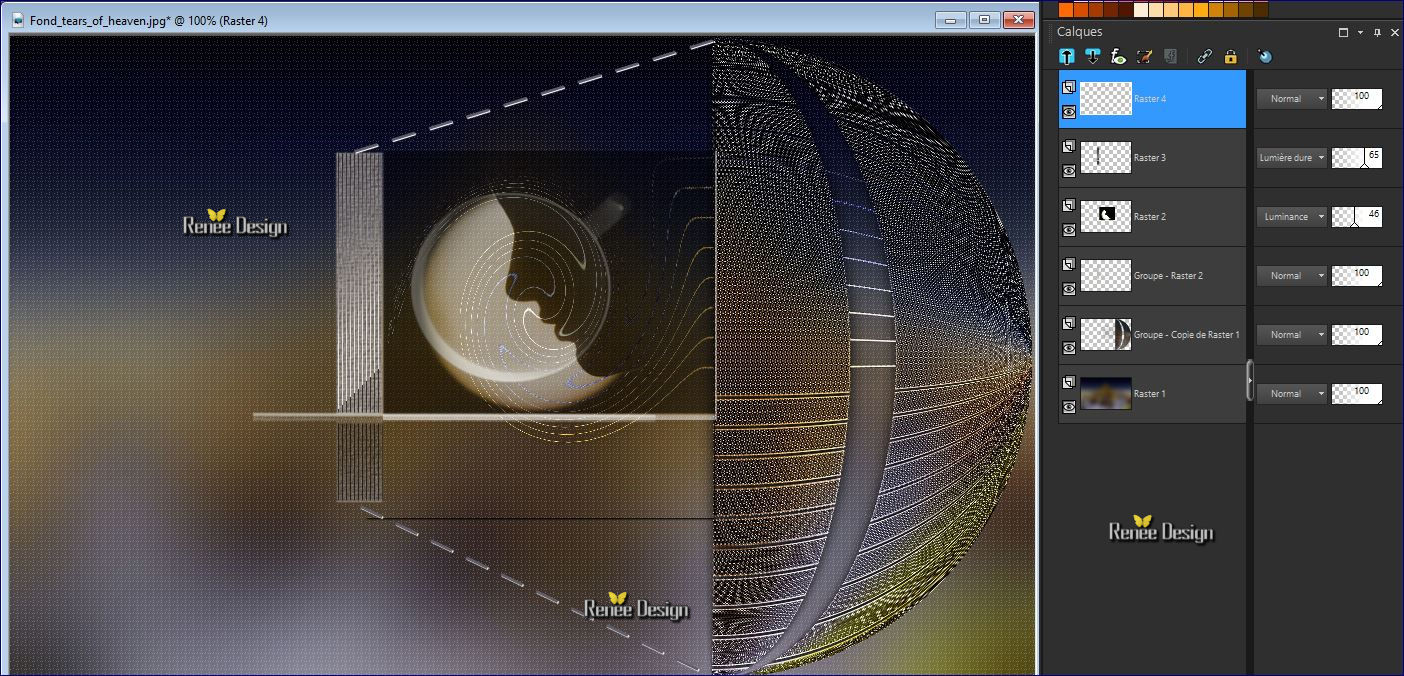
- Activate Move Tool (M) move it the right place
(see finished image)
30.
Effects –Plugins- Unlimited - &<Background Designers
IV>-@Night shadow use settings below
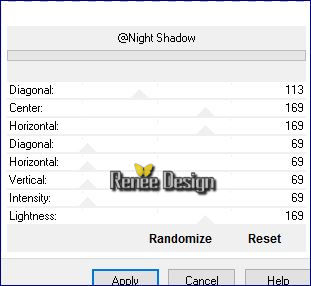
- Activate the bottom of the layer palette =Raster 1
31.
Selection Tool ( S ) Custom selection use settings below

Selections- Promote selection to Layer
32. Effects- Plugins - AAA Frame Foto Frame use settings below
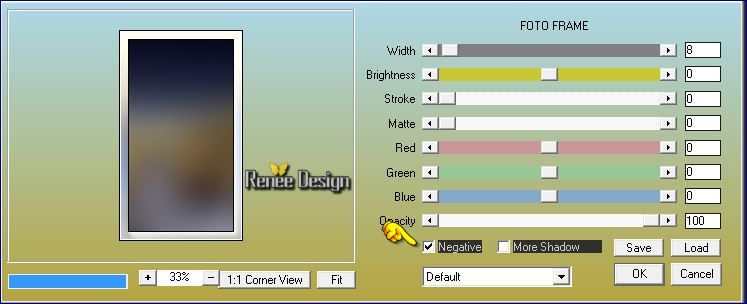
Selections- Deselect All
- Layer- Palette- Make Copy of Group Raster 1 active
33. Open the tube ‘’ Renee_tube_femmerousse’’
- Image
Mirror
- Edit/ Copy-Edit - Paste as new layer on your working image
34. Activate Pick Tool (K) move it the right place as shown in the example below
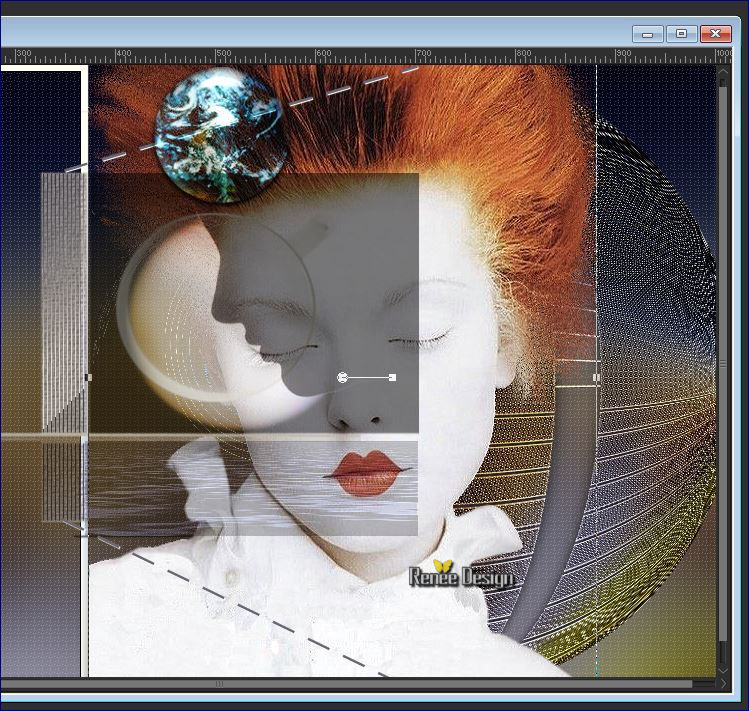
35.
Set the layer opacity of this layer to 46%
- In the Layer- Palette-Activate the second layer from the bottom (Promoted Selection Layer)
36. Open the tube ’ Renee_tube_femmerousse’’
- Edit/ Copy-Edit - Paste as new layer on your working image
37. Effects- Image Effects- Offset use setting below
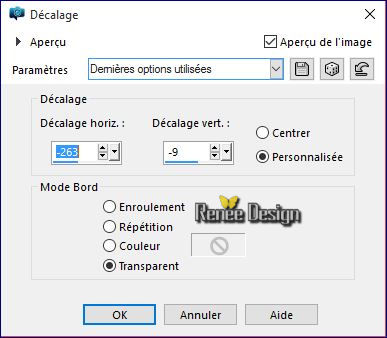
-In the layer- Palette- activate the layer underneath ( Promoted Selection )
38. Activate your Magic Wand:select the right transparent part
39. Layer palette – Make raster 8 active
Press the delete button on your key board
Selections- Deselect All
Your Layer palette look like this now-You should have this result

- Layer palette – Make raster 8 active
40.
Selections –load/save selection –load selection from disc and select my selection:‘’ tears_sel2’’
41.
Selections- Promote selection to Layer
42. Effects- 3 D Effects- Cutout use settings below
Selections- Deselect All
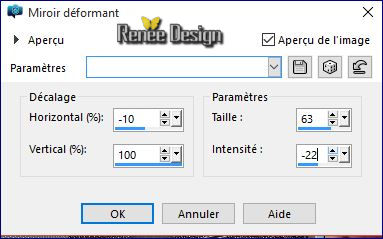
43. Effects- Distortion Effects-Warp with these settings
44. Layers- New raster Layer
45.
Selections –load/save selection –load selection from disc and select my selection: ‘’
tears_sel2
46. Open the tube ‘’renee_tube_tears3.pspimage’’
- Edit/ Copy-Edit - Paste into selection
47. Effects- Texture Effects- Weave use setting below
Selections- Deselect All
48.
Set the layer opacity of this layer to 36%
-
Activate the top of the layer palette
49. Open the tube ‘’ renee_tube_tears4.pspimage’’
- Edit/ Copy-Edit - Paste as new layer on your working image
- Activate Move Tool (M) move it the right place (see finished image)
- Color-palette:Set your foreground color to # 7b2218
50. Layers- New Raster Layer
51.
Activate the Brush Tool and choose the brush:‘’ tears.brush ‘’-use settings below

-
Stamp with the foreground color at the right side
52. Open the tube’’renee_tube_tears5.pspimage’’
- Edit/ Copy-Edit - Paste as new layer on your working image
- With your move tool place it to the left (Place the tube under the eyes of the girl)
53.
Layers-Duplicate- repeat 3 times- With your Move Tool: move it to the bottom right corner.
54. Layers- Merge- Merge Visible
55. Image Rotate Left
- Color-palette:Set your foreground color to #ffffff -Set your background color to black
56. Activate Pen Tool –Line Style = Full Line with these settings and draw a horizontal line

57. Click on your Text Tool-Font ‘Castellar’ use settings below

-
Write your text ‘’TEARS OF HEAVEN »
- Activate Move Tool (M) move it the right place (see finished image)
-Convert to Raster Layer
58. Image Rotate Right
59. Open the tube « renee_tube_tears6.pspimage »
- Edit/ Copy-Edit - Paste as new layer on your working image
Activate Pick Tool (K) move it the right place as shown in the example below
60. Image - Add borders-Symmetric checked: 1 pixel color black
61. Image - Add borders-Symmetric checked: 50 pixels color white
62. Image - Add borders-Symmetric checked: 1 pixel color black
63. Image - Add borders-Symmetric checked: 20 pixels color white
64. Open the tube ‘’ Renee-tube-tears-lunerouge’’
- Edit/ Copy-Edit - Paste as new layer on your working image and move
65. Layers- Merge- Merge- All
66.
Color-palette-Swap your materials: FG-Color =Black- BG-Color =White
67. Click on your Text Tool-With the same handwriting font – Write your text ‘’
Les larmes du Ciel
Save as JPG
I hope you enjoyed this lesson
Renée
This lesson was written by Renée 17/12/2015
Edited and Update
06/01/2016
*
Any resemblance with an existing lesson is a coincidence *
Do not forget to thank the people who work with us and for us I have appointed the tubeurs and translators
Thanks
*
| 
 Translations


 When you see this logo the filter is imported in Unlimited

 All rights reserved