|
Let's start the lesson.
Les petites filles
modèles/Little model girls
1. Open the Image ‘’Fond_les
petites filles modeles ‘’- Window - Duplicate (or shift+D) - Close the original and proceed on the copy -Promote Background Layer =Raster 1
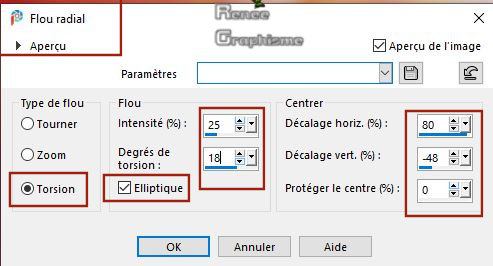
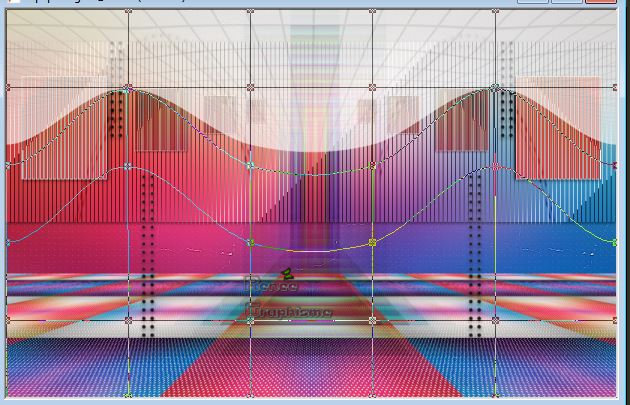
2.Adjust-Blur- Radial Blur use the settings below
3. Adjust- Blur- Gaussian Blur: Radius 45
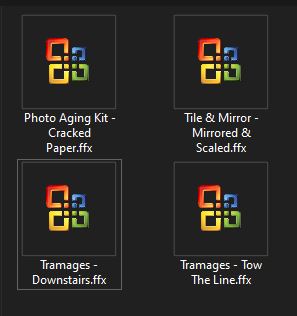
4. Effects –Plugins-
Unlimited 2.0 - Photo Aging Kit- Cracked Paper 53/128
5. Effects – Edge Effects– Erode
6. Effects – Edge Effects– Enhance More
7. Layers- Duplicate
8. Effects –Plugins-
Unlimited2.0- Neology -Turnaround
9. Effects –Plugins-
Unlimited2.0-ICNETS FILTERS - Tile & Mirror - Mirrored &
Scaled
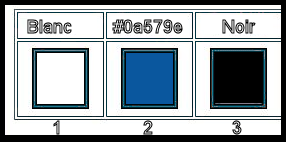
10. Effects – Plugins – Mura’s Meister – Tone with these settings / Color White and
#0a579e
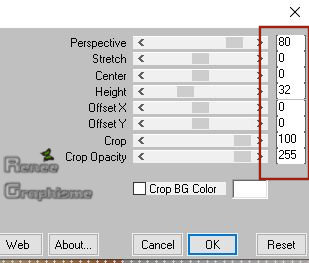
11. Effects – Plugins – Mura’s Meister- Perspective Tiling use the settings below
12. Layers- New Raster Layer
13. Selections –load/save selection –load selection from disc and select my selection: ‘’PF_Modele’’
14.Color Palette- Set your Foreground color to color #ffffff
-Flood Fill Tool – Fill the selection with the Foreground color #ffffff (2 clicks)
Selections- Deselect All
-Activate the Bottom Layer in the Layer Palette = Raster 1
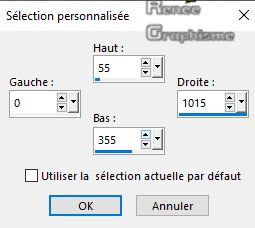
15. Activate Selection Tool -Custom Selection (S) -Rectangle with these setting
16. Selections- Promote Selection to Layer
17. Adjust- Blur- Gaussian Blur: Radius 30
Selections- Deselect All
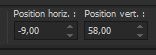
18. Layers- Arrange -Move Up ( above Copy of Raster 1)
19. Effects– 3 D Effects – Drop Shadow with these settings: 2/2/55/9 Color Black
20. Effects –Plugins-
Unlimited 2.0 – Tramages - Tow The Line... using the default settings
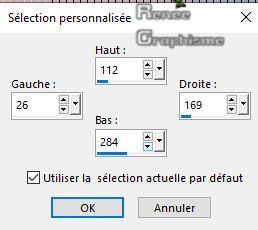
21. Activate Selection Tool -Custom Selection (S) -Rectangle with these setting
22. Selections- Promte Selection To Layer
Selections- Deselect All
23. Effects– 3 D Effects – Drop Shadow with the same settings
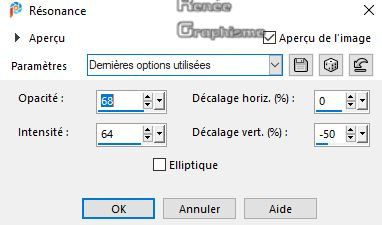
24. Effects – Reflection Effects- Feedback use the settings below
25. Effects – Edge Effects – Enhance More
26. Layers- Duplicate
27. Image - Mirror - Mirror Horizontal (Image - Mirror in older versions of PSP)
28. Layers- Merge- Merge Down
29. Selections –load/save selection –load selection from disc and select my selection: ‘’PF_Modele 1’’
DELETE

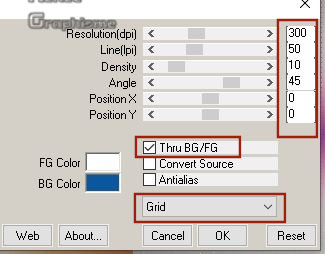
Selections- Deselect All
30. Open the tube ‘’PTF-Modele-Image 2
cadres.pspimage’’ Edit - Copy- Activate your work -Edit - Paste as a new layer
31. Pick Tool: (K) on your keyboard -Enter these parameters for the X: -9,00 and Y:58,00 positions on the Toolbar
Press any Key to close the Pick Tool
32. Layers- New Raster Layer
33. Selections –load/save selection –load selection from disc and select my selection: ‘’PF_Modele 2’’
34. Color Palette: Set your Foreground color to color #ffffff
Flood Fill Tool – Opacity 40%- Fill the Selection with #ffffff
35. Effects –Plugins-
Unlimited 2.0 – Tramages - Downstairs... 18/195/47
Selections- Deselect All
36. Effects – Plugins - (or unlimited) Toadies – What are you 20/20
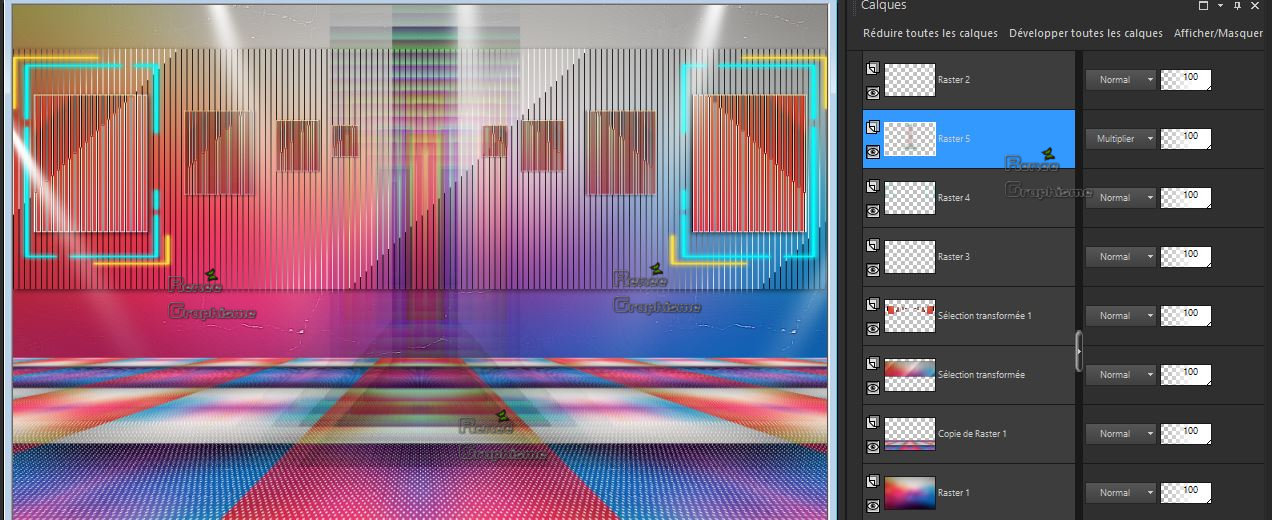
37. Layers-Properties-Change the Blend Mode to " Multiply "
Your work and Layer Palette look like this now-You should have this result
38. Open the tube ‘’ PTF-Modele-Image
1’’ -Edit - Copy- Activate your work -Edit - Paste as a new layer
39. Pick Tool: (K) on your Keyboard -Enter these parameters for the X: 166,00 and Y: 49,00 positions on the Toolbar

- Press any Key to close the Pick Tool
40. Layers- Duplicate
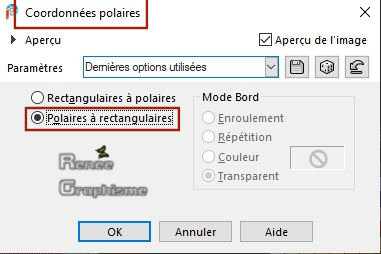
41. Effects-Distortion Effects- Polar Coordinates-Polar to Rectangular
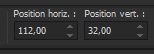
42. Pick Tool: (K) on your keyboard -Enter these parameters for the X: 112,00 and Y:32,00 positions on the Toolbar
- Press any Key to close the Pick Tool
43. Layers-Properties-Change the Blend Mode to " Hard Light " and Lower the Opacity to
65%
- To replace the Top of the Layer-Palette
44. Layers-New Raster Layer
45. Flood Fill Tool
- Opacity 65% – Fill the Selections with #ffffff
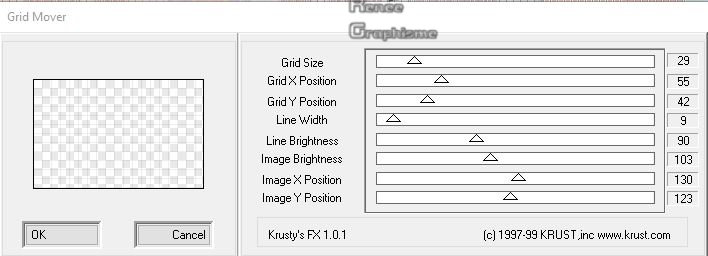
46. Effects – Plugins - Krusty's vol. III 1.0- Grid Mover use the settings below
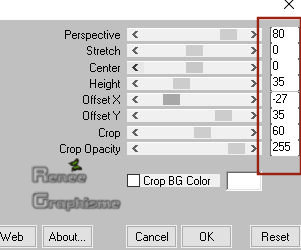
47. Effects - Plugins - Mura's Meister - Perspective Tiling use the settings below
48. Image - Mirror - Mirror vertical ( Image - Flip in older versions of PSP)
49. Activate your Mesh Warp Tool

If you don’t have the Tool Mesh Warp in your PSP, please continue to read)
Go to Menu -> View / Customize => click on Tools in the left menu => Click on Mesh Warp in
the right menu
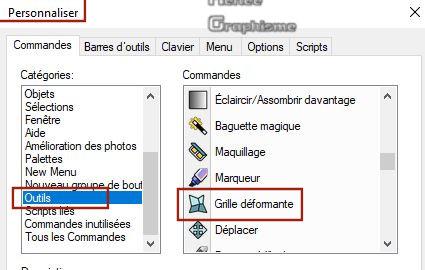
-Keep the Mouse Button pressed in, and drag it to the other tools. Release the Mouse Button
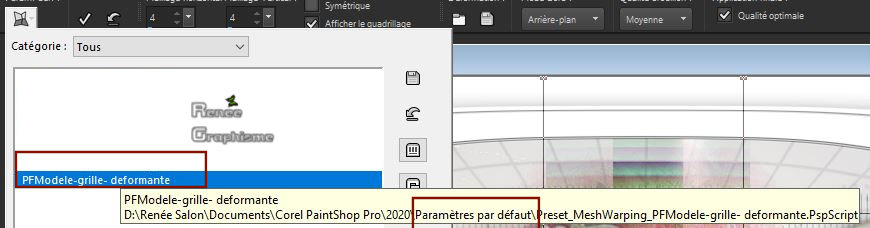
- Activate your Mesh Warp Tool and select my Preset ‘’
PFModele-grille- deformante’’ (Put the Preset in the Presets folder of your PSP)
- Hit the M key of your Keyboard to deselect the Tool
50. Layers- Arrange- Move Down (Above the Promoted Selection Layer)
51. To replace the Top of the Layer-Palette
52. Open the tube ‘’ PTF-Modele-Image
2’’ -Edit - Copy- Activate your work -Edit - Paste as a new layer
53. Pick Tool: (K) on your Keyboard -Enter these parameters for the X: 294,00 and Y: -30,00 positions on the Toolbar
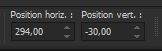
- Press any Key to close the Pick Tool
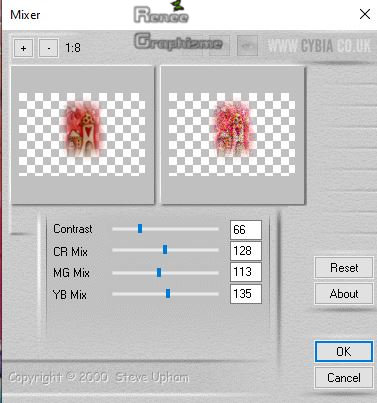
54. Effects –Plugins – Mezzy- Mixer use the settings below
55. Layers-Properties -Lower the Opacity to 77
56. Open the tube ‘’PTF-Modele-Image
3.pspimage’’ -Edit - Copy- Activate your work -Edit - Paste as a new Layer
57. Effects-Image Effects- Offset with these settings: H = 73 and V = -32
58. Open the tube ‘’PTF-Modele-Image
-texte.png’ - Edit - Copy- Activate your work -Edit - Paste as a new layer
- Activate your Move Tool (M) move to the top left side
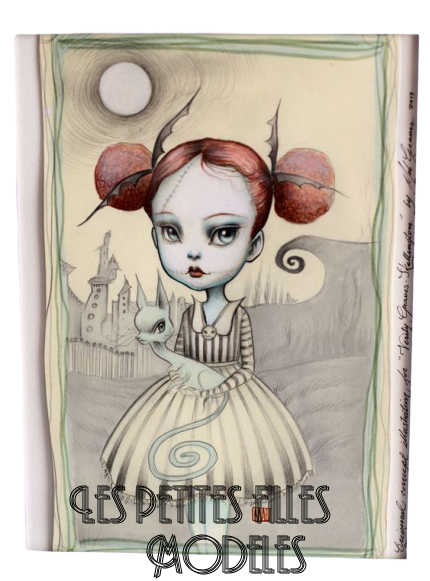
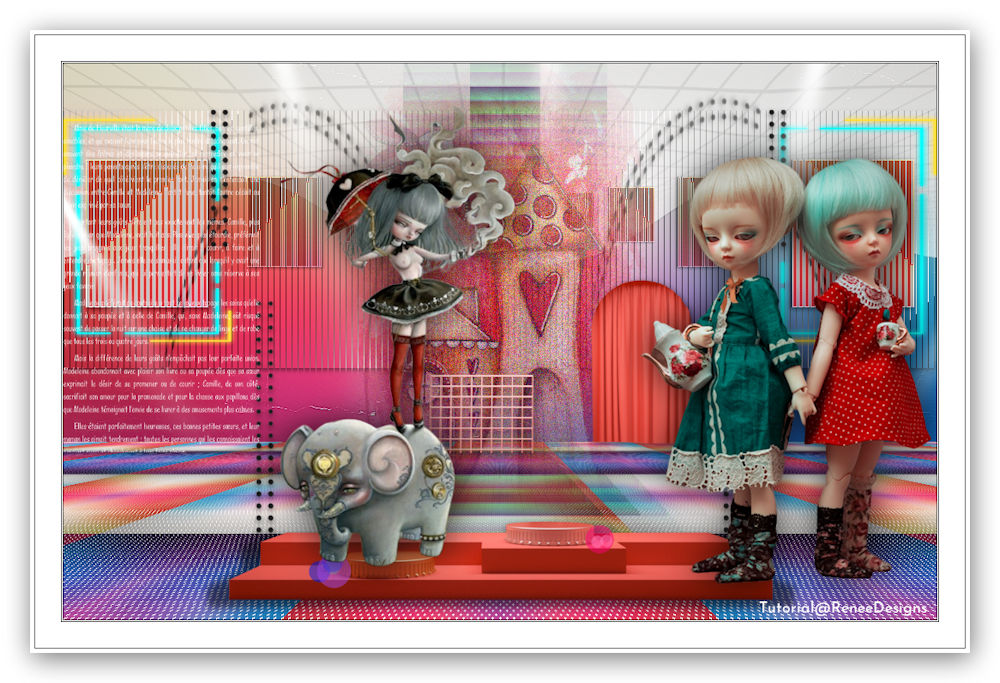
(See finished image )
59. Layers-Properties-Change the Blend Mode to " Screen "
60. Open the tube ‘’PTF-Modele-Image
4.pspimage’’ - Edit - Copy- Activate your work -Edit - Paste as a new layer
61. Effects-Image Effects- Offset with these settings: H = 0 and V = - 258
You find
Here
more little girls for your Creations
62. (For Renée these two girls ) Open the tube ''Renee_TUBES_les petites filles modeles_27'' and ''Renee_TUBES_PTFModeles-cirque''
Edit - Copy- Activate your work -Edit - Paste as a new layer (or another tube of your choice)
For Renée- Image Resize 68% and the other girl -Image Resize 88%
-Activate your Move Tool (M) place it in the right place ( see finished image )
63. Effects-Plugins – Alien skin EyeCandy 5 Impact – Perspective
Shadow –Tab-Settings-User Settings and select my file- Preset : PTFModele-shadow ( both girls)
64. Layers- Merge- Merge Visible
65. View - Toolbars - Script checked in your PSP ! (Put the Script in your Script folder –Restricted Script from PSP! )
Activate Toolbar Script, choose my file in the list ''ptfillesmodeles'' click the little blue arrow and let the Script run

66. Selections- Select All
67. Selections- Modify-Contract with 35 Pixels
68. Effects – 3 D Effects– Drop Shadow with these settings : 6/2/55/45 Color Black
Selections- Deselect All
69. Image
-Resize to 1000 Pixels width.
Save as JPG
I hope you enjoyed this lesson
Renée
This lesson was written by Renée 8/12/2019
Edited and Update
2019
*
Any resemblance with an existing lesson is a coincidence
* Do not forget to thank the people who work with us and for us
I have appointed the tubeurs and translators
Thanks
*
|
 Translations


 If a plugin supplied appears with this icon it must necessarily be imported into Unlimited *