|
Let's begin.
1.
Open the Image:
''fond_le_mysterieux_voyage'' Promote Backgroundlayer = raster 1
2.
Layers- New Raster layer
3. Selections-Select All
4.
Open the tube ''lewi-155" Edit/copy-Edit paste into selection
5.
Selections-Deselect All
6.
Effects-Image Effects-Seamless Tiling with these settings 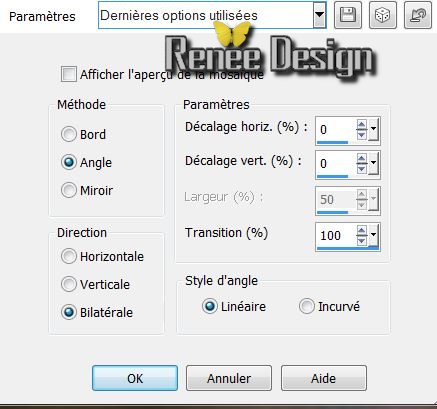
7. Effects - Texture Effects-
Soft Plastic /color #555555

8. Layers- Merge- Merge Down
9. Layers- New Raster layer/Flood Fill Tool: fill the layer with black
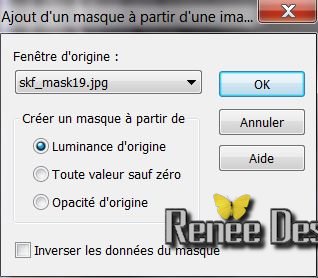
10. Layers- New Mask Layer From Image and choose:"skf_mask19''
11. Layers- Merge - Merge Group
12. Effects- Filter Vanderlee -Unplugged X /
Saturation

13. Layers- New Raster layer/Flood Fill Tool: fill the layer with white
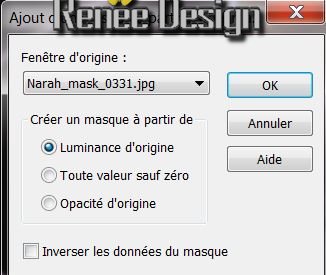
14. Layers- New Mask Layer From Image and choose:''Narah_mask_0331.jpg''
15.Layers- Merge - Merge Group
16. Effects-Edge Effects-Enhance More
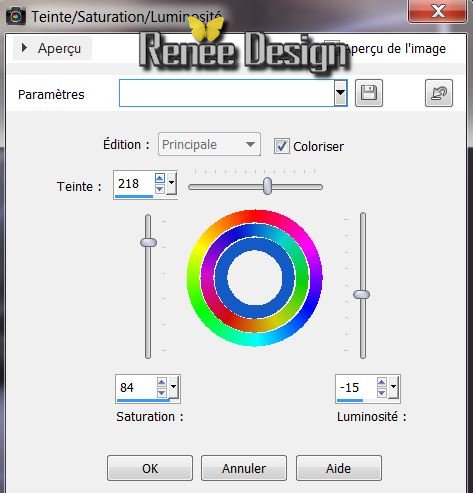
17.Adjust-Hue and Saturation-Hue/Saturation/Lightness
18. Layers- New Raster layer
19.Selections - load/save selection - load selection from disk and choose :
''voyage_mysterieux_1'' Flood Fill Tool: fill the selection with this color: #bcc6da /click 5 times in the selection
20. Selections-Deselect All
21. Open the tube
''talaNat_paysage'' Edit/copy- Edit/ paste as new layer (do not move it is in the right place)
22. Effects-Filter - Flaming Pear /
Flexify 2
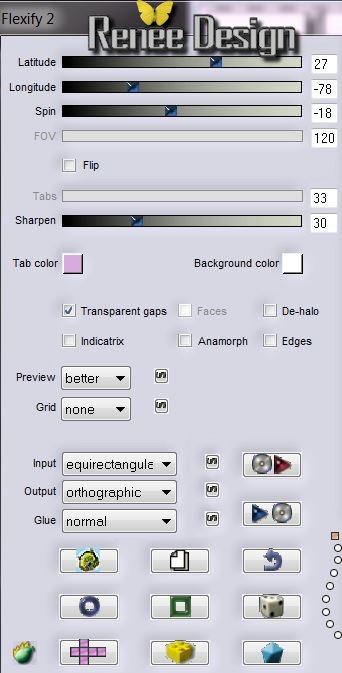
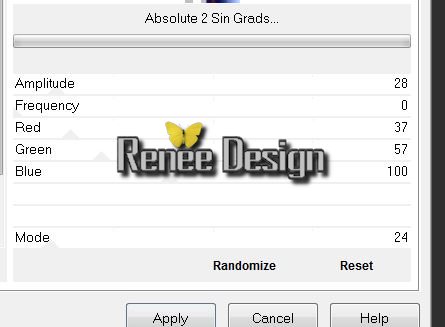
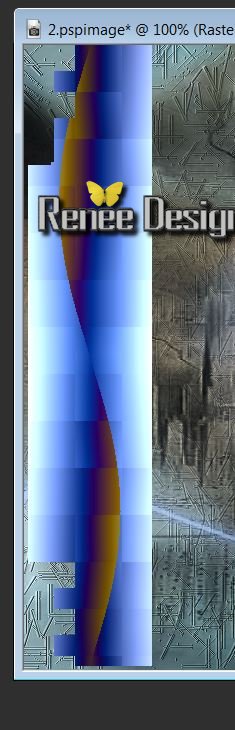
23. Layer Palette: change your Blend Mode to "Hard Light" .Reduce the opacity to 55%
24. Layers- New Raster layer/ Activate Selection Tool-Rectangle-(S) draw a selection like this
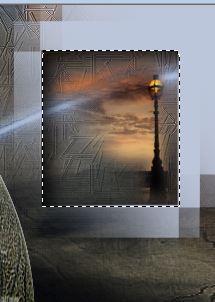
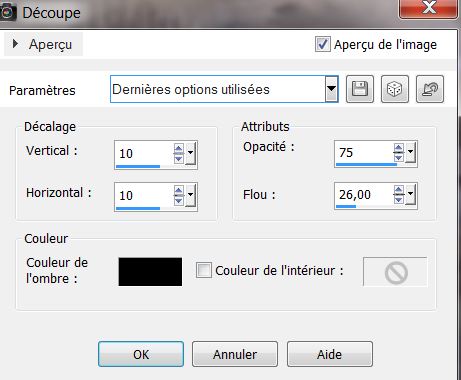
25. Effects- 3D Effects-Cutout with these settings
26. Open the tube
''MMC_AUG_2008_032'' Edit/copy-Edit paste into selection
27. Effects-Filter - EyeCandy 5 Impact - Glass tab SETTINGS/USER SETTINGS and choose my preset ''voyage_mysterieux_glass''
28. Selections-Deselect All
29. Layers- New Raster layer
30. Material Properties: Foreground color to color: #bcc6da. Background color to color:
#71625b
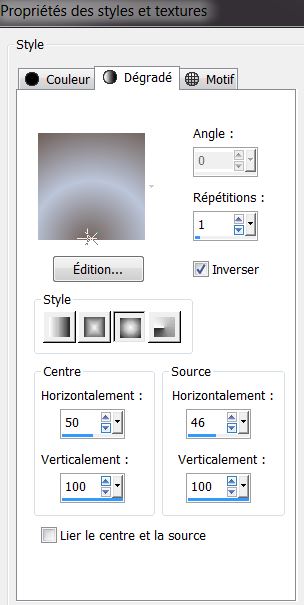
31.Prepare a Sunburst Gradient as configured
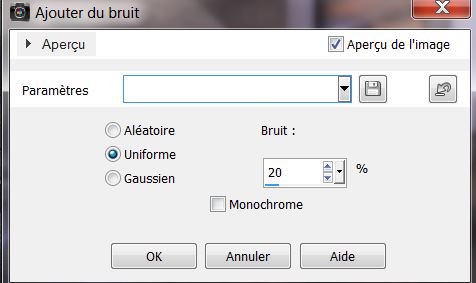
32.Selections - load/save selection - load selection from disk and choose : ''voyage_mysterieux_2'' Flood Fill Tool: fill the selection with the gradient
33. Effects-Filter VM Distorsion - Flipper
87/39/172
34. DO NOT DESELECT
35. Effects- Filter Unlimited 2.0
/ Alf's Power Sines / Absolute 2 Sin Grads
36. Repeat: Effects- Filter Unlimited 2.0 / Alf's Power Sines / Absolute 2 Sin Grads
37. Selections-Deselect All
The result (The color can result in a slightly different effect )
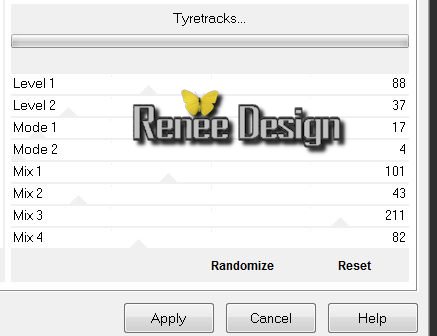
38. Effects-Filter Unlimited Plugin AB21 - Tyretracks
39. Layer Palette: change your Blend Mode to "luminace-Legacy"
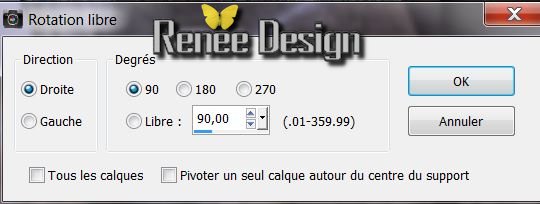
40. Image/ Free Rotate 90°/ Right
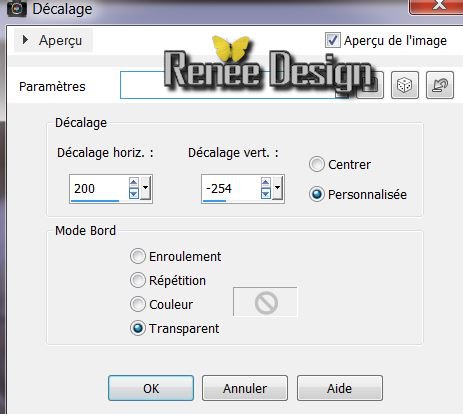
41. Effects-Image Effects- Offset
42. Layers- Duplicate/Image- Mirror. Layers Merge- Merge Down
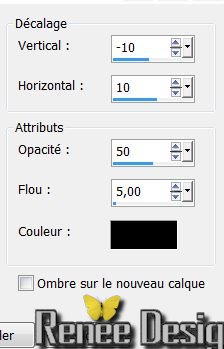
43. Effects- 3D Effects-Drop Shadow/Black
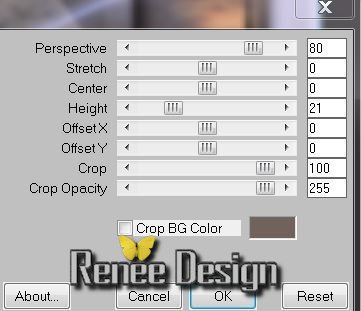
44. Effects- Filter -Mura's Meister - Perpective Tilling
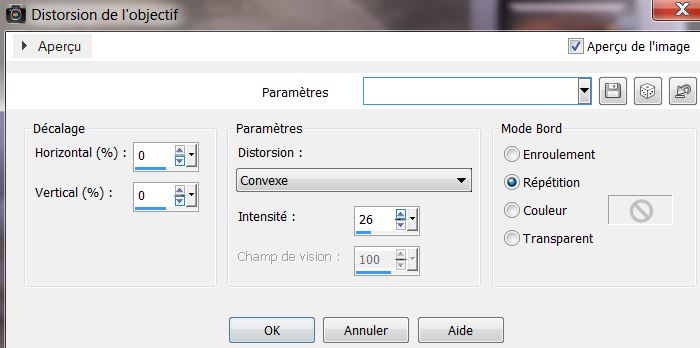
45. Effects - Distortion Effects- Lens Distortion/Barrel
46. Adjust-Add/Remove Noise/Add Noise
47.Layers - New Raster Layer
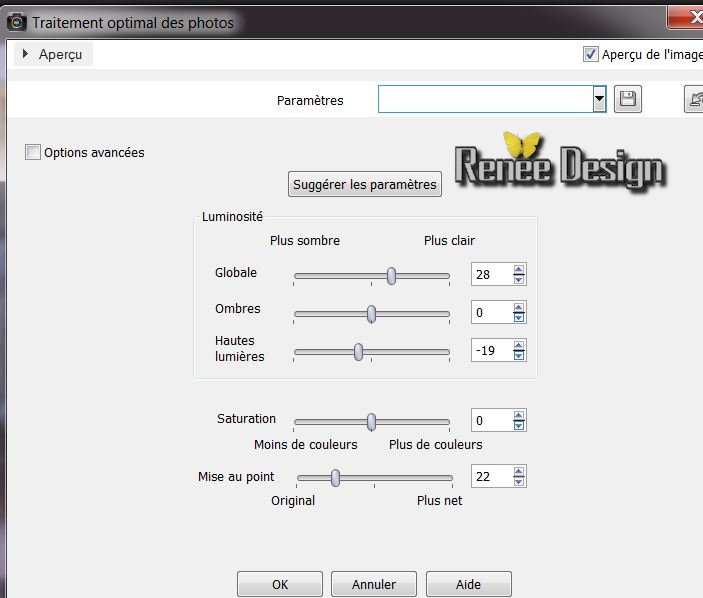
48.Selections - load/save selection - load selection from disk and choose :
''voyage_mystérieux_3''
49. Flood Fill Tool: fill the selection with this color: #bcc6da.
Selections- Deselect All
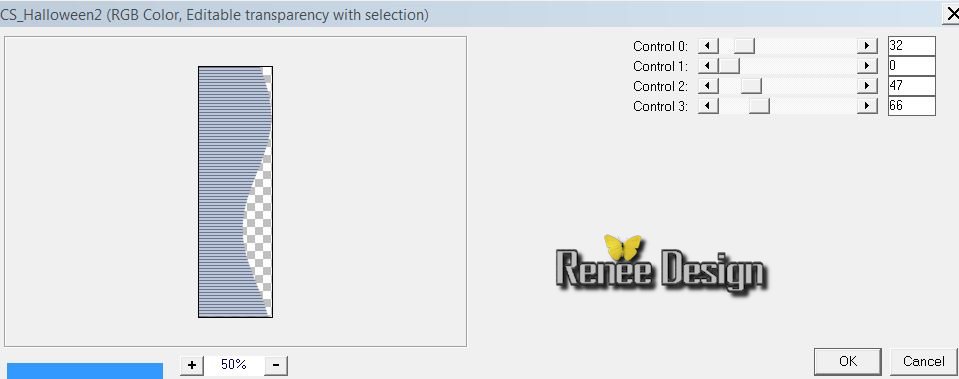
50. Effects-Filter - Carolaine et Sensibilty / CS
_Halloween2
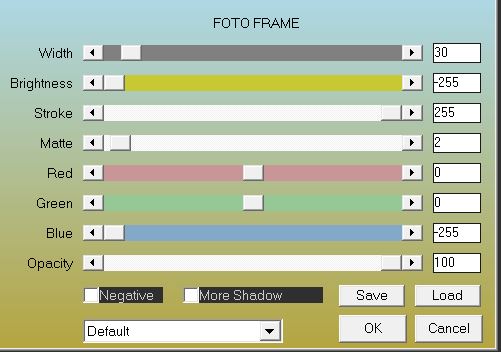
51.Effects- 3D Effects-Drop Shadow/Black with the same settings
52. Layer Palette: change your Blend Mode to "Multiply"
53. Open the tube de odette ''msck_mec_floral_01'' be placed on the layer of strange characters /Image- Mirror-Edit/copy-Edit Paste as a new layer
54. With your move tool move to the left like this
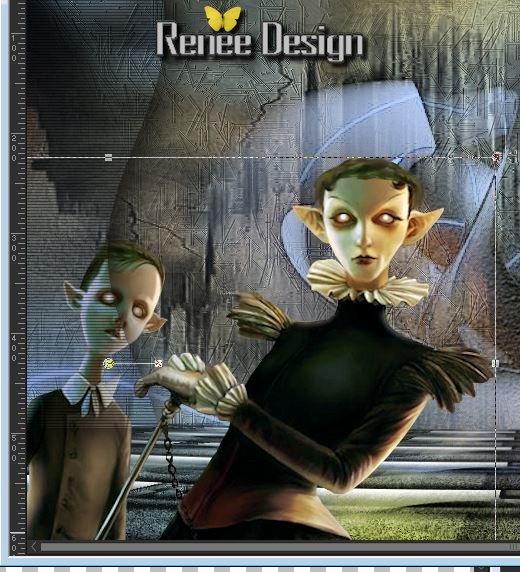
55. Layers- Arrange-Move Down
56. Return to odette tube /be placed on the raster 1 of the tube. Edit/copy-Edit Paste as a new layer(like this) /With your move tool:move to the top left corner like this
57. Effects-Edge Effects-Enhance
Layer Palette look like this now
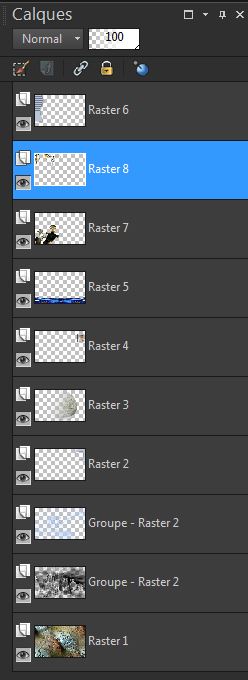
58. Aktivate the top of the Layers palette
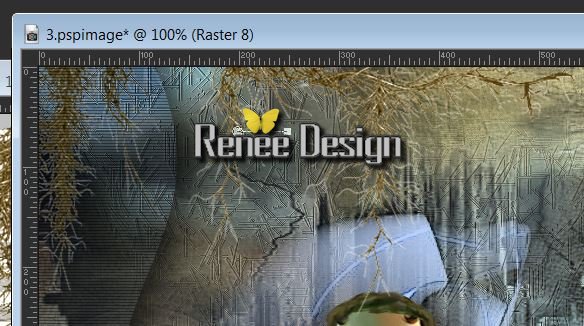
59. Open the tube ''inter745 machin volant'' .be placed on the raster 1 of the tube - Layers- Merge- Merge Down
/Image- Resize 63% /Edit/copy -Edit/paste as a new layer
60. Image- Mirror -With your move tool place it in the right place
61. Open the tube ''Dead End Peroni68-mistd tube of
Devil'' be placed on the raster 1 of the tube /Edit/copy- Edit/paste as a new layer
62. Layers- Duplicate/Layers- Merge- Merge Down
63. Layer-Palette: Blend Mode "Normal" With your move tool place it in the right place
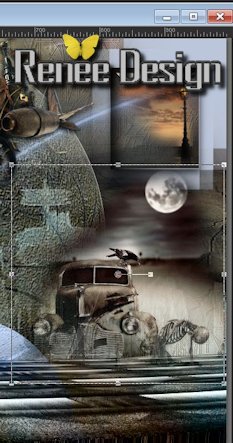
64. Layers- Merge- Merge Visible
65. Adjust- Smart Photo Fix with these settings
66. Image - Add Borders - Symmetric 5 pixels Black
67. Image - Add Borders - Symmetric 55 pixels White
68. With your magic wand select the border of
55 pixels
69. Open the tube ''cadre_renee_voyage_mysterieux''
Edit/copy -Edit/paste into selection
70. Selections-Invert
71. Effects -Filter AAA -Frame Foto frame
72.
Selections- Deselect All
73. Image - Add Borders - Symmetric 5 pixels White
74. Open the ''tube_drapeaux'' Edit/copy -Edit/paste as a new layer and place. Or write your own text

I hope you enjoyed this lesson
Renée
This lesson was written by Renée 2/09/2013
Created the
21 /10 /2013
Any resemblance with an existing lesson is merely a coincidence
*
Don't forget to thank the people who work for us and with us. I named the tubeurs - Testers and the translators.
Thanks Renée
| 
 Translations