|
Let's start the lesson .
The magic world of JHanna
1. Open a new transparent image of 995 x 645 pixels
2.
Selections- Select All
3.
Open the fond ''Jhanna_177_bground'' Edit/copy-Edit paste into selection
4.
Selections-Deselect All
5.
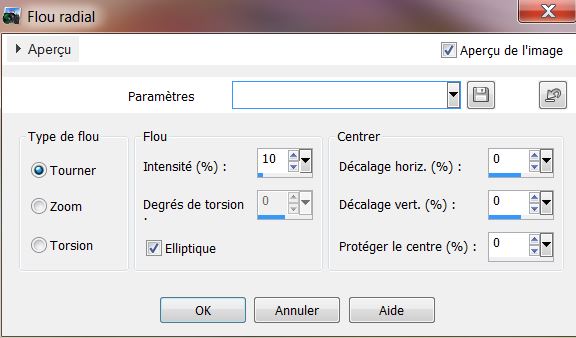
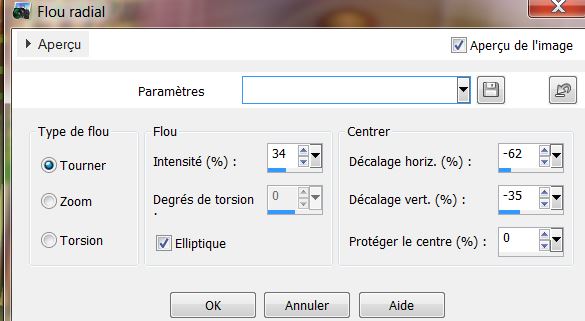
Adjust- Blur-Radial Blur with these settings
6. Layers- New Raster layer
7. Activate Flood Fill Tool and fill the layer with this color #cac979
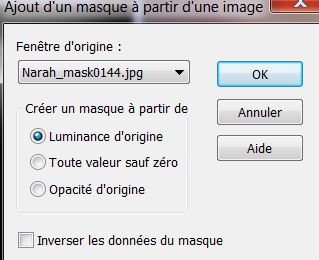
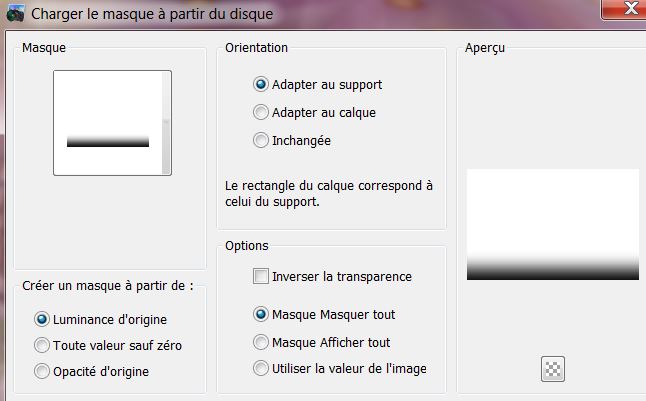
8.
Layers-New Mask Layer From Image and choose Mask: ''Narah_mask0144''
9.
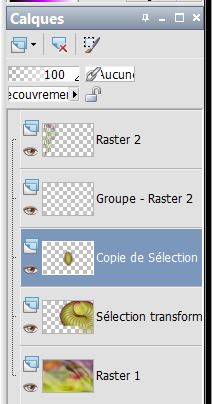
Layers- Merge - Merge Group
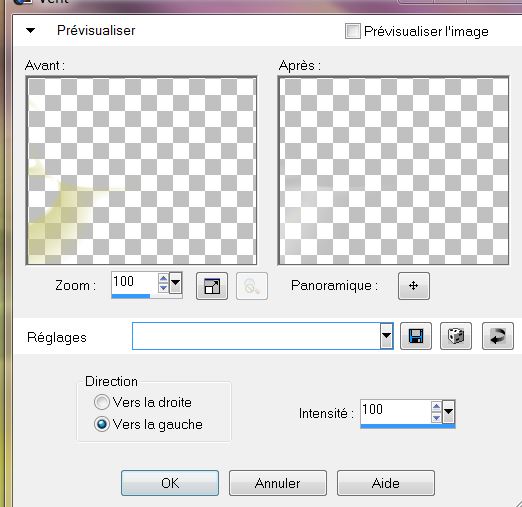
10. Effects- Distortions Effects -Wind from the left 100
11.Layers- Duplicate / Image – Mirror
12.
Layers- Merge- Merge Down
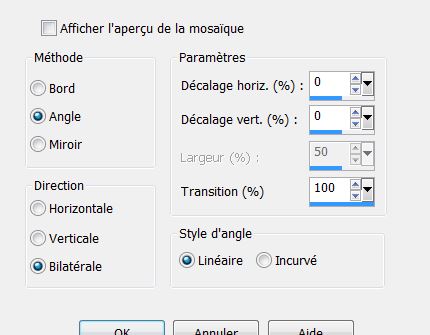
13.
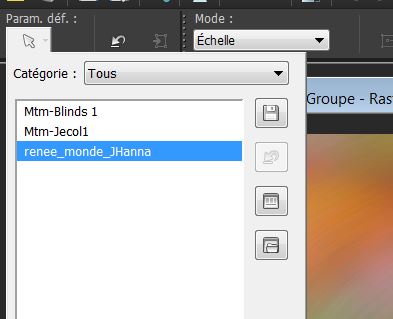
Activate your Pick Tool(K) and choose my preset ''Preset_Pick_renee_monde_JHanna''
-
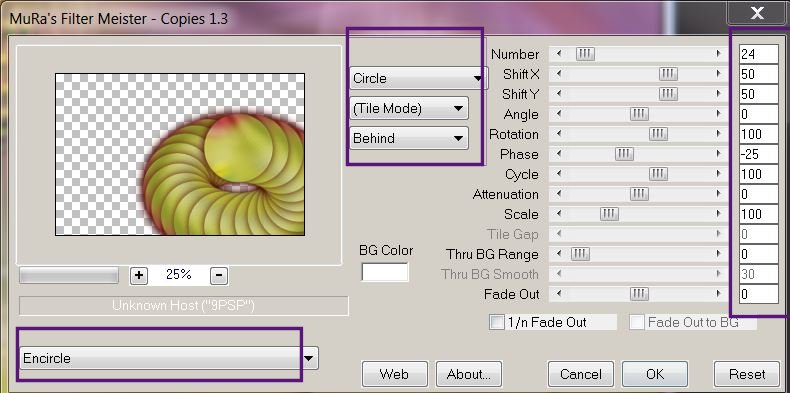
Click on the Preset and OK
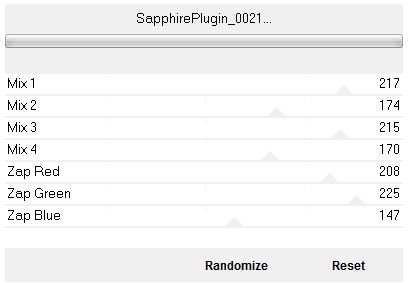
- The result

14. Effects- Image Effects- Seamless Tiling use settings below
15.
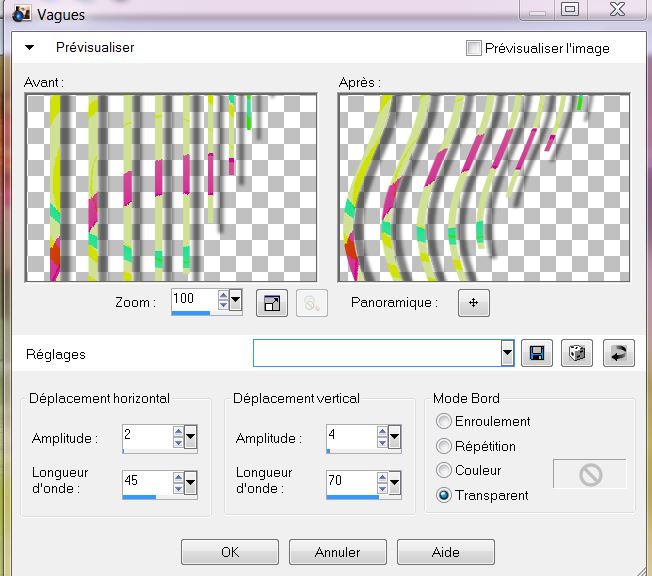
Layers- Duplicate
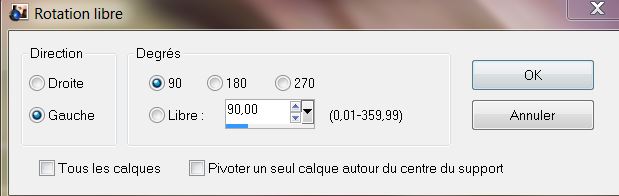
16. Image
- Free Rotate 90° Left
17.
Effects- Image Effects- Seamless Tiling use settings below
18.
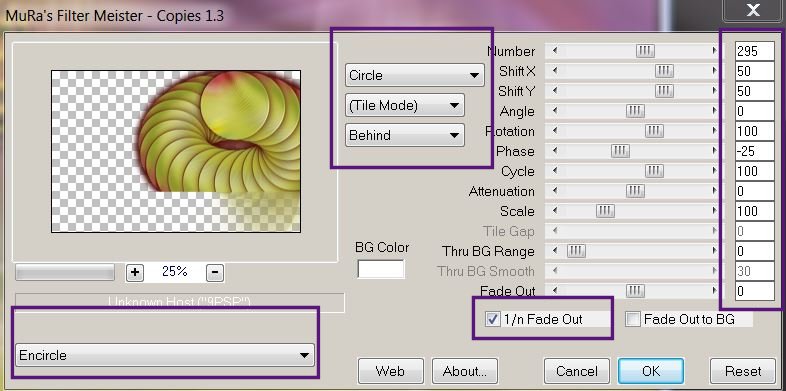
Layers- Merge- Merge Down
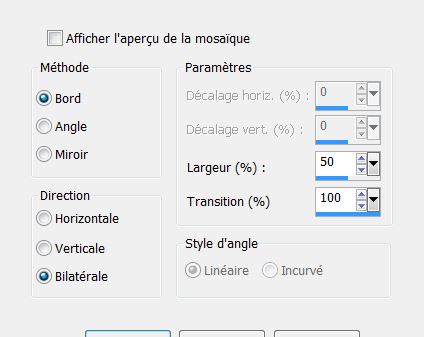
19. Effects- Image Effects- Seamless Tiling use settings below
20. Effects-Edge Effects- Enhance More
21.
Layers- New Raster layer
22.
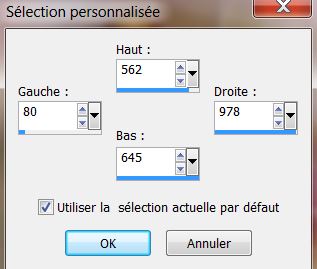
Selection Tool ( S ) Custom selection use settings below

23.
Activate Flood fill tool and fill the selection with this color: #cac979
24.
Selections-Deselect All
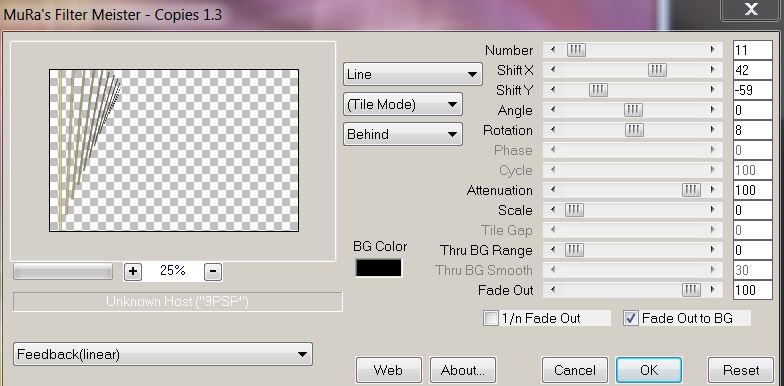
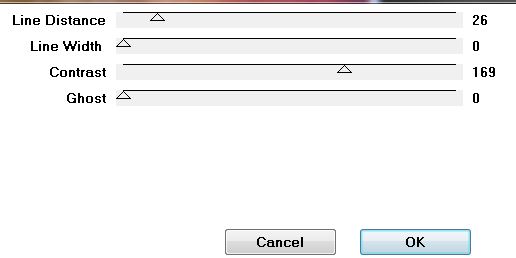
25. Effects- Plugins - Mura's Meister - Copies use settings below
26. Effects- Plugins - Unlimted2.0- Sapphire Filters01-
SapphirePlugin _0021 (The colors may be slightly different that depends on which version you are using )
27.
Layer Palette -Double click on this Layer and set the Blend Mode to " Hard Light " Reduce the opacity of this layer to 79 %
28. Effects - 3D Effects - Drop shadow with these settings:10/10/50/5 color black
29. Effects- Distortions Effects- Wave use settings below
30. Activate the bottom of the Layer-Palette = (raster1)
31.
Selections - load/save selection - load selection from disk and choose my selection:
''le_monde_JHanna_1''
32
Selections- Promote selection to layer
33. Effects- Plugins EyeCandy5- Impact- Perspective shadow -tab Settings/User settings - choose my
preset ''Jhanna_1''
34.
Selections-Deselect All
35. Effects- Plugins - Mura's Meister – Copies use settings below
36.
Layer Palette -Double click on this Layer and set the Blend Mode to "Soft Light " .Reduce the opacity of this layer to 48%
37. Effects- User Defined Filter - - Emboss 3 default settings
38. Effects- Plugins - Mura's Meister – Copies use settings below
39. Layers- Duplicate
40.
Layer Palette -Double click on this Layer and set the Blend Mode to "Hard Light " . Reduce the opacity of this layer to 100%
41. Effects- Plugins - Simple-Top Left Mirror
42.
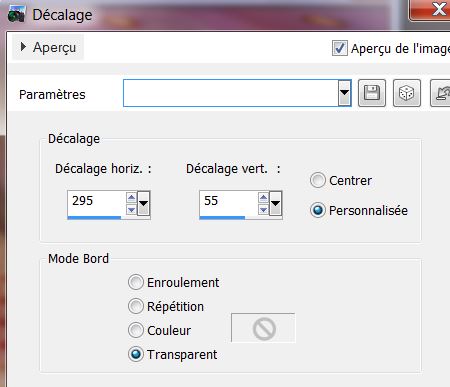
Image Resize 50 % (Resize all the layers not checked)
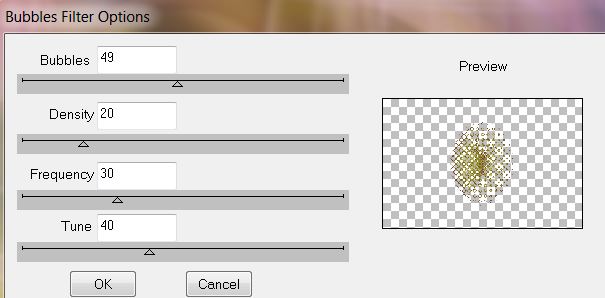
43. Effects- Plugins - DBS Flux – Bubble Filter Options
44. Layer Palette -Double click on this Layer and set the Blend Mode to "Overlay "
- Your work look like this now
45.
Layers- Duplicate
46. Effects- Plugins - Muras's Meister – Perspective Tilling /
color #cac979

47. Activate the top of the Layer-Palette
48.
Layers- New Raster layer
49.
Selection Tool ( S ) Custom selection use settings below
50.
Open the tube ''Jhanna_587_tube'' Edit/copy-Edit paste into selection
- Keep selected
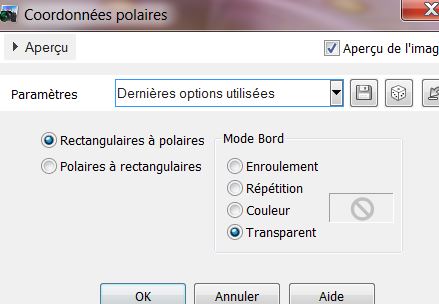
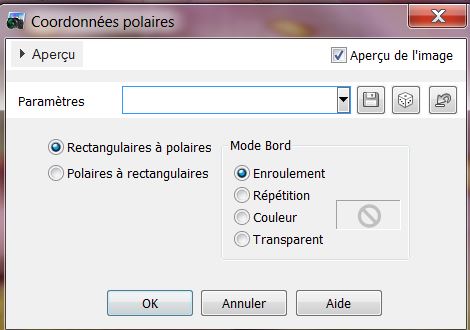
51. Effects- Distortions Effects-Polar Coordinates-Rectangular to Polar
52.
Selections-Deselect All
53.
Effects- User Defined Filter - Emboss 3 default settings
54.
Open the tube ''Jhanna_396-N.Ceccoli'' /Image Resize 75% . Edit/copy-Edit paste as a new layer on your working area and move
55. On this tube layer:
56. Layers- Layers-load/save Maske Load Mask from Disk and select Mask:'' !!!mask.ket-fadesuave''/
57.
Layers- Merge- Merge Group and place
58.
Layers- New Raster layer
59.
Selections - load/save selection - load selection from disk and choose my selection: ''le _monde _
Jhanna _2''
60.
Pot of Paint Opacity 25 %. Activate Flood fill tool and fill the selection with this color: #af0806 -

Pot of Paint Opacity 100%
61.
Selections-Deselect All
62.
Layers- Arrange- Move Down
63. Effects- Distortions Effects-Polar Coordinates-Rectangular to Polar
64.
Activate the top of the Layer-Palette
65.
Layers- New Raster layer
66.
Selections - load/save selection - load selection from disk and choose my selection: le _monde _
Jhanna _3''
Pot of Paint Opacity 100% .
Activate Flood fill tool and fill the selection with this color: #af0806
67.
Selections-Deselect All
68. Adjust- Blur-Radial Blur with these settings
69. Effects- Plugins - Penta Com – VTR2 with these settings
70.
Layer Palette -Double click on this Layer and set the Blend Mode to " Saturation-Legacy "
71. Activate the top of the Layer-Palette
72.
Activate the tube ''Jhanna_118 .tube'' / activate ="tube" – Image Resize 60% .Edit/copy-Edit paste as a new layer on your working area
73. Effects - Images Effects - Offset use settings below
74.
Layers- Arrange- Move Down
75. Layer Palette -Double click on this Layer and set the Blend Mode to "Overlay "
76. On the same tube ''Jhanna_118 .tube'' activate ''fish 3 and 2 '' Edit/copy-Edit paste as a new layer on your working area and move
77.
Open the tube ''Waterdrupples'' select 2 tears. Edit/copy-Edit paste as a new layer on your working area and move
78.
Layers- Merge-Merge Visible
79. Image - Add borders-Symmetric checked: 5 pixels color #cac979
80. Image - Add borders-Symmetric checked: 45 pixels color #c7381f
81.
With the magic wand select the border of 45 pixels
82. Effects- Plugins -EyeCandy 5- Textures- texture noise- Preset -
Subtle Shadows
83.
Selections-Deselect All
84. Image - Add borders-Symmetric checked: 2 pixels color #cac979
85. Open the tube ''titre ''–Edit/copy-Edit paste as a new layer and move . Opacity 61%
Save as JPG
I hope you enjoyed this lesson
This lesson was written by Renée
23/04/2013

|


 Translations