|
Let's start the lesson.
-
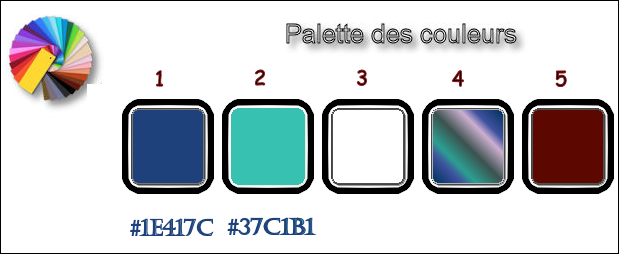
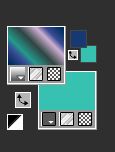
Preparation/ Material Properties: Set your foreground color to #1e417c = Nr1 - Set your background color to # 37c1b1 =Nr 2
-
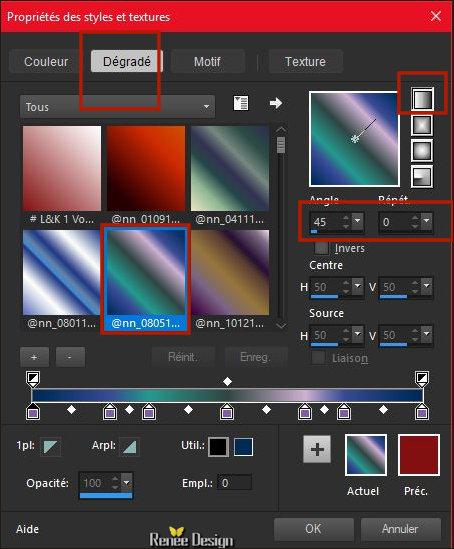
Set your foreground to gradient and select
''@nn_080513_GR_130_tdstudio- Prepare a foreground linear gradient use the settings below
1. File: Open a new transparent image: 1005 x 685 Pixels
2. Activate the Flood Fill Tool  and fill the layer with the gradient
3. Adjust- Blur- Gaussian Blur: Radius 30
4. Adjust-Blur- Radial Blur use the settings below
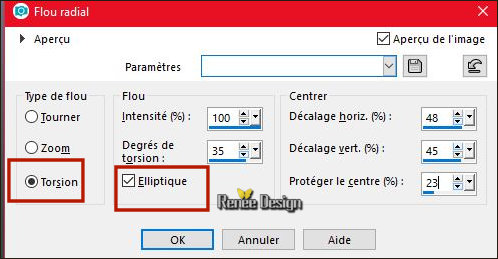
5. Effects- Distortion Effects- Polar Coordinates-Polar to Rectangular
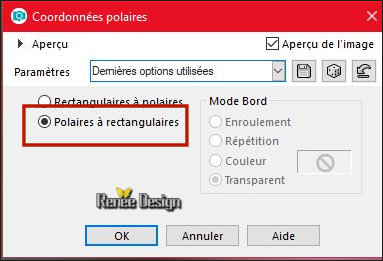
6. Layers- Duplicate
7. Image - Mirror - Mirror Horizontal (Image - Mirror in older versions of PSP)
8. Layers-Properties-Set the Blend Mode to " Overlay "
9. Layers-Merge- Merge Down
10. Effects- Image Effects- Seamless Tiling use the settings below
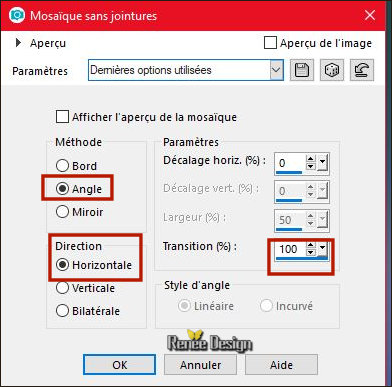
11. Layers- Duplicate
12. Effects -Plugins- Unlimited - Harry's Power Grads Double
Sphere Gradients
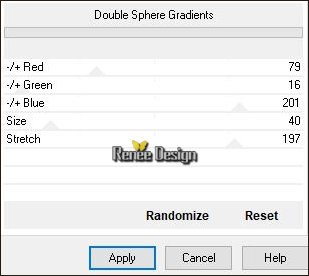
13. Effects - Plugins-Unlimited – Toadies - Weaver
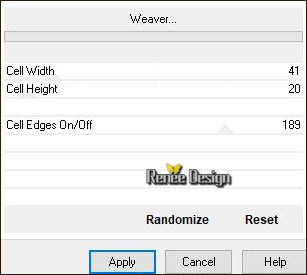
14. Effects-Edge Effects- Enhance
15. Layers-Properties-Set the Blend Mode to " Overlay "
16. Layers-Merge- Merge Down
17. Effects -Plugins -Unlimited - Filter Factory Gallery S -
itsa Edge thing... 24/0
18. Layers- Duplicate
19.
Image - Mirror - Mirror vertical ( Image - Flip in older versions of PSP)
- Image - Mirror - Mirror Horizontal (Image - Mirror in older versions of PSP)
20. Layers-Properties-Set the Blend Mode to " Multiply "
21. Layers-Merge- Merge Down
22. Effects -Plugins - Medhi - Sorting Tiles
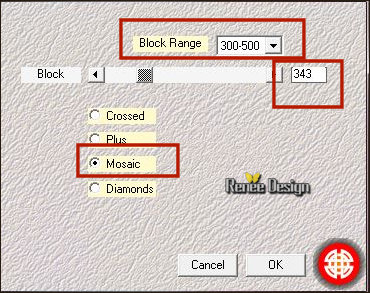
23. Effects -Plugins - Simple - 4 Way average
24. Activate Selection Tool -Custom Selection (S) -Rectangle with these settings
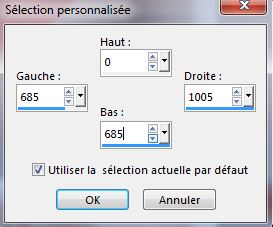
25. Selections-Promote Selection to Layer
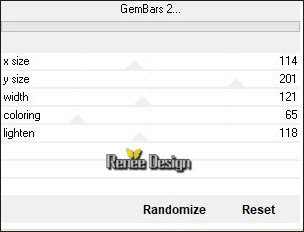
26. Effects –Plugins- Unlimited - Filter Factory Gallery S -GemBars
2..use the settings below .
Keep Selections Active
27. Effects –Plugins – Simple Blintz
28. Image - Mirror - Mirror vertical ( Image - Flip in older versions of PSP)
29. Effects – Plugins – Simple - Blintz
30. Effects -Plugins - Mock - Windo use the settings below
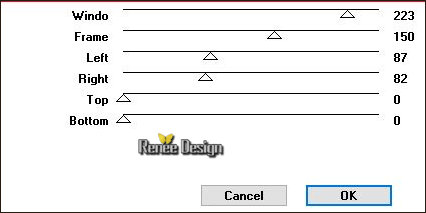
Selections- Deselect All
31. Effects -Plugins - Toadies - What are you 20/20
32. Adjust- Sharpness-Sharpen More
33. Layers- Duplicate
34. Image - Mirror - Mirror Horizontal (Image - Mirror in older versions of PSP)
35. Effects -Plugins - Simple - Center Tile
36. Effects- Distortion Effects- Polar Coordinates-Rectangular to Polar- Transparent
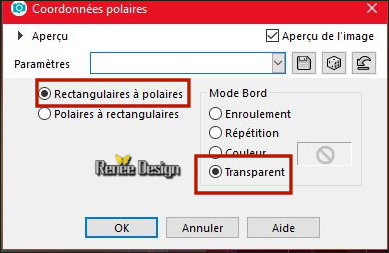
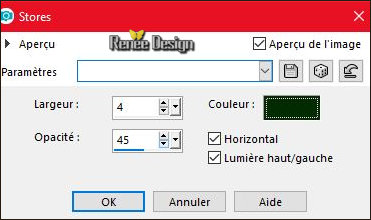
37. Effects -Texture Effects-Blinds use the settings below-Color
#083500
38. Effects -3 D Effects -Drop Shadow with these settings: 10/10/35/12
color black
- Layer-Palette: Activate the layer underneath
39. Effects – Distortion Effects–Wave use the settings below
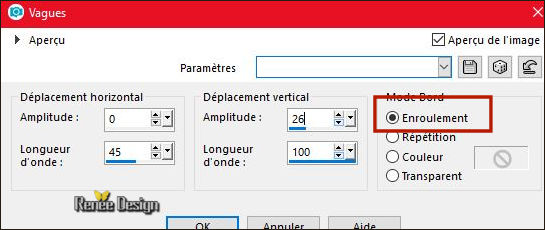
- To replace the top of the layer-palette
40. Layers- New Raster Layer
41. Selections –load/save selection –load selection from disc and select my selection:'' Le
contrôleur_1''
42. Activate the Flood Fill Tool  and fill the selection with #ffffff ( 2 clicks)
Selections- Deselect All
43. Effects –3 D Effects -Drop Shadow with these settings: 1/1/85/1 color black
- Layer Palette – Make Raster 1 active
44. Selections –load/save selection –load selection from disc and select my selection:'' Le
contrôleur_2''
45. Selections-Promote Selection to Layer
46. Layers- Arrange- Bring to Top
47. Effects -Plugins - Eyecandy 5 Impact -
Glass/ Preset ; Clear
Selections- Deselect All
48. Effects- Distortion Effects- Polar Coordinates-Rectangular to Polar- Transparent
49. Image Resize to 60% All Layers not checked
50. Effects- 3 D Effects- Drop Shadow with the same settings
-
Material Properties: Set your foreground color to Nr.5 - Set your background color to #000000
51. Layers- New Raster Layer
52. Selections –load/save selection –load selection from disc and select my selection:'' Le
contrôleur_3''
53. Activate the Flood Fill Tool  and fill the selection with the foreground color
54. Effects -Plugins - L & K's - Mayra
(attention a patched filter )
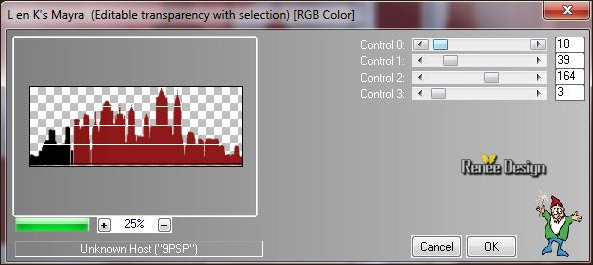
Selections- Deselect All
55. Layers- Arrange- 3 times Down
56. Layers-Properties-Set the Blend Mode to" Overlay "– Decrease the opacity of the layer to 67%
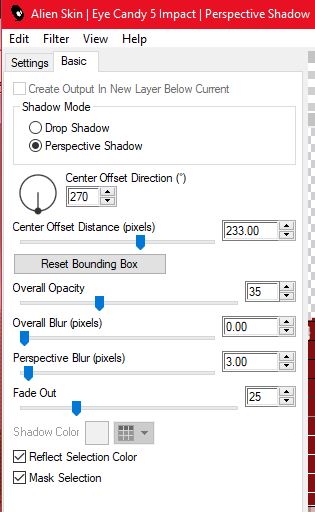
57. Effects - Plugins - EyeCandy 5 Impact -
Perspective shadow-Tab- Settings- User Settings and choose my Preset ‘’contrôle_persective"
Or manual settings as shown in the example below
-
Layer Palette – Make Raster 1 active
58. Layers- Duplicate
59. Effects –Plugins Unlimited -&<Background Designers
IV>-@Smoke: 62/116/217
60. Decrease the opacity of the layer to 59%
-
Your work and Layer Palette look like this now-You should have this result
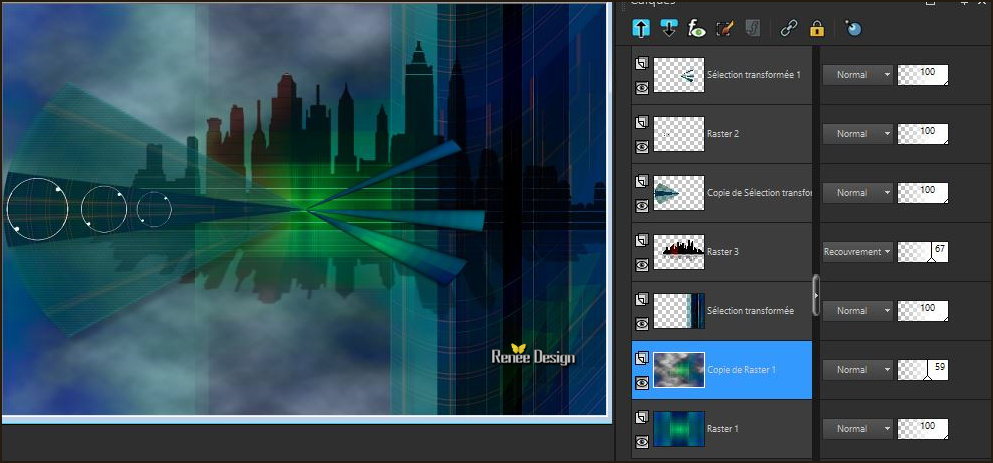
- To replace the top of the layer-palette
61. Layers- New Raster Layer
62. Effects - Plugins - Flaming Pear-
Glitterato- colors
 #cacaca #cacaca  #6b839c
 #fefefe #fefefe  #0013e4
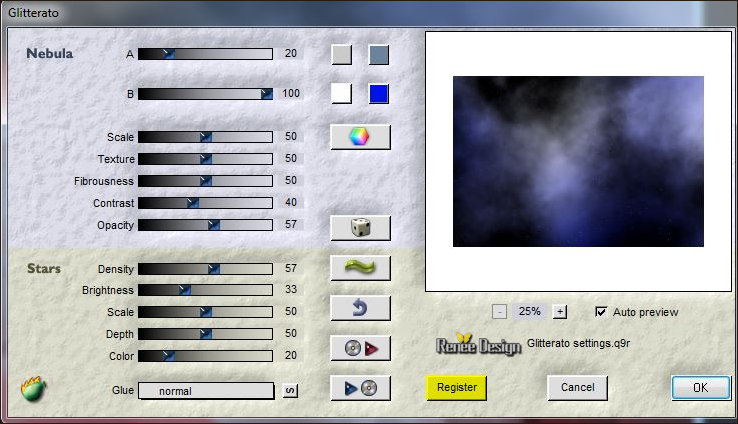
63. Selections –load/save selection –load selection from disc and select my selection:'' Le
contrôleur_4''
Hit the Delete Key of your Keyboard
Selections- Deselect All
64. Layers-Properties-Set the Blend Mode to" Normal "– Decrease the opacity of the layer to
63%
- Properties Foreground:Set your foreground color to #ffffff
65. Layers-New Raster Layer
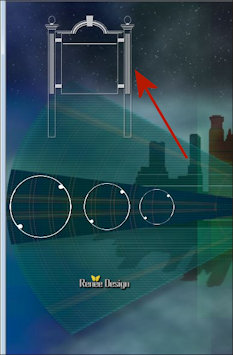
66.
Activate Brush: ‘’ Pinceau contrôle 1 ‘’
Do you have problems with this
-
Open the Image ‘’Pinceau_controle_1.jpg’’ in your psp
- File- Export Custom Brush (Give it a name)
Activate Brush Tool and select my file:‘’ Pinceau contrôle 1 ‘’ use the settings below

67. Stamp your brush in the upper left side by using your foreground color #ffffff
68. Effects –3 D Effects -Drop Shadow with these settings: 1/1/85/1 color black
- Layer Palette – Make Raster 1 active
69. Selections –load/save selection –load selection from disc and select my selection:'' Le
contrôleur_5''
70. Selections- Promote selection to Layer
71. Layers- Arrange- Bring to Top
72. Effects –3 D Effects -Drop Shadow with these settings: 0/12/50/48 color black
Selections- Deselect All
73. Layers- Duplicate
74. Effects – Image Effects -Offset with these settings: H = - 35
and V = 32
75. Layers-Properties-Set the Blend Mode to" Screen "– Decrease the opacity of the layer to 63%
76. Layers-Merge- Merge Down
77. Effects – Distortion Effects- Warp use the settings below
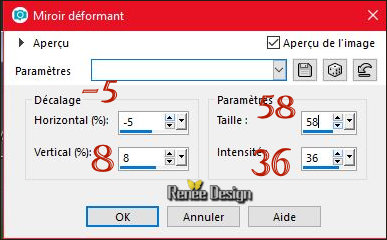
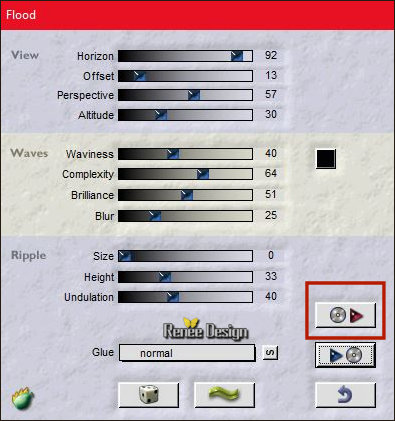
78. Effects –Plugins - Flaming Pear – flood /
preset ‘’ Controle
_Flood settings’’
click on the red arrow  select my file preset
  can be used in any folder of your choice by clicking it. -3 Open it will be ok in your filter. can be used in any folder of your choice by clicking it. -3 Open it will be ok in your filter.
Or manual settings as shown in the example below

79. Activate the tube ‘’controle_Plot’’
-
Edit - Copy- Activate your work -Edit - Paste as a new layer
-Activate your Move Tool (M)
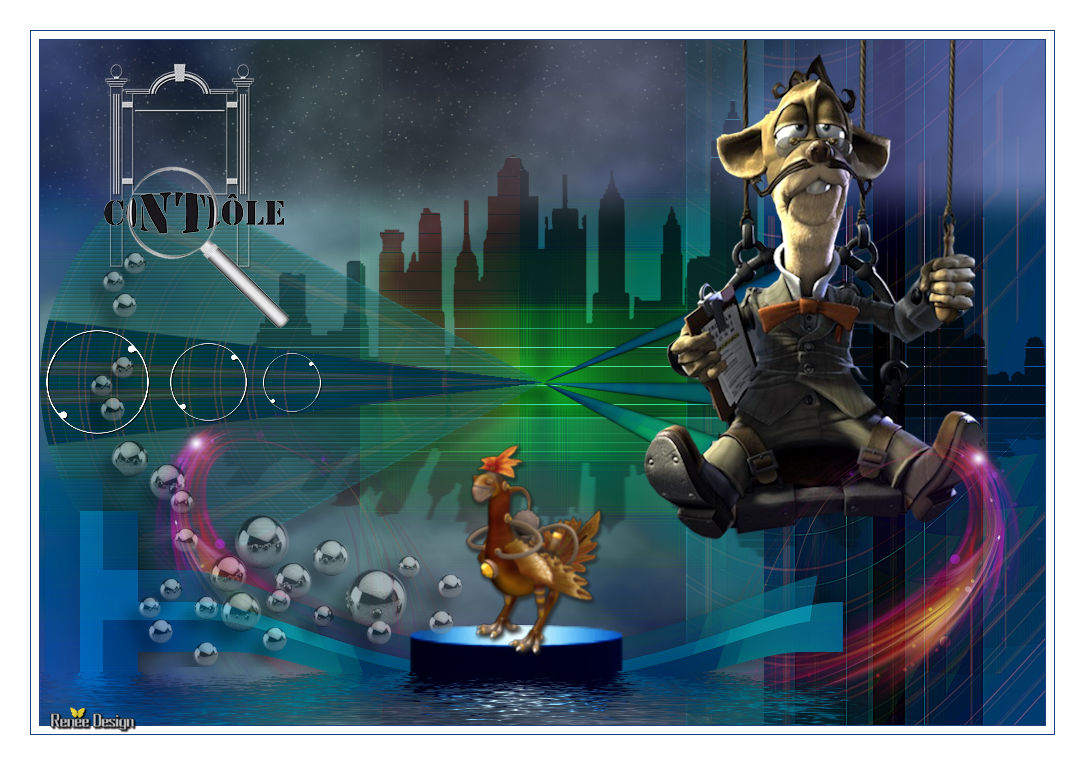
Place the tube in the middle at the bottom ( see finished image)
80. Activate the tube ‘’ loupe’’
-
Edit - Copy- Activate your work -Edit - Paste as a new layer
-
Activate your Move Tool (M) place the tube at the top left
81. Activate the tube ‘’ Controle_coq.png’’
-
Edit - Copy- Activate your work -Edit - Paste as a new layer
- Activate your Move Tool (M) place the tube in the middle at the bottom ( see finished image)
82. Activate the tube ‘’controle_Billes
-
Edit - Copy- Activate your work -Edit - Paste as a new layer
- Activate your Move Tool (M) place the tube at the bottom left ( see finished image)
83. Decrease the opacity of the layer to 46%
84. Activate the tube
‘’Renee_TUBES_Controleur.pspimage’’
85.
Image Resize to 60%
- Edit - Copy- Activate your work -Edit - Paste as a new layer
-
Activate your Move Tool (M) place the tube at the top right ( see finished image)
86. Activate the tube ‘ ‘Controle_effet de
couleur.png’’
- Edit - Copy- Activate your work -Edit - Paste as a new layer
- Activate your Move Tool (M) place it in the right place ( see finished image)
87. Image - Add borders-Symmetric checked 1 Pixel #1e417c = Nr. 1
88. Image - Add borders-Symmetric checked 8 Pixels #ffffff
89. Image - Add borders-Symmetric checked 1 Pixel #1e417c = Nr. 1
90. Image - Add borders-Symmetric checked 30 Pixels #ffffff
Save as JPG
I hope you enjoyed this lesson
Renée
This lesson was written by Renée - March 2018
Edited and Update
2018
*
*
Any resemblance with an existing lesson is a coincidence
* Do not forget to thank the people who work with us and for us I have appointed the tubeurs and translators
Thanks
| 

 Translations




 If a plugin supplied appears with this icon it must necessarily be imported into Unlimited *


 can be used in any folder of your choice by clicking it. -3 Open it will be ok in your filter.