|
Let's start the lesson.
Joie de la nature/Joy of nature
1. Open the BG-Image-
Fond-Joie-Nature – Promote Background Layer =Raster 1
2. Layers- Duplicate
3. Effects –Plugins-
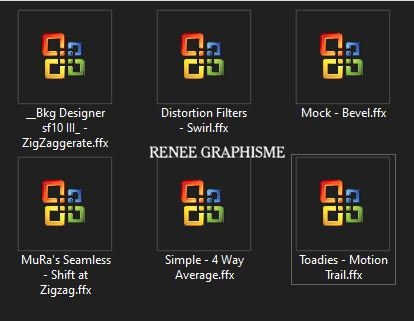
Unlimited 2.0 - &<Bkg Designer sf10 III>-ZigZaggerate at
60/60
4. Adjust -Blur- Gaussian Blur: Radius 45
5. Effects – Plugins- AlphaWorks- Horizontal Fade out at 128
6. Effects –Plugins-
Unlimited 2.0 – Mock – Bevel at 106
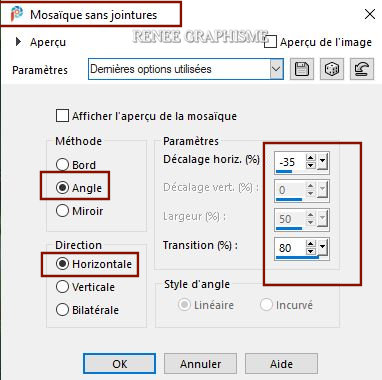
7. Effects – Image Effects- Seamless tiling use the settings below
8. Effects – Edge Effects– Enhance
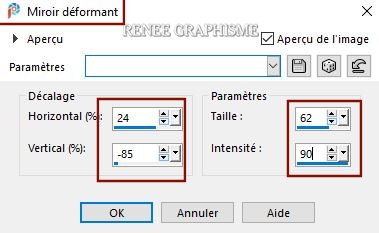
9. Effects -Reflection Effects- Rotating Mirror use the settings below

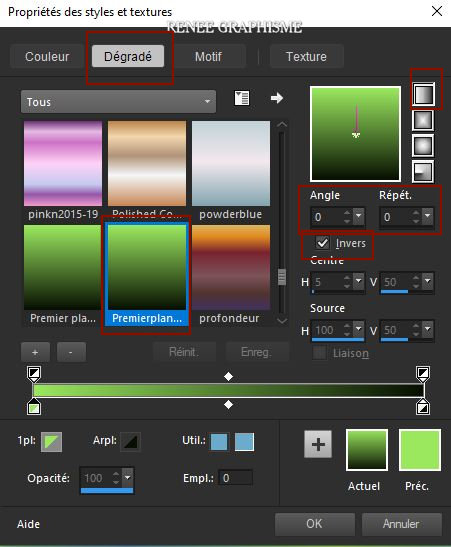
- Layers-Properties- Lower the Opacity to 85 %
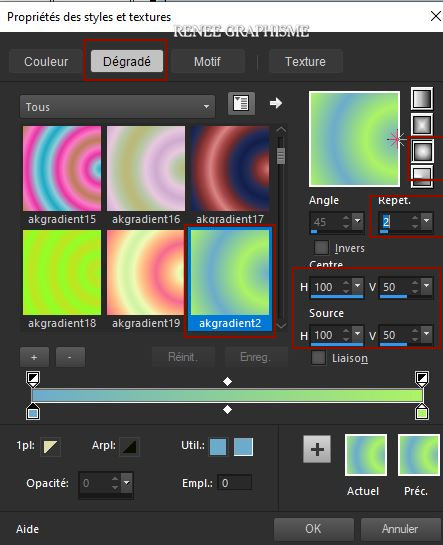
- Color Palette: Set your Foreground to gradient and select ‘’akgradient2’’- -Prepare a foreground sunburst gradient configured like this
10. Layers- New Raster Layer
11. Flood Fill Tool
 –
fill the layer with the gradient –
fill the layer with the gradient
12. Effects –Plugins-
Unlimited 2.0 -Distortion Filters-Swirl at 127
13. Effects –Plugins-
Unlimited 2.0 - MuRa's Seamless- Shift at Zigzag...
2/255/0/128/255/0
14. Effects-
Plugins-Unlimited 2.0- Simple- 4 Way Average
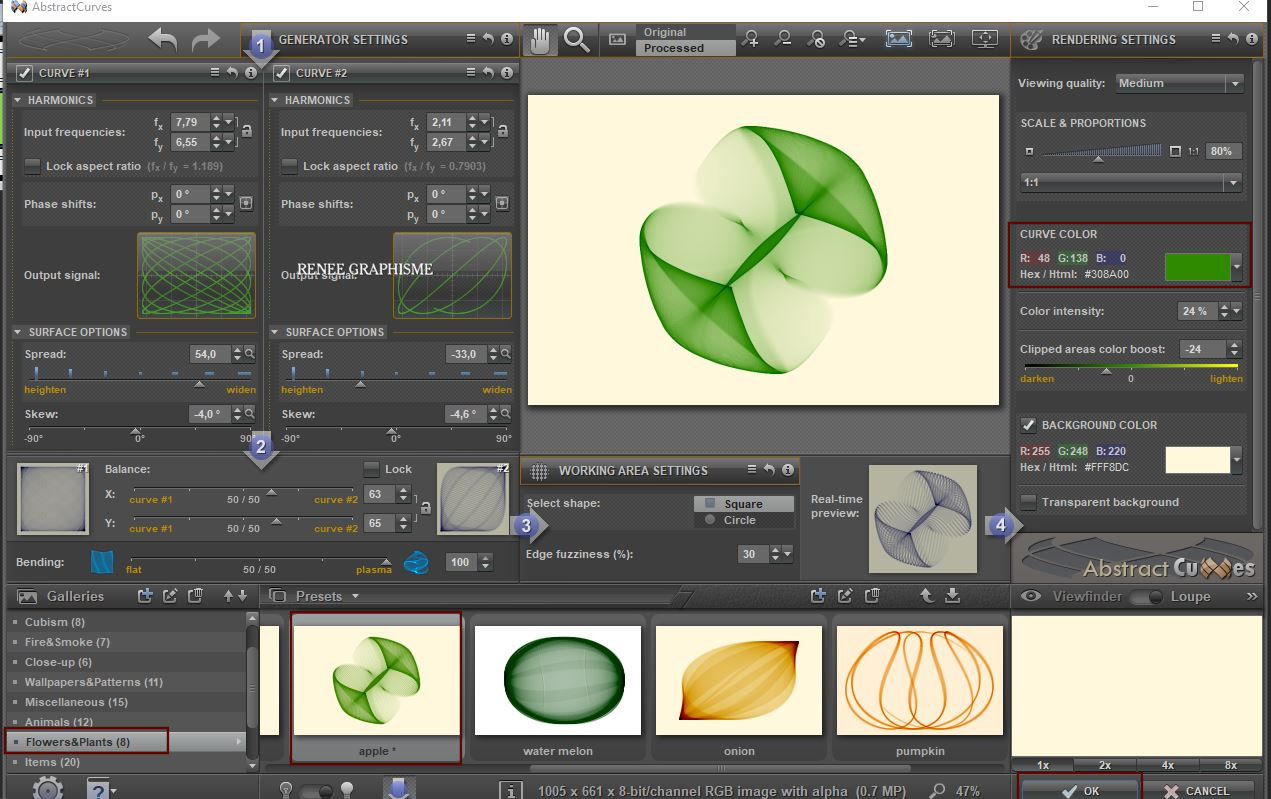
15. Effects – Plugins – Abstrack Curves ( It is very easy)
2). Only.....In the Galleries choose Menu 8 ( Flowers & plants)
choose Apple
and Ok
16.
Selections –load/save selection –load selection from disc and select my selection: ‘’Nature-1’’
DELETE
17. Selections –
Invert
18. Effects – Edge Effects - Erode
Selections- Deselect All
19. Image- Resize to 60 % - Resize all layers unchecked
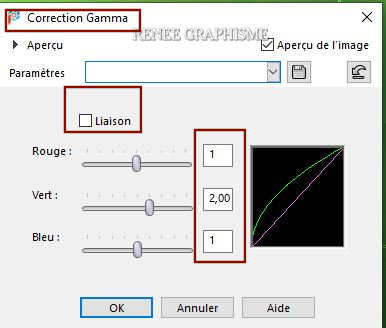
20. Gamma Correction
To open the gamma correction window - type on keyboard Shift+G
21.
Pick Tool: (K) on your keyboard -Enter these parameters
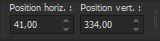 41 / 334
Press ( M ) to close the Pick Tool
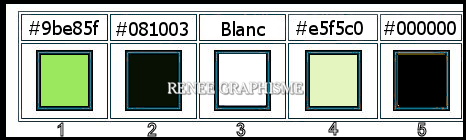
- Material Properties: Set your foreground color to color #9be85f= 1 – Set your background color to color #081003= 2
-
Set your Foregroundcolor to foreground-background linear gradient configured like this
22. Layers- New Raster Layer
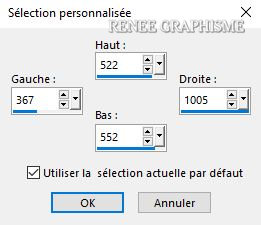
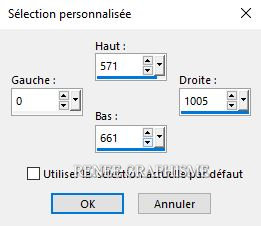
23. Activate Selection Tool -Custom Selection (S) -Rectangle with these settings 
24. Flood Fill Tool
–
fill the selection with the gradient
Selections- Deselect All
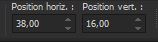
25. Effects-Plugins- Unlimited 2.0 – Toadies - Motion Trail...
using the default settings
26. Layers- Duplicate
27. Image - Mirror - Mirror Horizontal (Image - Mirror in older versions of PSP)
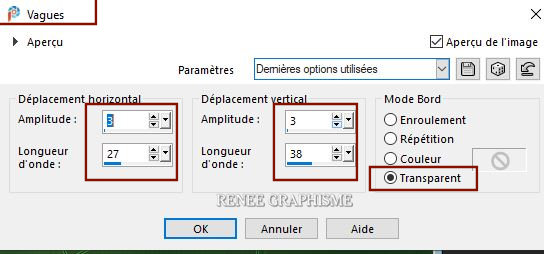
28. Effects- Distortion Effects– Wave use the settings below
29. Image - Mirror - Mirror Horizontal (Image - Mirror in older versions of PSP)
30.Layers-Properties-Change the Blend Mode to " Hard Light "
-Activate the layer underneath (Raster 3)
31. Effects -3D Effects– Drop Shadow with these settings: 35/0/80/50 - Color
#c9eda3
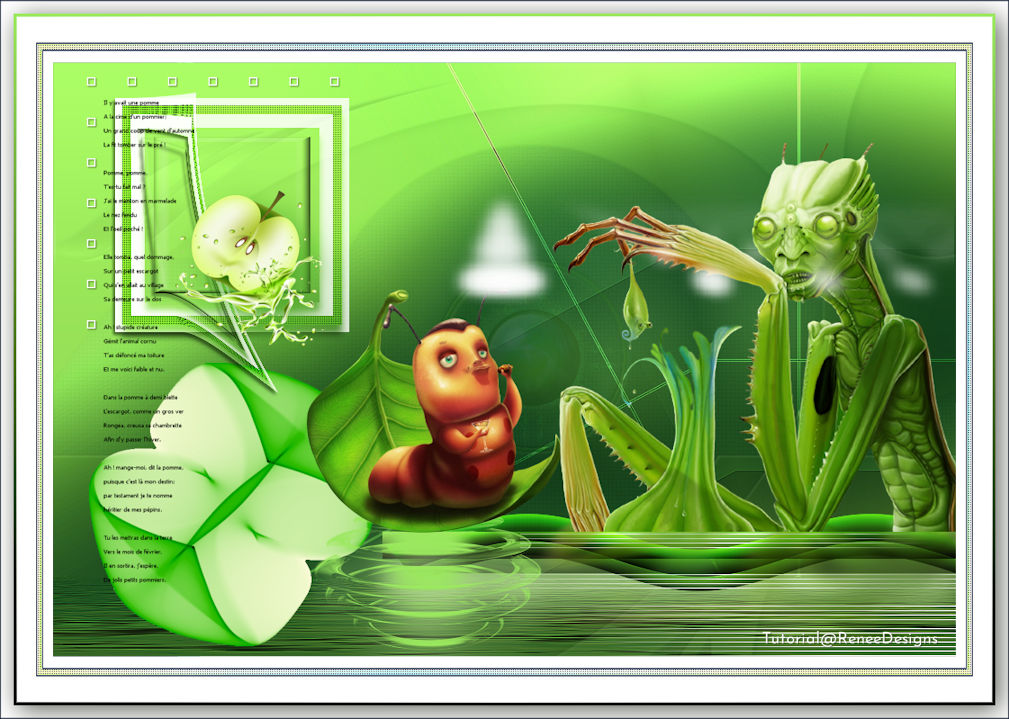
- Your work and Layer Palette look like this now-You should have this result

32. Layer Palette-activate the second layer from the bottom ( Copy of Raster 1 )
33. Activate Selection Tool -Custom Selection (S) -Rectangle with these settings
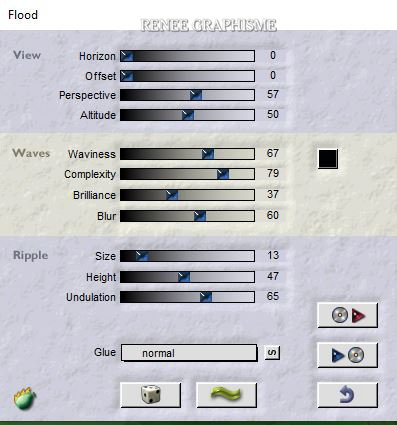
34. Effects- Plugins – Flaming Pear – Flood
use the settings below
35. Effects - Edge Effects – Enhance
Selections- Deselect All
- To replace the top of the layer-palette
36. Layers- New Raster Layer
37. Selections –load/save selection –load selection from disc and select my selection: ‘’Nature-2’’
38. Color Palette- Set your Foreground color to color #9be85f=1
Flood Fill Tool –
fill the selection with the Foreground color #9be85f=1
Selections- Deselect All
39. Effects – 3 D Effects –Drop Shadow with the same settings
40.
Layers- New Raster Layer
41.
Activate Selection Tool -Custom Selection (S) -Rectangle with these settings

42. Color Palette- Set your Foreground color to color #ffffff=3
-Fill Tool
-
fill the selection with the Foreground color #ffffff=3
43. Selections -
Modify– Contract with 8 pixels
DELETE
44. Effects – 3 D Effects –Drop Shadow with these settings: 10 /0 /50 /12 Color Black
45. Color Palette- Set your Foreground color to color #9be85f=1
Flood Fill Tool
-
Opacity at 50% -Fill the selection with the Foreground color #9be85f=1
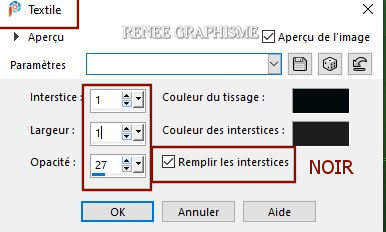
46. Effects – Texture Effects- Weave use the settings below-Color Black
47. Selections - Modify– Contract with 10 Pixels
48. Color Palette- Set your Foreground color to color #ffffff=3
Flood Fill Tool
Opacity at 100 % – fill the selection with the Foreground color #ffffff=3
49. Selections - Modify– Contract with 15 pixels
DELETE
50. Effects – 3 D Effects –Drop Shadow with the same settings
51. Selections - Modify– Contract with 10 Pixels
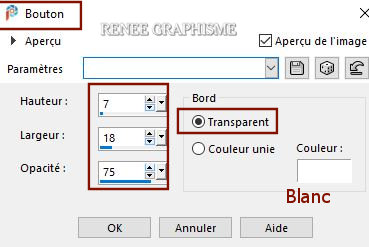
52. Effects – 3 D Effects - Buttonize with these settings
Selections- Deselect All
53. Layers-Properties-Change the Blend Mode to "Hard Light " and Lower the Opacity to 83%
54. Layers- Duplicate
55. Effects-
Distortion Effects- Warp use the settings below
56. Effects-
3 D Effects– Drop Shadow with these settings: 3 / -2 /49 /4 Color Black
57. Open the tube ‘’
Rene_TUBES-Nature-Image –barres’’ -Edit - Copy- Activate your work -Edit - Paste as a new layer
58. Pick Tool: (K) on your keyboard -Enter these parameters
 38 / 16
59. Open the tube ‘’Renee-TUBES_Nature 2.pspimage" -Edit - Copy- Activate your work -Edit - Paste as a new layer
Image Resize 85%
60. Pick Tool: (K) on your keyboard -Enter these parameters
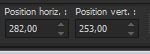 282 / 253
61.
Open the tube Renee-TUBES_Nature
1.pspimage "-Edit - Copy- Activate your work -Edit - Paste as a new layer
-Image Resize 65 %
62. Pick Tool: (K) on your keyboard -Enter these parameters
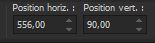 556 / 90
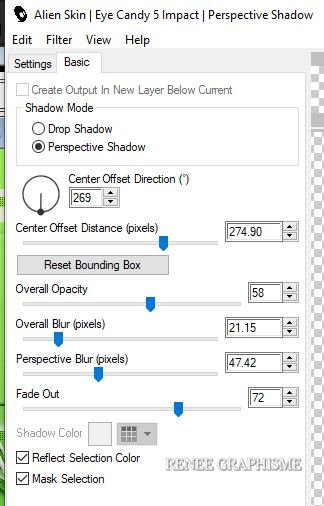
63. Effects – Plugins – AlienSkin Eyecandy 5 – Impact – Perspective
shadow use the settings below
64. Layers- New Raster Layer
65.
Selections –load/save selection –load selection from disc and select my selection: ‘’Nature-3’’
66. Flood Fill Tool
-
fill the selection with the Foreground color #ffffff=3 (2 clicks)
Selections- Deselect All
67. Open the Brush Image ‘’ texte pomme’’ in your PSP
- File- Export Custom Brush -Give it a name
‘’ texte pomme’’
-Color Palette: Set your Foreground color to color Black
Layers- New Raster Layer – Activate the Brush Tool and select my file ‘’ texte pomme’’ use the settings below
Stamp in the top left side by using your foreground color Black( see finished image)

68. Open the tube ‘’ Renee_TUBES--pomme-verte ou
Renee_TUBES--pomme-verte2 " Edit - Copy- Activate your work -Edit - Paste as a new layer
– Place it in the frame ( see finished image)
69. Layers- Merge- Merge Visible
70. Edit - Copy!!
71. Open the tube
‘’Cadre-Joie-nature’’ in your PSP
72. Edit - Paste as a new layer (Image is still in your PSP memory)
73. Image -
Resize to 90 % Resize all layers checked
Save as JPG
I hope you enjoyed this lesson
Renée
This lesson was written by Renée 26-10-2020
Edited and Update
2020
*
Any resemblance with an existing lesson is a coincidence
*
Do not forget to thank the people who work with us and for us I have appointed the tubeurs and translators
Thanks
*
|

 Translations