|
Let's start the lesson
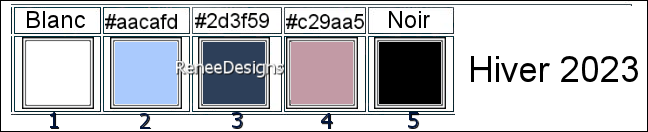
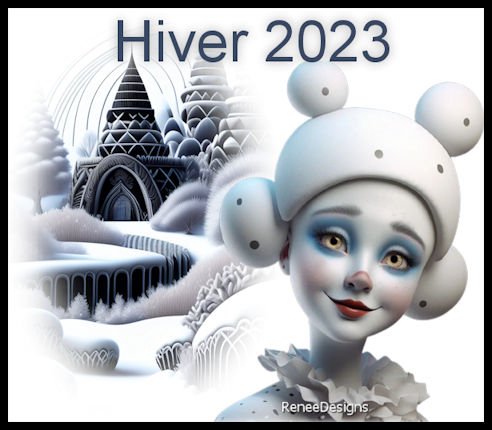
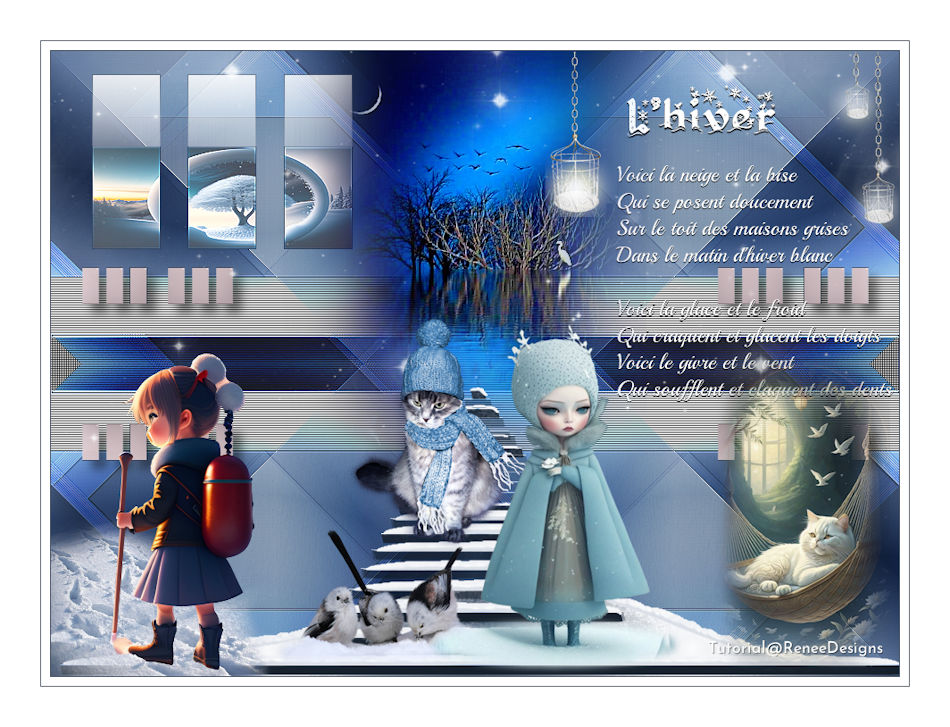
Hiver/Winter 2023
- Preparation
-Material Properties: Set your Foreground color to color #ffffff=color 1 – Set your Background color to color #2d3f59= 3
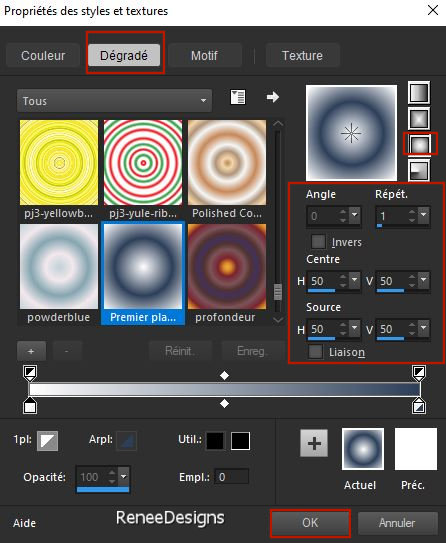
- Properties Foreground- Prepare a Foreground/Background Sunburst Gradient configured like this
1. File: Open a Transparent Image in this size : 950
x 700 Pixels
2. Flood Fill Tool
 –
Fill the layer with the gradient –
Fill the layer with the gradient
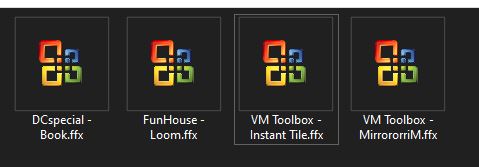
3. Effects - Plugins - Filters in Unlimited 2.0 – DCspecial – Book using the default settings: 0/ 70
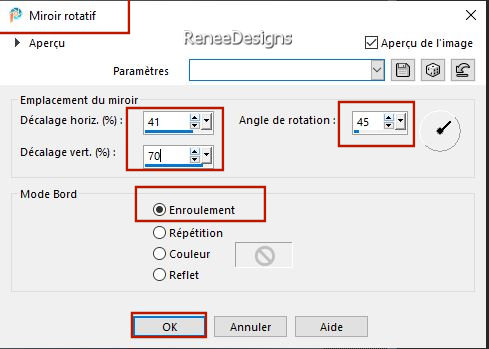
4. Effects – Reflection Effects – Rotating Mirror use the settings below
5. Layers – Duplicate
6. Image - Mirror - Mirror Horizontal (Image - Mirror in older versions of PSP)
7. Image - Mirror - Mirror vertical ( Image - Flip in older versions of PSP)
8. Layers-Properties-Set the Blend Mode to " Overlay"
9. Layers- Merge- Merge Down
10. Effects – Plugins– Simple – Pizza Slice Mirror
11. Effects – Plugins – Simple – 4 Way Average
12. Effects- Edge Effects- Enhance
13. Selections –load/save selection –load selection from disc and select my selection: ‘’Hiver-2023-1’’
14. Layers- New Raster Layer
-Material Properties: Set your Foreground color to color #aacafd=color 2 – Set your Background color to color #ffffff=1
15. Flood Fill Tool
-
Fill the selection with the Foreground color #aacafd=color 2

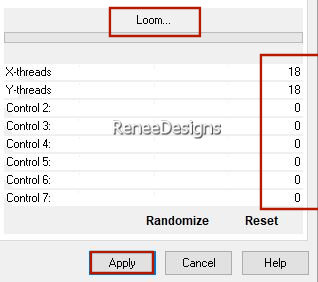
16. Effects - Plugins - Filters in Unlimited 2.0 – Funhouse – Loom use the settings below
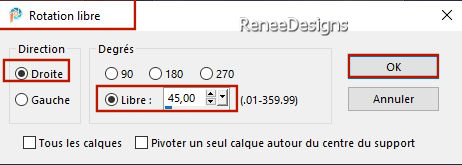
17. Image – Free Rotate - Direction Right-Degrees 45
18. Selections –load/save selection –load selection from disc and select my selection: ‘’Hiver-2023-2’’

Do not add a new layer
19. Flood Fill Tool –
Opacity
50
– Fill the selection with the Background color #ffffff=1
20. Effects- 3D- Effects- Drop Shadow with these settings: 10/10/45/45 Color #aacafd= 2
21. Effects - Image Effects
- Seamless Tiling use the settings below
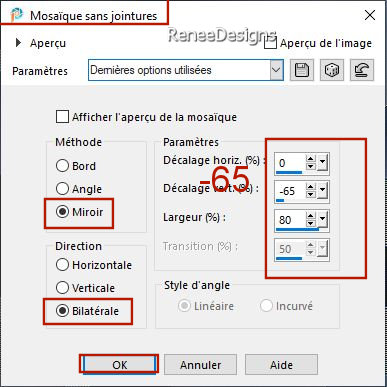
22. Effects - Image Effects - Seamless Tiling use the settings below
23. Layers-Properties-Set the Blend Mode to " Overlay" – Reduce the Opacity of this layer to 75%
24. Effects- Edge Effects- Enhance More
25. Effects- 3D- Effects- Drop Shadow with these settings: 10/10/45/45 Color Black
-Material Properties: Set your Foreground color to color #2d3f59=color 3 – Background colour remains at #ffffff=1
26. Layers- New Raster Layer
27. Selections –load/save selection –load selection from disc and select my selection: ‘’Hiver-2023-3’’
28. Flood Fill Tool
-
Opacity 100 %
-Fill the selection with the Foreground color #2d3f59=color 3
29. Selections - Modify -
Contract- 1 Pixel
30. Flood Fill Tool
–Fill the selection with the Background color #ffffff=1
31. Effects - Plugins - Filters in Unlimited 2.0 - VM Toolbox –
MirrororriM with these settings: 60/0/255/255
32. Layers – Duplicate
33. Image - Mirror - Mirror Horizontal (Image - Mirror in older versions of PSP)
34. Image - Mirror - Mirror vertical ( Image - Flip in older versions of PSP)
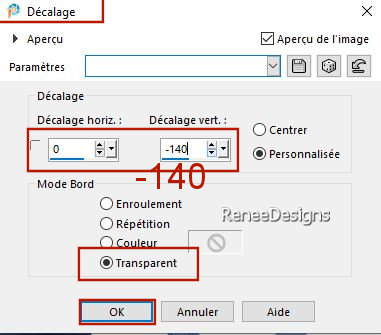
35. Effects – Image Effects
–Offset with these settings
36. Effects –Plugins– Simple – Zoom Out and Flip
- Layer Palette-activate Raster 3
37. Selections –load/save selection –load selection from disc and select my selection: ‘’Hiver-2023-4’’
38. Layers- New Raster Layer
39. Activate a landscape image of your choice /Renée chose this image ‘’Hiver-2023-Paysage 1.jpg’’ -
Edit - Copy- Activate your work -Edit - Paste Into Selection
40. Layers-Properties-Reduce the Opacity of this layer to 71%
41. Effects – Edge Effects –Enhance
Activate the top of the Layer Palette (Copy of Raster 3)
42. Effects - Plugins - Filters in Unlimited 2.0 -VM Toolbox - Instant
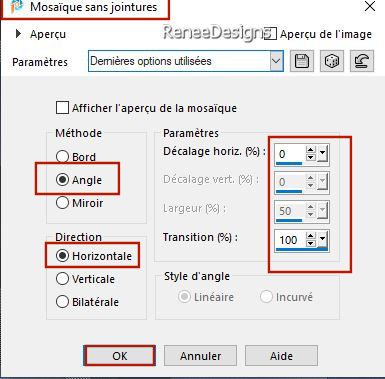
Tile..with these settings: 224/116
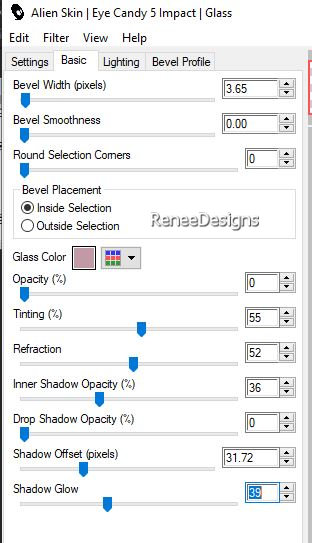
43. Effects - Plugins - Alien Skin EyeCandy 5 - Impact - Glass-Tab- Settings- User Settings and select my file–Preset
‘’ Hiver-2023- Glass ‘’
Or put the settings in manually
44. Effects–3D- Effects- Drop Shadow with these settings: 10/10/45/15 Color Black
45. Open the Tube ‘’Hiver-2023-texte’’ - Edit - Copy- Activate your work -Edit - Paste as new layer
- Pick Tool: (K) on your keyboard -Enter these parameters on the toolbar
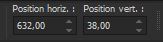 632
/ 38 632
/ 38
46. Open the Tube ‘’ ’Hiver-2023-paysage 2’’ -Edit - Copy- Activate your work -Edit - Paste as new layer
47. Pick Tool: (K) on your keyboard -Enter these parameters on the toolbar
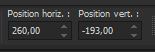 260 /
-193
260 /
-193
Press ( M ) to close the Pick Tool
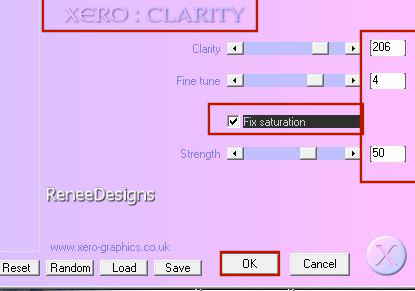
48. Effects – Plugins– Xero – Clarity use the settings below
49. Effects – Plugins – FM Tile Tools – Saturation Emboss using the default settings
50. Layers- New Raster Layer
51. Flood Fill Tool
– Fill the layer with the Background color #ffffff=1
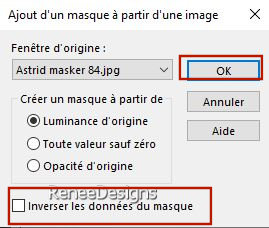
52. Layers-New Mask Layer- From Image and select Mask ‘’Astrid masker
84.jpg’’
- Layers – Duplicate
-Layers- Merge- Merge Group
53. Selections –load/save selection –load selection from disc and select my selection: ‘’Hiver-2023-5’’
- Properties Foreground- Prepare a Foreground/Background Sunburst Gradient configured like this
54. Layers- New Raster Layer
55. Selections –load/save selection –load selection from disc and select my selection: ‘’Hiver-2023-6’’
56. Flood Fill Tool
–
Fill the selection with the gradient
57. Effects - Plugins- Alien Skin EyeCandy 5 – Nature – Snow Drift -Tab- Settings- User Settings and select my file -Preset
– ‘’Hiver-2023-Snow Drift’’
- Foreground keep the gradient
- View-Ruler on (CTRL+ ALT+ R )!!
58. Aktivate your Pen Tool with these settings

- Put the pen at 670 pixels –Hold Shift key and draw a straight line to the right

- Convert Vector Layer to Raster Layer
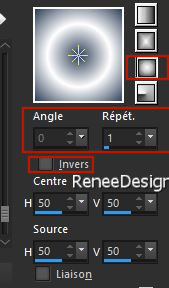
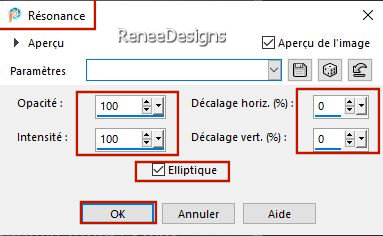
59. Effects – Reflection Effects – Feedback use the settings below
60. Effects – Edge Effects - Enhance
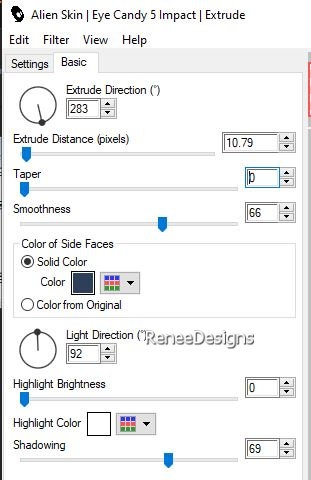
61. Effects - Plugins - Alien Skin EyeCandy 5 – Impact- Extrude use the settings below -Color #2d3f59= 3
62. Effects - Plugins - Alien Skin EyeCandy 5 – Nature – Snow Drift use the settings below

63. Objects – Align – Bottom
64. Open the Tube ‘’ Emeto-
DC9.pspimage’’
- Select 2 Tubes to taste and paste as a new layer on your work and put in the right place
65. Open the Tube ‘’ Hiver-2023-Fillette’’ -Edit - Copy- Activate your work -Edit - Paste as new layer
- Place at bottom left
66. Now for the embellishment of our work.
Open Renée's tubes or a tube of your own choice and paste as a new layer on your work
(Renée attached many different tubes in separate folders)
- Resize if necessary
- Everything in place ?
67.Image - Add Borders-Symmetric checked: 1 Pixel -Color #2d3f59=3
-Image - Add Borders-Symmetric checked: 10 Pixels -Color #ffffff=1
-Image - Add Borders-Symmetric checked: 1 Pixel -Color #2d3f59=3
-Image - Add Borders-Symmetric checked: 45 Pixels -Color #ffffff=1
68. Image - Resize - 950 Pixels width-Resize all Layers checked
- Paste the author's watermark on your work and your own watermark
-
Layers- Merge- Merge All (flatten)
Save as JPG

I hope you enjoyed this lesson
Renée
This lesson was written by Renée 30/07/2023
Edited and Update
in 2023
*
*
Any resemblance with an existing lesson is a coincidence * Do not forget to thank the people who work with us and for us
-I have appointed the tubeurs and translators
Thanks
|
 Translations