|
Let's start the lesson
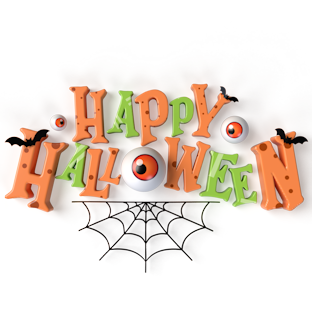
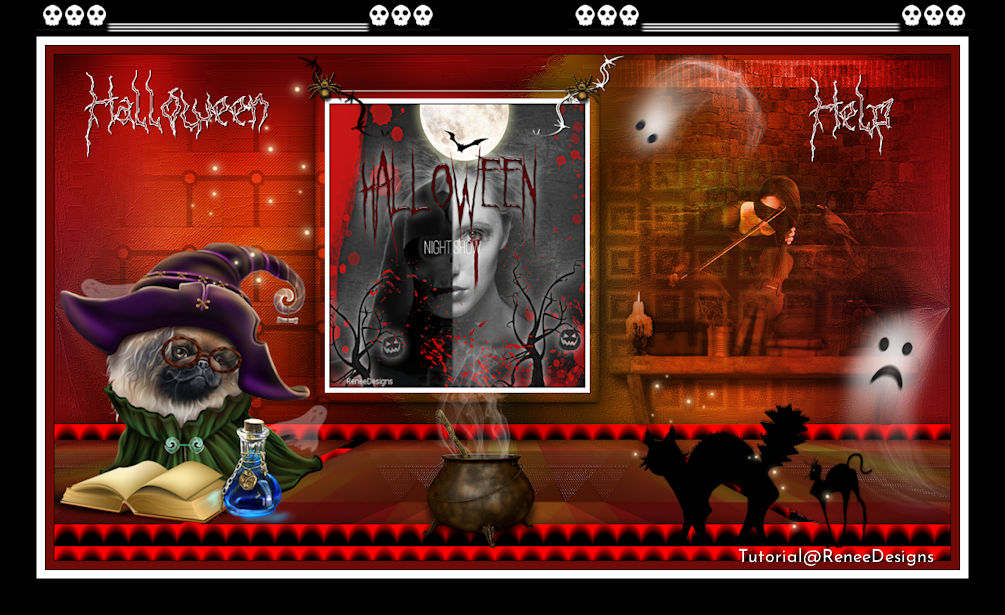
Help-Halloween-2022
- Preparation
-Material Properties: Set your foreground color to color #ffffff=color 1 – Set your background color to color #6f0b07=color 2

1. Open the Background Image
‘’Fond-Help-Halloween-2022’’- Promote Background Layer =Raster 1
2. Effects - Plugins– Simple – Pizza Slice Mirror
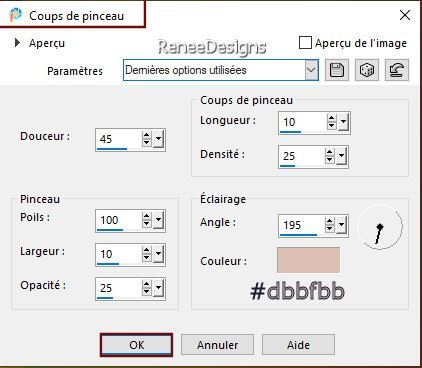
3. Effects – Art Media Effects–
Brush Strokes use the settings below
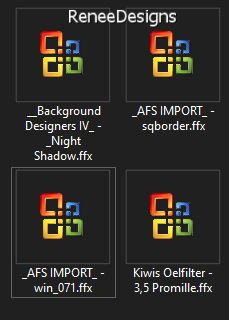
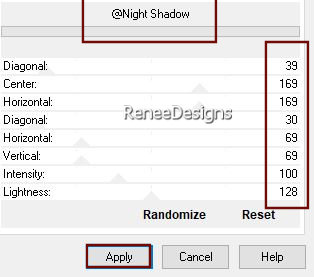
4. Effects - Plugins - Filters in Unlimited 2.0 - &<Background
Designers IV>-@Night Shadow use the settings below
5. Layers - Duplicate
6. Effects -Plugins - Filters in Unlimited 2.0 - Kiwis Oelfilter - 3,5
Promille - using the default settings
7. Layers-Properties-Change the Blend Mode to " Soft Light " – Reduce the Opacity of this layer to 77%
- Activate Raster 1 in the layer palette
8.Layers- Duplicate (Rename Copy of Raster 1-bis)
9. Layers- Arrange- Bring to Top
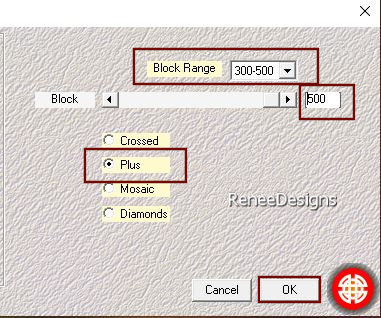
10. Effects – Plugins – Medhi – Sorting Tiles use the settings below
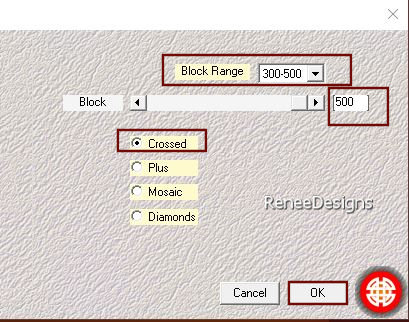
11. Effects – Plugins – Medhi – Sorting Tiles use the settings below
12. Selections –load/save selection –load selection from disc and select my selection: ‘’ Help-Halloween-2022-1’’
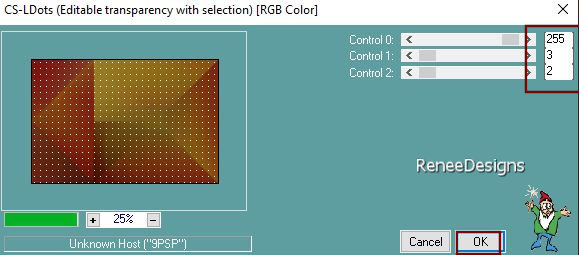
13. Effects – Plugins – Carolaine &Sensibilty- CS-LDots use the settings below
DO NOT DESELECT
14. Effects- Image Effects -Seamless Tiling with these settings
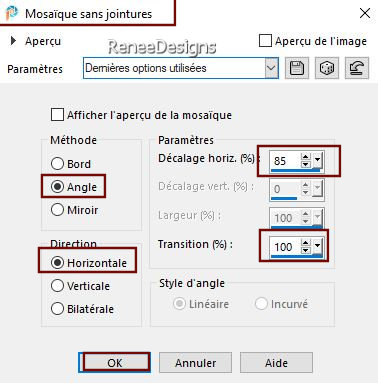

- Repeat - Effects- Image Effects -Seamless Tiling with the same settings
15. Image - Resize to 85% - Resize all layers Not checked
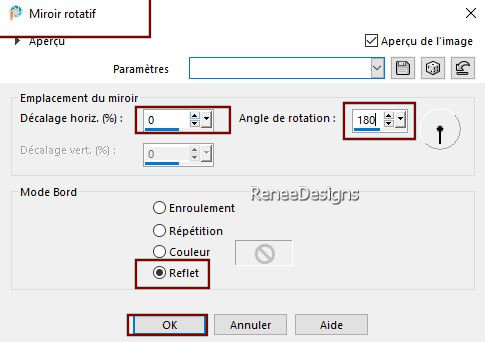
16. Effects – Reflection Effects - Rotating Mirror use the settings below
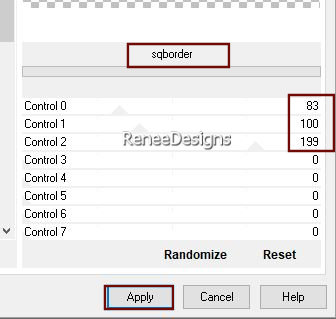
17. Effects – Plugins – Unlimited 2.0 - [AFS IMPORT]- sqborder use the settings below
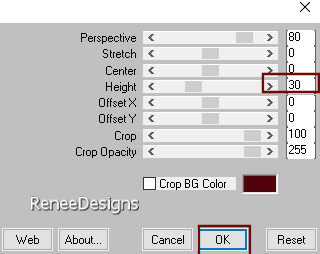
18. Effects – Plugins – Mura’s Meister – Perspective Tiling use the settings below
19. Selections –load/save selection –load selection from disc and select my selection: ‘’ Help-Halloween-2022-2’’
20. Selection- Promote selection to layer
21. Effects – Plugins – Unlimited 2.0 - [AFS IMPORT]- win_071 using the default settings
22. Effects- 3D Effects- Drop Shadow with these settings: 0/0/65/24 Color black
-Activate the layer below (Copy of Raster 1 bis)
23. Selections –load/save selection –load selection from disc and select my selection: ‘’ Help-Halloween-2022-3’’
  5
times 5
times
-Activate the second layer from the bottom ( Copy of Raster 1)
24. Effects – Plugins – Flaming Pear – Ornament
- Repeat this filter a second time
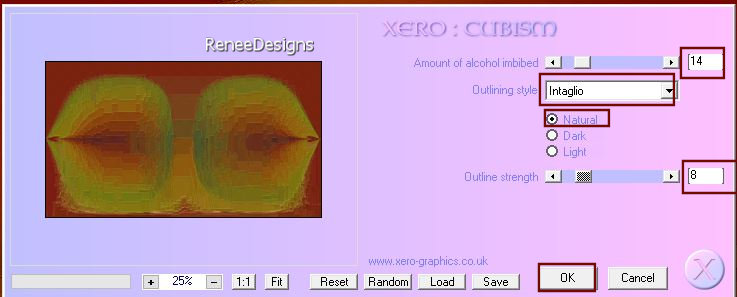
25. Effects – Plugins – Xero – Cubism use the settings below
26. Effects – Edge Effects – Enhance
-To replace the top of the layer-palette
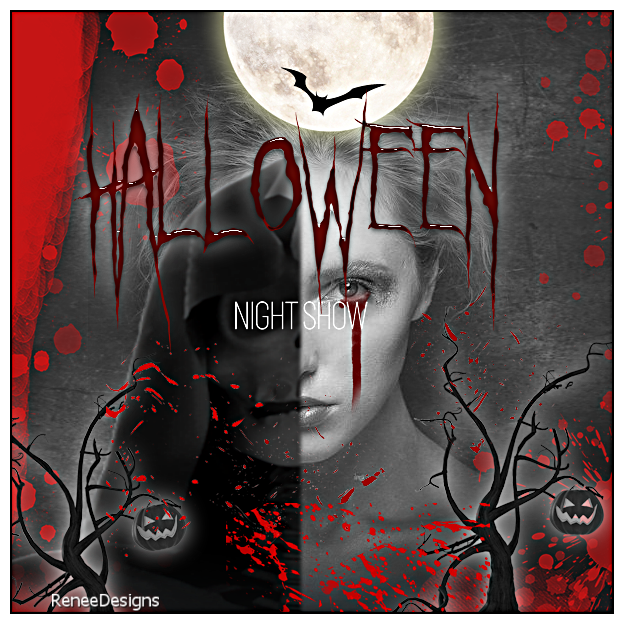
27. Open the Tube ‘’Help-Halloween-2022-Image1’’ -Edit - Copy- Activate your work -Edit - Paste as a new layer
28. Pick Tool: (K) on your keyboard -Enter these parameters on the toolbar
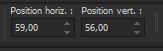 59/56 59/56
Press ( M ) to close the Pick Tool
29. Effects – Plugins- Xero – Clarity using the default settings
30. Open the Tube ‘’ A.Devil-tube’’ -Edit - Copy- Activate your work -Edit - Paste as a new layer
31. Pick Tool: (K) on your keyboard -Enter these parameters on the toolbar
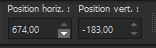 674/
-183 674/
-183
32. Layers-Properties-Change the Blend Mode to " Luminance" – Reduce the Opacity of this layer to 85%
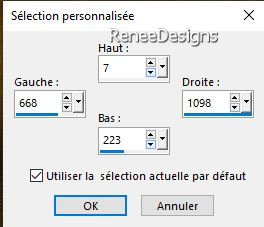
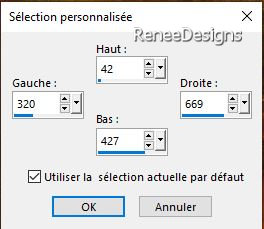
33. Activate Selection Tool -Custom Selection (S) with these settings
(stay on the tube layer)
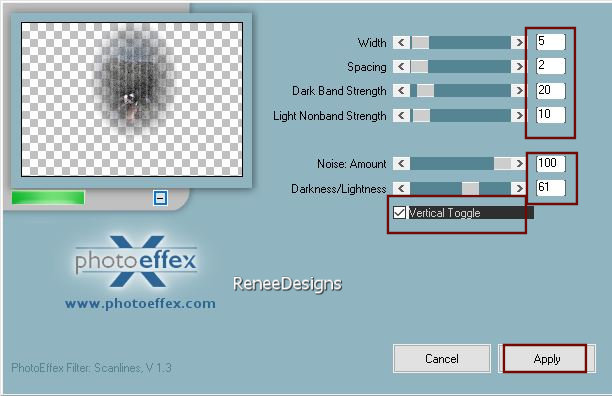
34. Effects – Plugins – Photo Effex – Scanlines use the settings below
35. Activate the Tube ’’
Halloween-2022-Image 2’’(three layers with ghosts)
36. Open the first tube with a ghost-(images of ghosts to your taste)- Edit - Copy- Activate your work -Edit - Paste as a new layer.
Move the tube to its place and repeat with the other ghosts (see finished image).
Put the image aside for now, we will need it later
- Activate the folder
‘’Affiche’’
37. Open the image ‘’
Affiche-Halloween2022’’ we will work on it
- Activate Raster 2
(the Tube)
38. Effects-3D Effects– Drop Shadow with these settings: 0/0/75/32 Color black
39.Open the Tube ‘’femme-Halloween’’ or a tube of your choice -Edit - Copy- Activate your work -Edit - Paste as a new layer
( do not move it is in the right place)
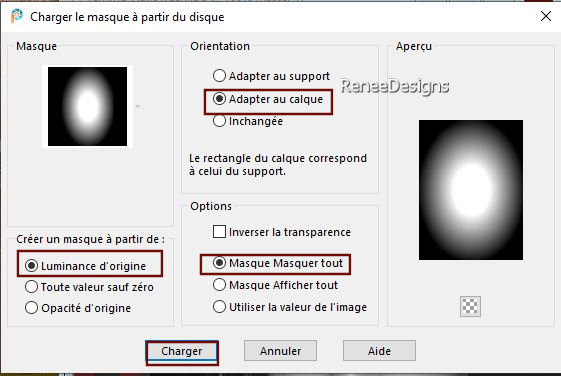
40. Layers- load/save mask-Load mask from disk and select mask ’’20/20’' with these settings
- Layers-Merge- Merge Group
41. Open the Tube ’’Affiche-Demi-Visage’’ -Edit - Copy- Activate your work -Edit - Paste as a new layer
- Renée chose this location: Pick Tool: (K) on your keyboard -Enter these parameters on the toolbar
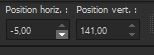 -5
/ 141 -5
/ 141
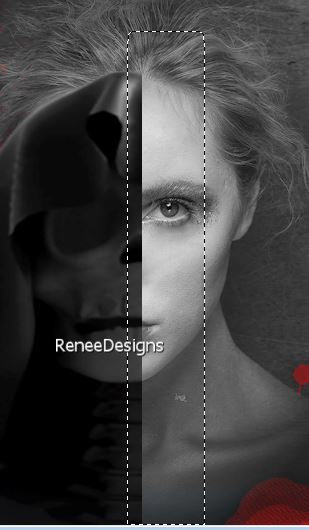
42. Activate –
Selection Tool (S) – Rectangle – Feather 5
-Draw a selection as shown on the screen below

43. Open the Tube ’’ Affiche-arbres’’ -Edit - Copy- Activate your work -Edit - Paste as a new layer - Place at the bottom of the work
44. Effects-3D Effects– Drop Shadow with these settings: 0/0/75/32 Color white
45. Open the Tube ‘’Affiche-Lune’’ -Edit - Copy- Activate your work -Edit - Paste as a new layer
-Place above the head of the woman
46. Layers- New Raster Layer
47. Selections –load/save selection –load selection from disc and select my selection: ‘’Help-Halloween-2022-4’’
48. Activate Flood Fill Tool
 –
Fill the selection with the background color #6f0b07=color 2 –
Fill the selection with the background color #6f0b07=color 2
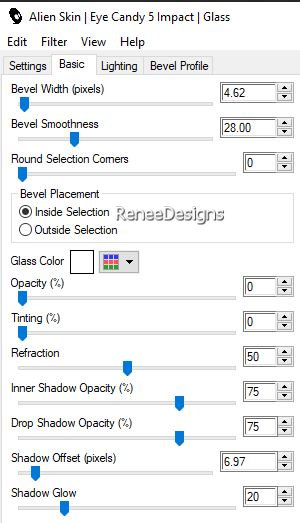
49. Effects - Plugins - Alien Skin EyeCandy 5 - Impact – Glass use the settings below
50. Effects-3D Effects– Drop Shadow with these settings: 0/0/75/32 Color white
51. Layers-New Raster Layer
52. Selections –load/save selection –load selection from disc and select my selection: ‘’Help-Halloween-2022-5’’
53. Activate Flood Fill Tool
–Fill the selection with the foreground color #ffffff=1
54. Layers-New Raster Layer
55. Selections –load/save selection –load selection from disc and select my selection: ‘’Help-Halloween-2022-6’’
56. Activate Flood Fill Tool
–Fill the selection with the foreground color #ffffff=1
(2 clicks)
57. Open the Tube ‘’ Affiche-sang’’ --Edit - Copy- Activate your work -Edit - Paste as a new layer
Move the tube in the right place (drop of blood under the eye)
58. Layers- Arrange- Move Down
Everything is in place?
59. Image - Add borders-Symmetric checked: 2 Pixels -Color black
60. Image - Add borders-Symmetric checked: 10 Pixels -Color white
61. Effects – Plugins – Xero – Clarity using the default settings
Edit – Copy !!
Activate the image you minimized at step 36
62. Activate Selection Tool -Custom Selection (S) with these settings
63. Layers- New Raster Layer
64. Effects-3D Effects– Drop Shadow with these settings: 0/0/100/100 Color black
65. Effects - Plugins - Alien Skin EyeCandy 5 - Impact – Glass with the same settings
66. Selections - Modify –
Contract with 12 Pixels
67. Edit - Paste into Selection (Image is still in your PSP memory)
68. Open the Tube ’’
Help-Halloween-2022-Image3’’ -Edit - Copy- Activate your work -Edit - Paste as a new layer
- Place on top of the frame
69. Activate Text Tool - with font of your choice -Renée chose the font- XXLL-Ultimate-Black-Metal -Size 72 --Color white Write the first text ‘’ Halloween" write the second text " Help’’
70. Effects-3D Effects– Drop Shadow with these settings: 1/1/100/1 Color black
–Place these 2 texts to your taste
71.
Open the Tube '' Help-Halloween-2022-Image5''-Edit - Copy- Activate your work -Edit - Paste as a new layer
-
Place to your liking
- Decorate your work with the tubes of your choice
72. Image - Add borders-Symmetric checked: 1 Pixel -Color black
Image - Add borders-Symmetric checked: 10 Pixels -Color #6f0b07= 2
Image - Add borders-Symmetric checked: 1 Pixel -Color black
Image - Add borders-Symmetric checked: 10 Pixels -Color white
Image - Add borders-Symmetric checked: 45 Pixels -Color black
73. Open the Tube
‘’Bordure-Halloween’ –Edit - Copy- Activate your work -Edit - Paste as a new layer Move it in the right place( see finished image )
74. Paste the author's watermark on your work and your own watermark.
75. Layers- Merge- Merge All (flatten)
76. Image- Resize to 1005 pixels width
Save as JPG
I hope you enjoyed this lesson
Renée
This lesson was written by Renée
11/09/2022
Edited and Update
in 2022
*
*
Any resemblance with an existing lesson is a coincidence
* Do not forget to thank the people who work with us and for us
-I have appointed the tubeurs and translators
|
 Translations