|
Let's start the lesson
HALLOWEEN 2023
- Preparation
-Material Properties: Set your Foreground color to color #8074a8=color 1 – Set your Background color to color #09080a= 2

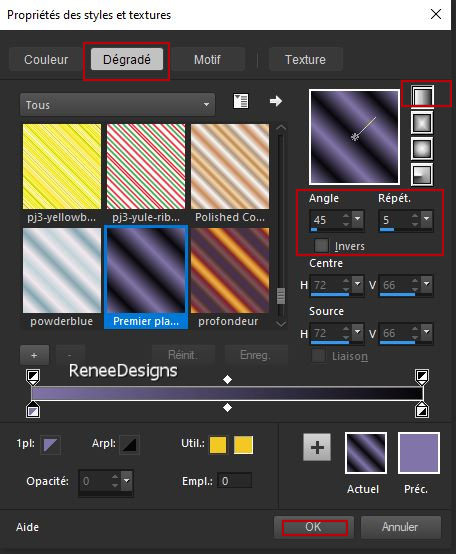
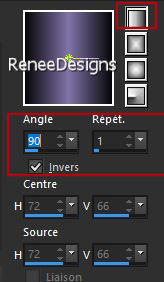
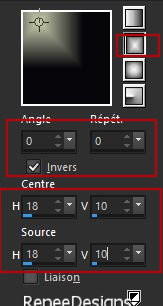
- Properties Foreground- Prepare a Foreground/Background Linear Gradient configured like this
1.File: Open a Transparent Image in this size :1000 x
800 Pixels
2. Flood Fill Tool
 –
Fill the layer with the Gradient –
Fill the layer with the Gradient
3. Layers- New Raster Layer
- Properties Foreground – Change the foreground color to color #8490a0=3
4. Flood Fill Tool
–
Fill the layer with the foreground color =3
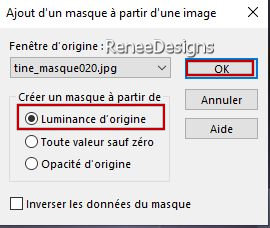
5. Layers- New Mask Layer-From Image and select Mask ‘’ tine_masque020.jpg’’
- Layers- Merge- Merge Group
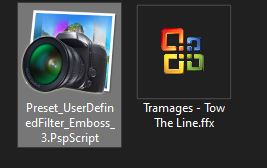
6. Effects- User Defined Filter –
Emboss 3
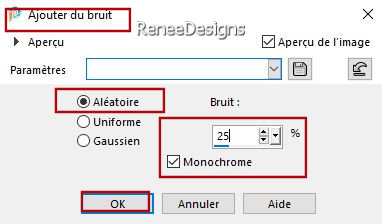
7. Adjust –
Add/Remove Noise/Add Noise use the settings below
8. Adjust- Sharpness –
Sharpen More
- Activate the bottom of the Layer Palette= Raster 1
9. Selections –load/save selection –load selection from disc and select my selection: ‘’Halloween-2023-1’’
10. Selections- Promote Selection to Layer
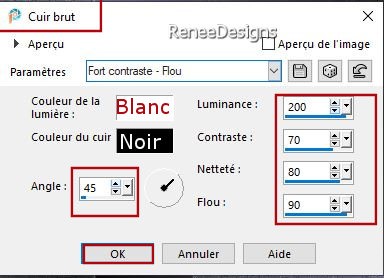
11. Effects –Texture Effects – Rough Leather use the settings below
12. Effects –Texture Effects – Fine Leather using the default settings
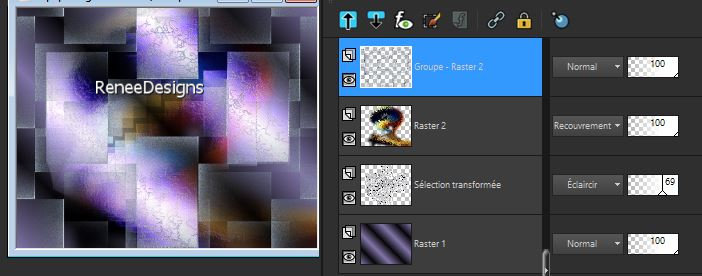
13. Layers-Properties-Set the Blend Mode to " Dodge" -Reduce the Opacity of this layer to 69%
14. Layers- New Raster Layer
15. Selections –
Select All (it cancels the previous selection)
16. Open the Tube Renee-TUBES-Halloween-2023-45’’ -
activate raster 2 of this tube
- Edit - Copy- Activate your work -Edit - Paste Into Selection

17. Layers-Properties-Set the Blend Mode to " Overlay"
18. Effects – Art
Media Effects– Brush Strokes–use the settings below - Color #808080
This filter needs time
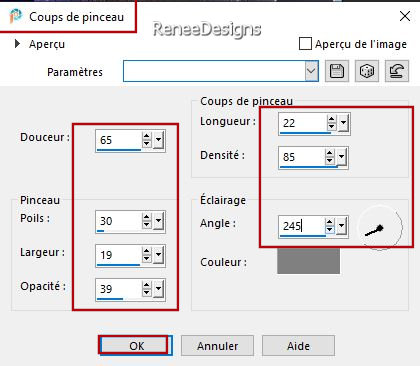
- Repeat: Effects – Art
Media Effects– Brush Strokes with the same settings
Layer Palette- Activate Promoted Selection Layer (The second from the bottom)
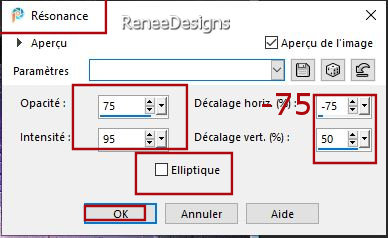
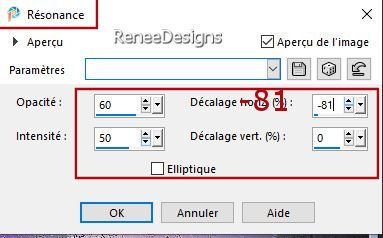
19. Effects – Reflection Effects - Feedback use the settings below
20. Effects –Edge Effects – Enhance
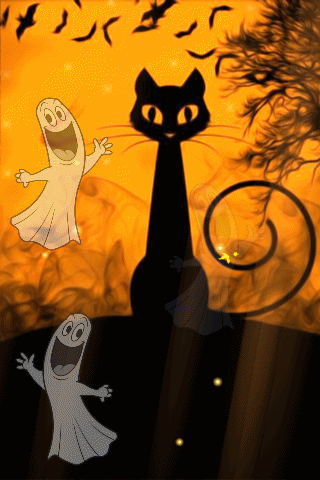
Your work and Layer Palette look like this now-You should have this result
- Activate the top of the Layer Palette
- Material Properties:
Set your Foreground color to color #8074a8=color 1 – Set your Background color to color #09080a= 2
- Properties Foreground- Prepare a Foreground/Background Linear Gradient configured like this
21. Layers- New Raster Layer
22. Selections –load/save selection –load selection from disc and select my selection: ‘’Halloween-2023-2’’
23. Flood Fill Tool
–
Fill the selection with the Gradient
24. Effects– Distortion Effects– Pinch : 100
25. Effects – Art Media Effects– Brush Strokes with the same settings
26. Effects – Reflection Effects - Feedback use the settings below
27. Layers– Duplicate
28. Image - Mirror - Mirror Horizontal (Image - Mirror in older versions of PSP)
29. Layers- Merge- Merge Down
30. Effects- 3D- Effects- Drop Shadow with these settings: 6/10/32/12 Color Black
31. Open Tube Renee -TUBES-Halloween-2023-5’’
32. Edit - Copy- Activate your work -Edit - Paste as new layer (do not move)
33. Image - Resize 70 % - Resize all layers-Not Checked
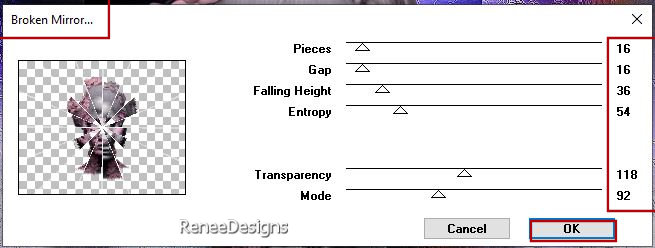
34. Effects – Plugins – VM Distorsion – Broken Mirror use the settings below
35. Layers-Properties-Set the Blend Mode to " Multiply" -Reduce the Opacity of this layer to 48%
36. Effects – Edge Effects– Enhance
37. Layers- Arrange- Move Down
38. Layers – Duplicate
39. Layers-Properties-Set the Blend Mode to " Hue" -Opacity of this layer to 100%
- Material Properties:
Set your Foreground color to color #09080a=color 2 – Set your Background color to color #c9ceb0= 4
- Properties Foreground- Prepare a Foreground/Background Rectangular Gradient configured like this
40. Layers- New Raster Layer
41. Selections –load/save selection –load selection from disc and select my selection: ‘’Halloween-2023-3’’
42. Flood Fill Tool
–Fill the selection with the Gradient
43. Adjust- Blur- Gaussian Blur- Radius
32%
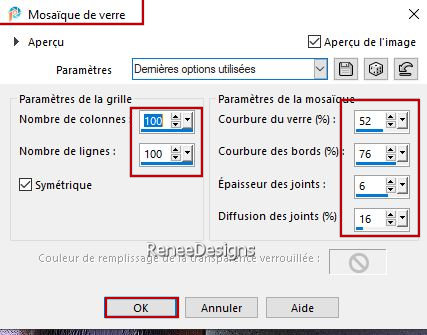
44. Effects– Texture Effects – Mosaic Glass use the settings below
45. Effects – Edge Effects– Enhance
46. Effects –Plugins – Mura’s Meister – Perspective Tiling using the default settings
47. Selections –load/save selection –load selection from disc and select my selection: ‘’Halloween-2023-4’’
48. Adjust- Blur- Gaussian Blur- Radius 20%
49. Layers-Properties-Set the Blend Mode to " Luminance Legacy"
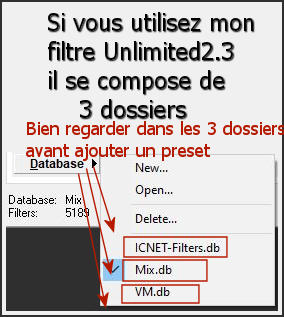
50. Effects - Plugins - Filters in Unlimited 2.0 – Tramages – Tow The
Line...with these settings: 255/ 37 /0 /21
51. Effects – Edge Effects– Enhance
- Activate the top of the Layer Palette
52. Open Tube Renee-
‘’TUBES-Halloween-2023-4’’
- Image - Resize 68%
53. Edit - Copy- Activate your work -Edit - Paste as new layer
54. Pick Tool: (K) on your keyboard -Enter these parameters on the toolbar
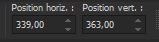 339
/ 363 339
/ 363
-Press ( M ) to close the Pick Tool
55. Layers-Properties-Set the Blend Mode to " Screen"
56. Open the Tube ‘’Renee-TUBES-Halloween-2023-chauves- souris’’ -Edit - Copy- Activate your work -Edit - Paste as new layer
57. Objects- Align- Top
/Objects-Align-Right
58. Open the Tube ‘’Renee-TUBES-Halloween-2023-nuage’’ -Edit - Copy- Activate your work -Edit - Paste as new layer
- Place to your liking
- Properties Foreground – Change the foreground color to color #ffffff=6
59. Layers- New Raster Layer
60. Selections –load/save selection –load selection from disc and select my selection: ‘’Halloween-2023-5’’
61. Flood Fill Tool
–Fill the selections with
the Foreground color #ffffff=6 (2 clicks)
62. Effects– Distortion Effects– Wind -Wind strenght 50% - Wind direction From right
63. Now for the embellishment of our work. Open one of Renée's tubes, or a tube of your own
Tubes
Here
if you wish to change
I've put these tubes on my work. You'll find them in the folder
If you choose these tubes below, you need to do the following
- ‘’Renee-TUBES-Halloween-2023-Halloween’’
- ‘’ Renee-TUBES-Halloween-2023-37’’-
Resize 70%
- ‘’Renee-TUBES-Halloween-2023-28’’
- ‘’Renee-TUBES-Halloween-2023-64’’
– Redimensionner à 50 %-Layers-Properties-Set the Blend Mode to" Luminance"
- ‘’Renee-TUBES-Halloween-2023-date’’
- place it as you like
64. Image - Add Borders-Symmetric checked: 1 Pixel – Color #8074a8=1
Image - Add Borders-Symmetric checked: 5 Pixels – Color #ffffff=6
Image - Add Borders-Symmetric checked: 1 Pixel – Color #09080a=2
Image - Add Borders-Symmetric checked: 50 Pixels –Color #ffffff=6
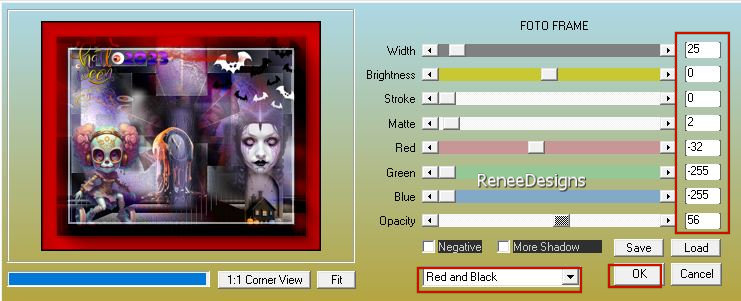
65. Effects – Plugins –
AAA Frame Foto Frame use the settings below
66. Image - Add Borders-Symmetric checked: 15 Pixels -Color Black
67. Paste the author's watermark on your work and your own watermark
68. Layers- Merge- Merge All (flatten)
69. Image - Resize - to 88% - Resize all layers- Checked
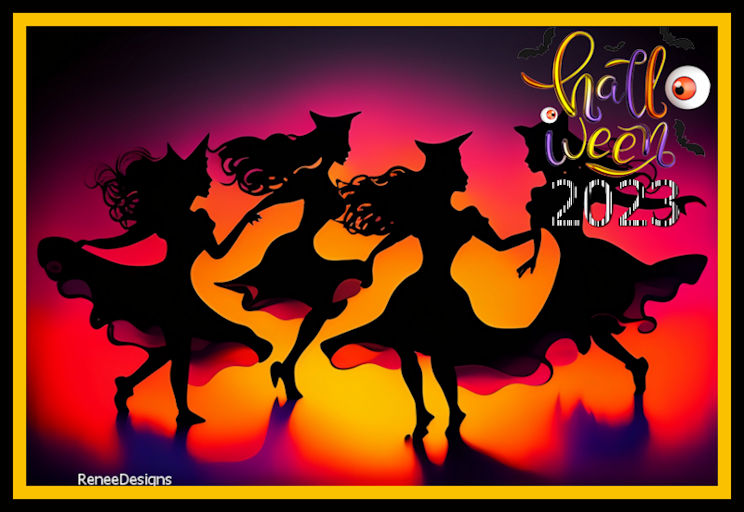
I hope you enjoyed this lesson
Renée
This lesson was written by Renée
24/07/2023
Edited and Update
in 2023
*
*
Any resemblance with an existing lesson is a coincidence
* Do not forget to thank the people who work with us and for us -I have appointed the tubeurs and translators
Thanks
|
 Translations